Shared Nothing
This page applies to RSF-1 version 2.0 and later
Introduction
A shared-nothing cluster consists of two nodes, each with their own locally accessible ZFS storage pool residing on non shared storage:
flowchart TD
    SNa("Node A")<-->|SAS/FC etc.|SNSa
    SNb("Node B")<-->|SAS/FC etc.|SNSb
    SNSa[("Storage")]
    SNSb[("Storage")]
Data is replicated between nodes by an HA synchronisation process. Replication is always done from the active to the passive node, where the active node is the one serving out the pool to clients:
flowchart LR
    SNa("Node A (active)<br />Pool-A")-->|HA Synchronisation|SNb
    SNb("Node B (passive)<br />Pool-A")
Should a failover occur then synchronisation is effectively reversed:
flowchart RL
    SNa("Node B (active)<br />Pool-A")-->|HA Synchronisation|SNb
    SNb("Node A (passive)<br />Pool-A")
Before creating pools for shared nothing clusters
-
To be eligible for clustering the storage pools must have the same name on each node in the cluster
-
It is strongly recommended the pools are of equal size, otherwise the smaller of the two runs the risk of depleting all available space during synchronization
Understanding the data replication process
Shared nothing clusters replicate data from the Active node to the Passive node using ZFS snapshots. Snapshots are taken at regular intervals on the active node and are then transfered to the passive node using the ZFS send/receive protocol. Snapshots received on the passive node are then applied to the local pool to 'fast forward' it to the state of the pool on the active node at the time the snapshot was taken.
Snapshot create interval
Operationally the active node is responsible for creating snapshots. The frequency at which snapshots are taken
is controlled by the Active node snapshot interval setting under Settings->Shared Nothing, with the default
value being every 15 minutes:
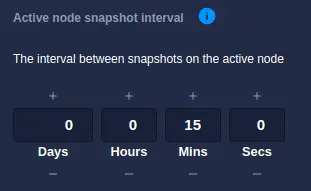
This interval represents the timeout the snapshot process is currently using; any change to this value will only be applied once the current timeout expires and the next snapshot is taken.
To clarity, if the snapshot interval is set to 15 minutes when a shared nothing service is created, then the first snapshot will be taken 15 minutes later. If, during that period, the snapshot interval is modified, then that setting will only come into effect once the current timeout of 15 minutes has expired and the next snapshot taken, at which point the new snapshot interval will be used.
Snapshot retention
The number of snapshots retained on the active server in controlled by the Snapshot retention setting under
Settings->Shared Nothing:
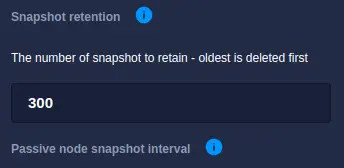
This value specifies the number of snapshots that should be retained on the Active node, with the oldest snapshot being deleted once the maximum number of snapshots has been reached.
Snapshot pull interval
The passive node performs the task of transferring (and applying) snapshots from the active node. The
frequency with which the active node is checked for new snapshots is controlled by the
Passive node snapshot interval setting under Settings->Shared Nothing, the default value being
every 3 minutes:

For each cycle of the timer, the passive node interrogates the active node for a list of snapshots it holds for clustered pools. This list is then compared to the snapshots held locally, with any missing snapshots being transferring and applied to the local pools to bring them in sync with the active node.
There are a number of advantages to having the passive node keep track of snapshots:
- The active node need not concern itself with the online state of the passive node.
- The passive node is in the best position to decide which snapshots are required to synchronize a pool.
- The interval by which the passive node checks for snapshots can be at a much faster beat rate than the snapshot creation interval.
- If the passive node becomes unavailable, upon recovery it can immediately start the process of pulling and applying missing snapshots.
This value should be left quite low, typically between 1-5 minutes is an acceptable setting. There are certain circumstances however where less frequent updates are desirable, for example to reduce the amount of burst traffic on the cluster network interconnect - in these cases a higher value can be configured.
Setting considerations
The values used for the snapshot settings directly impact how the cluster operates during normal running, therefore careful consideration should be given to the following points.
Rollback window
The rollback window is a combination of the number of snapshots taken and how long they are available for. For example, if the active node snapshot interval is set to 5 minutes and the retention count is set to 24 then the rollback window is two hours:
gantt
    title 5 minute interval with retention of 24 snapshots giving a 2 hour window
    dateFormat HH:mm
    axisFormat %H
    todayMarker off
    tickInterval 1hour
    24 hour period: done, 00:00, 24h
    24 Snapshots : active, 10:00, 2h
This setting provides a fine level of granularity when selecting a point in time to roll back to, but only a 2 hour window of available rollback points. Changing the snapshot interval to 30 minutes results in a reduction in snapshot granularity but an increase in the retention period to 10 hours:
gantt
    title 30 minute interval with retention of 24 snapshots giving a 10 hour window
    dateFormat HH:mm
    axisFormat %H
    todayMarker off
    tickInterval 1hour
    24 hour period: done, 00:00, 24h
    24 Snapshots : active, 10:00, 12h
A much longer rollback window can be achived using a 2 hour interval with a retention count of 84:
gantt
    title 2 hour interval with retention of 84 snapshots giving a 7 day window
    dateFormat DD:HH
    %%axisFormat %H
    todayMarker off
    %%tickInterval 1day
    14 day period: done, 01:00, 14d
    84 Snapshots : active, 04:00, 7d
Ultimately the values chosen will be influenced by the type of data held in the pools; for a fairly static use case (such as a web server with minimal changes) then daily snapshots with a long retention period is applicable, whereas a high level of activity (i.e. a database) would benefit from more frequent snapshots with a shorter retention period.
Service synchronization
When a cluster is first created, pools on the passive node need to be synchronised with their counterparts on the active node to bring them inline with each other; this is known as bootstrapping the pools and involves copying all the data from pools on the active node over to the passive node. Once this has been accomplished the normal process of pulling and applying snapshots proceeds.
Bootstrapping the pools is also necessary when a passive node has been unavailable for a period of time, which leads to the scenario where there are no common snapshots between the two nodes. To understand how this situation can occur consider the following when the passive node becomes unavailable:
- Snapshots on the active node are taken every 15 minutes.
- Snapshot retention on the active node is set to 40 snapshots.
With these settings 4 snapshots are taken every hour. As the retention policy is 40 snapshots then after 10 hours the crossover window for snapshots is reached and the passive node will no longer retain any common snapshots from the active node.
The following diagram illustrates a scenario where the passive node has been unavailable from 00:00 and at 10:00 drops out of sync as the two snapshot windows diverge:
gantt
    title Active and Passive node snapshots become out of sync
    dateFormat HH:mm
    axisFormat %H
    %% section Section
    %% Get rid of the red line
    todayMarker off
    tickInterval 1hour

    Passive node crashes        : milestone, m1, 00:00, 0h
    Snapshots on Passive Node   : passive,       00:00, 10h
    No common snapshots         : milestone, m2, 10:00, 0h
    Missing Snapshots           : crit,          10:00, 2h
    Snapshots on Active Node => : active,        12:00, 10h
    Current time                : milestone, m3, 22:00, 0h
Once the passive node comes back online it compares its list of snapshots with that of the active node and will recognise there are no snapshots in common, which in turn will trigger a complete re-sync of the pool.
Pool re-syncing
A complete re-sync of a pool means all the data in the pool has to be transferred from the active to the passive node in order to recreate it. Depending upon the size of the pool this transfer could take minutes, hours or even days. It is therefore important to strike the right balance between snapshot creation and retention settings on the active node as they essentially dictate the amount of possible down time on the passive node before a complete re-sync is required.
For comparison, when the two nodes are in sync, the passive node will slightly lag behind the active node as snapshots are pulled and applied:
gantt
    title Active and Passive nodes in sync
    dateFormat HH:mm
    axisFormat %H
    %% Get rid of the red line
    todayMarker off
    tickInterval 1hour

    Snapshots on Passive Node   : passive,       00:00, 10:00
    Snapshots on Active Node => : active,        00:15, 10h
Expiring snapshots on the passive node
During normal operation the passive node will remove copies of older snapshots that no longer exist on the active node. This is necessary in order to prevent unfettered snapshots accumulating on the passive node, which ultimately could consume all the available space in the pool and cause the synchronization process to fail.
Manual failover
When a manual failover is performed, pool data is automatically synchronised between nodes before the service is moved. To do this the following steps are undertaken:
- Disconnect the VIP(s) so clients are temporarily suspended from accessing the pool.
- Take a snapshot of the pool and apply it to the remote node to synchronise data across the cluster.
- Complete the service stop.
- Start the service on the other node and enable the VIP so clients can once again have access to the pool.
- Data now starts synchronising between the new active/passive nodes.
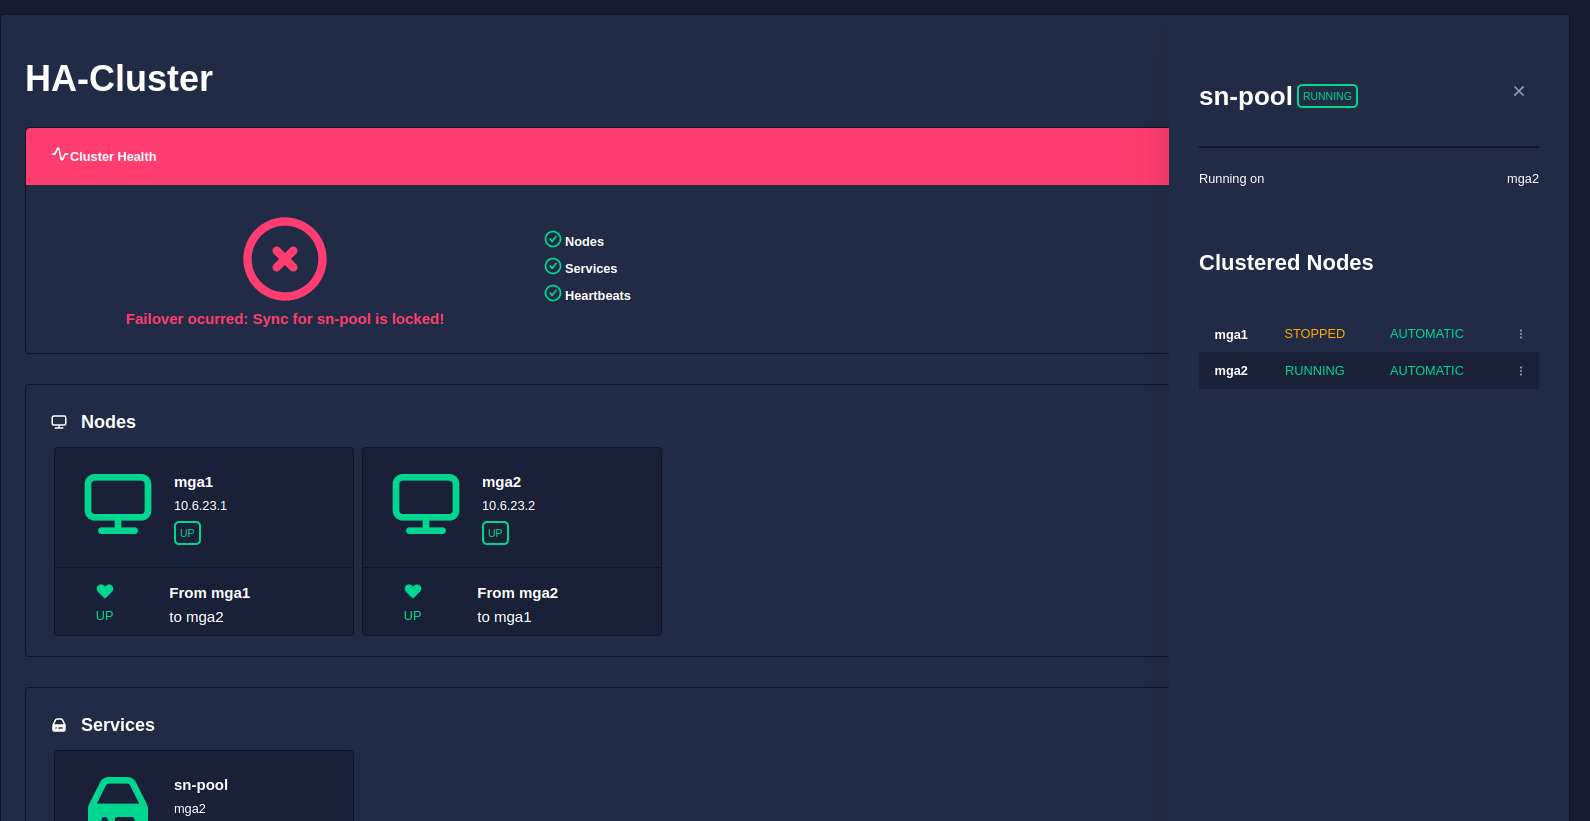
When an automatic failover occurs
Should an automatic failover from the active node to the passive node occur (i.e. when the active node crashes), the passive node will take over the service using its local copy of the data. The service then becomes locked to the now active node and data synchronisation is suspended.
To understand why a sevice becomes locked after an automatic failover consider the synchronisation state of a cluster:
gantt
    title Active and Passive nodes in sync
    dateFormat HH:mm
    axisFormat %H
    %% Get rid of the red line
    todayMarker off
    tickInterval 1hour

    Snapshots on Passive Node   : passive,       00:00, 02:00
    Latest snapshot applied : milestone, m1, 02:00, 0m

    Snapshots on Active Node => : active,        00:05, 2h
    Latest snapshot : milestone, m1, 02:00, 0m
    Current time : milestone, m1, 02:05, 0m
This diagram illustrates that in normal operation the passive node will be slightly behind the active node in terms of pool data synchronisation. A snapshot applied to the passive node will bring it in sync with the active node at the time the snapshot was taken; however, the active node will continue writing data, which will not be synchronised to the passive node until the next snapshot is taken and applied.
As snapshots are taken and applied at regular cyclic intervals, the active node will always be slightly
ahead of the passive node in terms of data, up to a maximum delta of
the snapshot interval. For example, with an interval of 15 minutes and a snapshot pulled and applied on the passive node at 12:00,
then by 12:14 the passive node will be 14 minutes behind the active node. If the active node crashes at this point then the passive node
will take over the service using the data synchronised at 12:00. Therefore on the failed node there is up to a possible 14 minutes of
unsynchronised data. For this reason data synchronisation is suspended and the service is locked to the new active node to prevent failover.
This is highlighted in the GUI cluster health in red along with the message Failover occurred. Sync for <pool> is locked!:
Resuming synchronisation after an automatic failover
Synchronisation is suspended so that once a failed node is brought back online, but before any data is overwritten by the resynchronisation process, there is an opportunity to retrieve data from the original pool in a stable environment.
In the above example
this would encompass any data written between 12:00 - 12:14 on the active node before it crashed. Note, when a failed
node is brought back online any clustered pools will be imported so data retrieval can be performed.
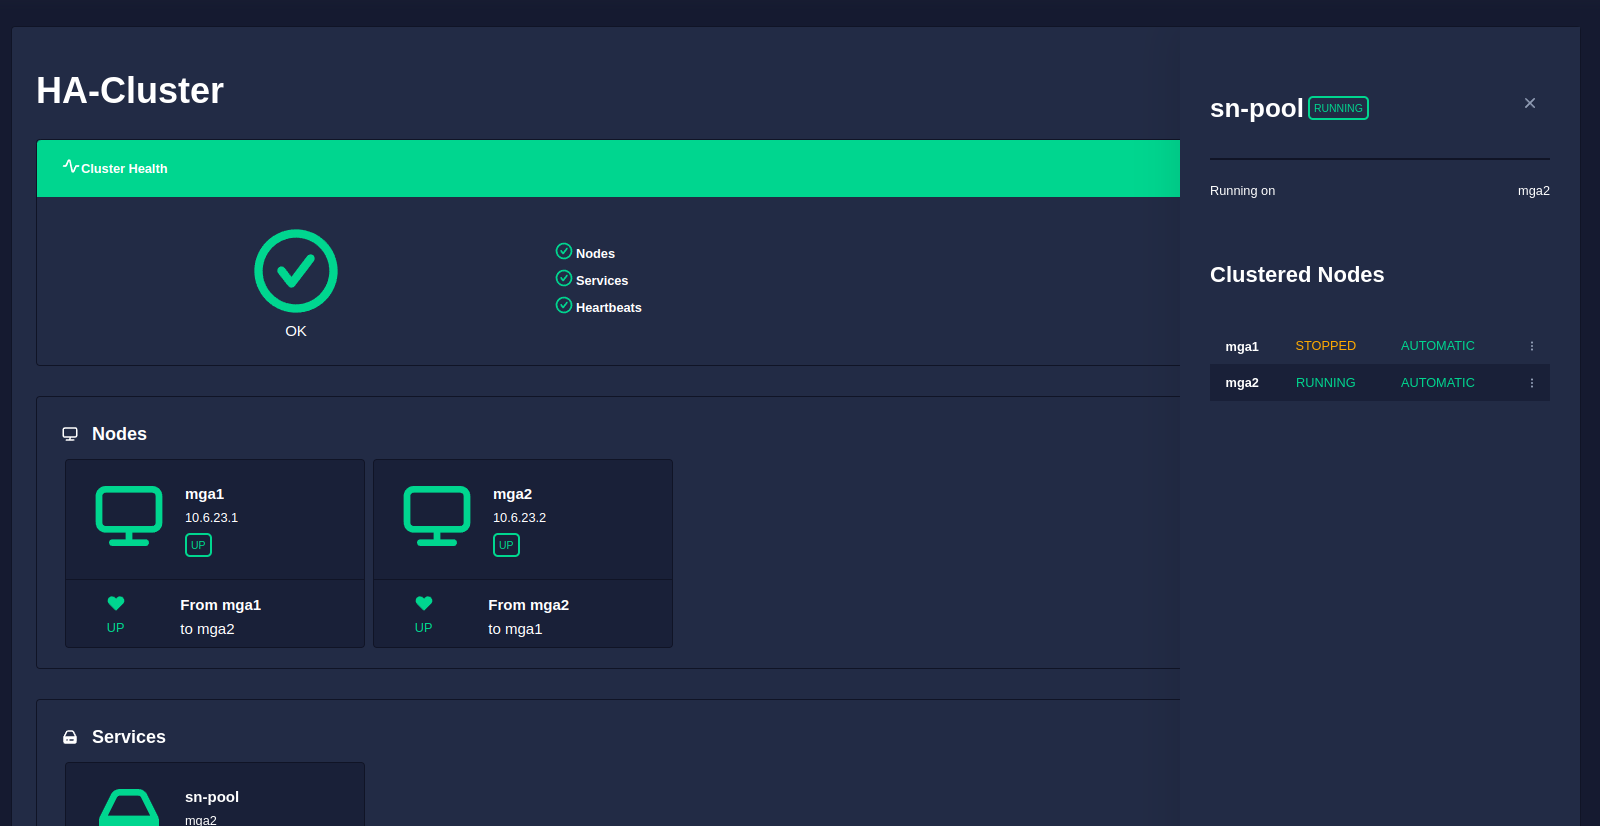
Finally, once any required data has been retrieved from the pool on the passive node instruct the cluster to restart synchronisation and clear any errors by running the following command (where <service> refers to the locked service and <node1>, <node2> refers to the two cluster nodes):
# /opt/HAC/RSF-1/bin/python /opt/HAC/RSF-1/lib/python/mark_sync_as_fixed.pyc <service> <node1> <node2>
Once run the the pool will restart resyncing and the GUI health will return back to normal:
Using SSH to bind two nodes together
A shared nothing cluster operates by creating incremental snapshots of data sets and then synchronising them between cluster nodes using ZFS send/receive over an ssh tunnel.
The ssh tunnel created and used by the synchronisation process needs to be passwordless and therefore the two nodes need to be ssh-bound. To configure ssh binding perform the following steps on each node:
-
Create your ssh keys as the root user (press return to accept the defaults for all prompts):
# ssh-keygen Generating public/private rsa key pair. Enter file in which to save the key (/root/.ssh/id_rsa): Enter passphrase (empty for no passphrase): Enter same passphrase again: Your identification has been saved in /root/.ssh/id_rsa Your public key has been saved in /root/.ssh/id_rsa.pub The key fingerprint is: SHA256:2dGrTFvaGz8QJbVeVGS5sFv/deJRngPvSOr6v1SaMXc root@NodeA The key's randomart image is: +---[RSA 3072]----+ | ...B| | ....= | | . .o+ o| | o ..= +.| | S o o+*=E| | o *.oX+*| | = =*oo=| | ..=o..| | .+oooo. | +----[SHA256]-----+ -
Once
ssh-keygenhas been run, a public key is saved to/root/.ssh/id_rsa.pub. This public key now needs to be added to the file/root/.ssh/authorized_keyson the other node (if theauthorized_keysfile does not exist simply create one). -
Manually ssh
NodeA > NodeBthenNodeB > NodeAand accept the prompt to add each machine to the list of known hosts:root@NodeA:~# ssh root@NodeB The authenticity of host 'NodeB (10.10.10.2)' can't be established. ED25519 key fingerprint is SHA256:EDmzS45TqKabZ53/35vXb4YyKTQuzJxNnbFuIwFj9UU. Are you sure you want to continue connecting (yes/no/[fingerprint])? yes Warning: Permanently added 'NodeB,10.10.10.2' (ED25519) to the list of known hosts. Last login: Tue Sep 12 09:54:49 2023 from 10.10.10.1 Oracle Solaris 11.4.42.111.0 Assembled December 2021 root@NodeB:~#
Once this process has been completed you should be able to ssh between nodes without being prompted for a password.
SSH login between nodes taking a long time
If ssh is taking a long time, try running ssh -v to see any errors
that may be causing the delay. A common issue is with GSS/Kerberos:
debug1: Next authentication method: gssapi-with-mic

debug1: Unspecified GSS failure.  Minor code may provide more information
Credentials cache file '/tmp/krb5cc_1000' not found


debug1: Unspecified GSS failure.  Minor code may provide more information
Credentials cache file '/tmp/krb5cc_1000' not found
This can be disabled on the nodes by modifying /etc/ssh/ssh_config and
disabling all Host options that begin with GSS. For example:
Host *
#   ForwardAgent no
#   ForwardX11 no
#   ForwardX11Trusted yes
#   PasswordAuthentication yes
#   HostbasedAuthentication no
    GSSAPIAuthentication no
    GSSAPIDelegateCredentials no
    GSSAPIKeyExchange no
    GSSAPITrustDNS no
#   BatchMode no
#   CheckHostIP yes
#   AddressFamily any
#   ConnectTimeout 0
#   StrictHostKeyChecking ask
#   IdentityFile ~/.ssh/id_rsa
#   IdentityFile ~/.ssh/id_dsa
#   IdentityFile ~/.ssh/id_ecdsa
#   IdentityFile ~/.ssh/id_ed25519
#   Port 22
#   Ciphers aes128-ctr,aes192-ctr,aes256-ctr,aes128-cbc,3des-cbc
#   EscapeChar ~
#   Tunnel no
#   TunnelDevice any:any
#   PermitLocalCommand no
#   VisualHostKey no
#   ProxyCommand ssh -q -W %h:%p gateway.example.com
#   RekeyLimit 1G 1h
#   UserKnownHostsFile ~/.ssh/known_hosts.d/%k
    SendEnv LANG LC_*