User Guide
Introduction
This guide is for when a cluster and services have been created and configured; for details on creating clusters please see the following guides:
Terminology
Services
In an RSF-1 cluster a service refers to a ZFS pool that is managed by the cluster. The cluster may consist of one or more services under it's control, i.e. multiple pools. Furthermore an individual service may consist of more than one pool - refered to as a pool group, where actions perfromed on that service will be performed on all pools in the group.
A service instance is the combination of a service and a cluster node that that service is eligible to run on. For example, in a 2-node cluster each service will be configured to have two available instances - one on each node in the cluster. Only one instance of a service will be active at any one time.
Modes (automatic/manual)
Each service instance has a mode setting of either automatic or
manual. The mode of a service is specific to each node in the
cluster, so a service can be manual on one node and automatic on
another. The meaning of the modes are:
AUTOMATIC
Automatic mode means the service instance will be automatically started when all of the following requirements are satisfied:
- The service instance is in the stopped state
- The service instance is not blocked
- No other instance of this service is in an active state
MANUAL
Manual mode means the service instance will never be started automatically on that node.
State (running/stopped etc)
A service instance in the cluster will always be in a specific
state. These states are divided into two main groups, active states
and inactive states1. Individual states within these groups are
transitional, so for example, a starting state will transition to a
running state once the startup steps for that service have completed
successfully, and similarly a stopping state will transition to a
stopped state once all the shutdown steps have completed
successfully (note that this state change stopping==>stopped also
moves the service instance from the active state group to the inactive
state group).
Active States
When the service instance is in an active state, it will be
utilising the resources of that service (e.g. an imported ZFS pool, a plumbed
in VIP etc.). In this state the service is considered up and running and
will not be started on any other node in the cluster until it
transitions to a inactive state; for example if
a service is STOPPING on a node it is still in an active state, and
cannot yet be started on any other node in the cluster until it
transitions to a inactive state - see below for the definition of inactive states.
The following table describes all the active states.
Active State |
Description |
|---|---|
STARTING |
The service is in the process of starting on this node. Service start scripts are currently running - when they complete successfully the service instance will transition to the RUNNING state. |
RUNNING |
The service is running on this node and only this node. All service resources have been brought online. For ZFS clusters this means the main ZFS pool and any additional pools have been imported, any VIPs have been plumbed in and any configured logical units have been brought online. |
STOPPING |
The service is in the process of stopping on this node. Service stop scripts are currently running - when they complete successfully the service instance will transition to the STOPPED state. |
PANICKING |
While the service was in an active state on this node, it was seen in an active state on another node. Panic scripts are running and when they are finished, the service instance will transition to PANICKED. |
PANICKED |
While the service was in an active state on this node, it was seen in an active state on another node. Panic scripts have been run. |
ABORTING |
Service start scripts failed to complete successfully. Abort scripts are running (these are the same as service stop scripts). When abort scripts complete successfully the service instance will transition to the BROKEN_SAFE state (an inactive state). If any of the abort scripts fail to run successfully then the service transitions to a BROKEN_UNSAFE state and manual intervention is required. |
BROKEN_UNSAFE |
The service has transitioned to a broken state because service stop or abort scripts failed to run successfully. Some or all service resources are likely to be online so it is not safe for the cluster to start another instance of this service on another node. This state can be caused by one of two circumstances:
|
Inactive States
When a service instance is in an inactive state, no service resources are online. That means it is safe for another instance of the service to be started elsewhere in the cluster.
The following table describes all the inactive states.
Inactive State |
Description |
|---|---|
STOPPED |
The service is stopped on this node. No service resources are online. |
BROKEN_SAFE2 |
This state can be the result of either of the following circumstances:
|
Blocked (blocked/unblocked)
The service blocked state is similar to the service mode (AUTOMATIC/MANUAL) except
that instead of being set by the user, it is controlled automatically by the cluster's
monitoring features.
For example, if network monitoring is enabled then the cluster constantly checks the state of the network connectivity of any interfaces VIP's are plumbed in on. If one of those interfaces becomes unavailable (link down, cable unplugged, switch dies etc.) then the cluster will automatically transition that service instance to blocked.
If a service instance becomes blocked when it is already running,
the cluster will stop that instance to allow it to be
started on another node so long as there is another
service instance in the cluster that is UNBLOCKED, AUTOMATIC
and STOPPED, otherwise no action will be taken.
Also note, a service does not have to be running on a node for that service instance to become blocked - if a monitored resource such as a network interface becomes unavailable then the cluster will set the nodes service instance to a blocked state, thus blocking that node from starting the service. Should the resource become available again then the cluster will clear the blocked state.
The following table describes all the blocked states.
Blocked State |
Description |
|---|---|
BLOCKED |
The cluster's monitoring has detected a problem that affects this service instance. This service instance will not start until the problem is resolved, even if the service is in automatic mode. |
UNBLOCKED |
The service instance is free to start as long as it is in automatic mode. |
Dashboard
The Dashboard is the initial landing page when connecting to the webapp once a cluster has been created. It provides a quick overview of the current status of the cluster and allows you to perform operations such as stopping, starting and moving services between nodes:
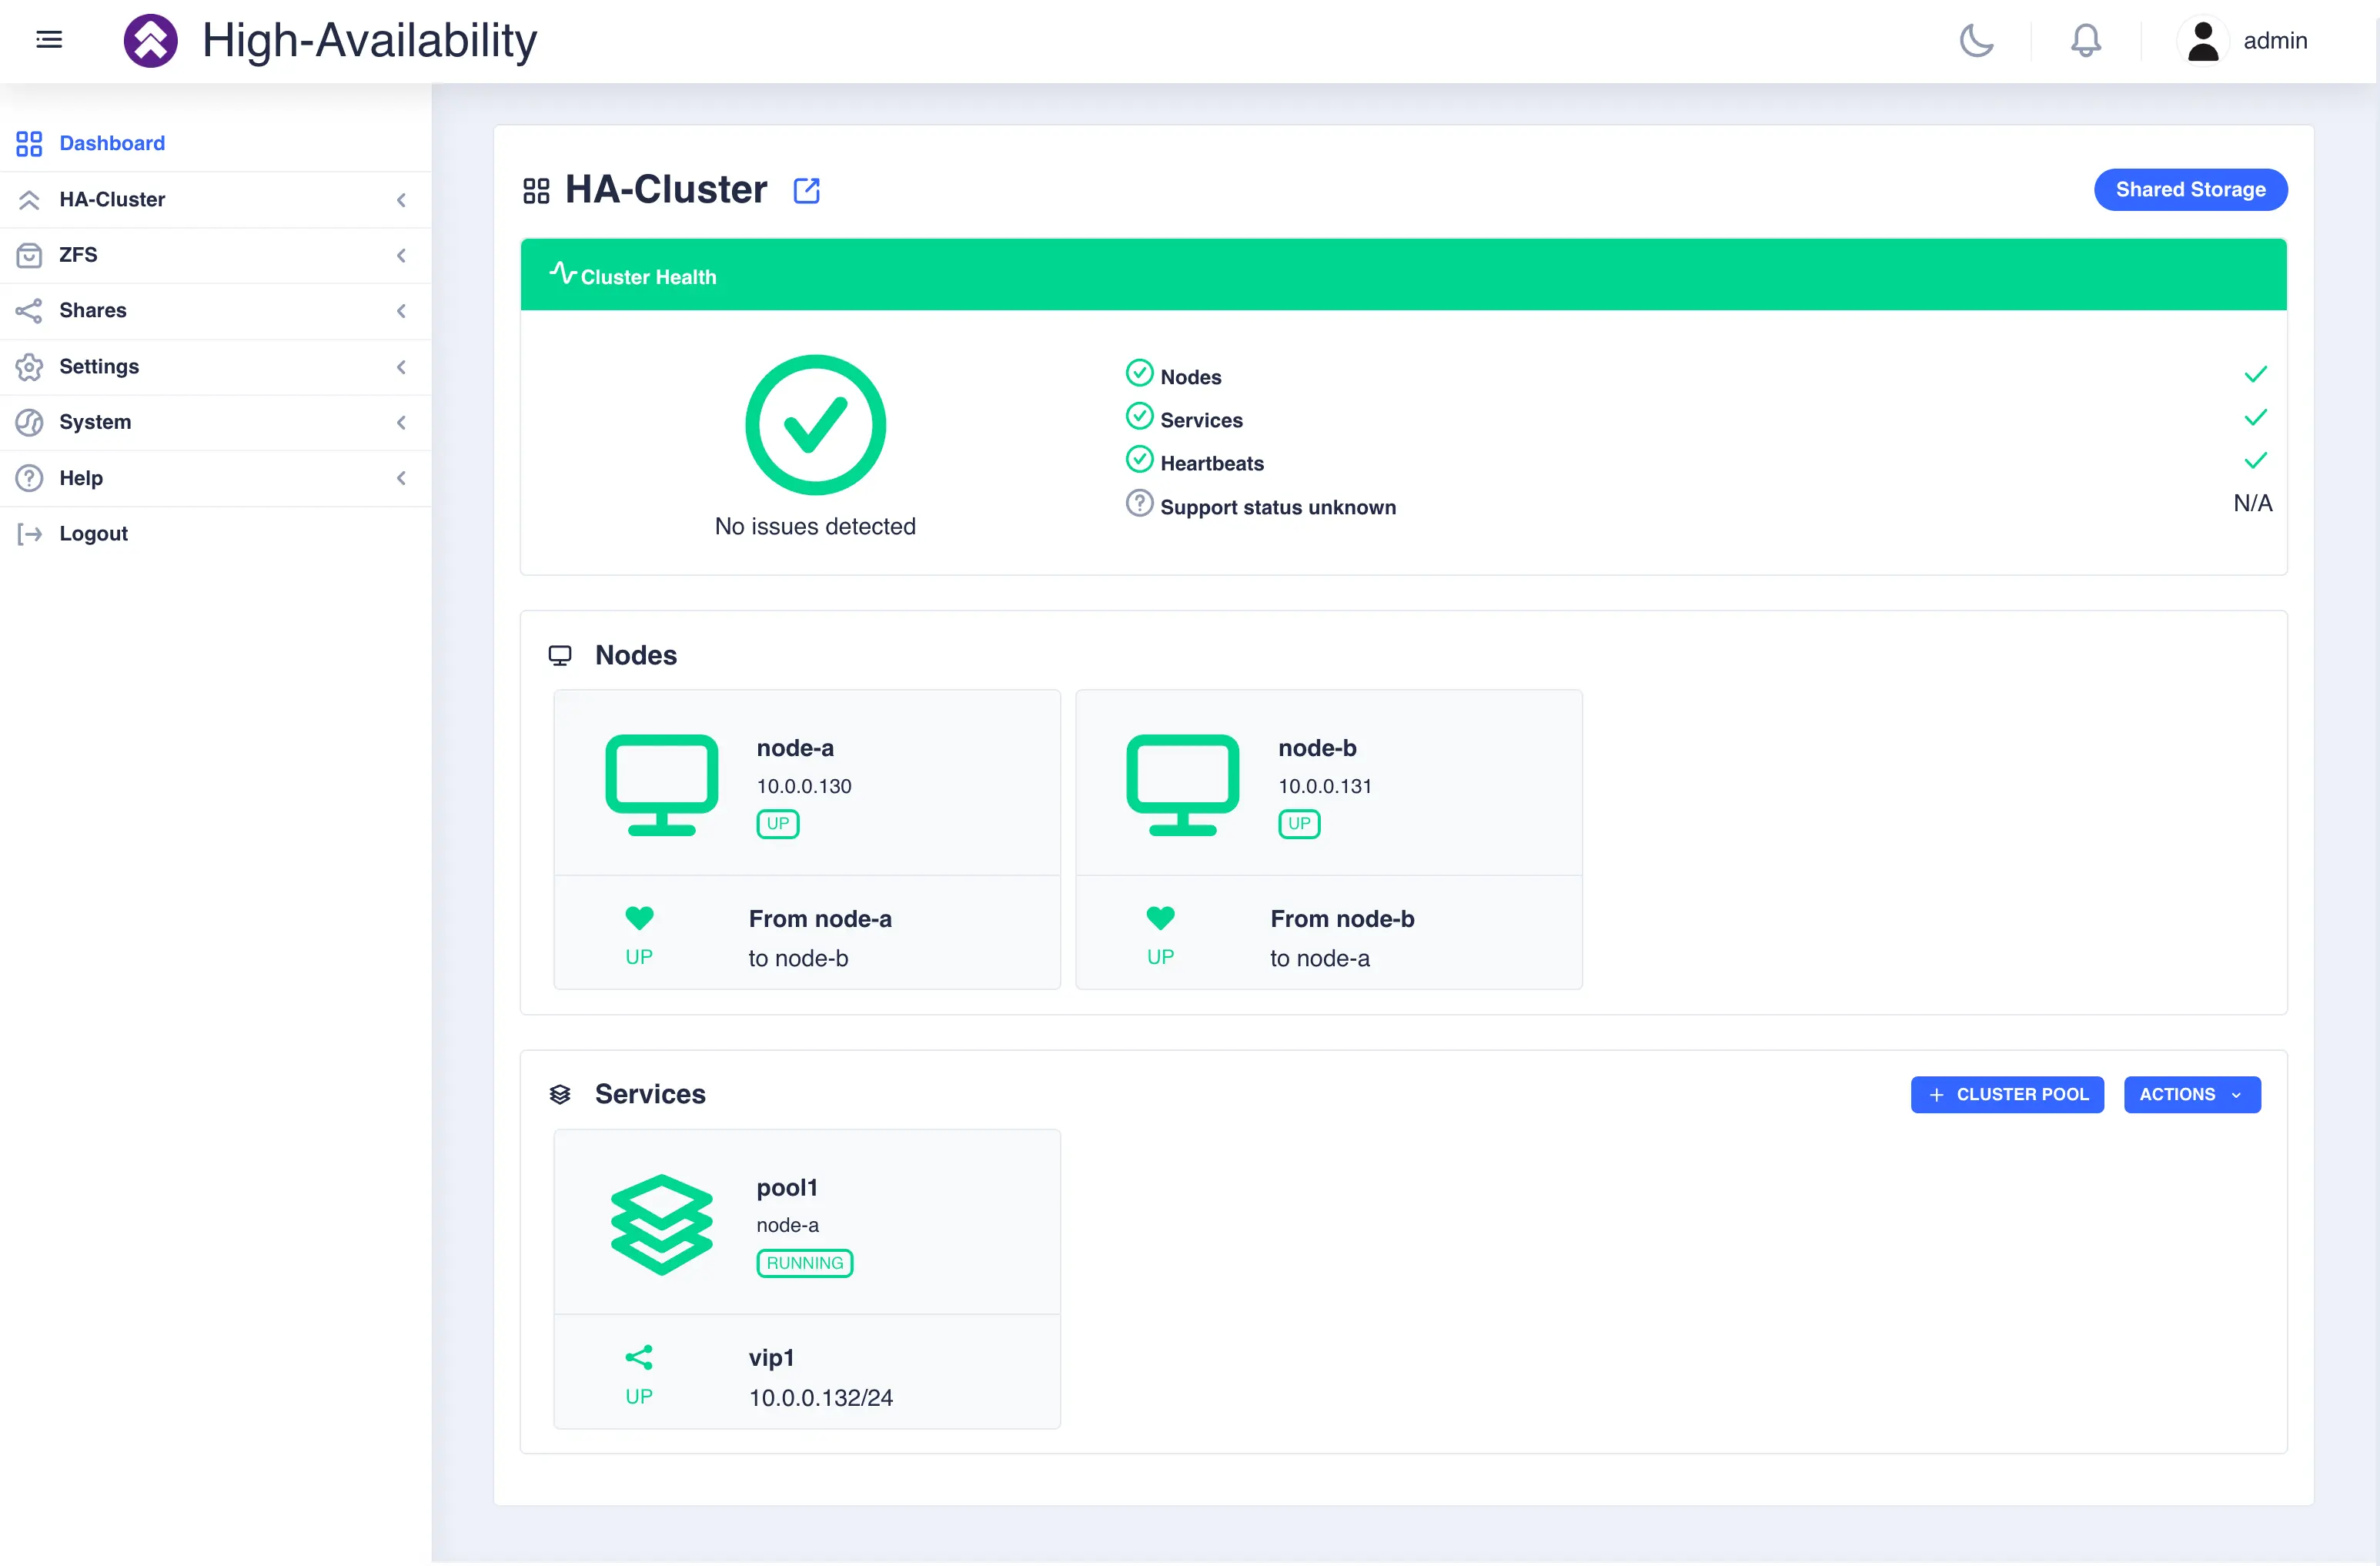
The dashboard is made up of three main sections along with a navigation panel on the left hand side:
- The status panel located at the top of the page providing a instant view of the overall health of the cluster with node, service and heartbeat summary status.
- The nodes panel detailing each nodes availability in the cluster along with its IP address and heartbeat status.
- The services panel detailing the services configured in the cluster, which node thay are running on, if any, and any associated VIPs.
Clicking on the icon for an individual node or service brings up a context sensitive menu, described in the following sections.
Nodes panel
The nodes panel shows the status of each node in the cluster:

Clicking on a node opens a side menu that allows control of services known to that node. In the example above,
clicking on the icon for node-a would bring up the following menu:
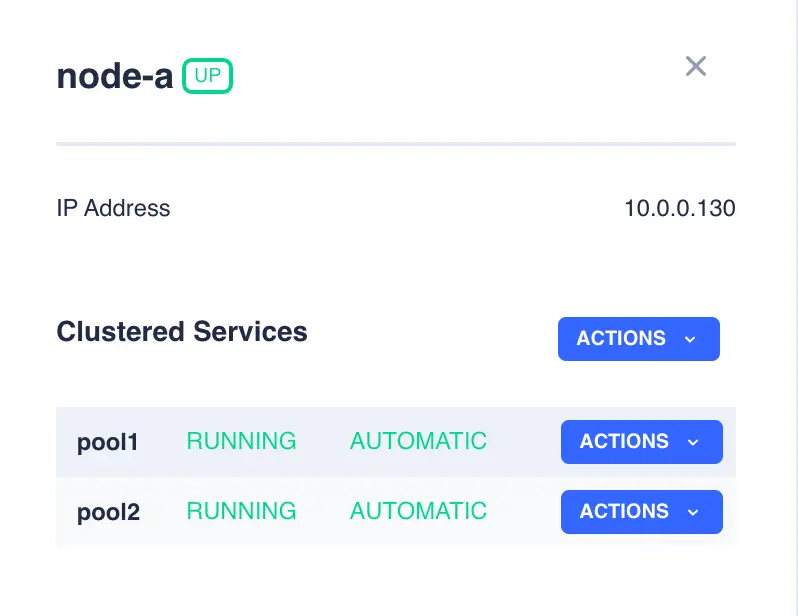
Available actions can then be viewed by clicking on the ACTIONS button in the right hand column for an individual service:
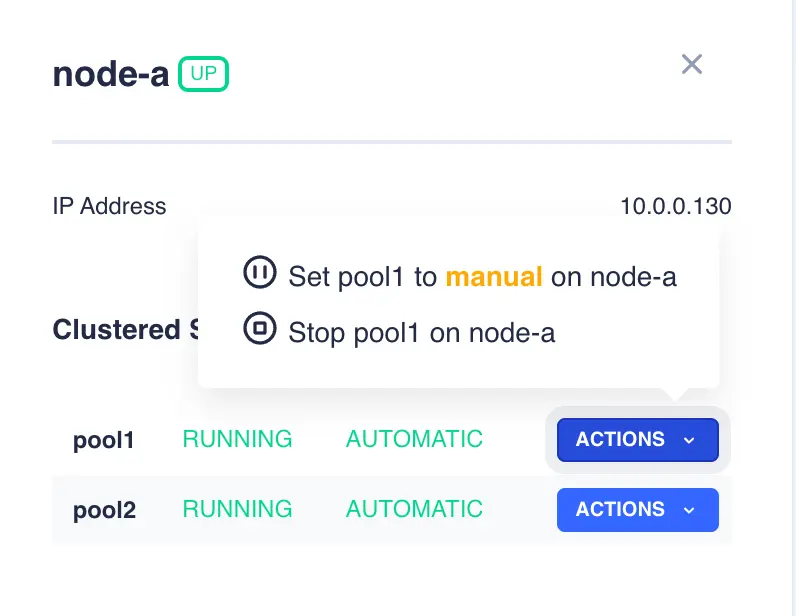
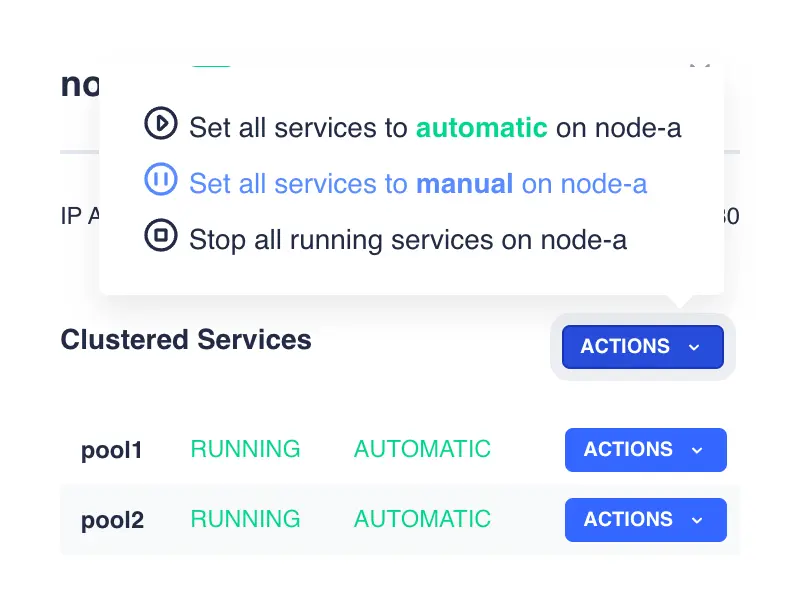
Alternatively, the ACTIONS button on the Clustered Services row brings up a menu that performs actions on all services on that node:
Services Panel
The services panel shows the status of each service in the cluster:

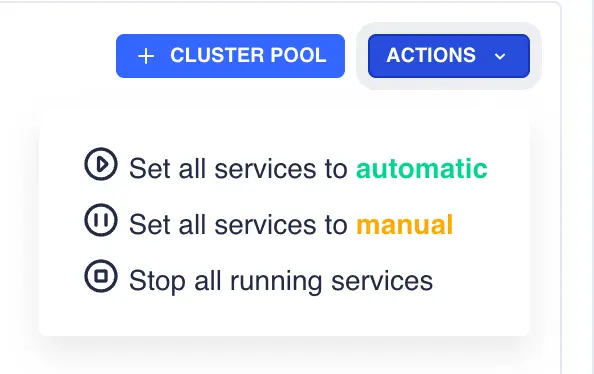
On the right hand side of the service panel the CLUSTER POOL button navigates to the ZFS pools page where pools can be created, imported,
exported and clustered; the ACTIONS menu performs actions that apply to all services in the cluster:
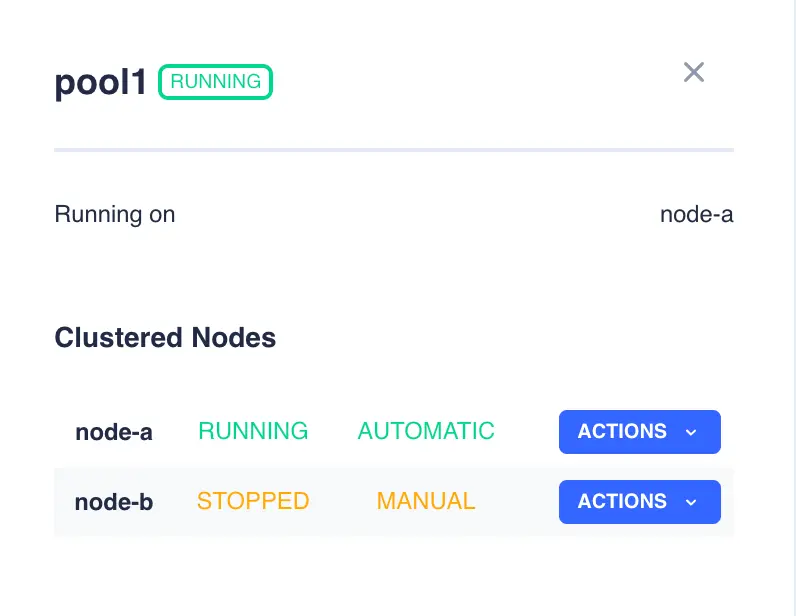
Clicking on an individual service opens up a side menu that allows control of that service in the cluster. In the example above
clicking on the icon for pool1 would bring up the following menu:
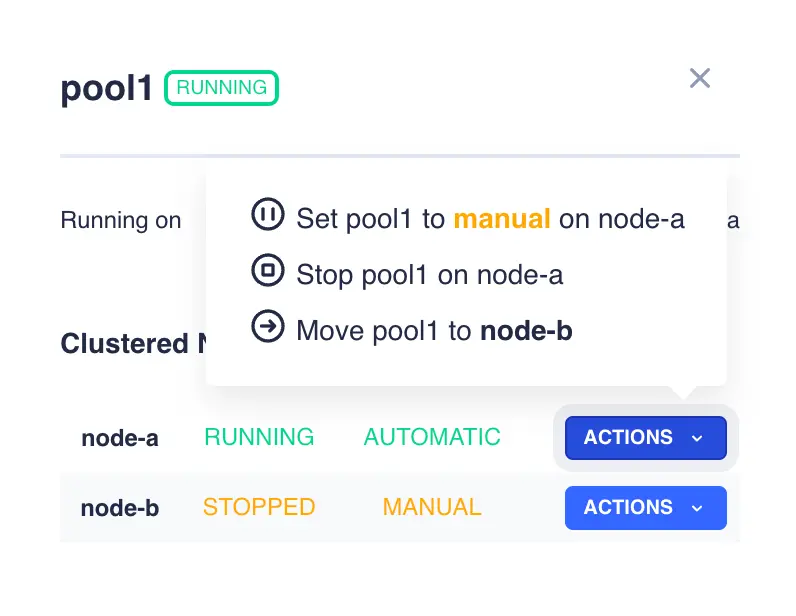
Available actions can then be viewed by clicking on the ACTIONS button in the right hand column for an individual service:
New Services
When a service is added to an RSF-1 High Availability cluster, its state will initially be set to stopped / automatic
and the cluster will start the service on the services' preferred node.
Clustering a Docker Container
These steps show the process of creating a Clustered docker container. The container will be created using
a standard docker compose.yaml file.
Install docker engine
Before using docker in the cluster, the docker engine must be installed on all cluster nodes. Please see here for installation instructions.
-
Navigate to
HA-Cluster -> Dockerin the webapp:
-
Click
Cluster a Docker applicationto bring up the creation/addition page and fill in the fields: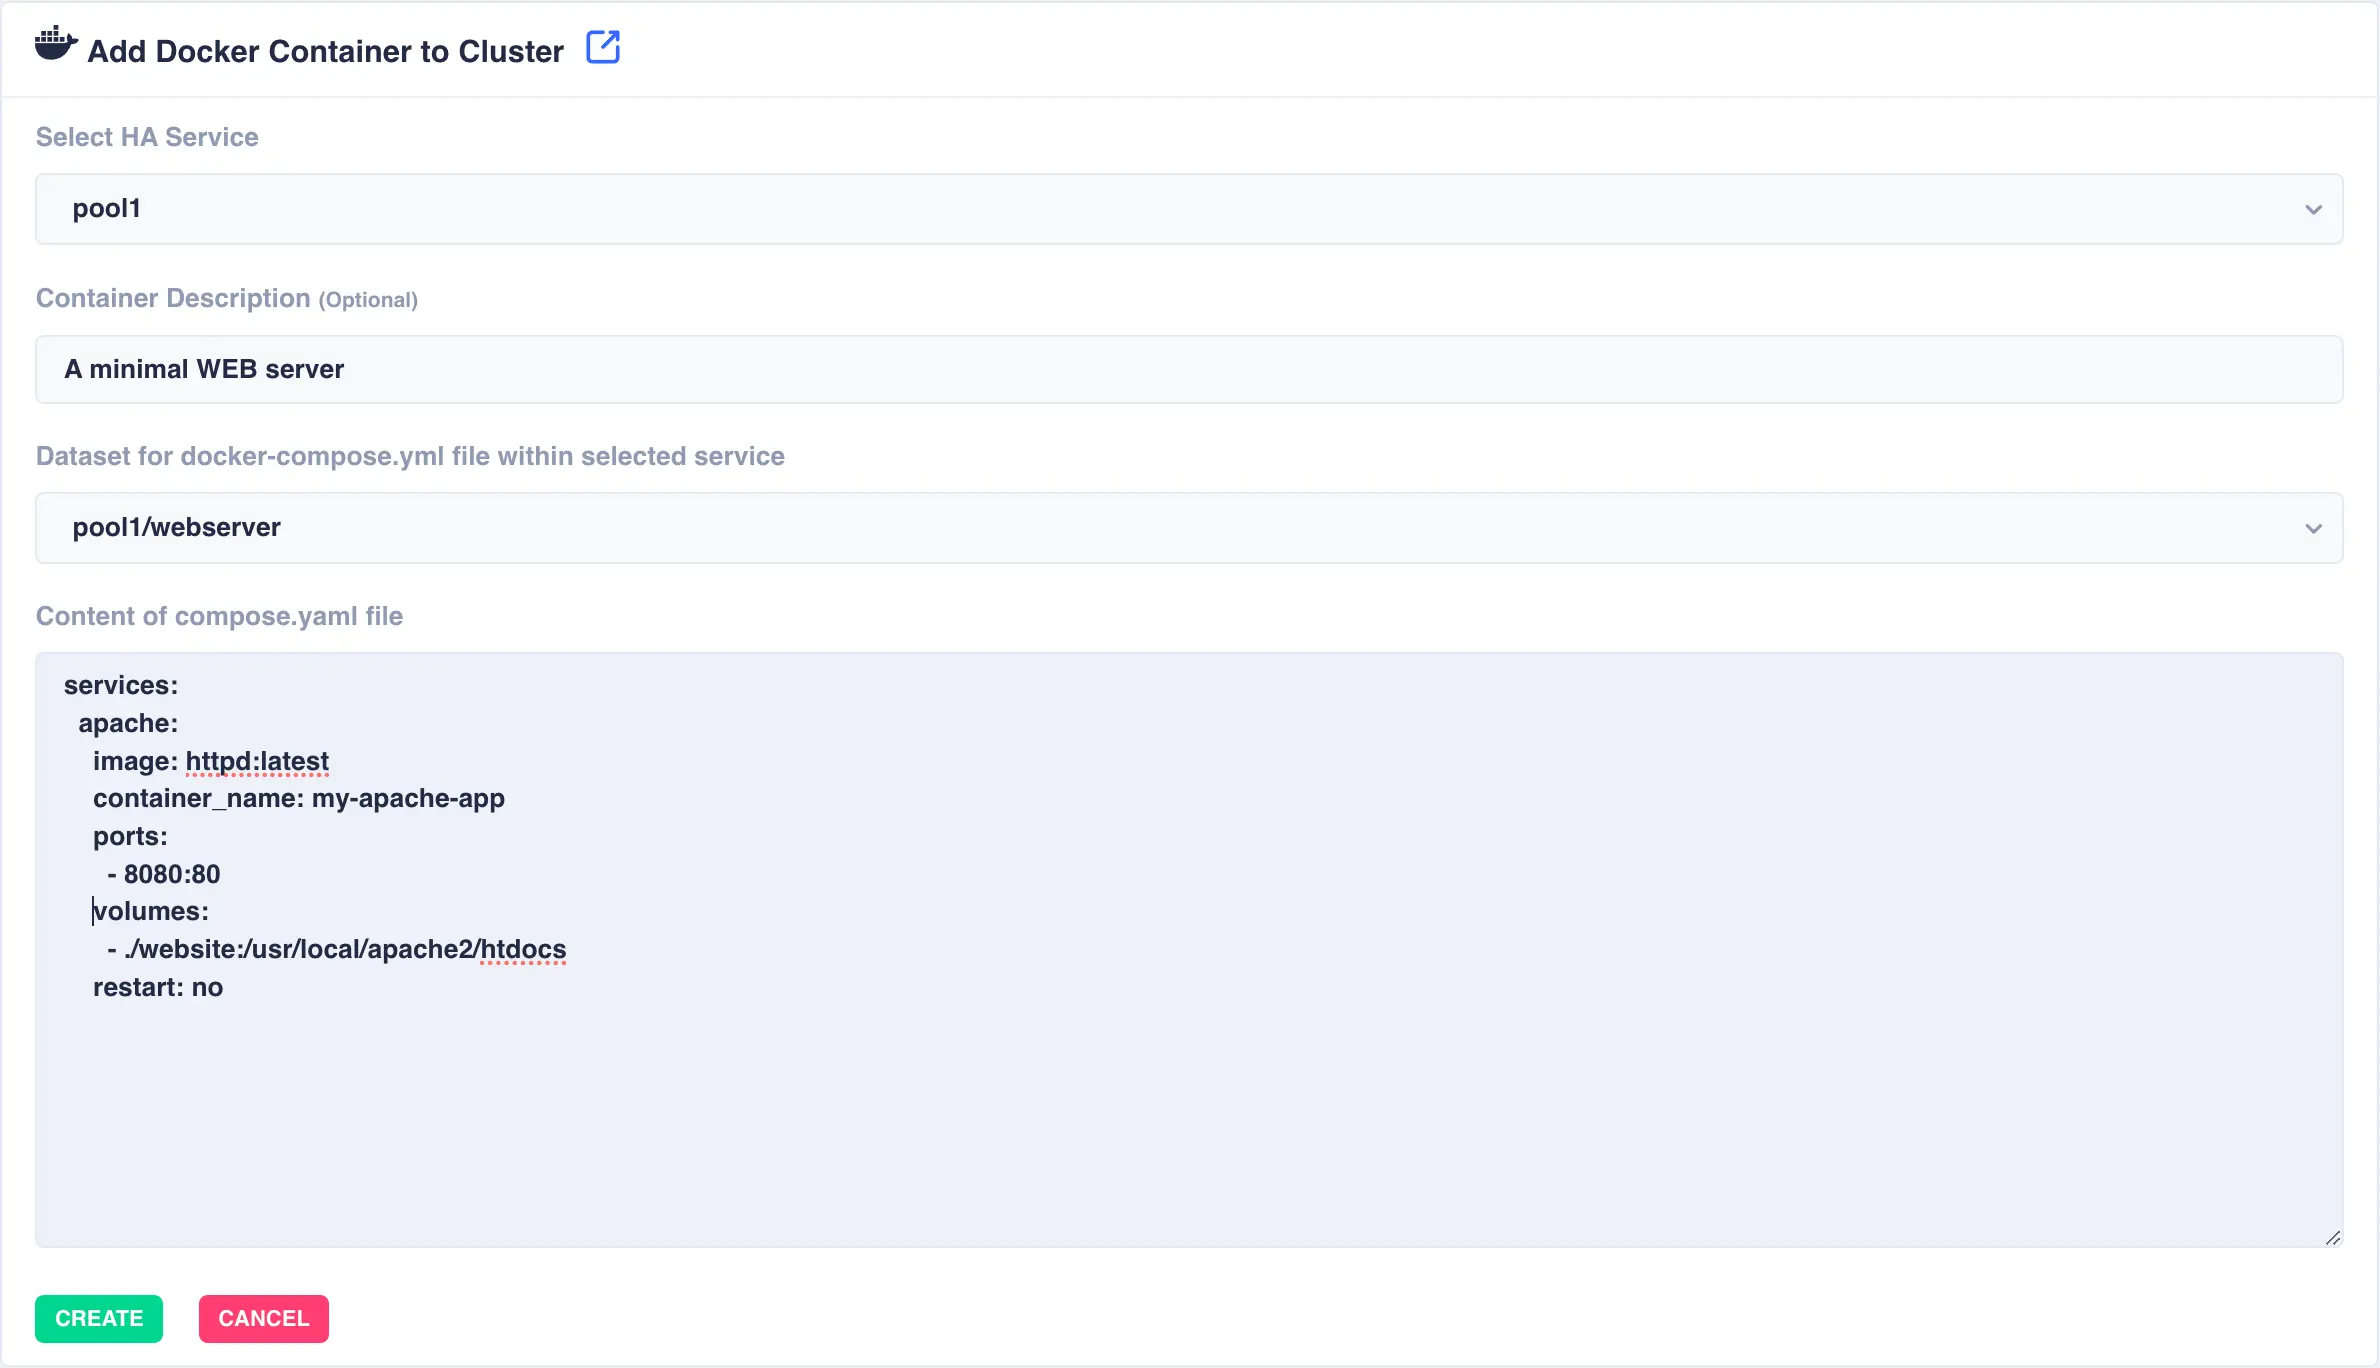
Available options:
Select HA Service- The service/pool that will host the docker container. In the event of a failover of this service the complete docker container will be moved with it.Container Description- An optional description of the docker container.Dataset- Location ofcompose.yamlfile within selected service.Contents- Thecompose.yamlfile for the docker container. Here is an example WEB server:
services:
  apache:
    image: httpd:latest
    container_name: my-apache-app
    ports:
      - 8080:80
    volumes:
      - ./website:/usr/local/apache2/htdocs
    restart: no
Warning
When adding your content, make sure to add
restart: noto your service configurations. RSF-1 will manage the restart of clustered containers in the event of a failover -
When finished click
Create. This will add the service in a stopped state:
-
By default the container will remain stopped until started. Click the
Startbutton to spin up the container:
Note
When a container is started for the first time there maybe a slight delay as the required images for the container are downloaded.
Heartbeats
In the cluster, heartbeats perform the following roles:
- To continually monitor the other nodes in the cluster, ensuring they are active and available.
- Communicate cluster and service status to the other nodes in the cluster. Status information includes
mode and state for every service on that node (
manual/automaticrunning/stoppedetc), along with any services that are currently blocked. - A checksum of the active cluster configuration on that node.
Configuration checksums
The configuration checksums must match on all cluster nodes to ensure the validity of the cluster; should a mismatch be detected then the cluster will lock the current state of the all services (active or not) until the mismatch is resolved. This safety feature protects against unexpected behaviour as a result of unsynchronised configuration.
The cluster supports two types of heartbeats:
- Network heartbeats
- Disk heartbeats
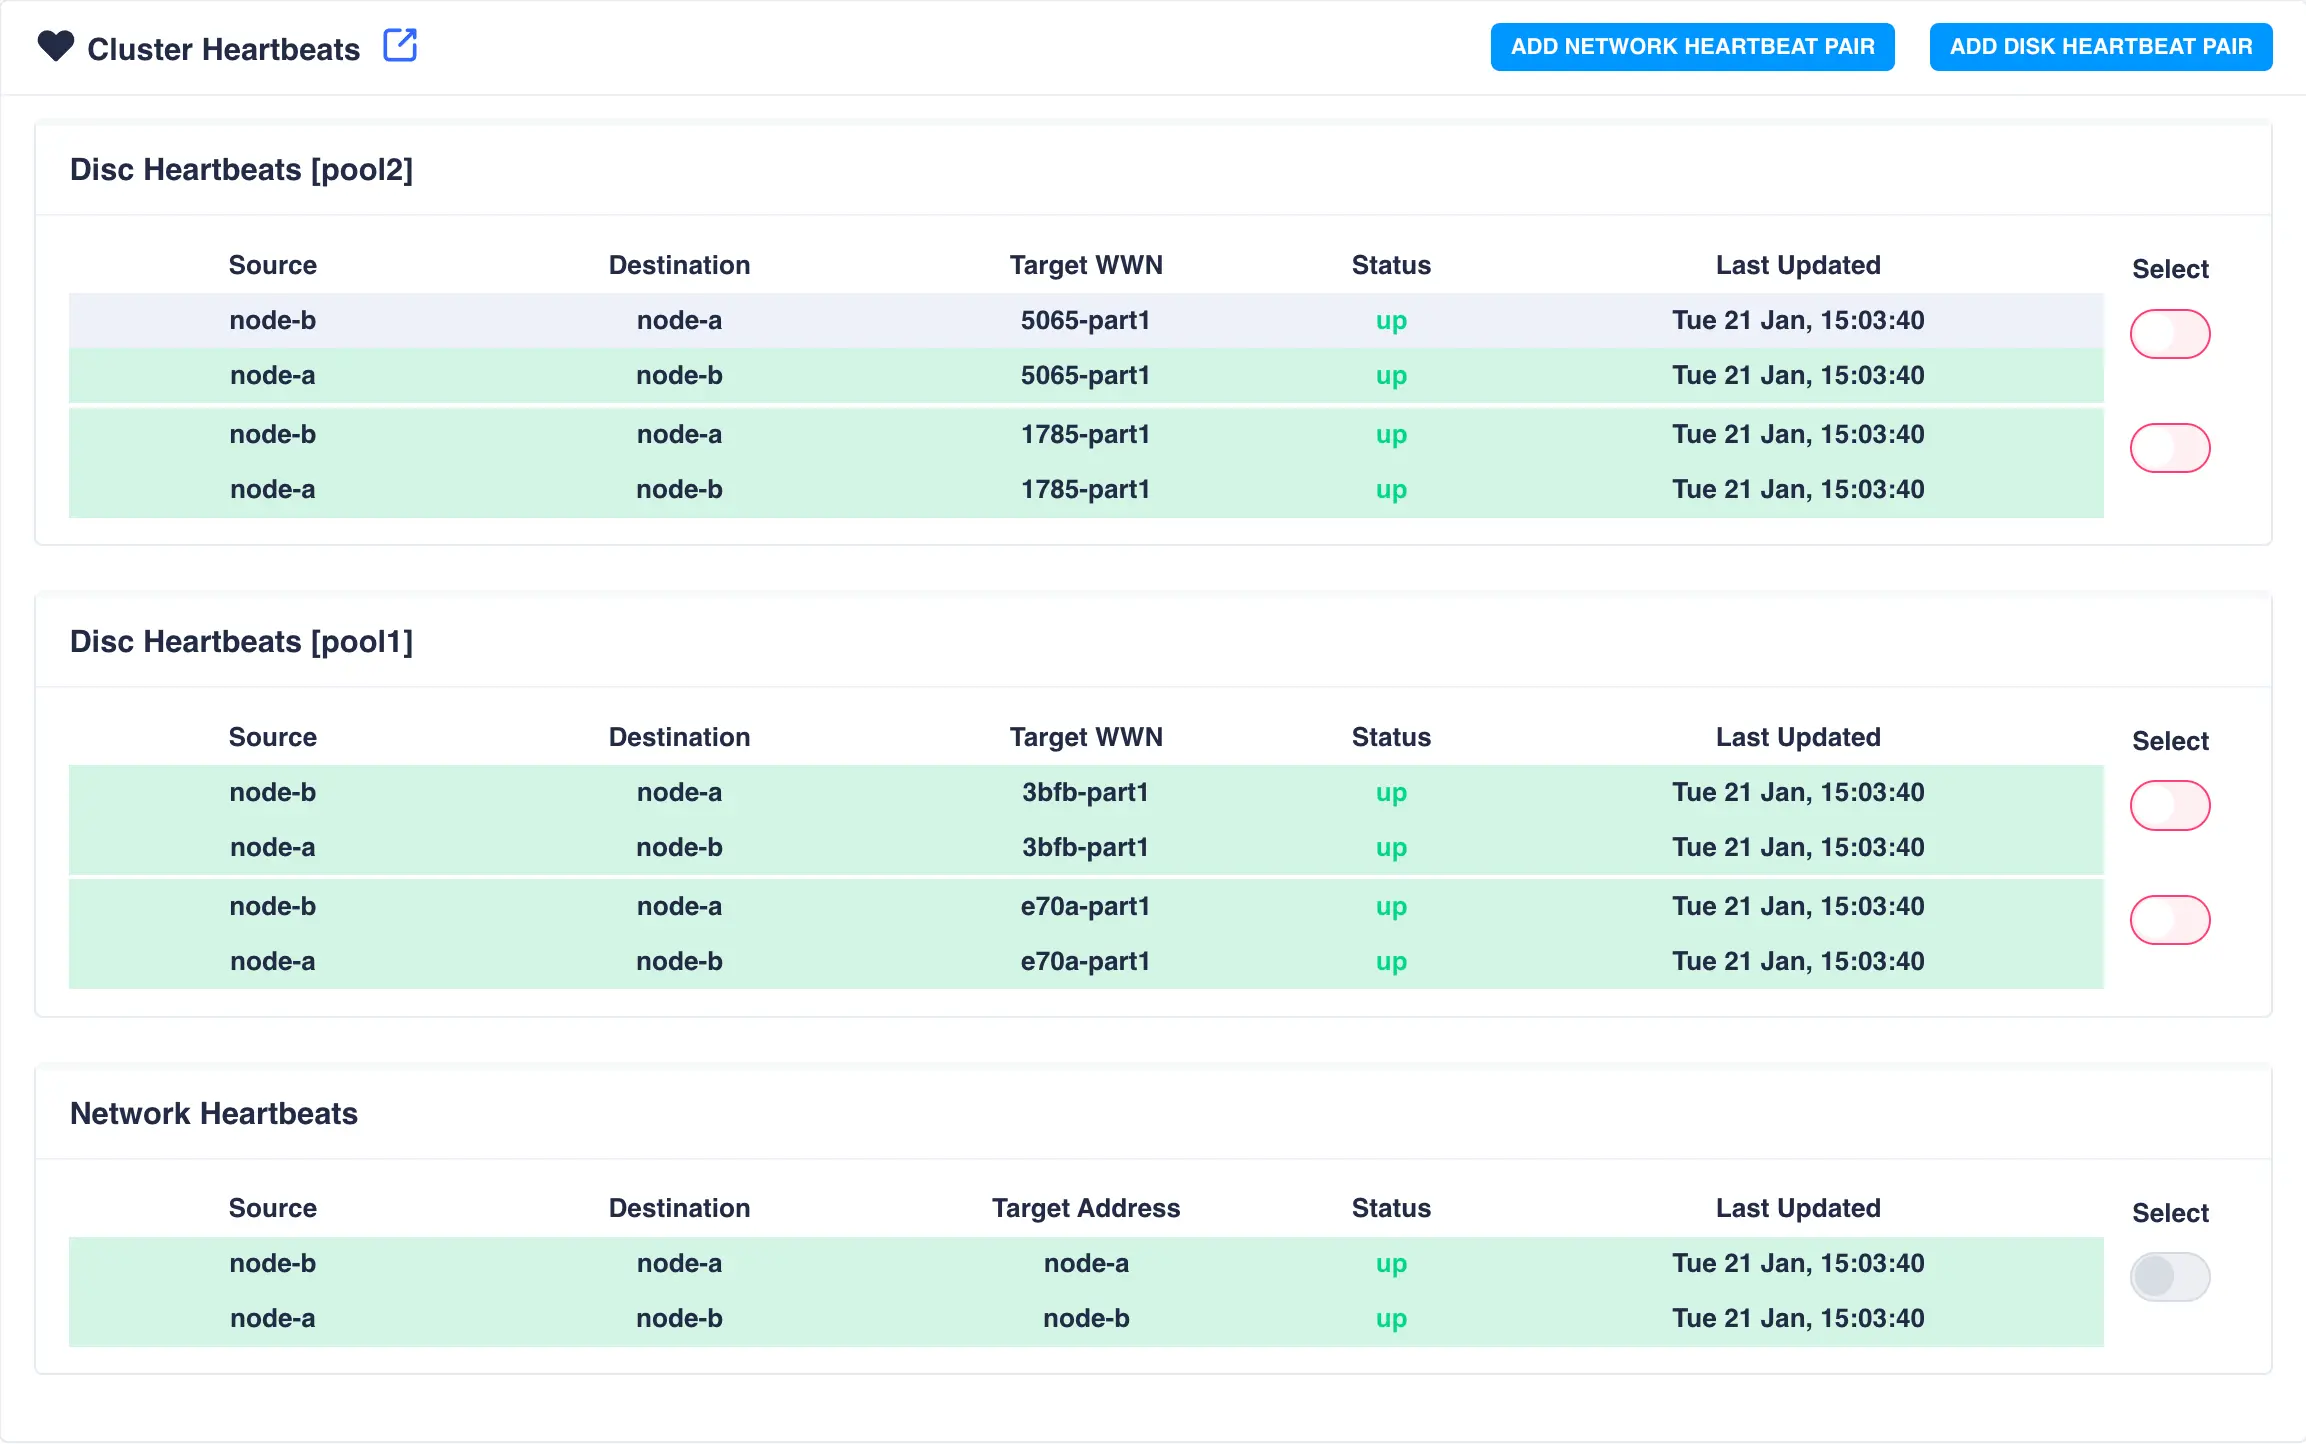
Heartbeats are unidirectional therefore for each heartbeat configured there will be two channels (one to send and one to receive).
The same information and structures is transmitted over each type of heartbeat. The cluster supports multiple heartbeats of each type. When the cluster is first created a network hearbeat is automatically configured between cluster nodes using the node hostnames as the endpoints. Disk heartbeats are automatically configured when a service is created and under normal circumstances require no user intervention.
It is recommended practice to configure network heartbeats across any additional network interfaces.
For example, if the hostnames are on a 10.x.x.x network, and an additional private network exists
with 192.x.x.x addresses, then an additional heartbeat can be configured on that private network.
Using the following example hosts file an additional network heartbeat can be configured using the
node-a-priv and node-b-priv addresses as endpoints:
10.0.0.1 node-a
10.0.0.2 node-b
192.168.72.1 node-a-priv
192.168.72.2 node-b-priv
By specifying the endpoint using the address of an additional interface the cluster will automatically route heartbeat packets down the correct network for that interface.
To view the cluster heartbeats navigate to HA-Cluster -> Heartbeats on the left side-menu:
Adding a Network Heartbeat
To add an additional network heartbeat to the cluster, select Add Network Heartbeat Pair.
In this example an additional physical network connection exists between the two nodes.
The end points for this additional network are given the names
node-a-priv and node-b-priv respectively. These
hostnames are then used when configuring the additional heartbeat:
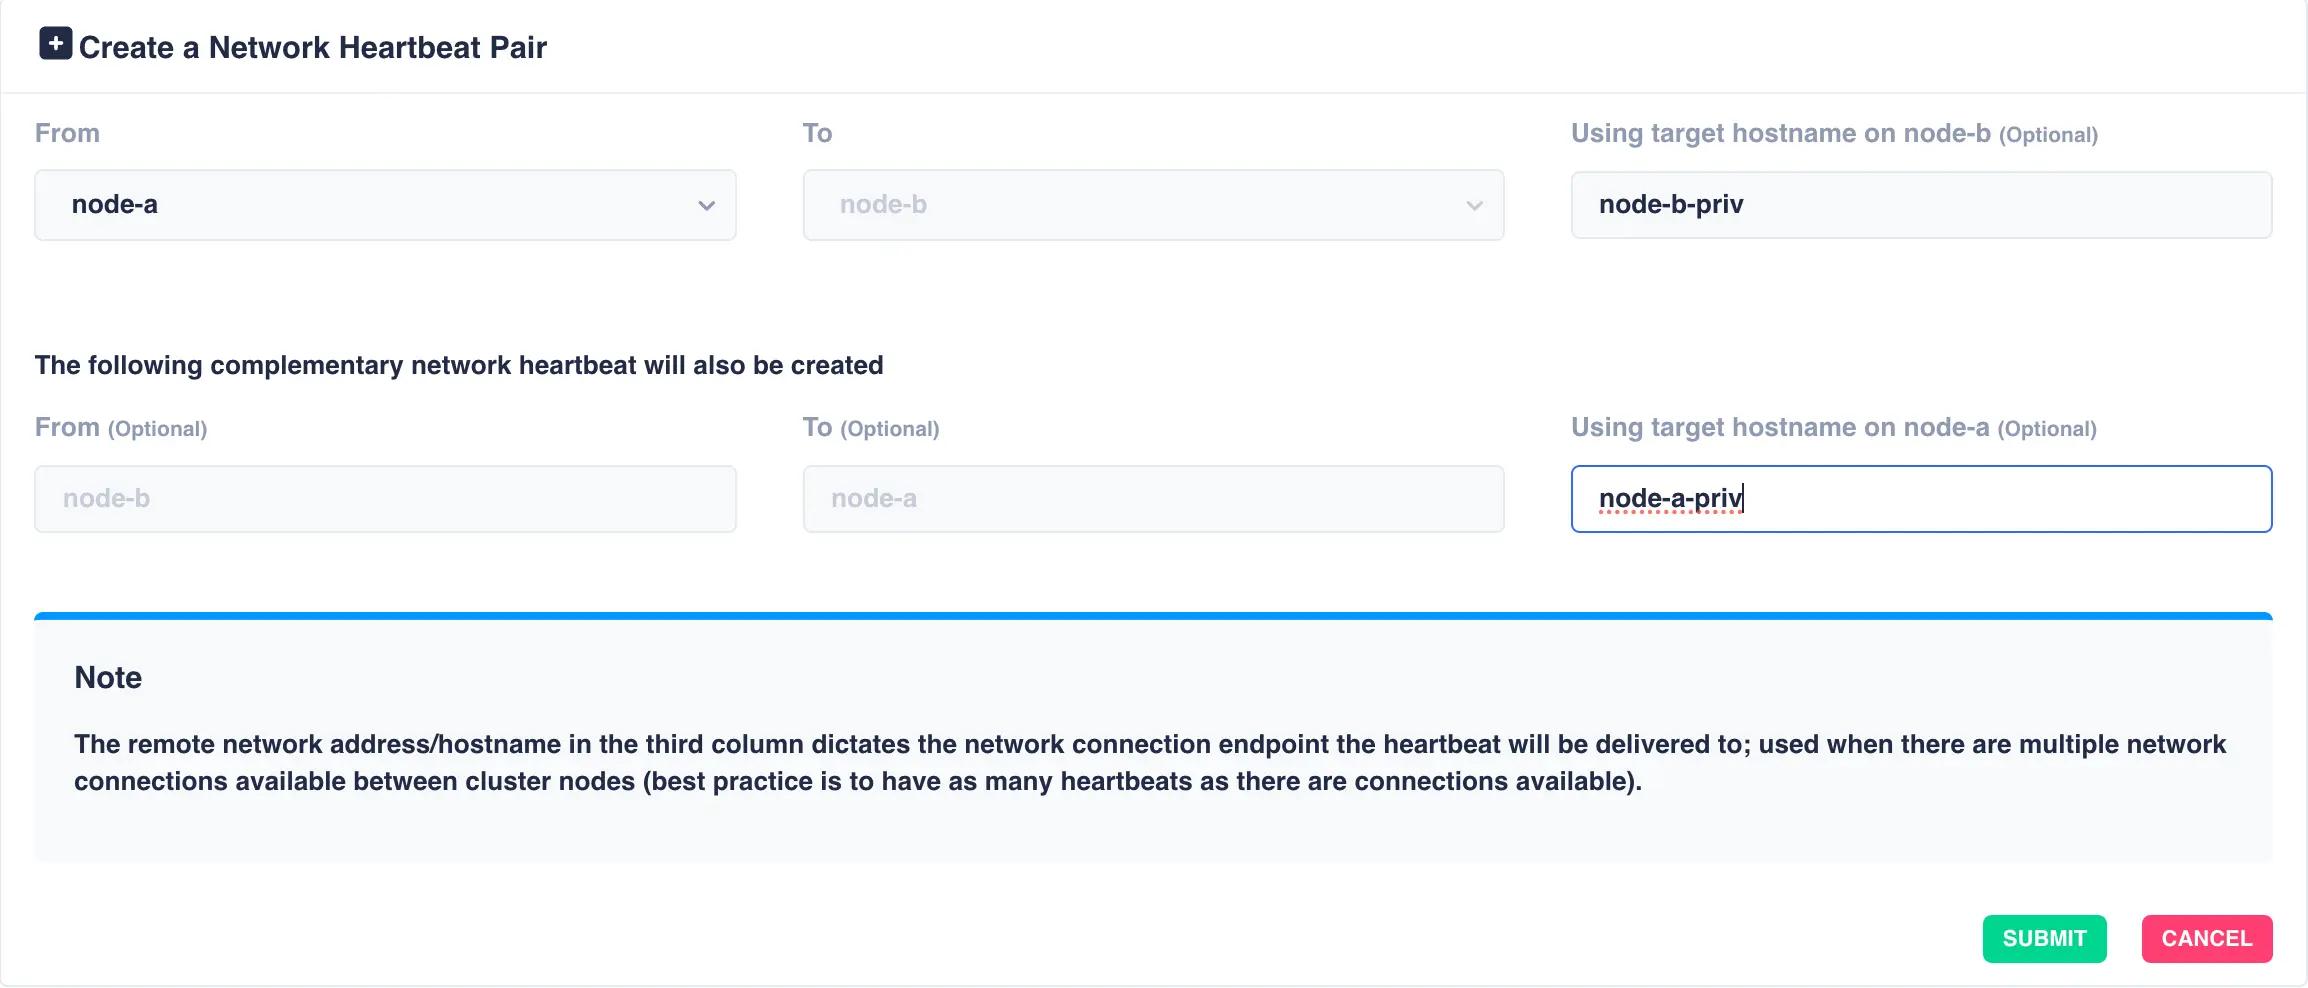
Click Submit to add the heartbeat.
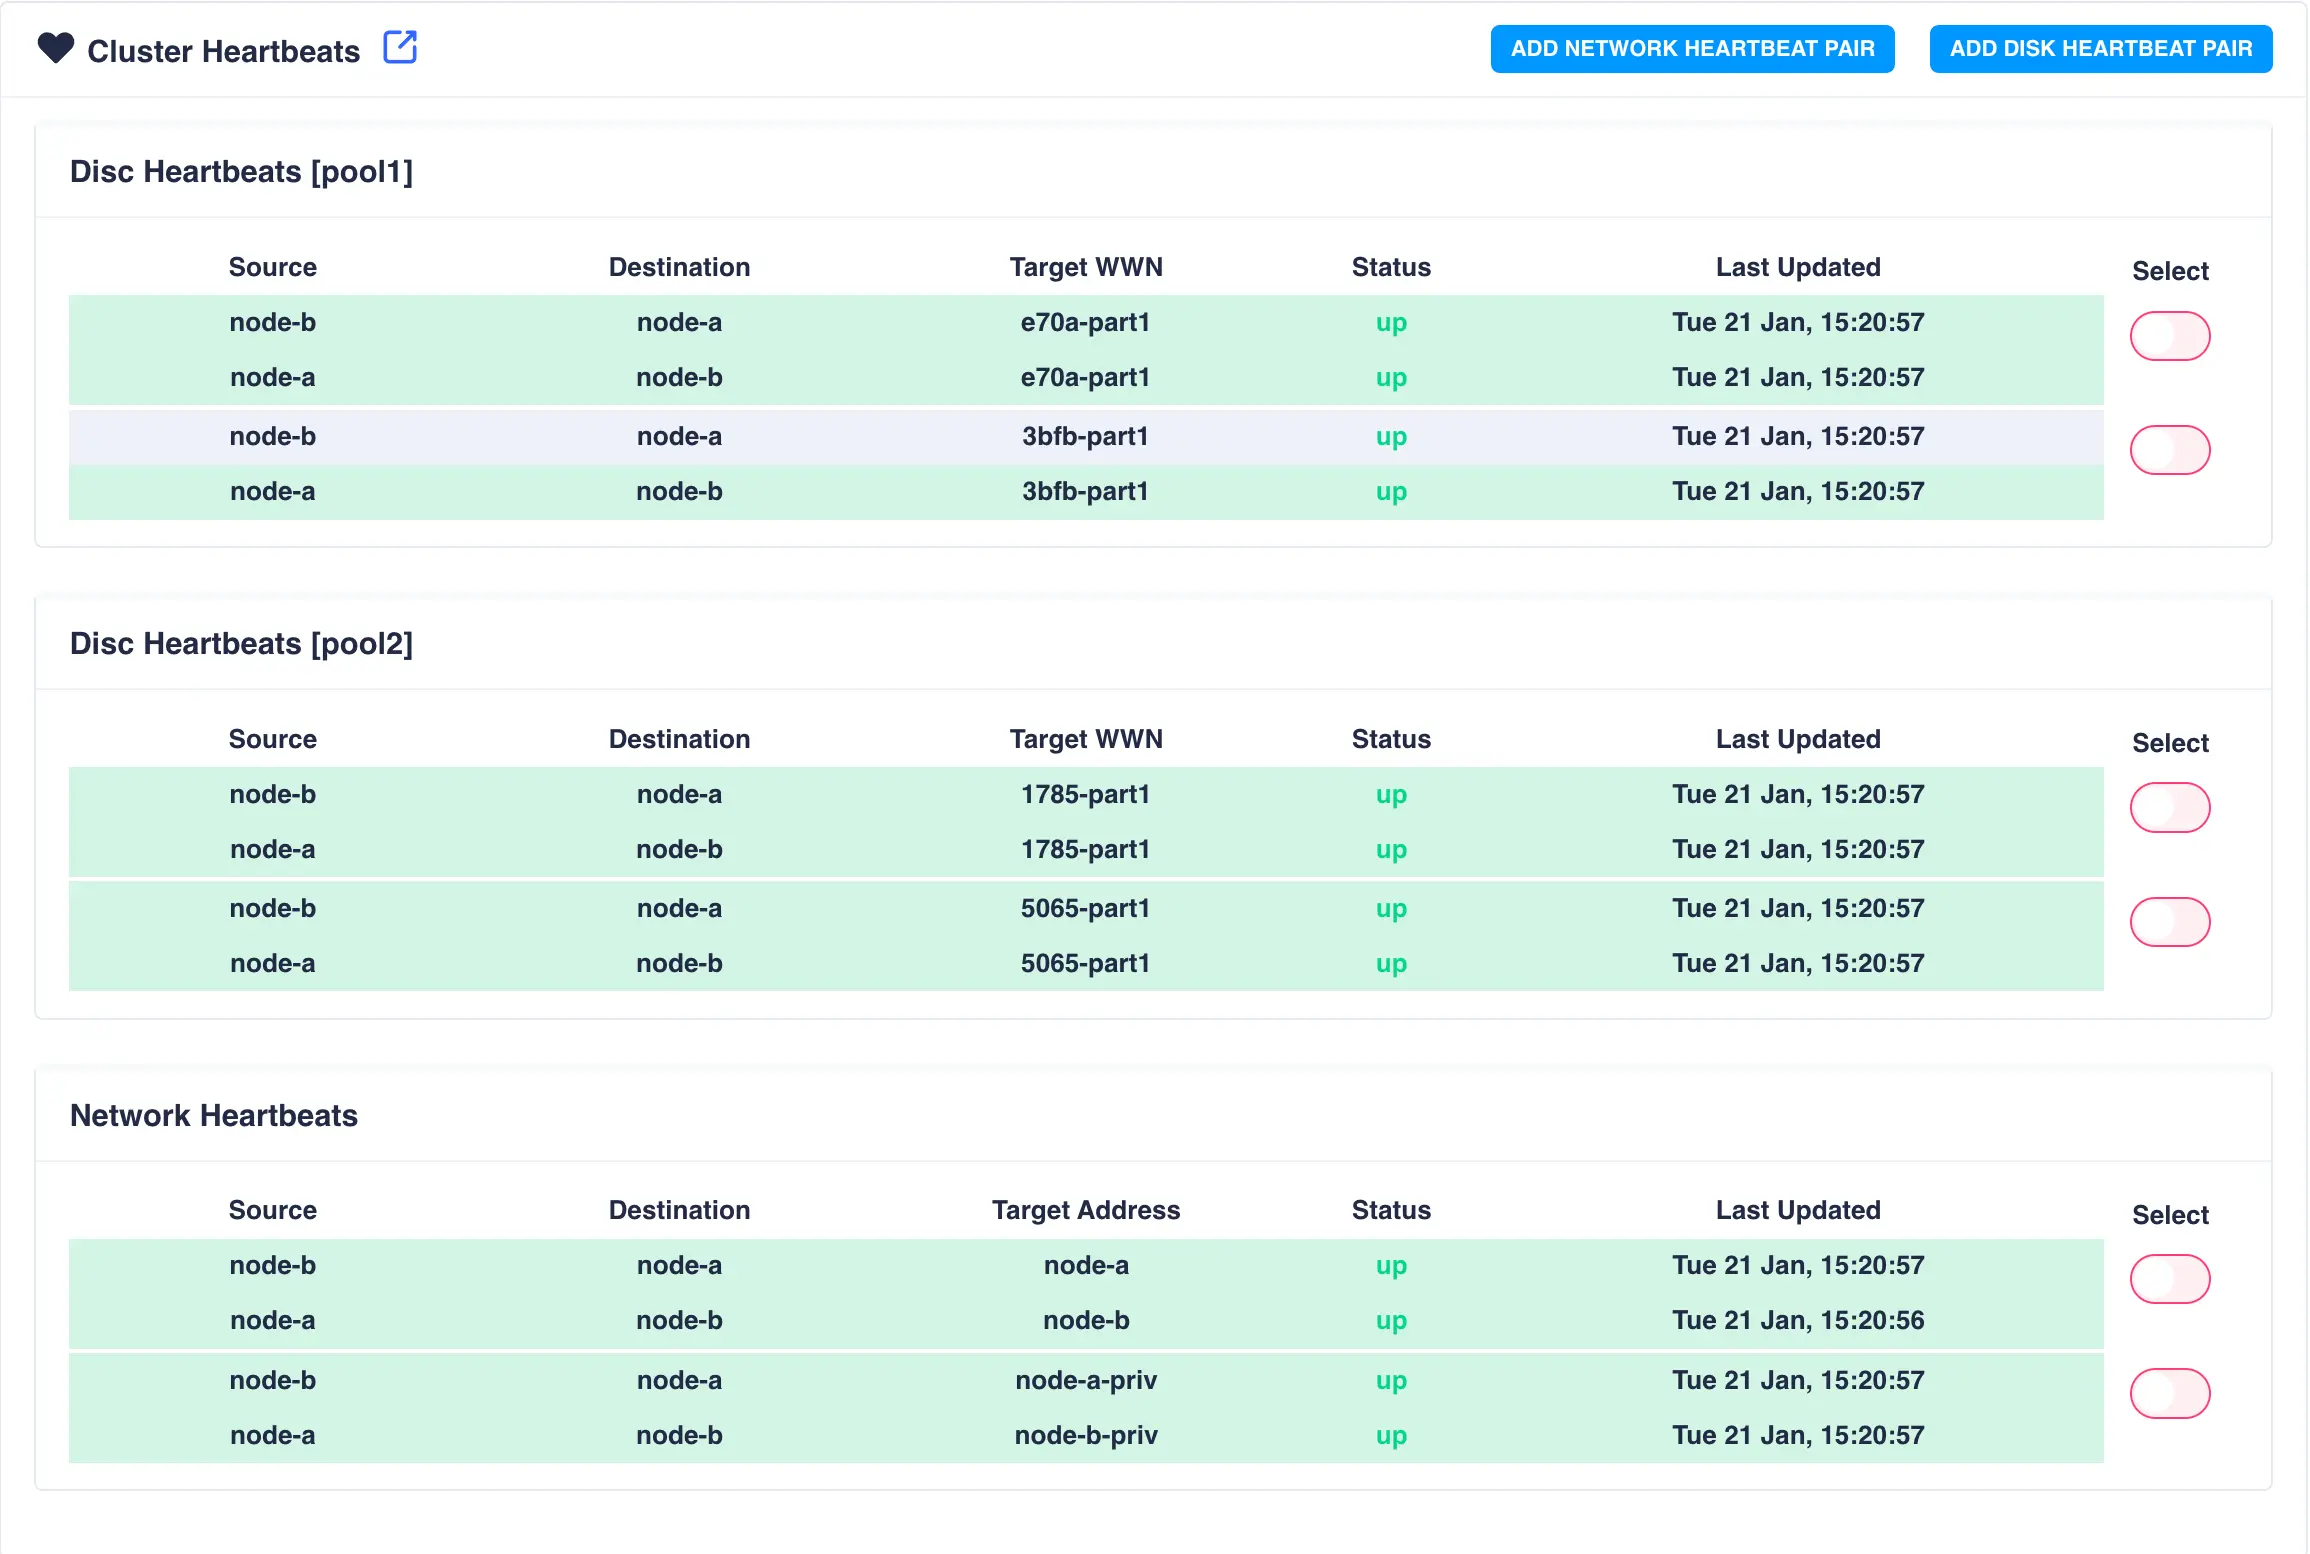
The new heartbeat will now be displayed on the Heartbeats status page:
Removing a Network Heartbeat
To remove a network heartbeat select the heartbeat using the slider on the
left hand side of the table and click the remove selected button:
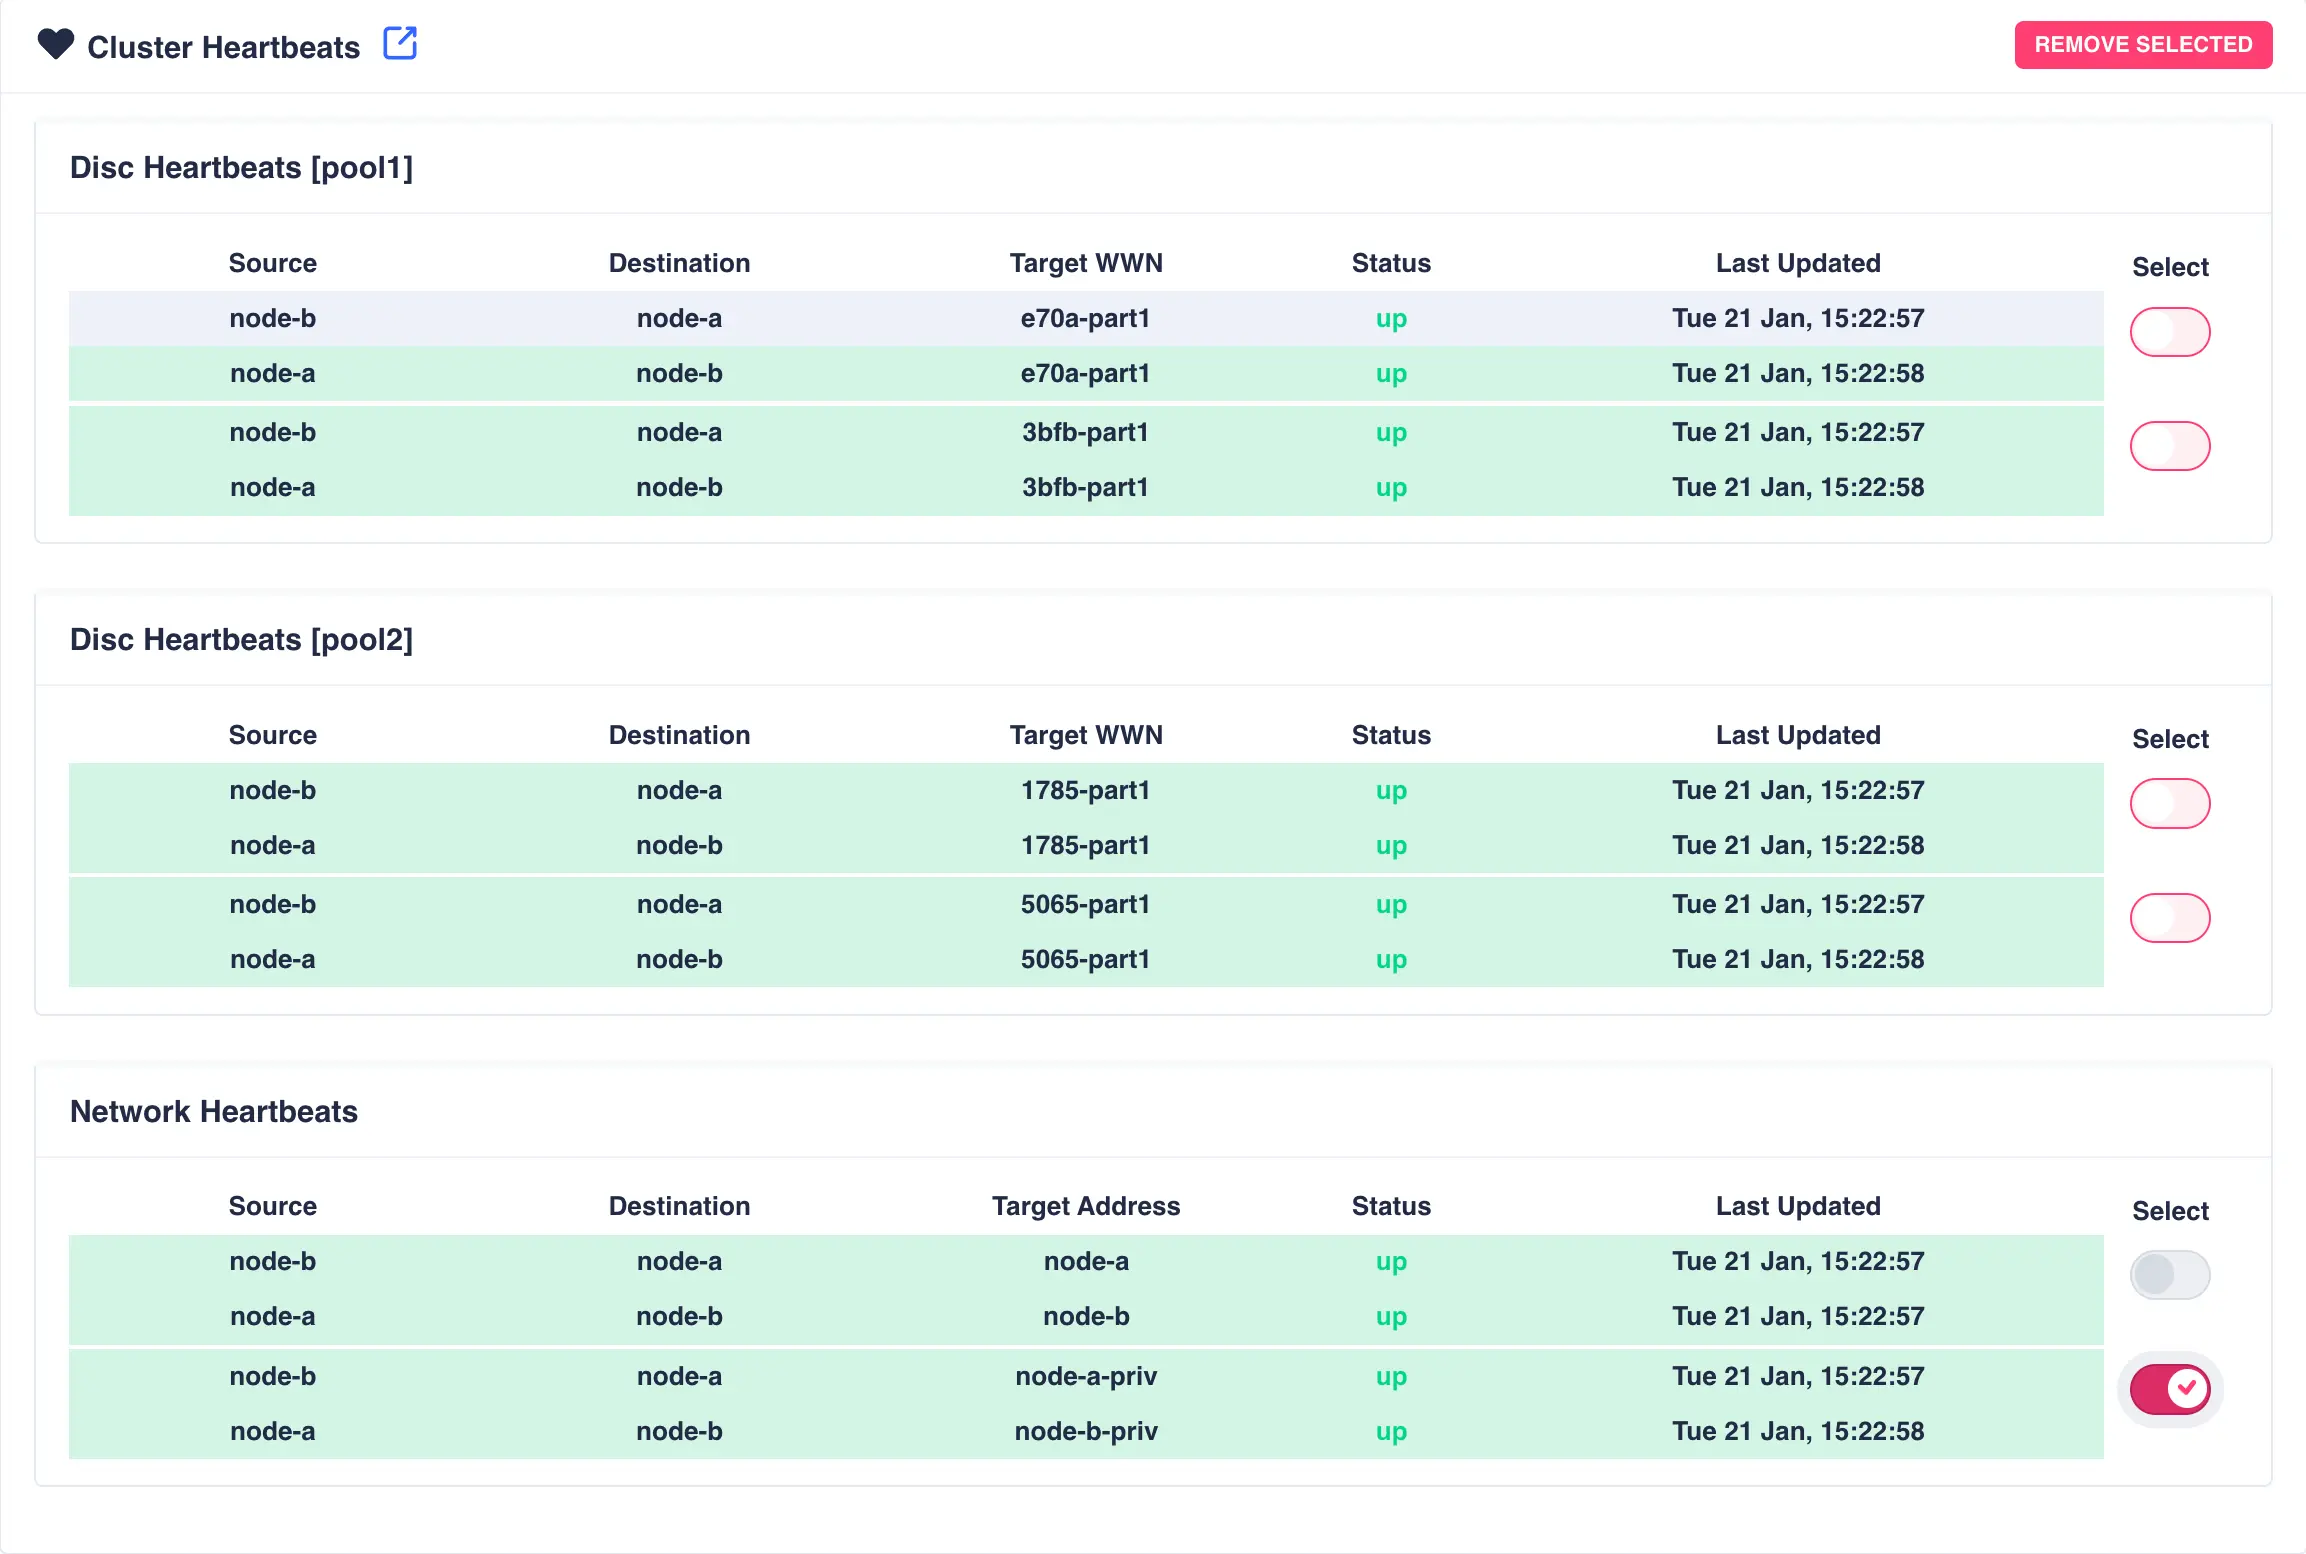
Finally, confirm the action:

Disk heartbeats
Under normal circumstances it should not be necessary to add or remove disk heartbeats as this is handled automatically by the cluster.
Licensing
The licensing page gives an overview of the current cluster license status:

The Support Expiry Date lists when the current technical support contract expires for this cluster (this is
unreleated to cluster licenses, which are typically permanent).
Updating licenses
The RE-ISSUE button is used to update the cluster licensing from the the High-Availability licensing server.
This action should be performed
- Extend temporary licenses
- Update a temporary license to a permanent one
- Update the support contract end date
Clicking on the button brings up the request form. A confirmation of any updated licenses will be sent to the email address provided:

Manually entering a license
In cases where manual license entry is required (dark sites with no external connection for example), clicking the
ENTER LICENSE button brings up the manual entry license form, where license keys can be added to the cluster:

Nodes
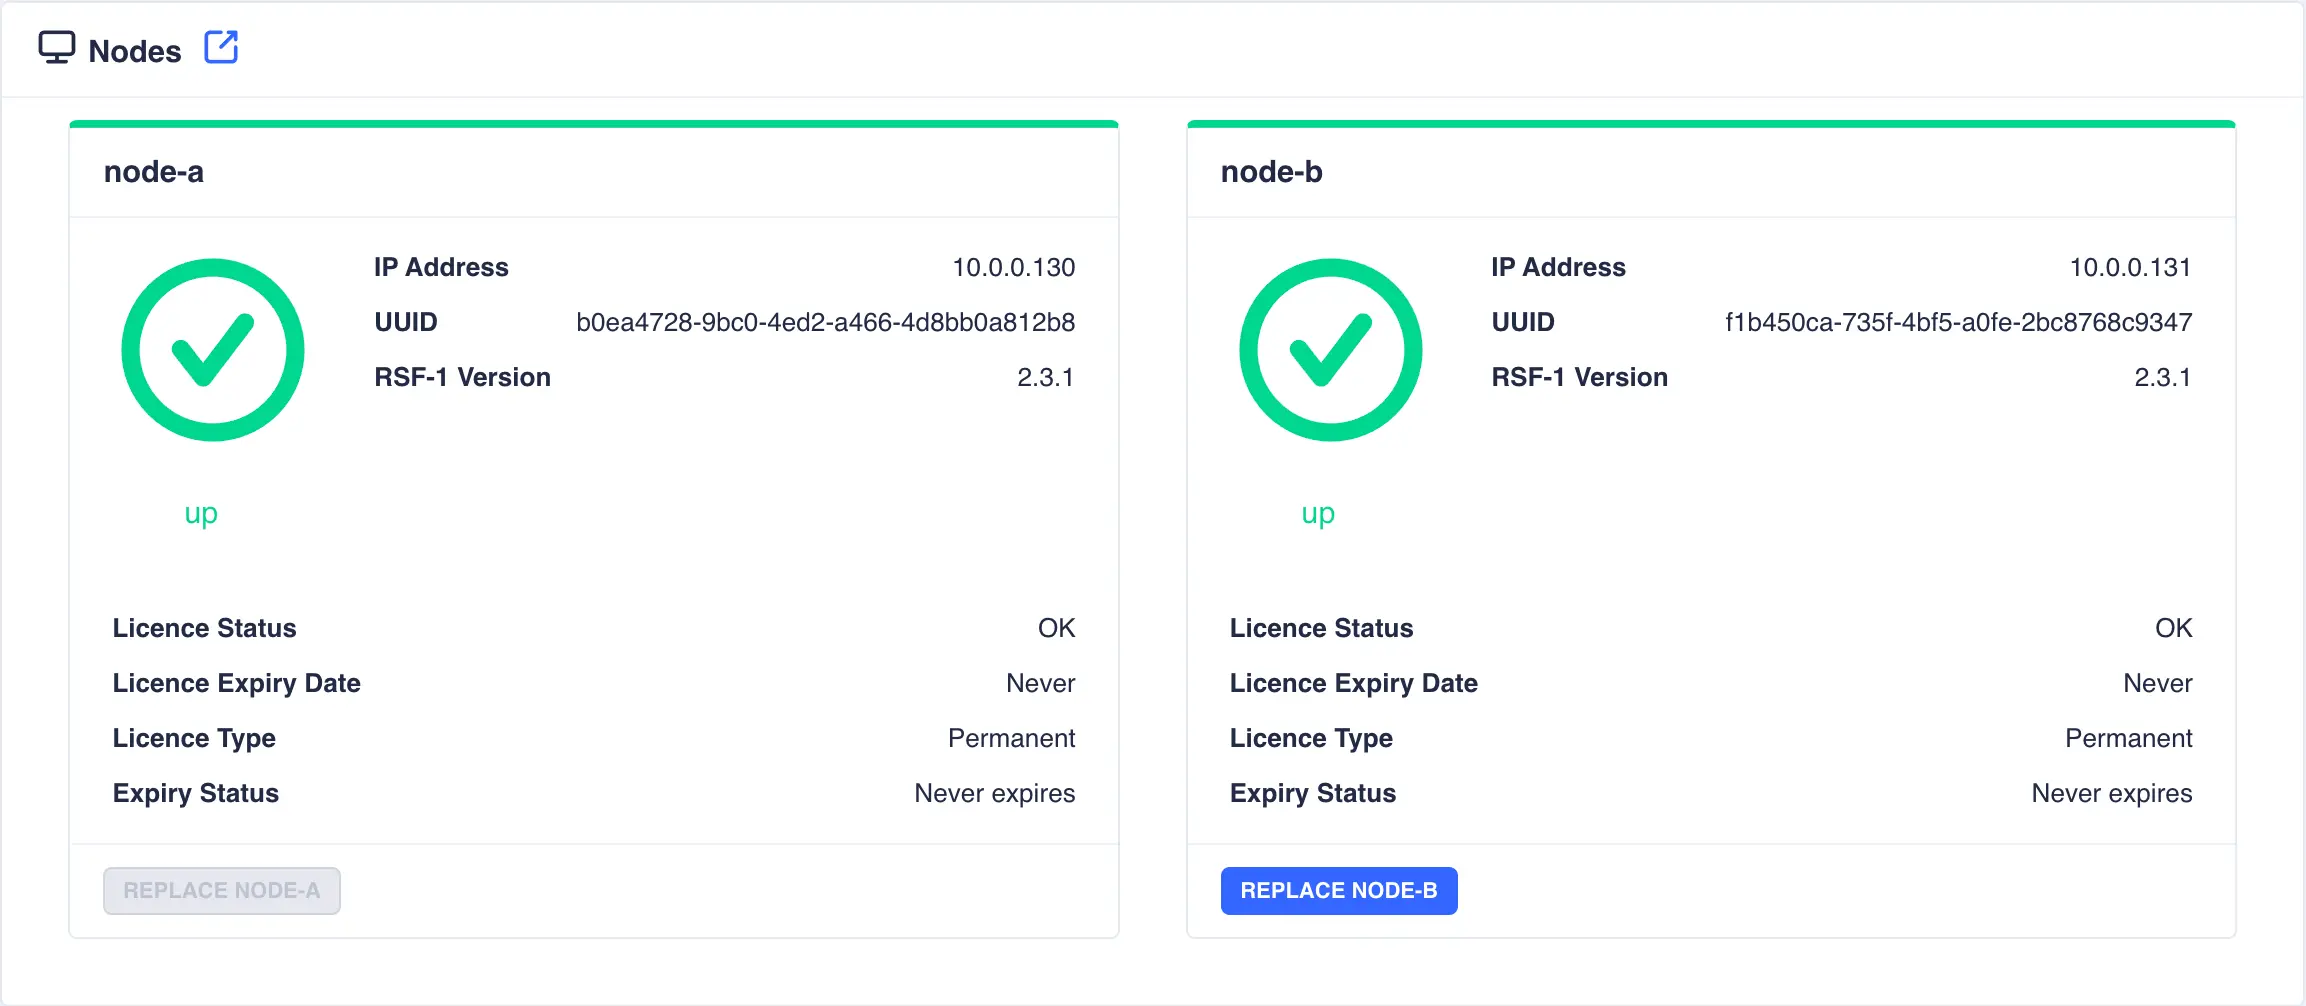
The nodes page provides details of the nodes in the cluster, including licensing status, the main IP address, the unique UUID and the version of RSF-1 running:
Replacing a cluster node
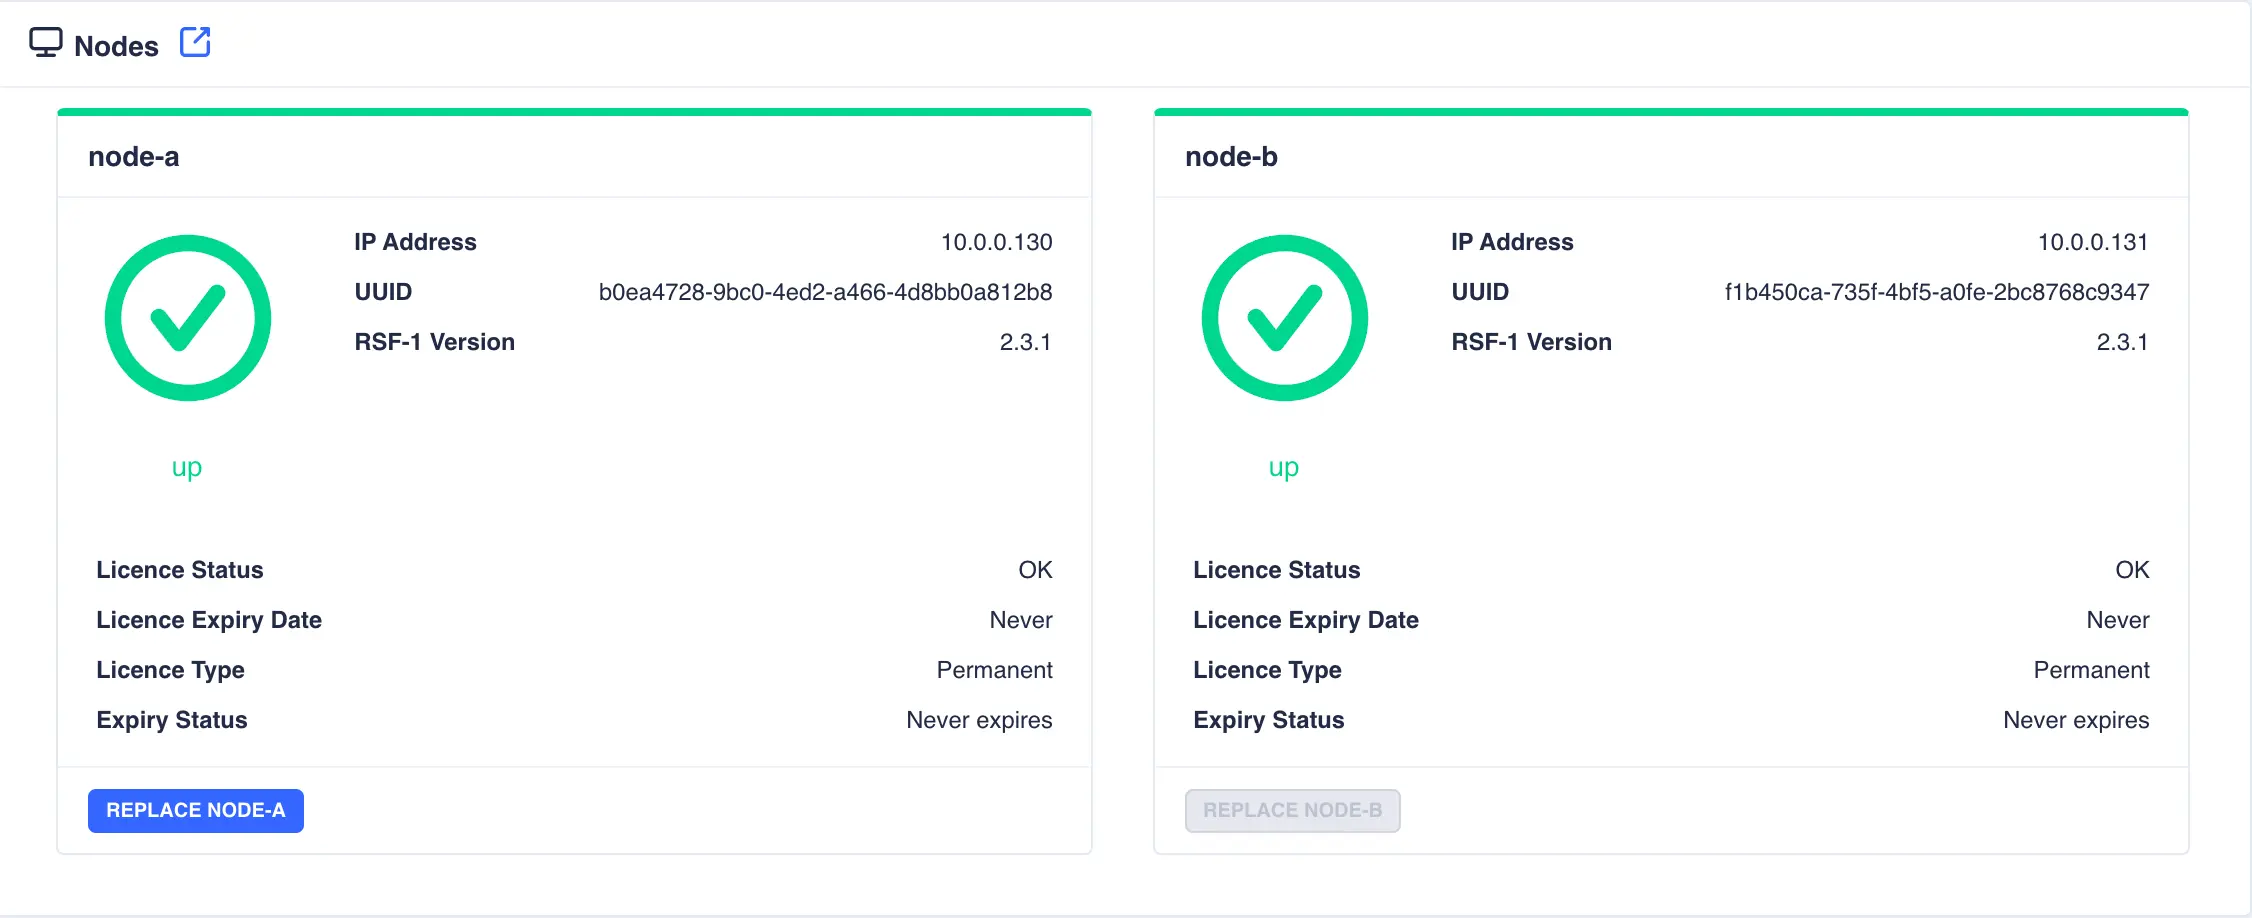
The nodes page allows a user with adminastrative privilege to replace any node in the cluster, other than the node they are currently logged into as this is used to orchestrating the replacement process.
In the above example, the administrator is logged into node-a and node-b is offered for replacement; to
replace node-a simply login to node-b:
Prerequisites
Before attempting to replace a node you must ensure there is a suitable 'replacement' node available that has been prepared as follows:
- RSF-1 is installed and licensed
- The host file contains the IP address of the other nodes in the cluster
- All services have been moved off the node that is about to be replaced
- Any dependant services/packages are installed, such as Samba, NFS, iSCSI etc
Please also ensure the orchestrating node has the replacement nodes' IP address in its host file.
To begin the replacement process click REPLACE <NODE>:
-
The system will start to scan for available replacement nodes:

-
Select the replacement node from the list:

-
Click the
REPLACE <NODE>button to start the replacement process:
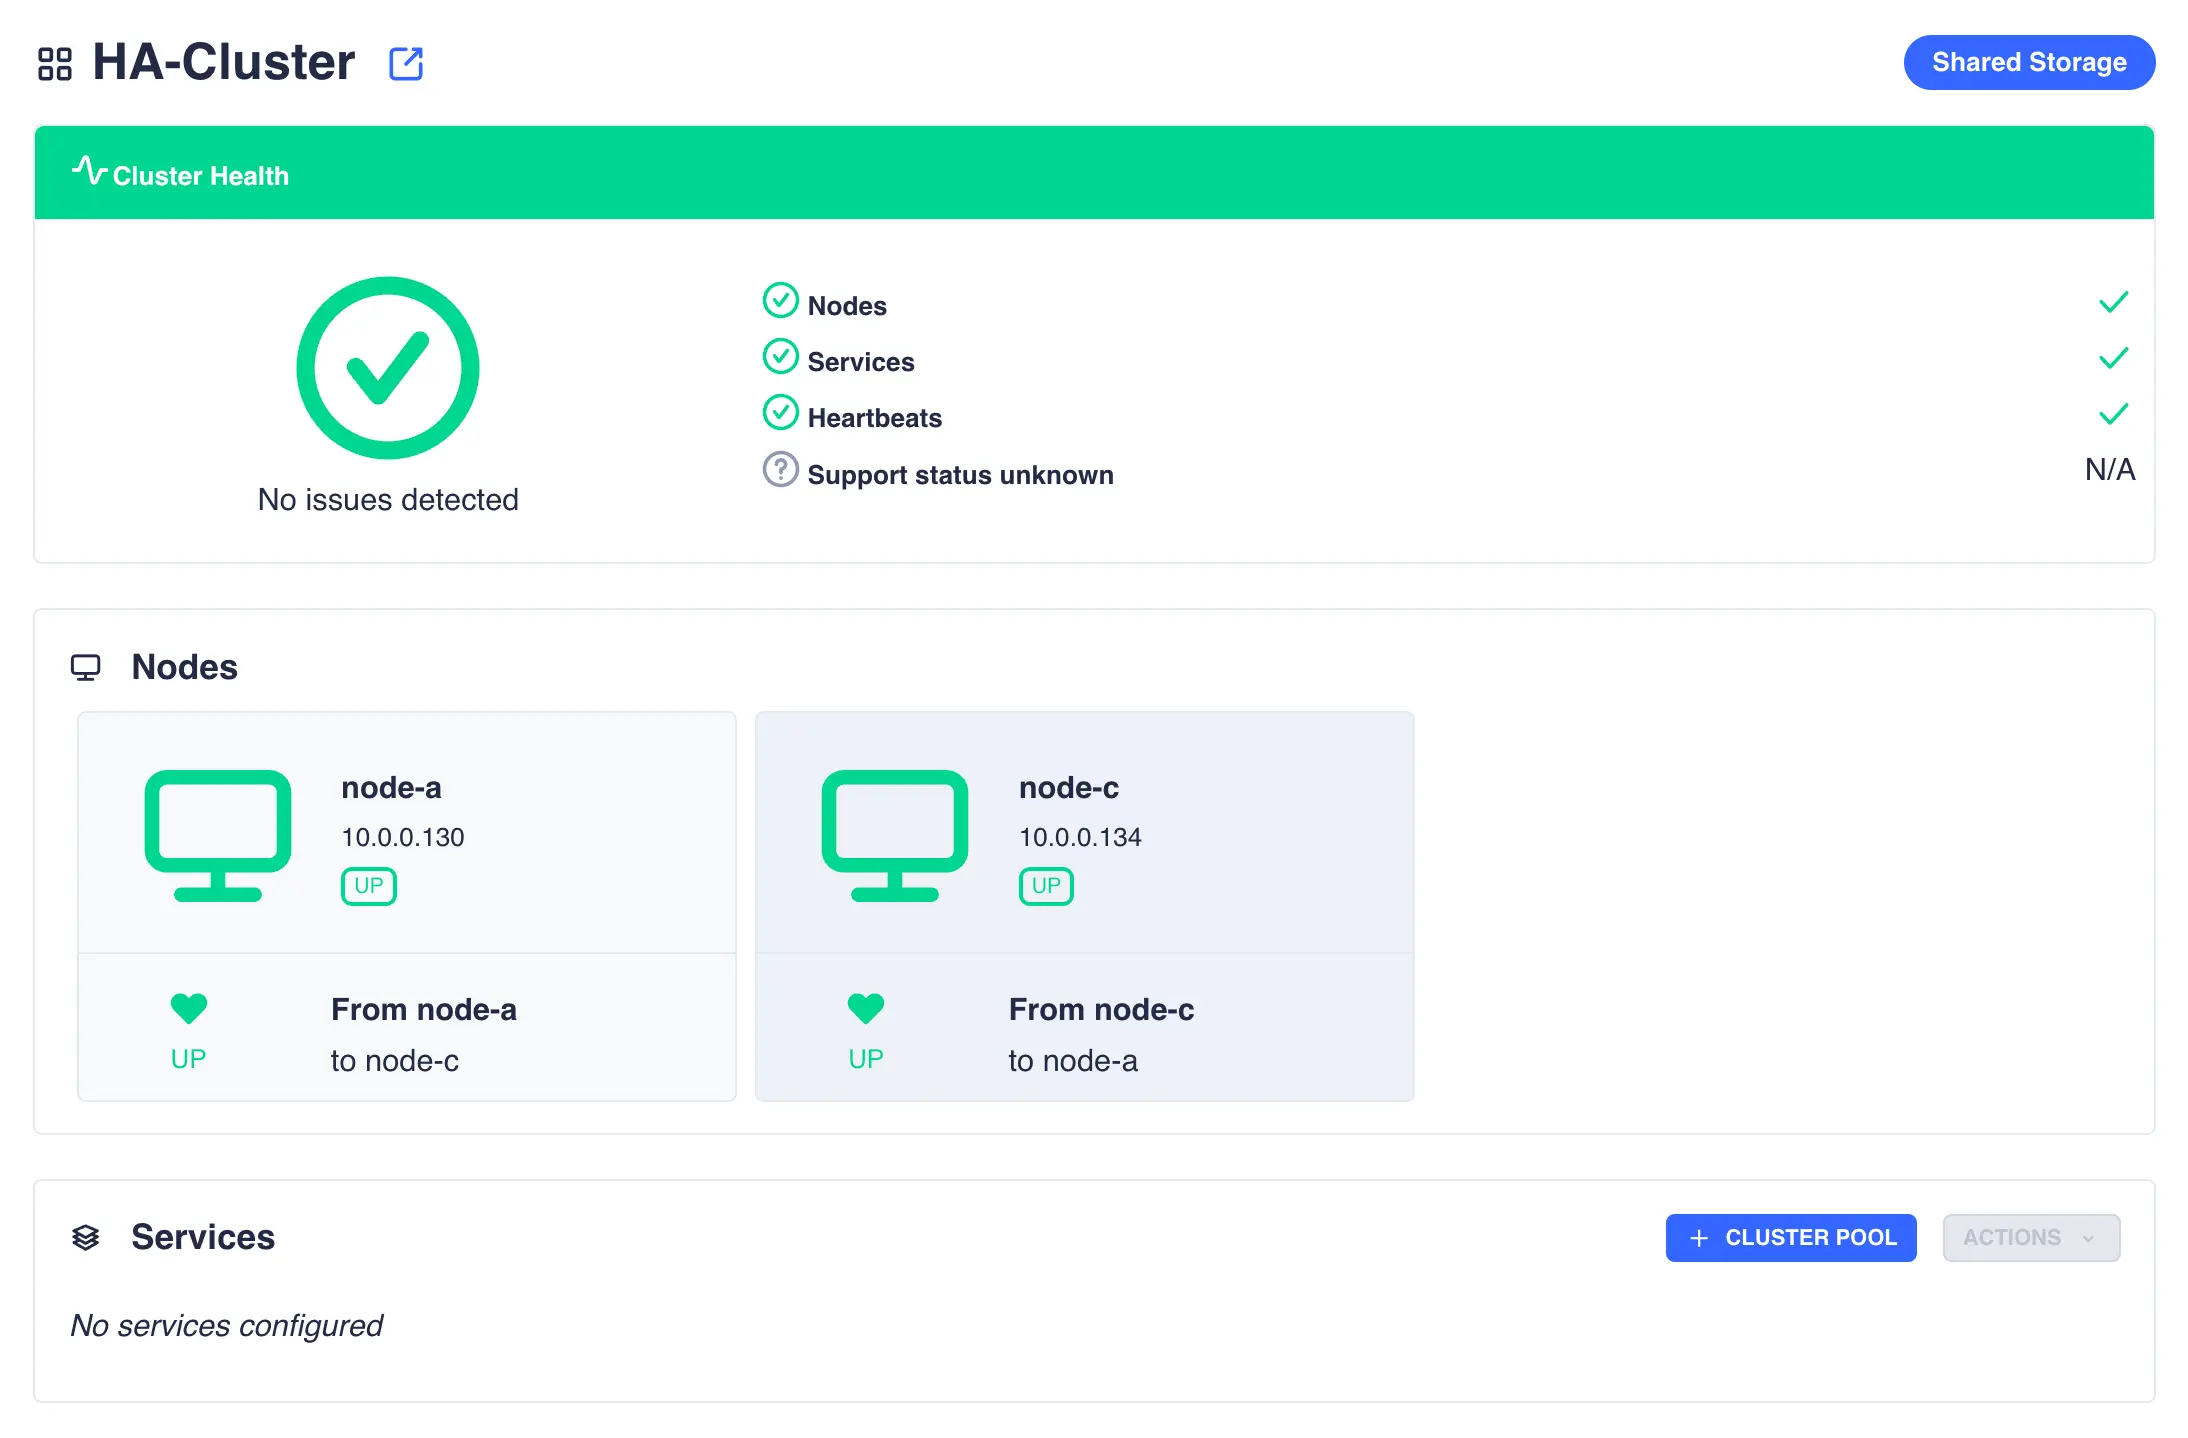
Once replaced the dashboard will reflect the new cluster nodes:
Virtual IP's
The Virtual IP's page is used to view, add and remove virtual IP addresses in the cluster. Use the drop down pool list to select a service and view its associated addresses:

Adding a Virtual IP
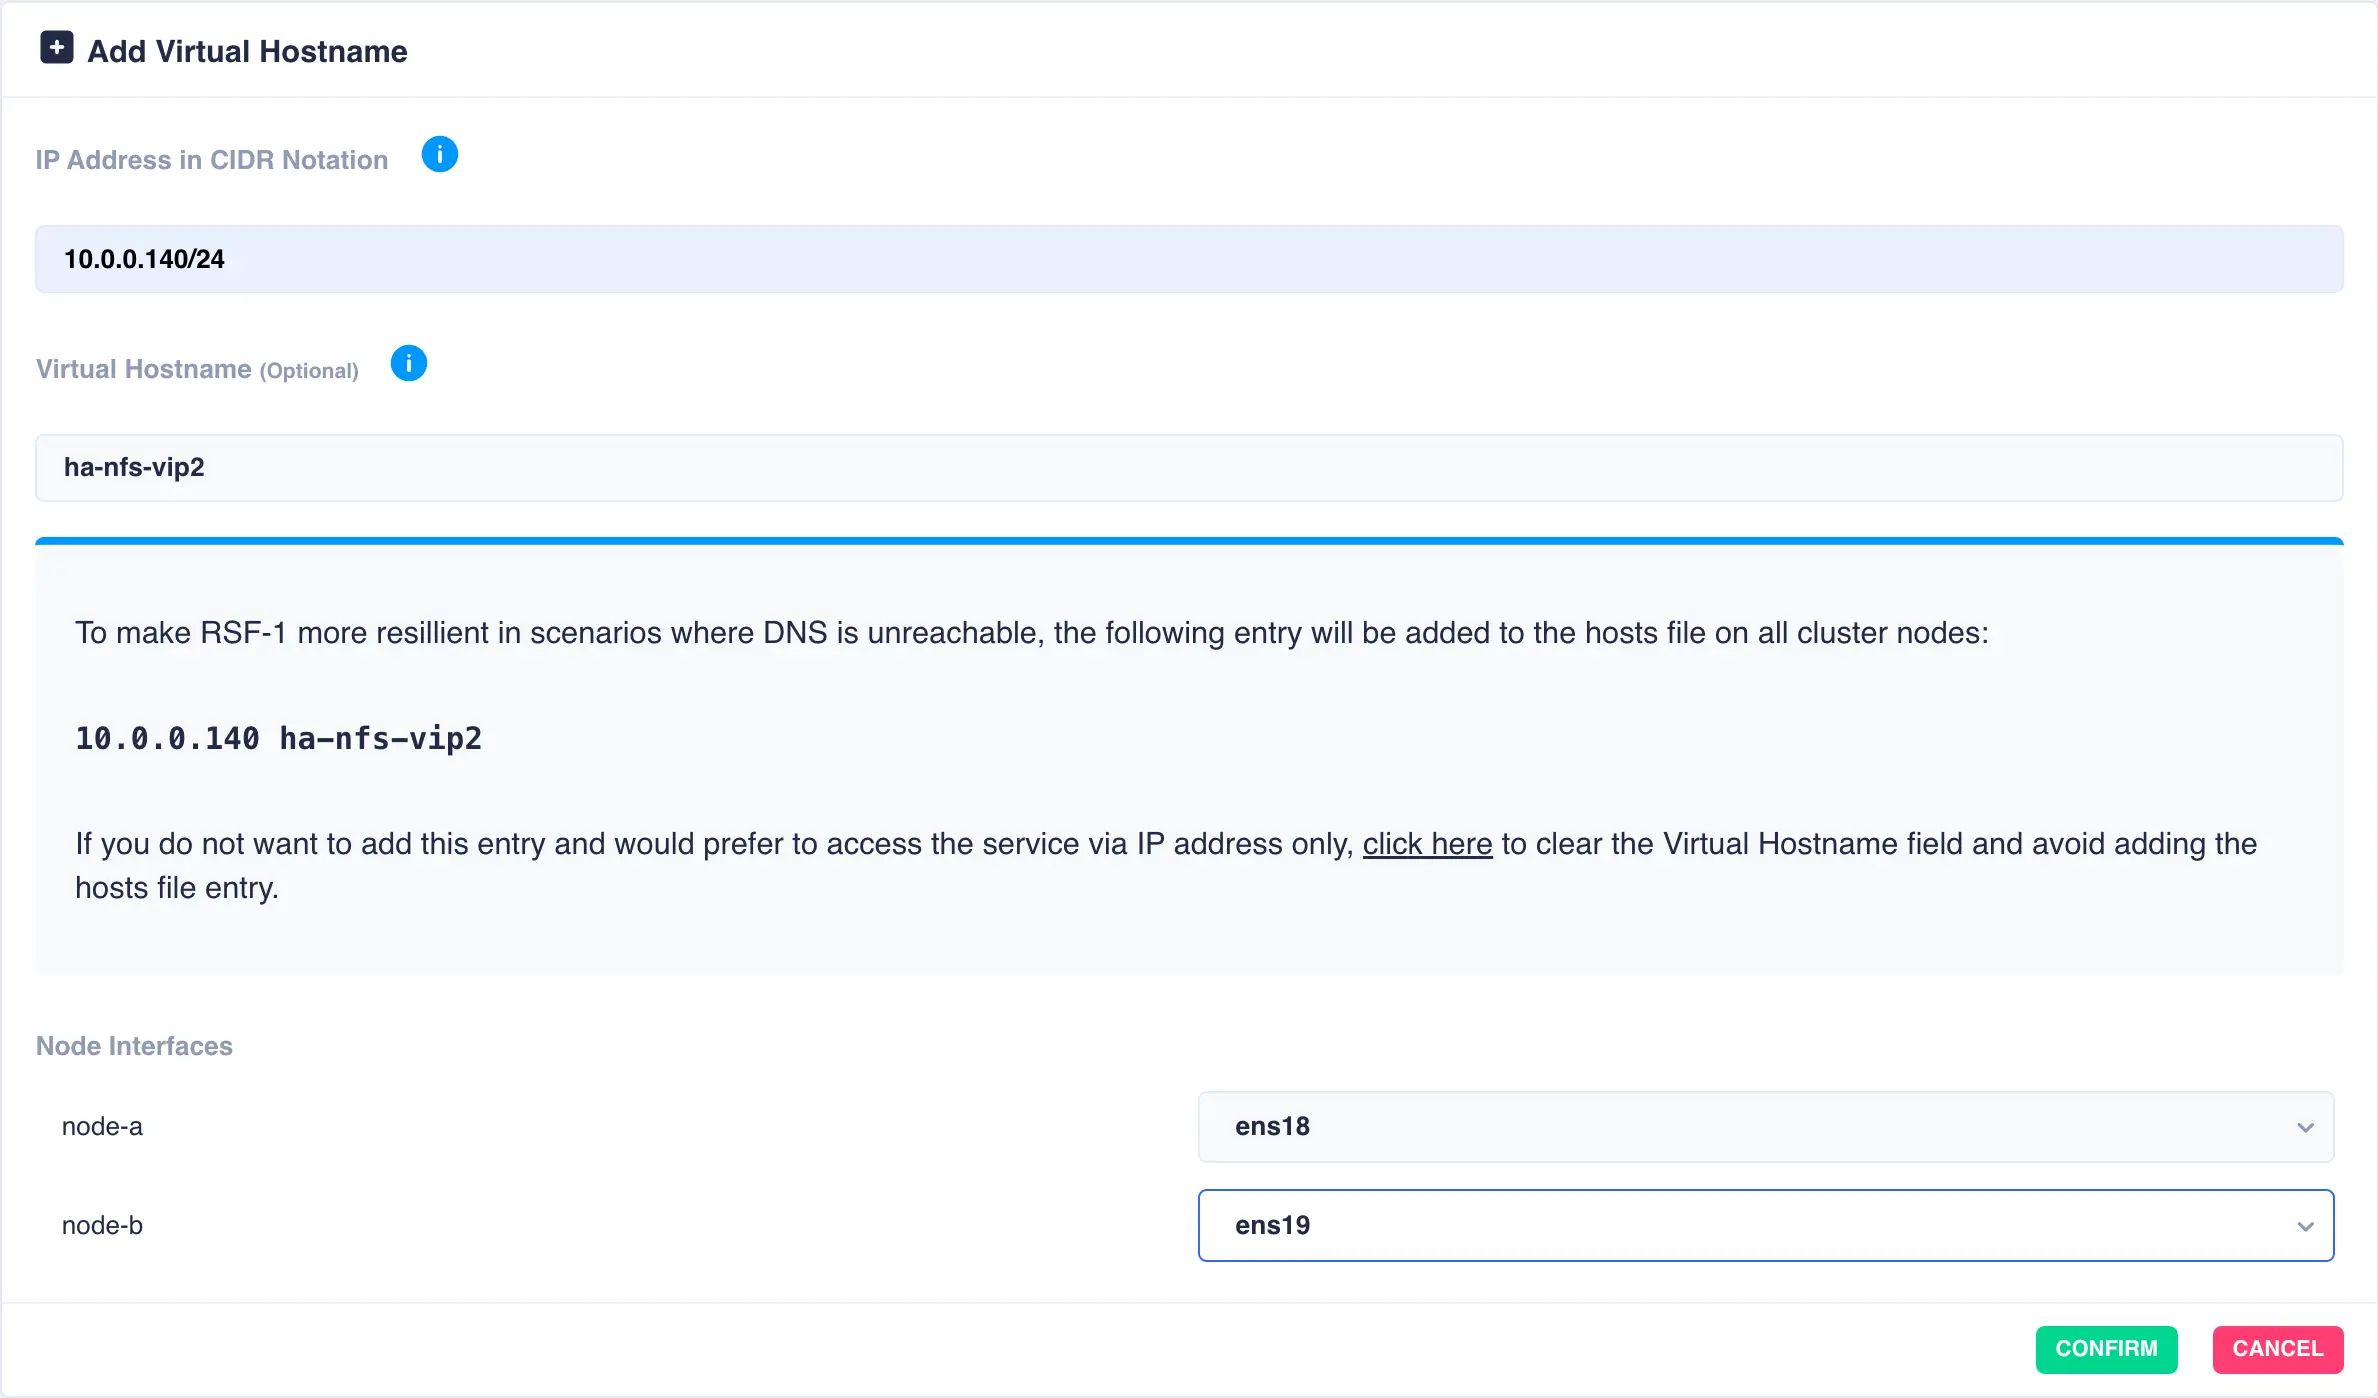
To add a new virtual IP to a service click the ADD VIP button and enter the IP address and optionally a
name. The interfaces on which to plumb in the new virtual IP can be selected from the drop down list:
Note
If required the cluster allows different interfaces to be selected for each node. In the above
example ens18 is the chosen interface for node-a, whilst for node-b the VIP will be plumbed in on
the interface ens19.
Click the confirm button to add the additional virtual IP:

Removing a Virtual IP
To remove a virtual IP from a service click the REMOVE button associated with the entry to be removed and confirm:

Destroy Cluster
Destroying a cluster removes the current cluster configuration and sets the nodes back to an uninitialised state.
Existing services will need to be removed from the cluster before the destroy operation can be performed -
use the ZFS -> Pools page to remove services. This step is necessary to ensure that pools are removed from the cluster
cleanly (i.e. removing any reservations etc.).
Note! pool data is unaffected
Destroying a cluster has no affect on existing pools/data and any cluster licenses will be preserved.
To destroy the cluster, acknowledge the confirmation slider and then click DESTROY:

Once DESTROY is clicked the cluster configuration will be cleared and the nodes will be available for re-clustering.
Datasets
Creating Datasets
ZFS uses datasets to organize and store data. A ZFS dataset is similar to a mounted filesystem and has its own set of properties, including a quota that limits the amount of data that can be stored. Datasets are organized in the ZFS hierarchy and can have different mountpoints.
The following steps will show the process of creating a dataset within clustered and non clustered pools.
Note
Datasets can only be created or edited on the node where the service is running.
-
To create a dataset navigate to
ZFS -> Datasetsand clickCREATE DATASET:
-
Select the
Parent Pooland enter aDataset Nameand set any options required: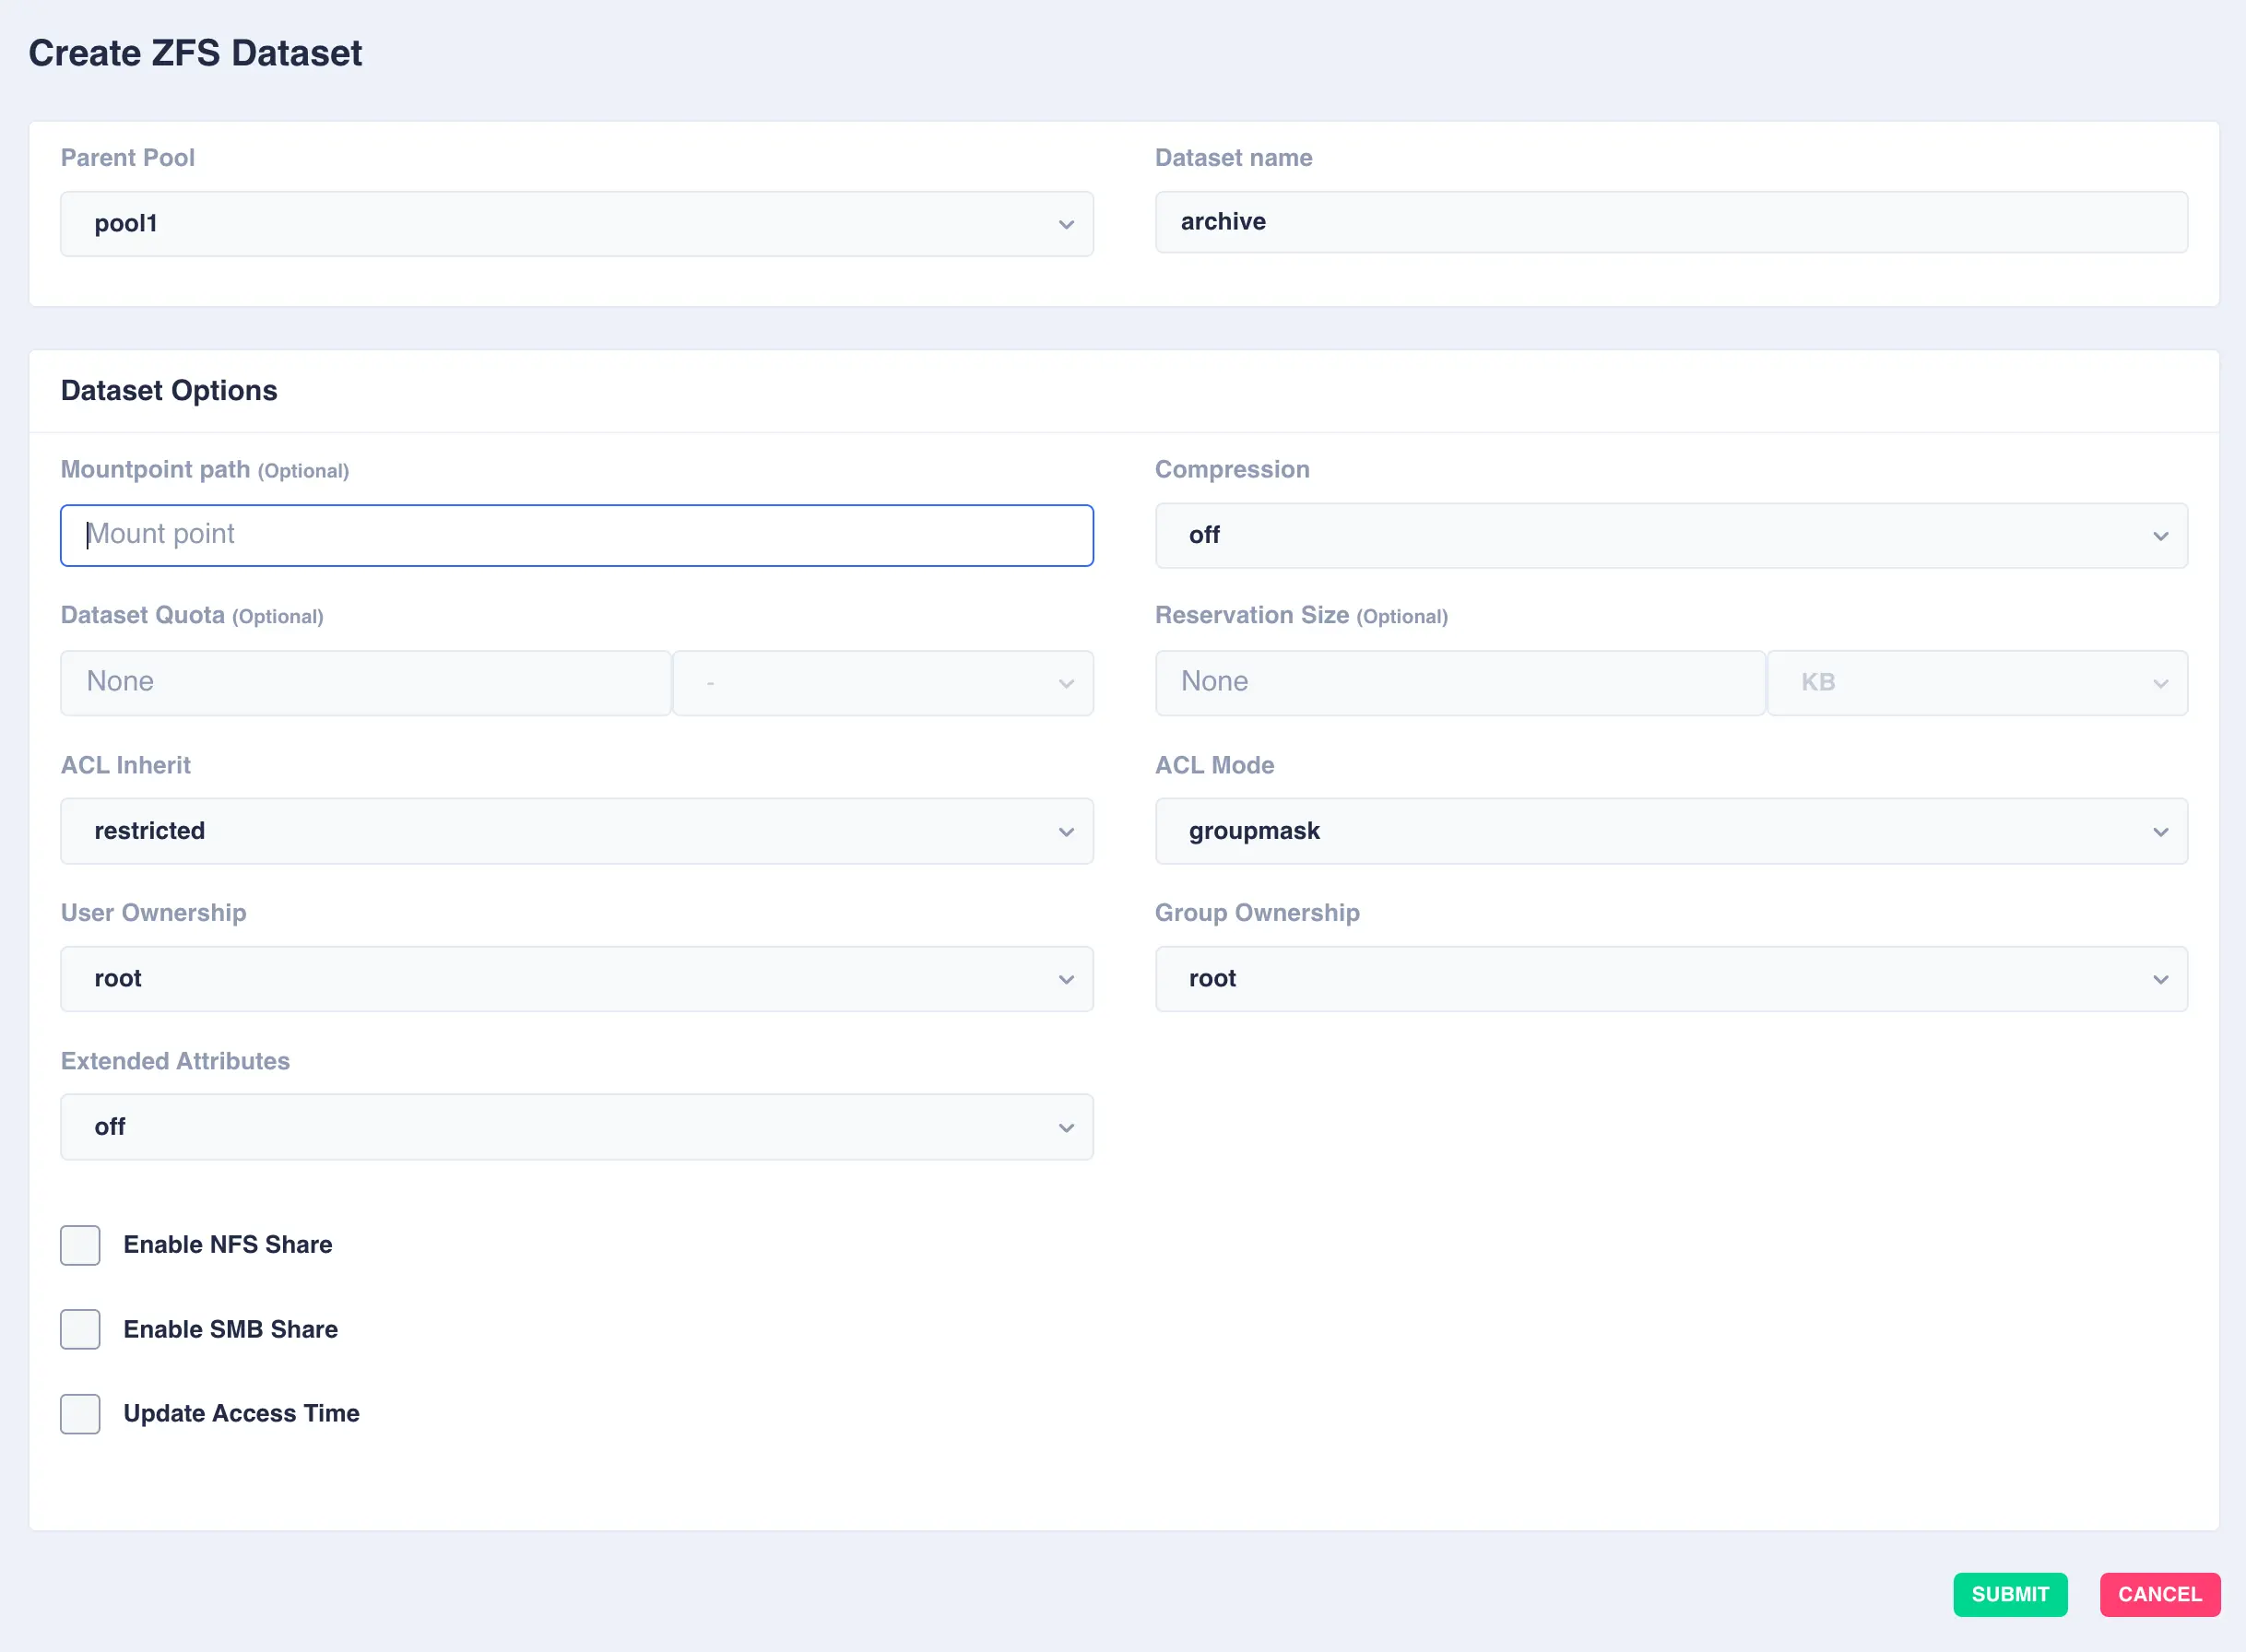
Available options:
OptionDescription Mountpoint pathAlternative path to mount the dataset or pool. Do not change the mountpoint of a clustered pool, doing this will break automatic failover CompressionEnable compression or select an alternative compression type (lz4/zstd) - on - The current default compression algorithm will be used (does not select a fixed compression type; as new compression algorithms are added to ZFS and enabled on a pool, the default compression algorithm may change).
- off - No compression.
- lz4 - A high-performance compression and decompression algorithm, as well as a moderately higher compression ratio than the older lzjb (the original compression algorithm).
- zstd - Provides both high compression ratios and good performance and is preferable over lz4.
Dataset QuotaSet a limit on the amount of disk space a file system can use. Reservation SizeGuarantee a specified amount of disk space is available to a file system. ACL InheritSetermine the behavior of ACL inheritance (i.e. how ACLs are inherited when files and directories are created). The following options are available: - discard - No ACL entries are inherited. The file or directory is created according to the client and protocol being used.
- noallow - Only inheritable ACL entries specifying deny permissions are inherited.
- restricted - Removes the write_acl and write_owner permissions when the ACL entry is inherited, but otherwise leaves inheritable ACL entries untouched. This is the default.
- passthrough - All inheritable ACL entries are inherited. The passthrough mode is typically used to cause all data files to be created with an identical mode in a directory tree. An administrator sets up ACL inheritance so that all files are created with a mode, such as 0664 or 0666.
- passthrough-x - Same as passthrough except that the owner, group, and everyone ACL entries inherit the execute permission only if the file creation mode also requests the execute bit. The passthrough setting works as expected for data files, but you might want to optionally include the execute bit from the file creation mode into the inherited ACL. One example is an output file that is generated from tools, such as cc or gcc. If the inherited ACL does not include the execute bit, then the output executable from the compiler won't be executable until you use chmod(1) to change the file's permissions.
ACL ModeModify ACL behavior whenever a file or directory's mode is modified by the chmod command or when a file is initially created. - discard - All ACL entries are removed except for the entries needed to define the mode of the file or directory.
- groupmask - User or group ACL permissions are reduced so that they are no greater than the group permission bits, unless it is a user entry that has the same UID as the owner of the file or directory. Then, the ACL permissions are reduced so that they are no greater than owner permission bits.
- passthrough - During a chmod operation, ACEs other than owner@, group@, or everyone@ are not modified in any way. ACEs with owner@, group@, or everyone@ are disabled to set the file mode as requested by the chmod operation.
User OwnershipSets the ownership of the dataset Group OwnershipSets the group ownership of the dataset Extended AttributesControls whether extended attributes are enabled for this file system. Two styles of extended attributes are supported: either directory-based or system-attribute-based. - off - Extended attributes are disabled
- on - Extended attributes are enabled; the default value of on enables directory-based extended attributes.
- sa - System based attributes
- dir - Directory based attributes
Enable NFS Shareenable NFS sharing dataset via ZFS. Do not enable if managing Shares via the WebApp. Enable SMB Shareenable SMB sharing dataset via ZFS. Do not enable if managing Shares via the WebApp. Update Access Timecontrols whether the access time for files is updated on read. Leaving this setting off will improve the datasets performance. What is an ACL
An ACL is a list of user permissions for a file, folder, or other data object. The entries in an ACL specify which users and groups can access something and what actions they may perform.
What are Extended Attributes
Extended file attributes are file system features that enable additional attributes to be associated with computer files as metadata not interpreted by the filesystem, whereas regular attributes have a purpose strictly defined by the filesystem.
In ZFS directory based extended attributes (
dir) imposes no practical limit on either the size or number of attributes which can be set on a file. Although under Linux the getxattr(2) and setxattr(2) system calls limit the maximum size to 64K. This is the most compatible style of extended attribute and is supported by all ZFS implementations.With system extended attributes (
sa) the key advantage is improved performance. Storing extended attributes as system attributes significantly decreases the amount of disk I/O required. Up to 64K of data may be stored per-file in the space reserved for system attributes. If there is not enough space available for an extended attribute then it will be automatically written as a directory-based xattr. System-attribute-based extended attributes are not accessible on platforms which do not support the xattr=sa feature. OpenZFS supports xattr=sa on both FreeBSD and Linux. -
Click
SUBMITto create - the Dataset is now created in the pool:
Modifying Datasets
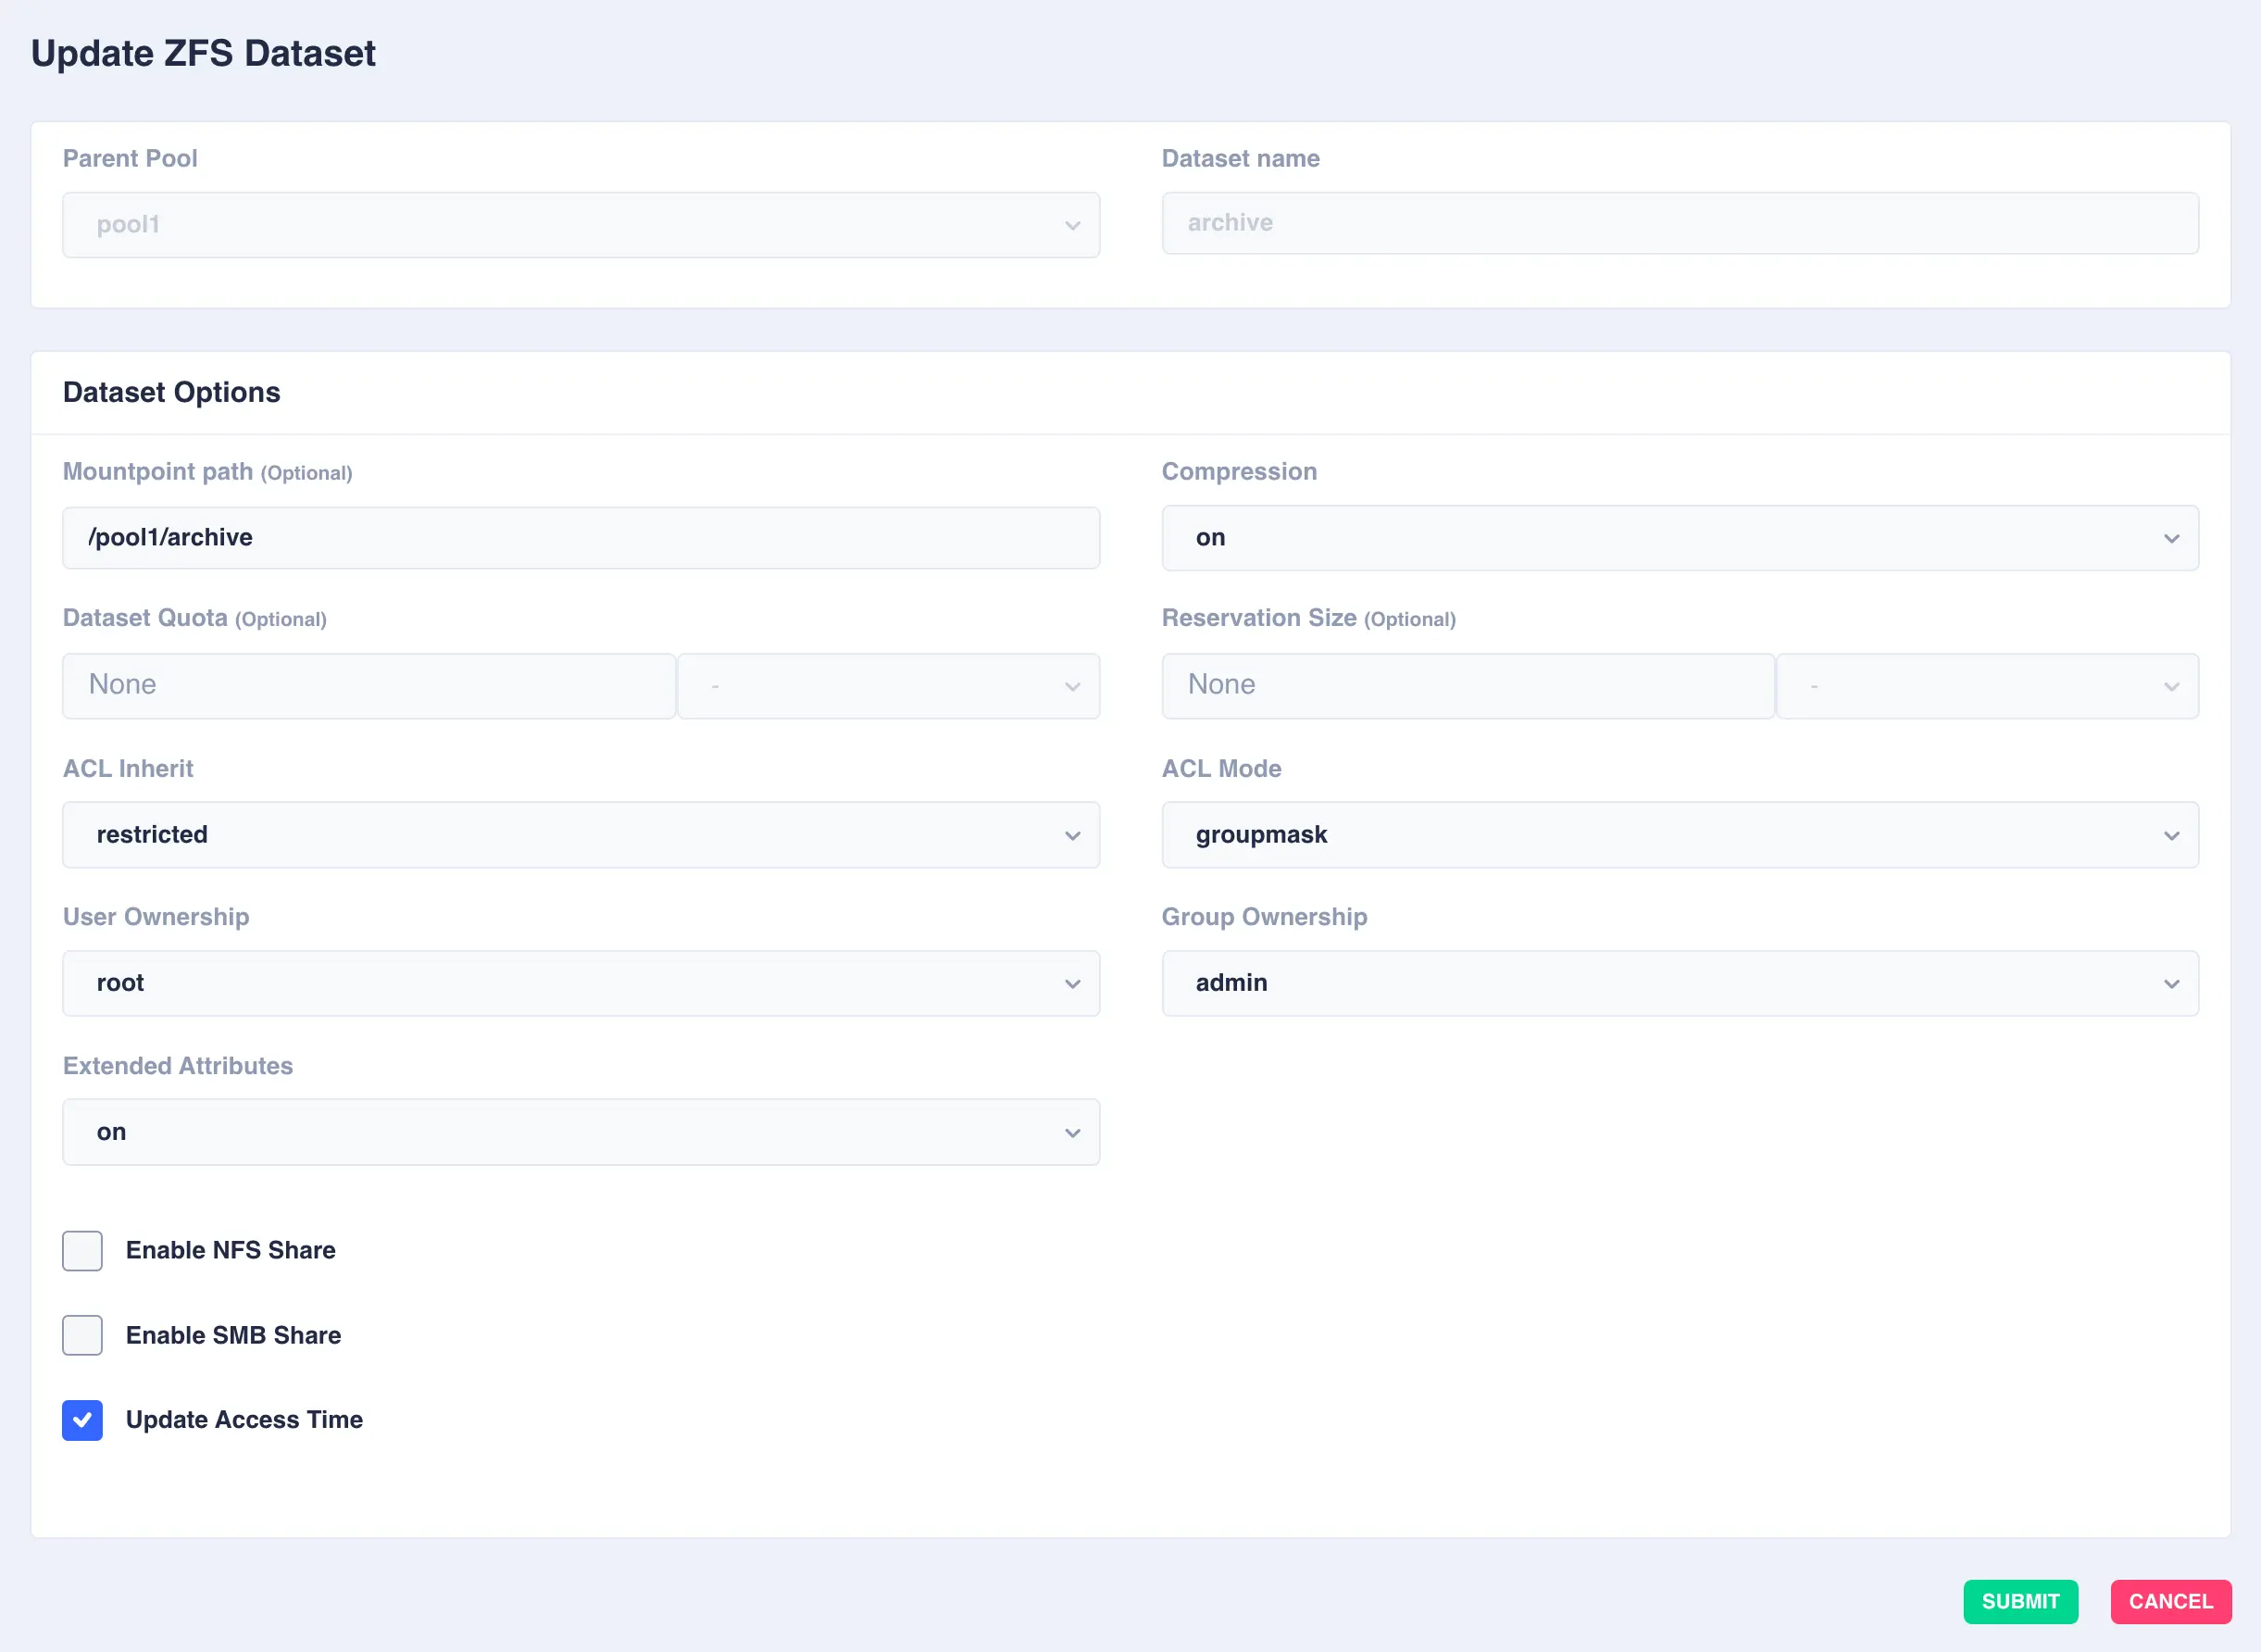
To modify an existing dataset, click the ![]() icon to the right of the dataset:
icon to the right of the dataset:
Deleting Datasets
To delete a dataset, click the ![]() icon to the right of the dataset and confirm
by clicking the
icon to the right of the dataset and confirm
by clicking the REMOVE DATASET option.
Pools
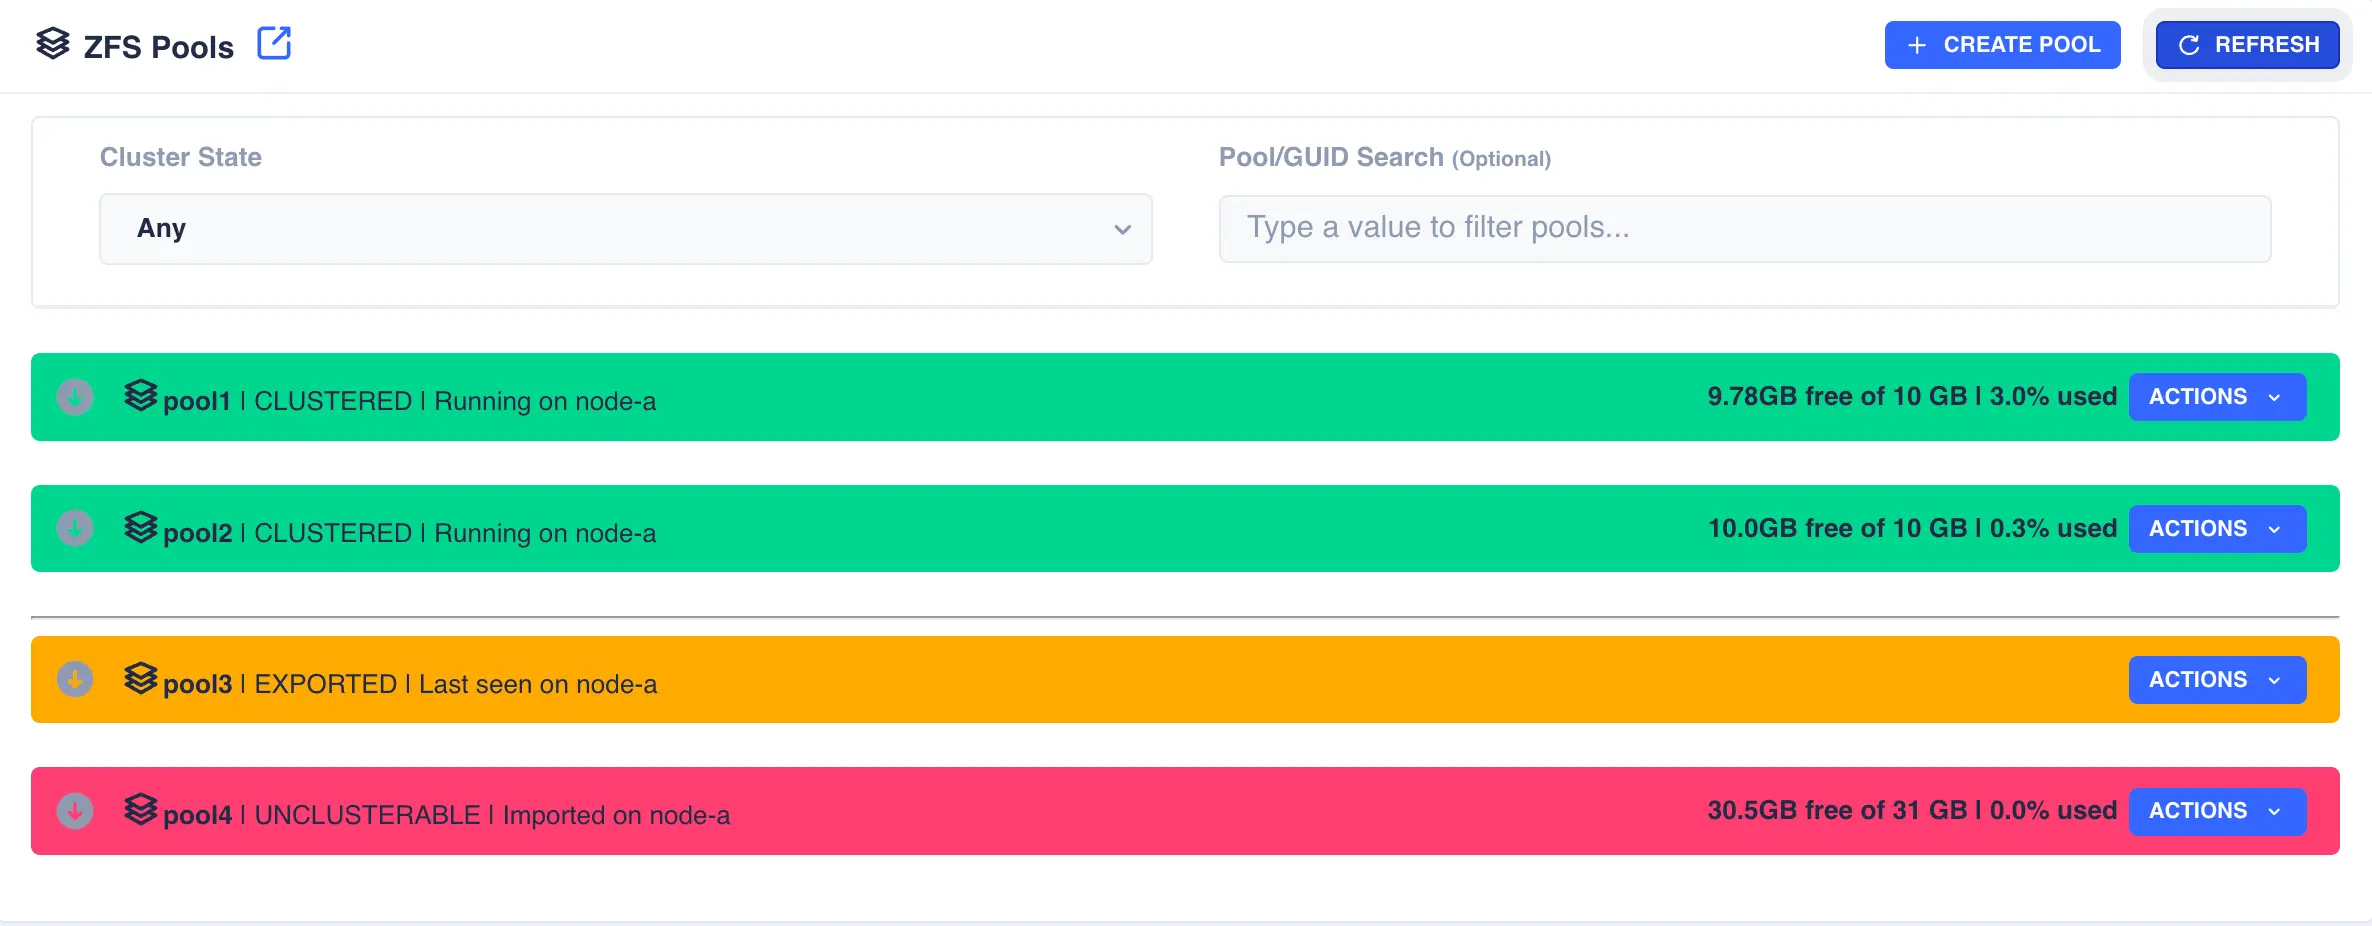
The Pools page is used to both create zpools and to cluster them to create a service. The main page shows the pools discovered on a local node:
Clusterable pools
For shared storage all of a pools devices must be accessible by both nodes in the cluster; this is normally achieved using SAS drives in a JBOD connected to both nodes (commonly referred to as a Dual Ported JBOD).
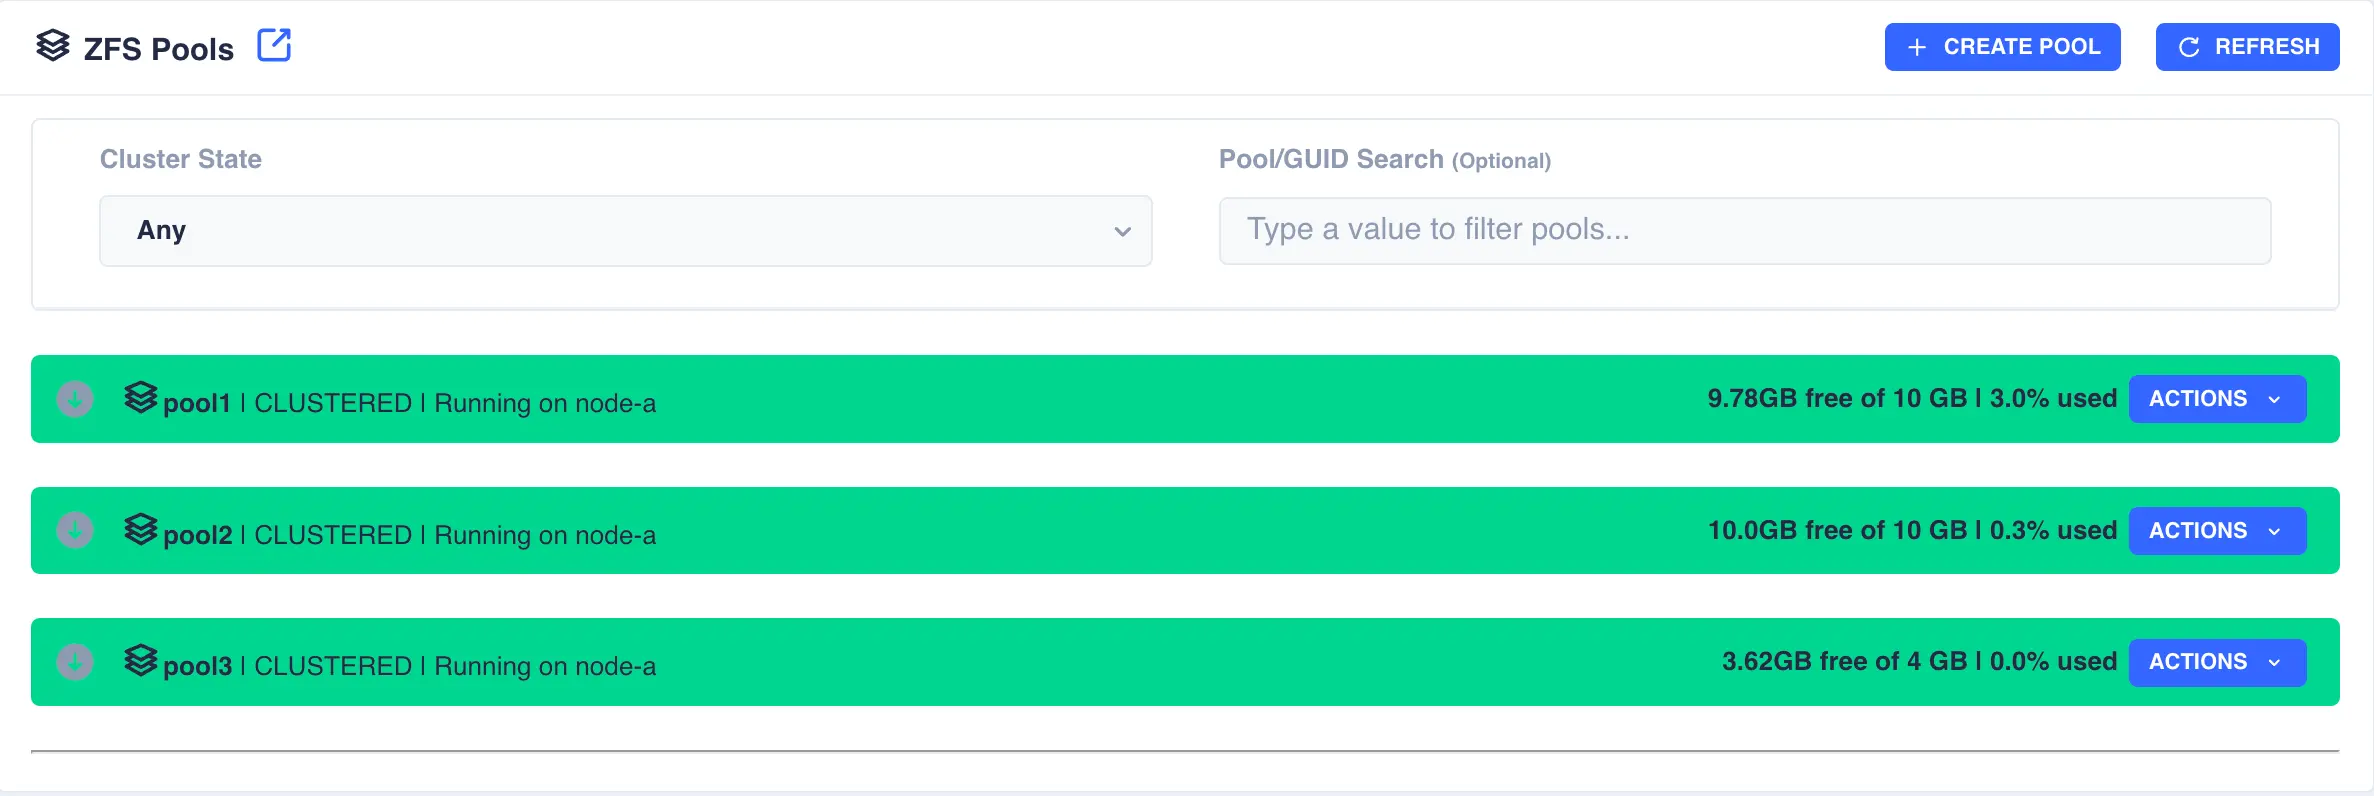
In the above example pools pool1 and pool2 are both clustered and running on node-a, pool3 is an exported, unclustered pool
and poollocal is only visible to node-a and therefore cannot be clustered.
Creating a Pool
To create a zpool click the + CREATE POOL button on the main pools page. You will then be presented with
the pool configuration page:
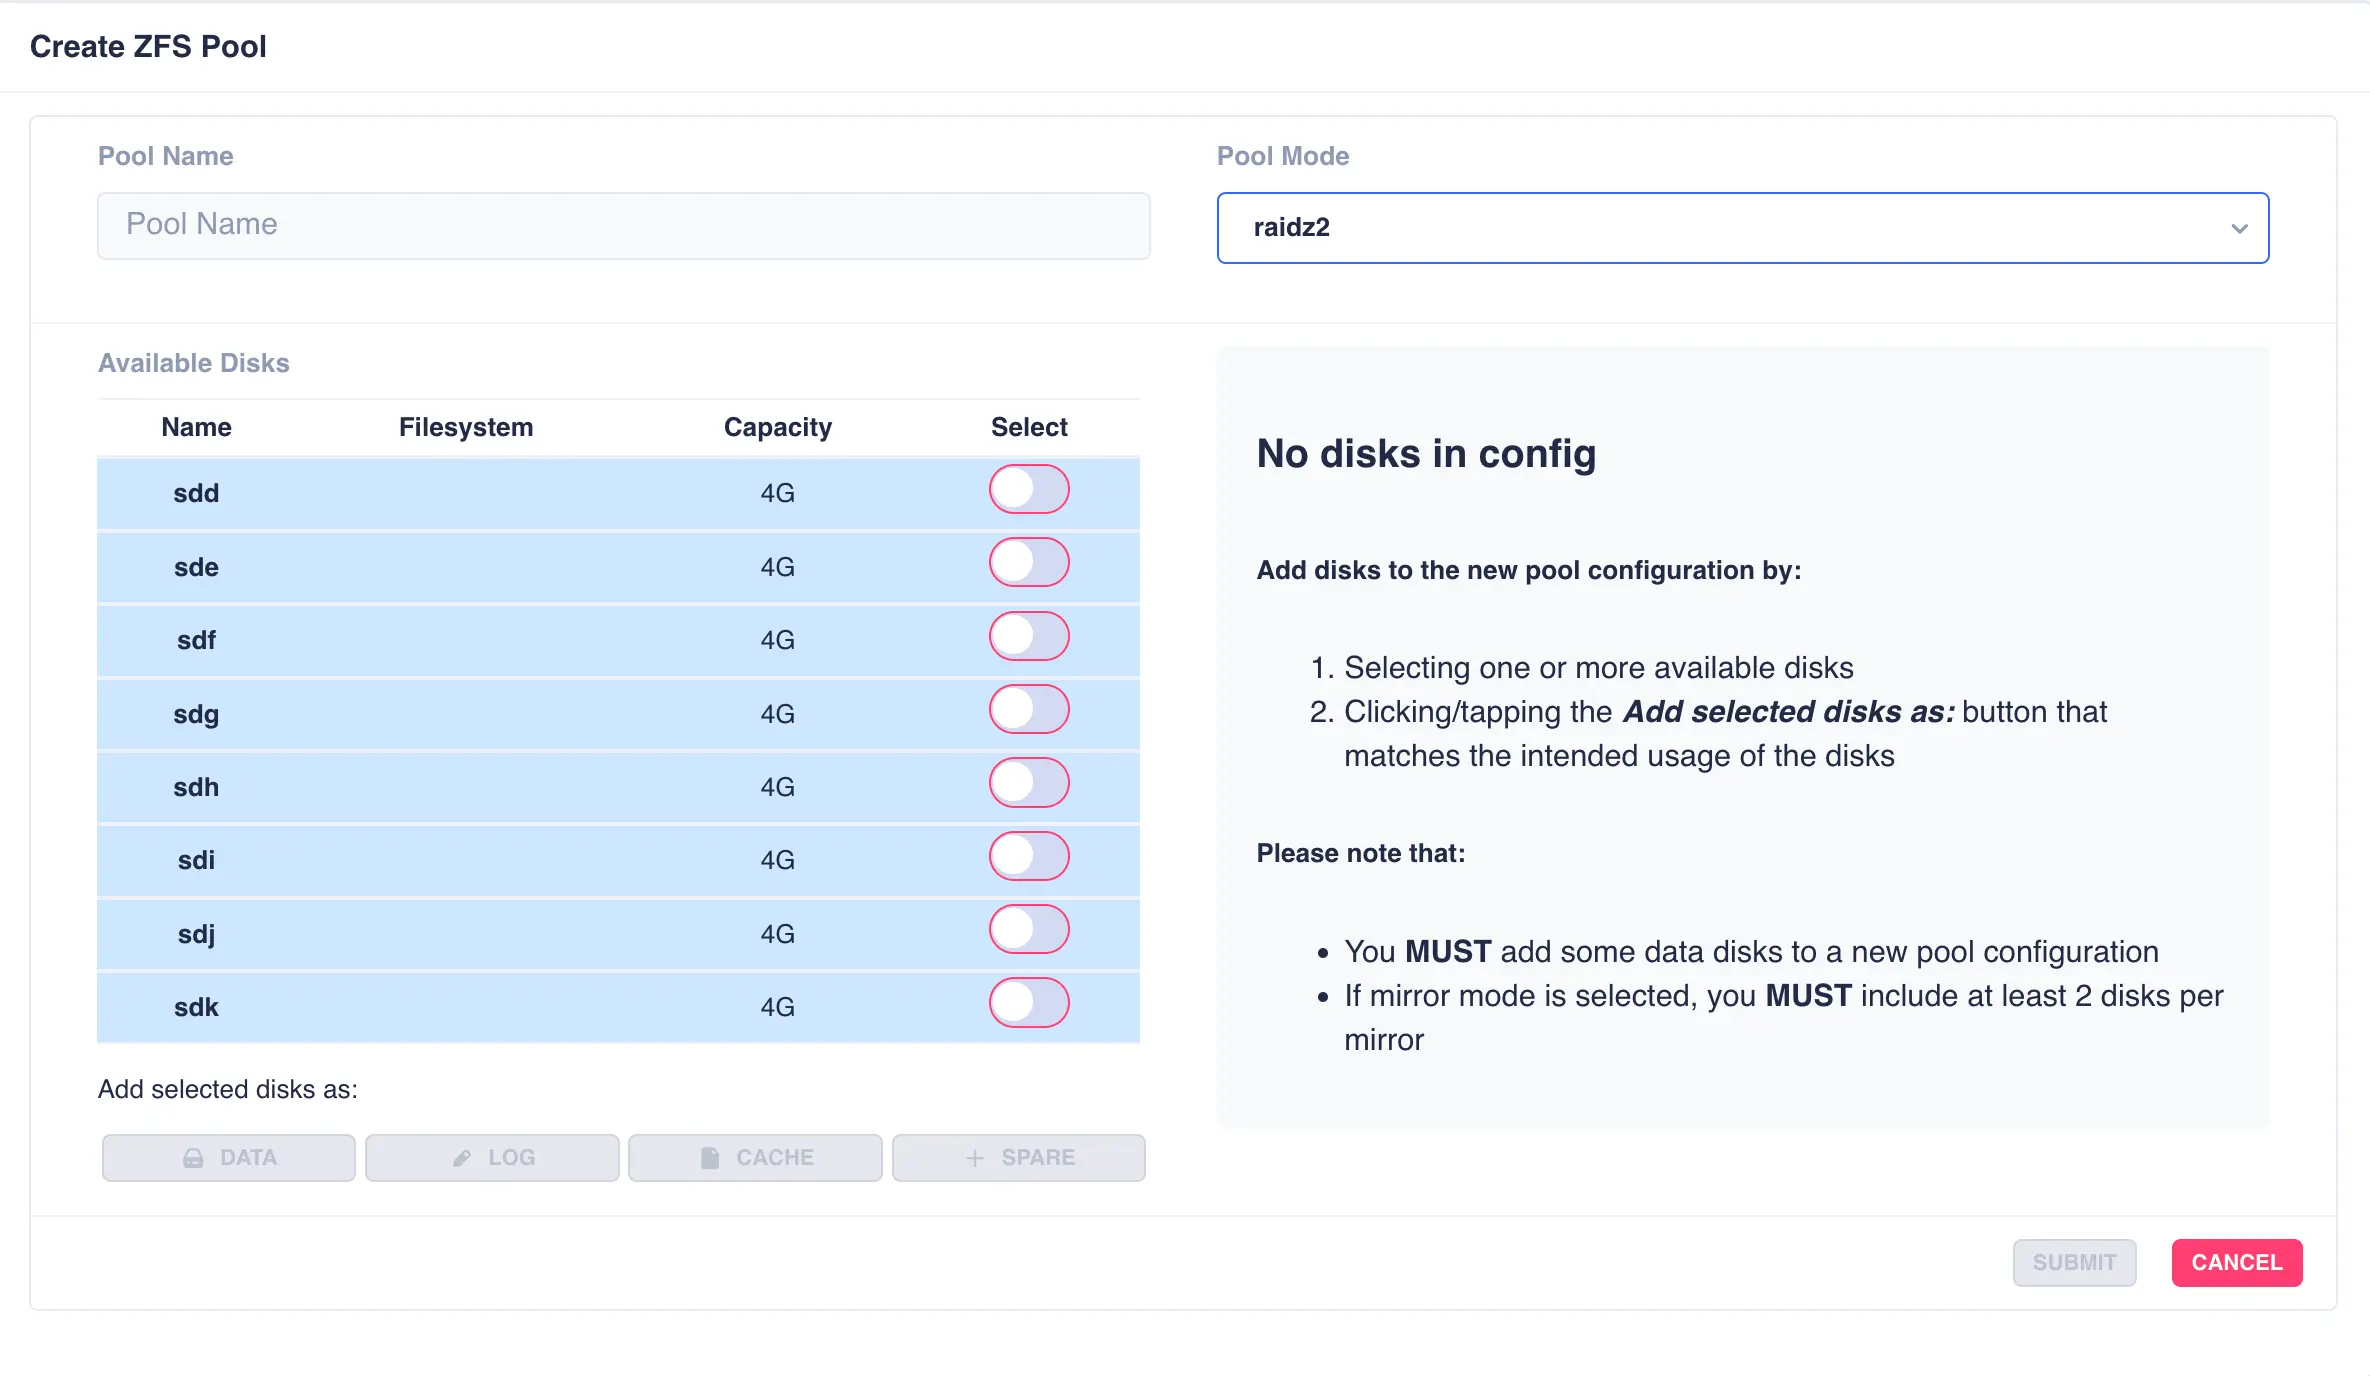
Fill out the Pool name field and select the desired structure of the pool from the Pool Mode list.
The cluster supports three types of layout when creating vdevs for a pool:
raidz2- Two of the drives are used as parity drives, meaning up to two drives can be lost in the vdev without impacting the pool. When striping raidz2 vdevs together each vdev can survive the loss of two of its members.mirror- Each drive in the vdev will be mirrored to another drive in the same vdev. Vdevs can then be striped together to build up a mirrored pool.jbod- Creates a simple pool of striped disks with no redundancy.
RAIDZ2 Pool
For this example a RAIDZ2 pool consisting of two five drive vdevs striped together, a log, a cache and a spare will be created. Five disks are selected for the first vdev, the desired Pool Name entered and raidz2 chosen from the Pool Mode list:
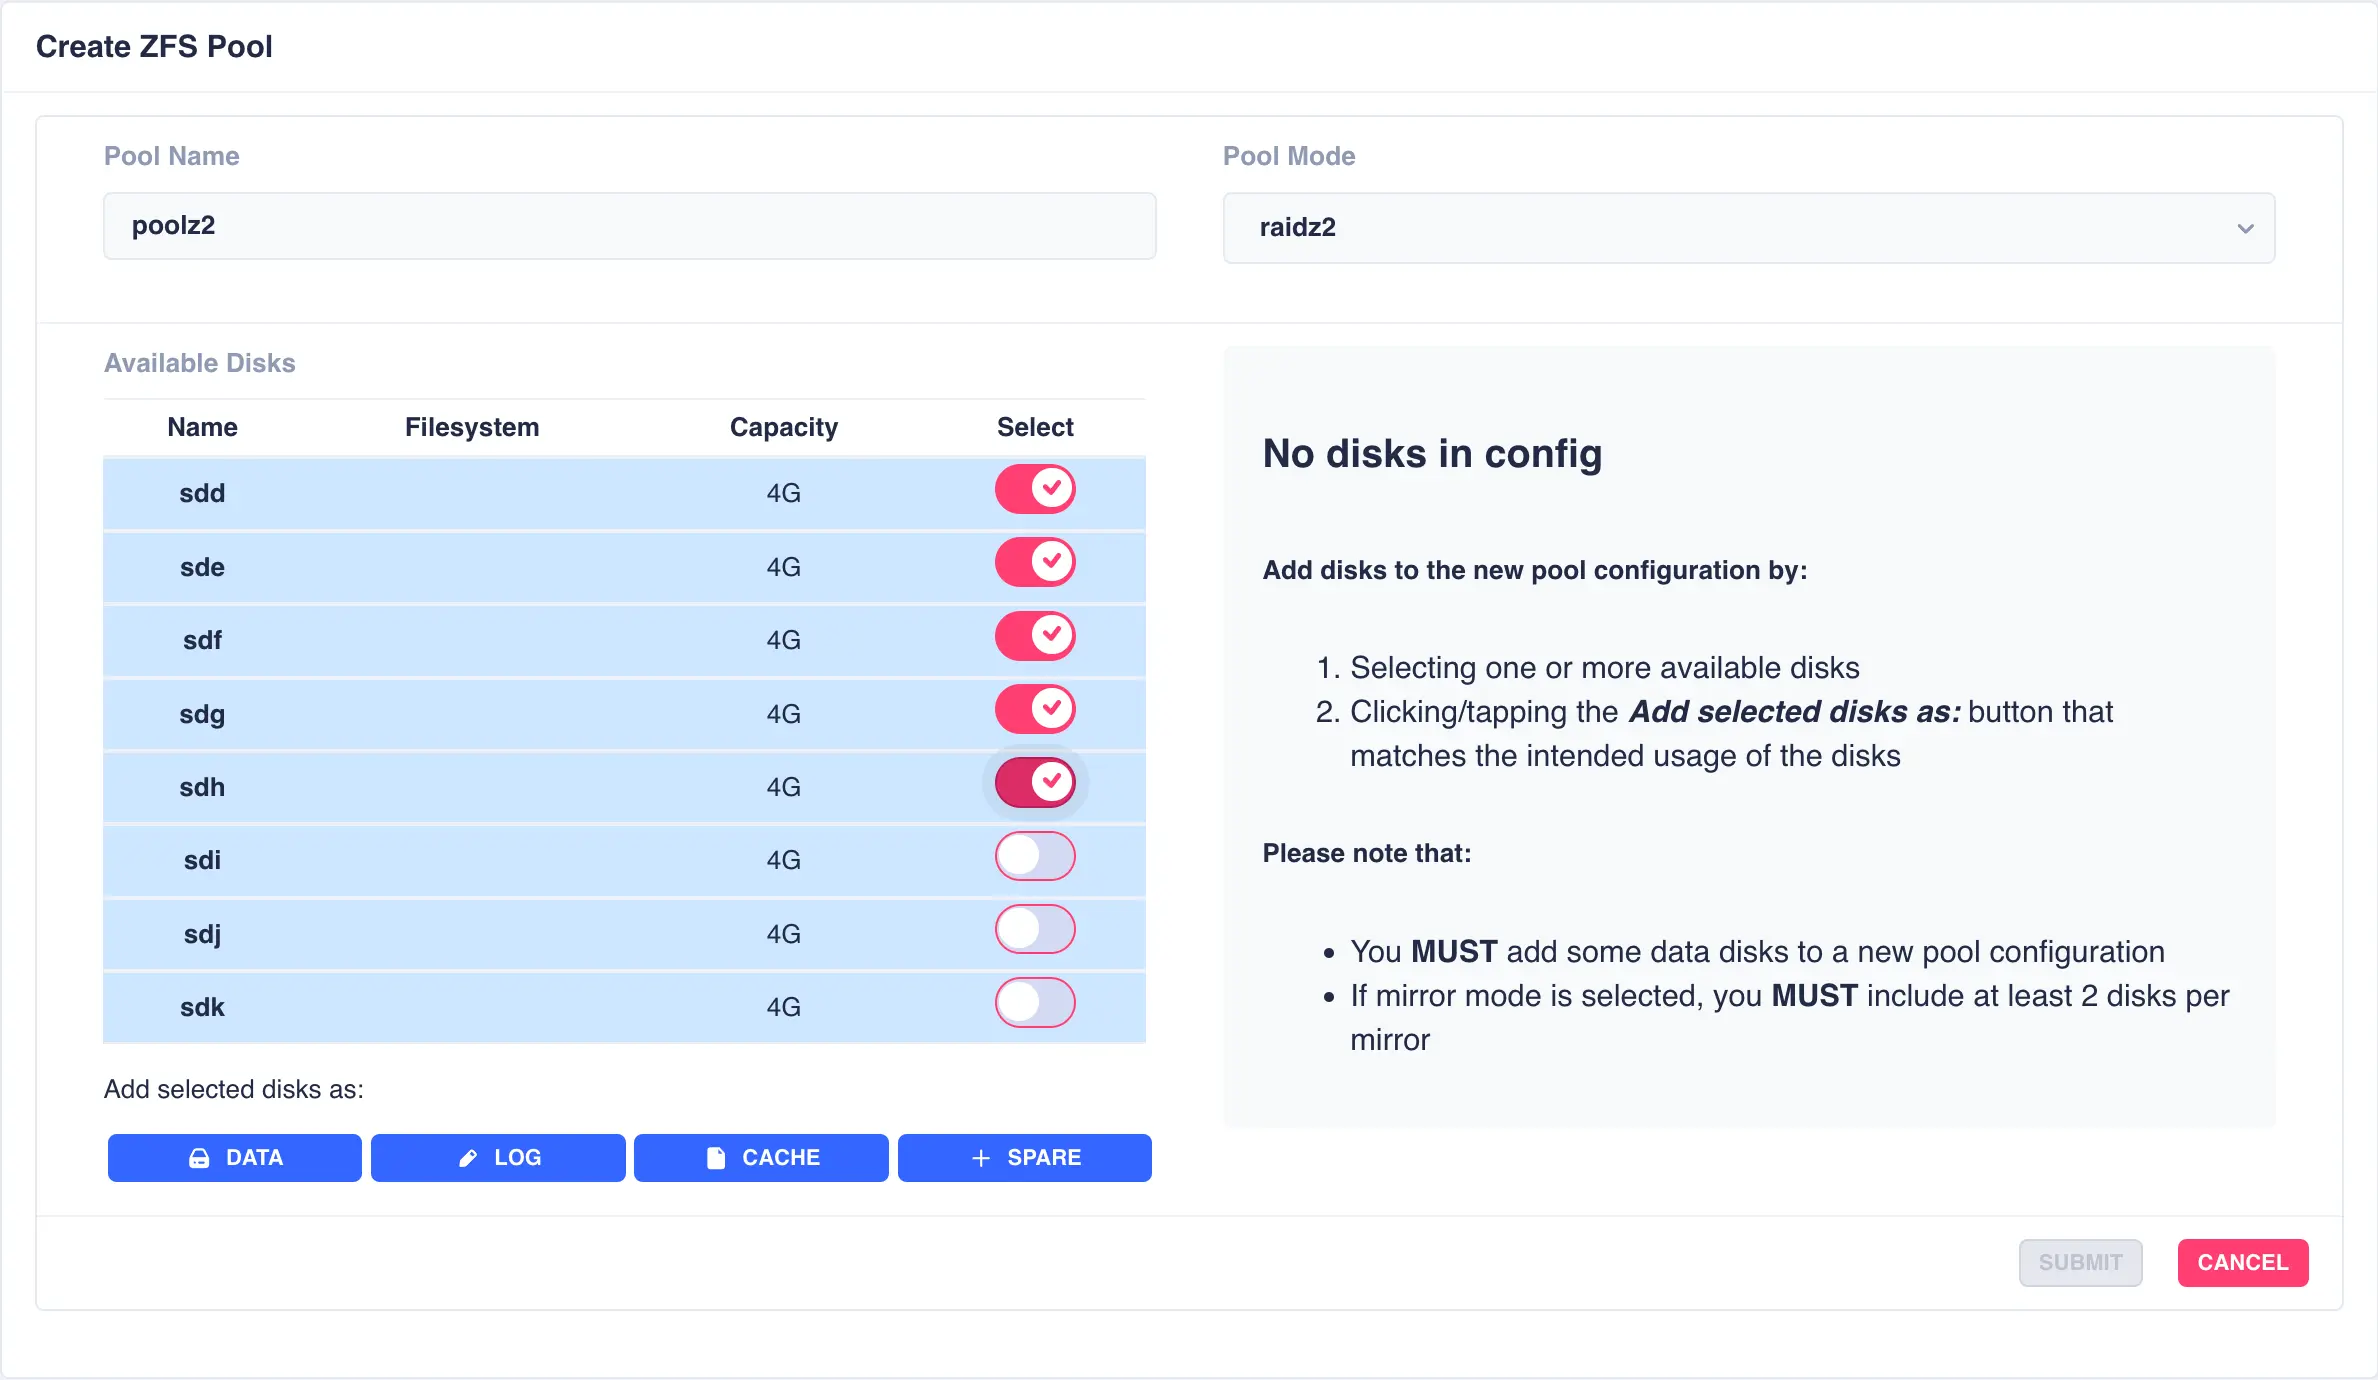
Click on DATA from the Add selected disks menu to configure the first vdev:
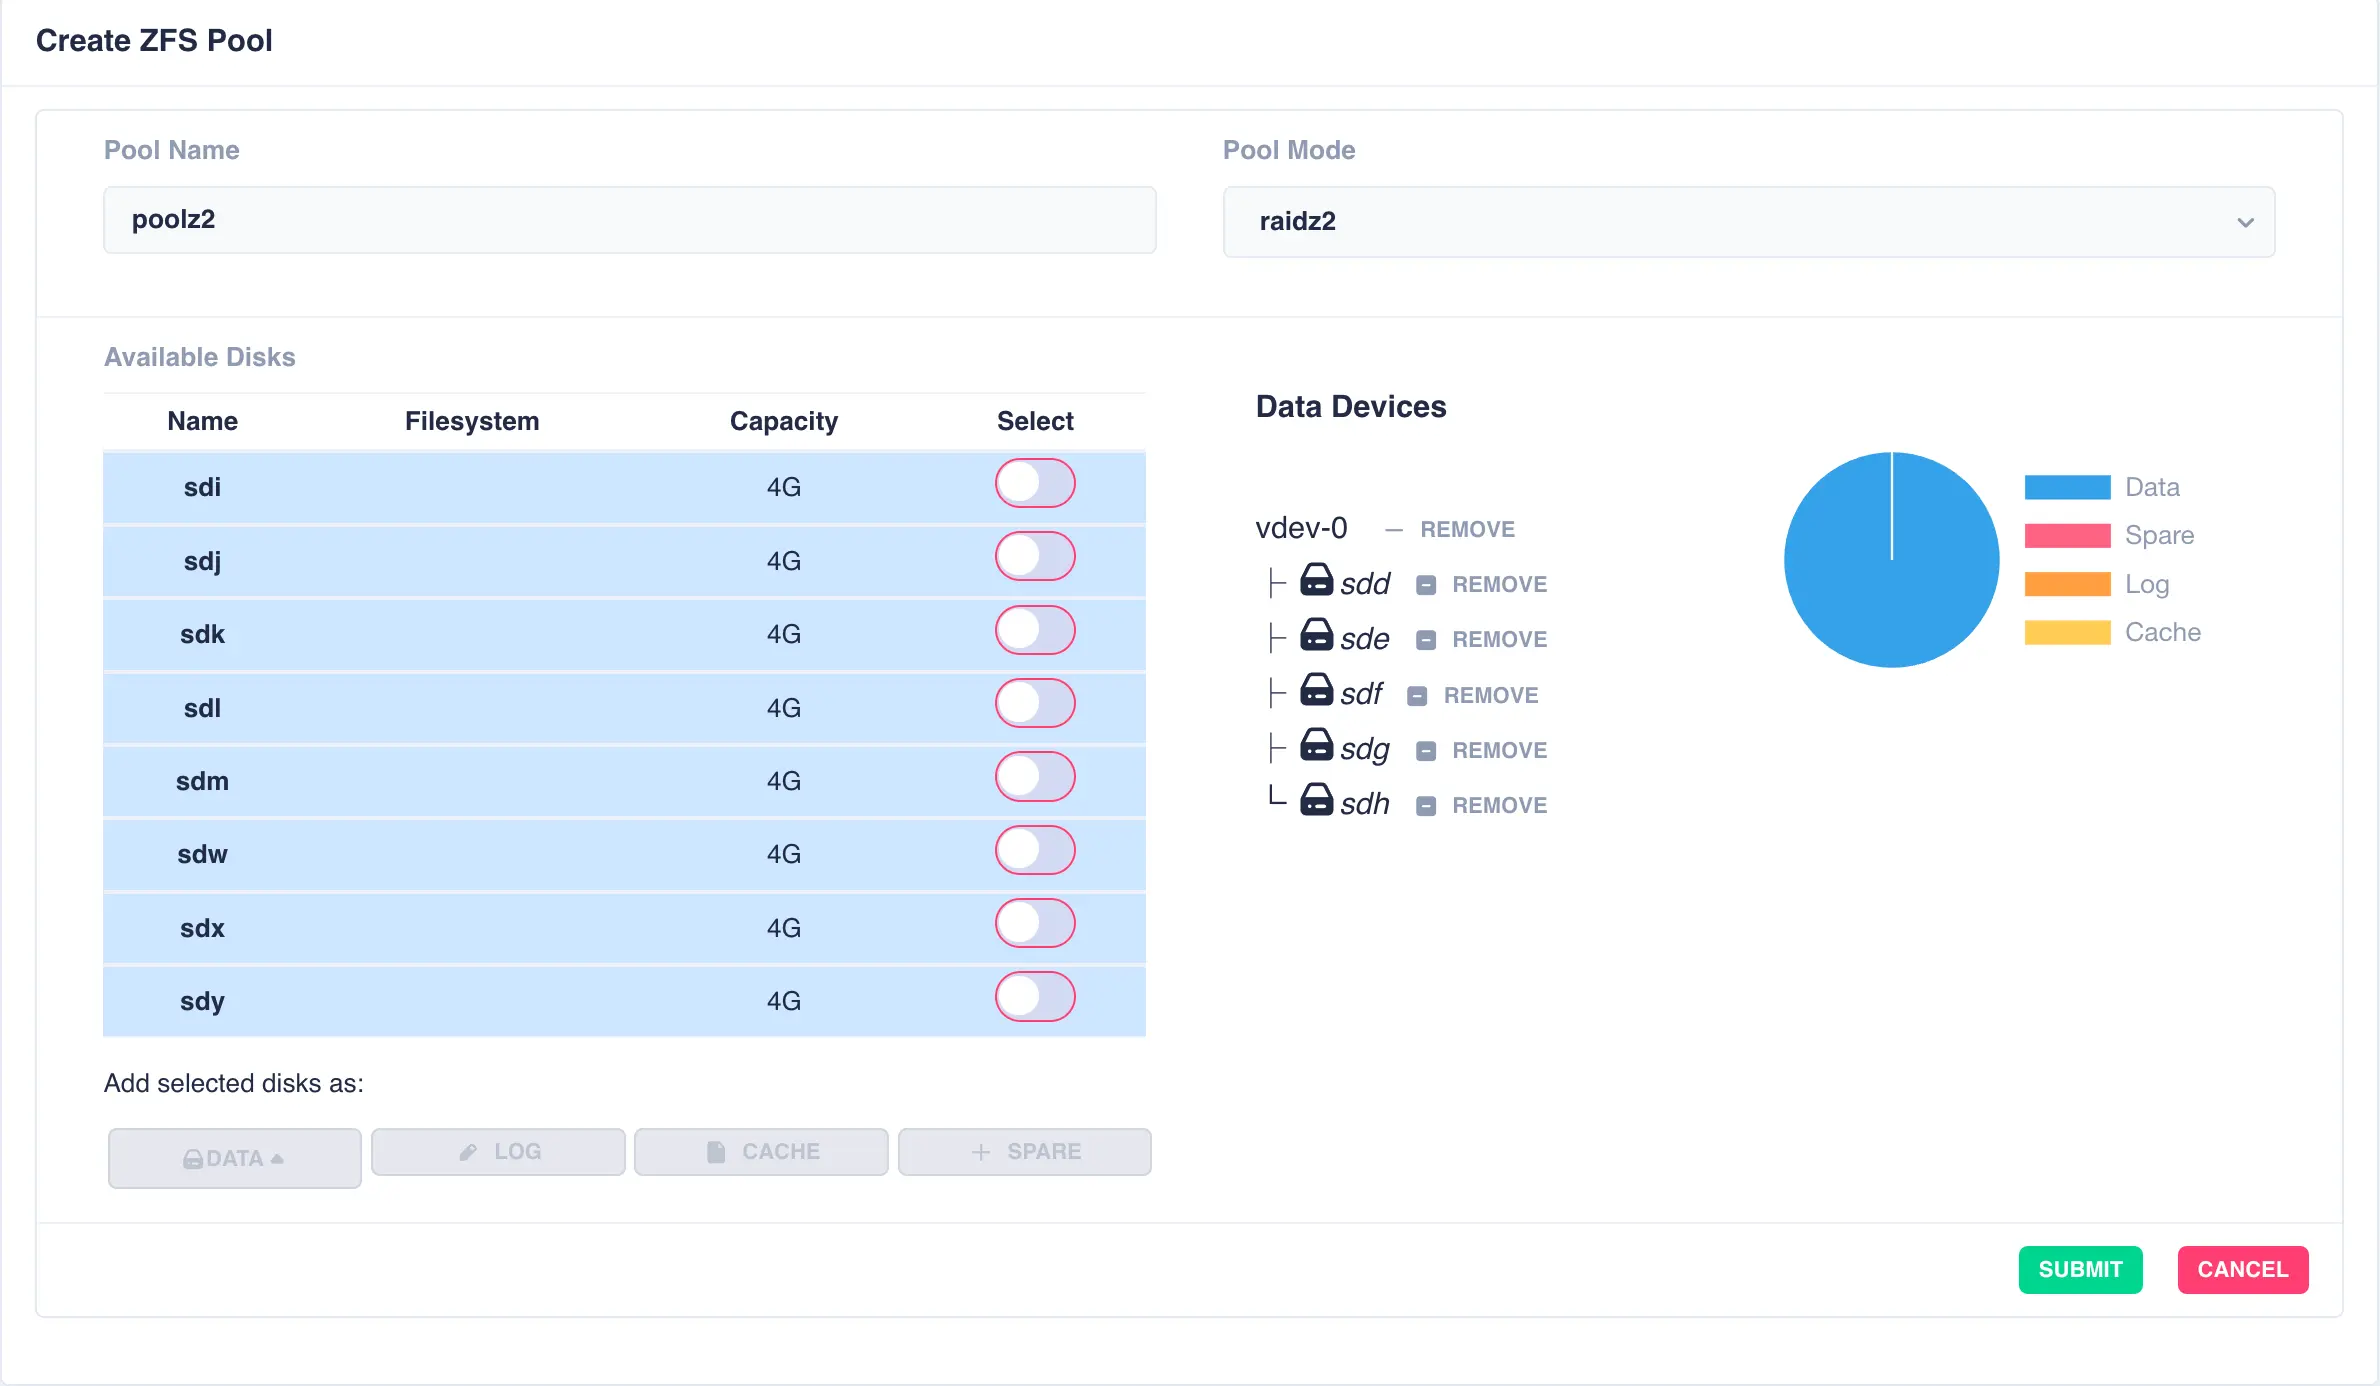
Next the second vdev is added, again using five drives, but this time selecting + New vdev from the DATA menu:
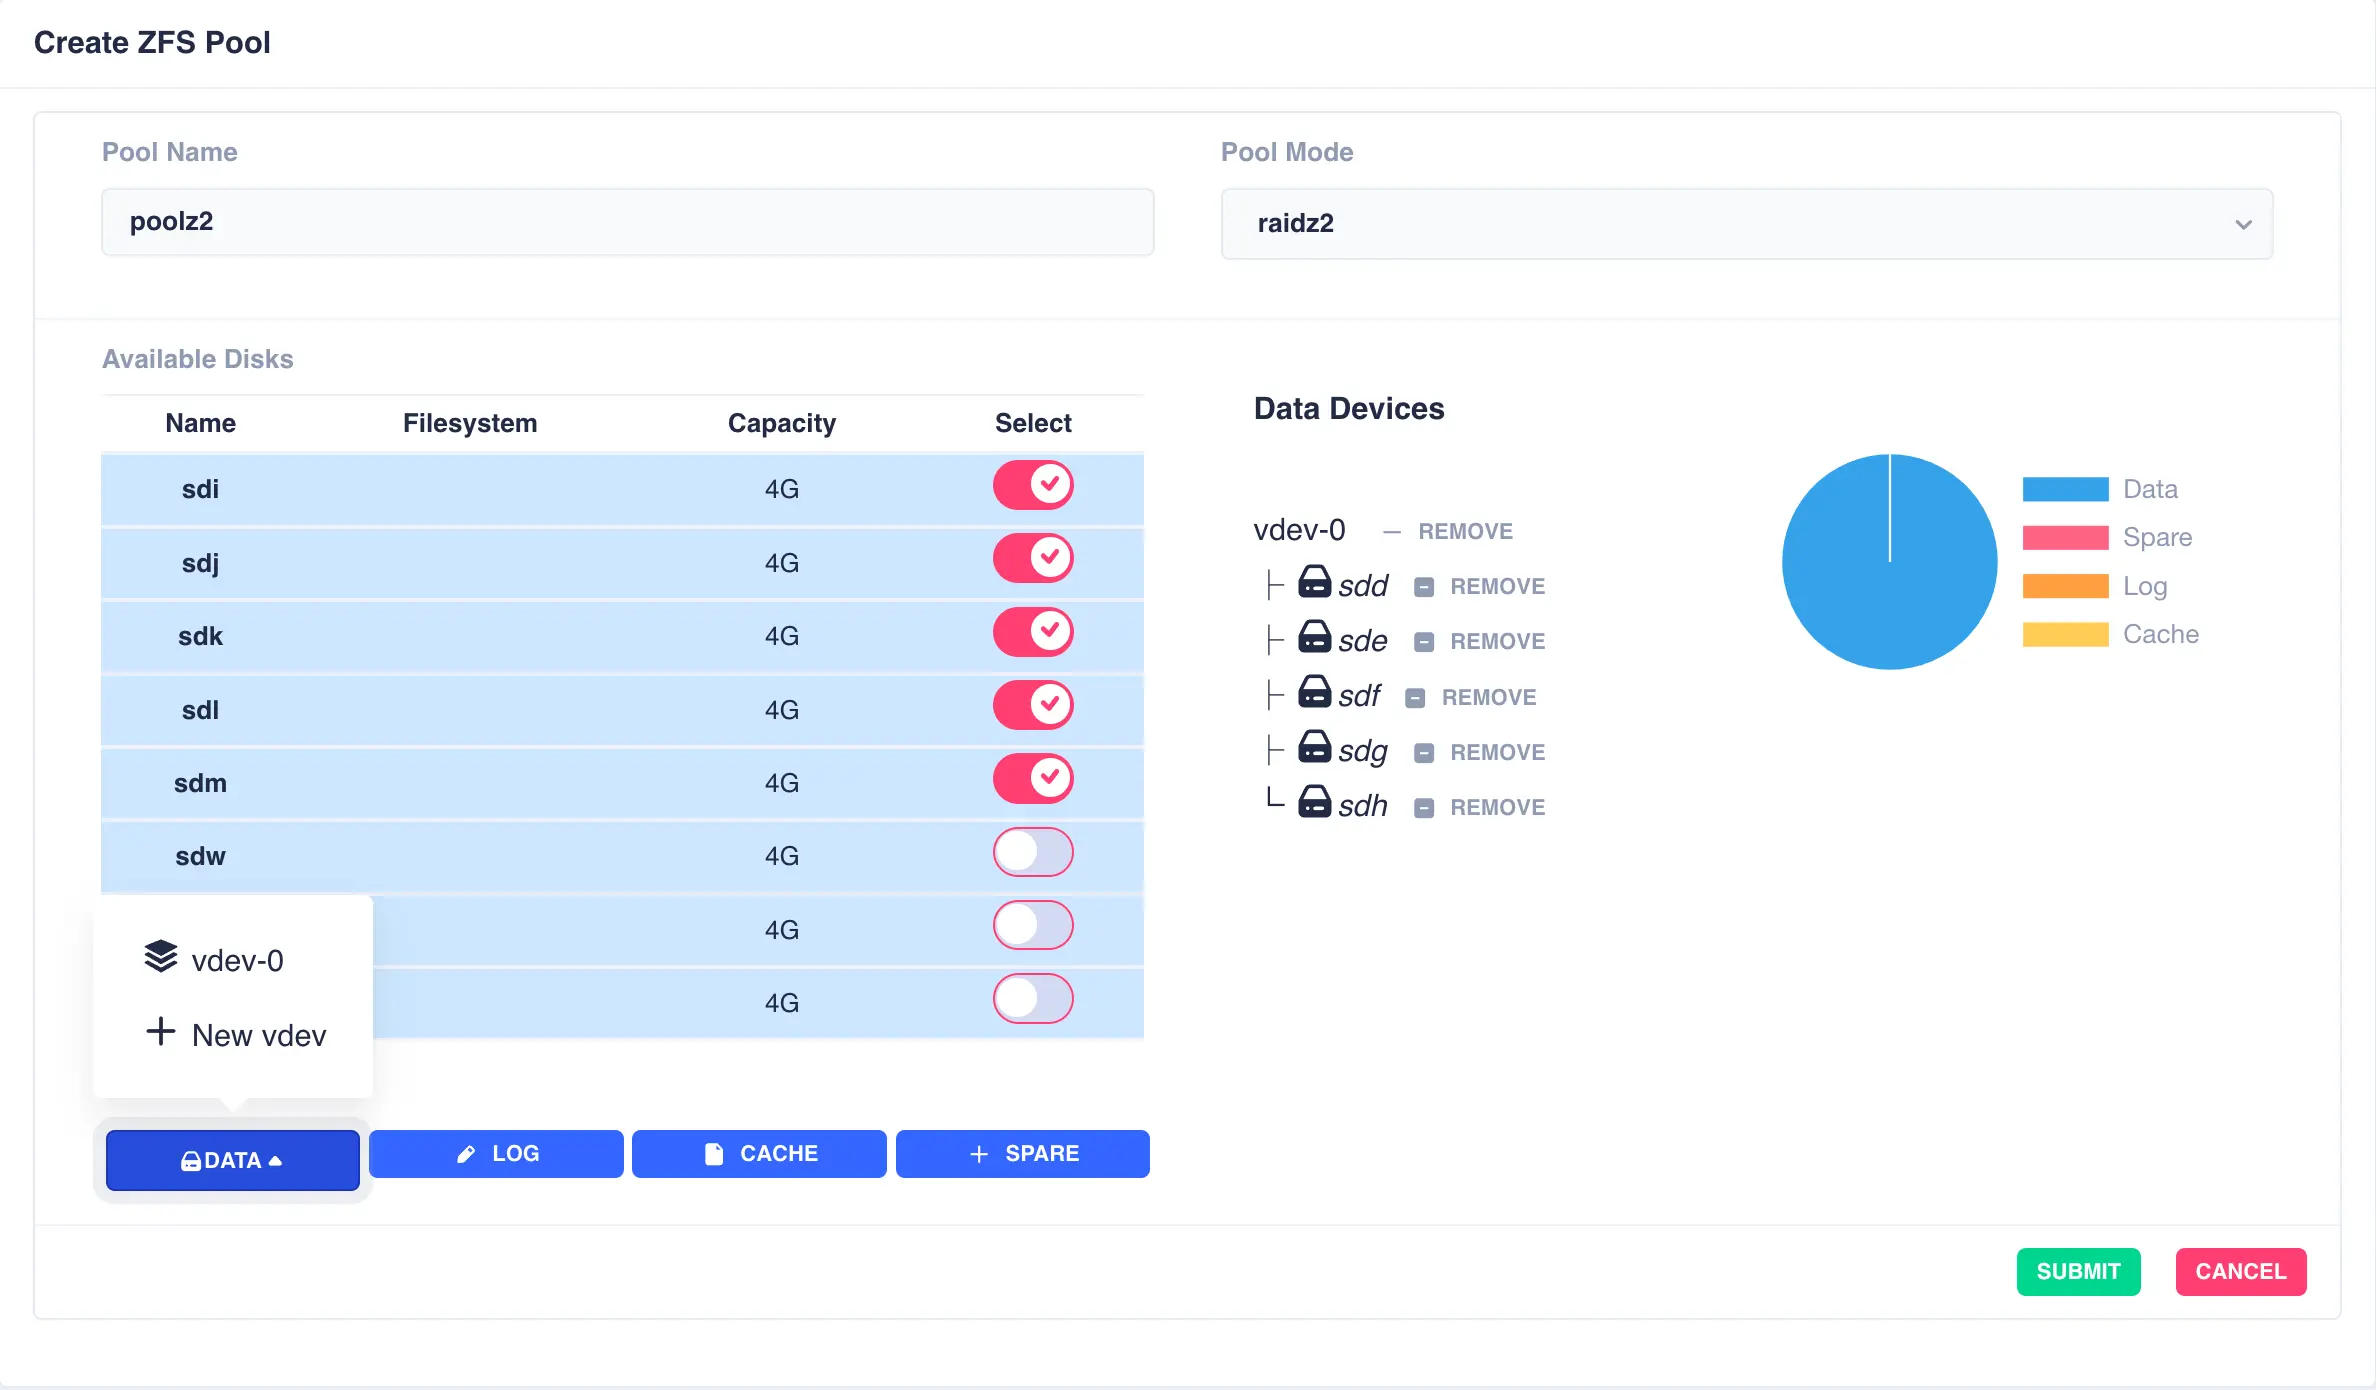
The resulting configuration depicts the two vdevs striped together:

Next a log disk is added by selecting one of the remaining available drives and clicking the LOG button:
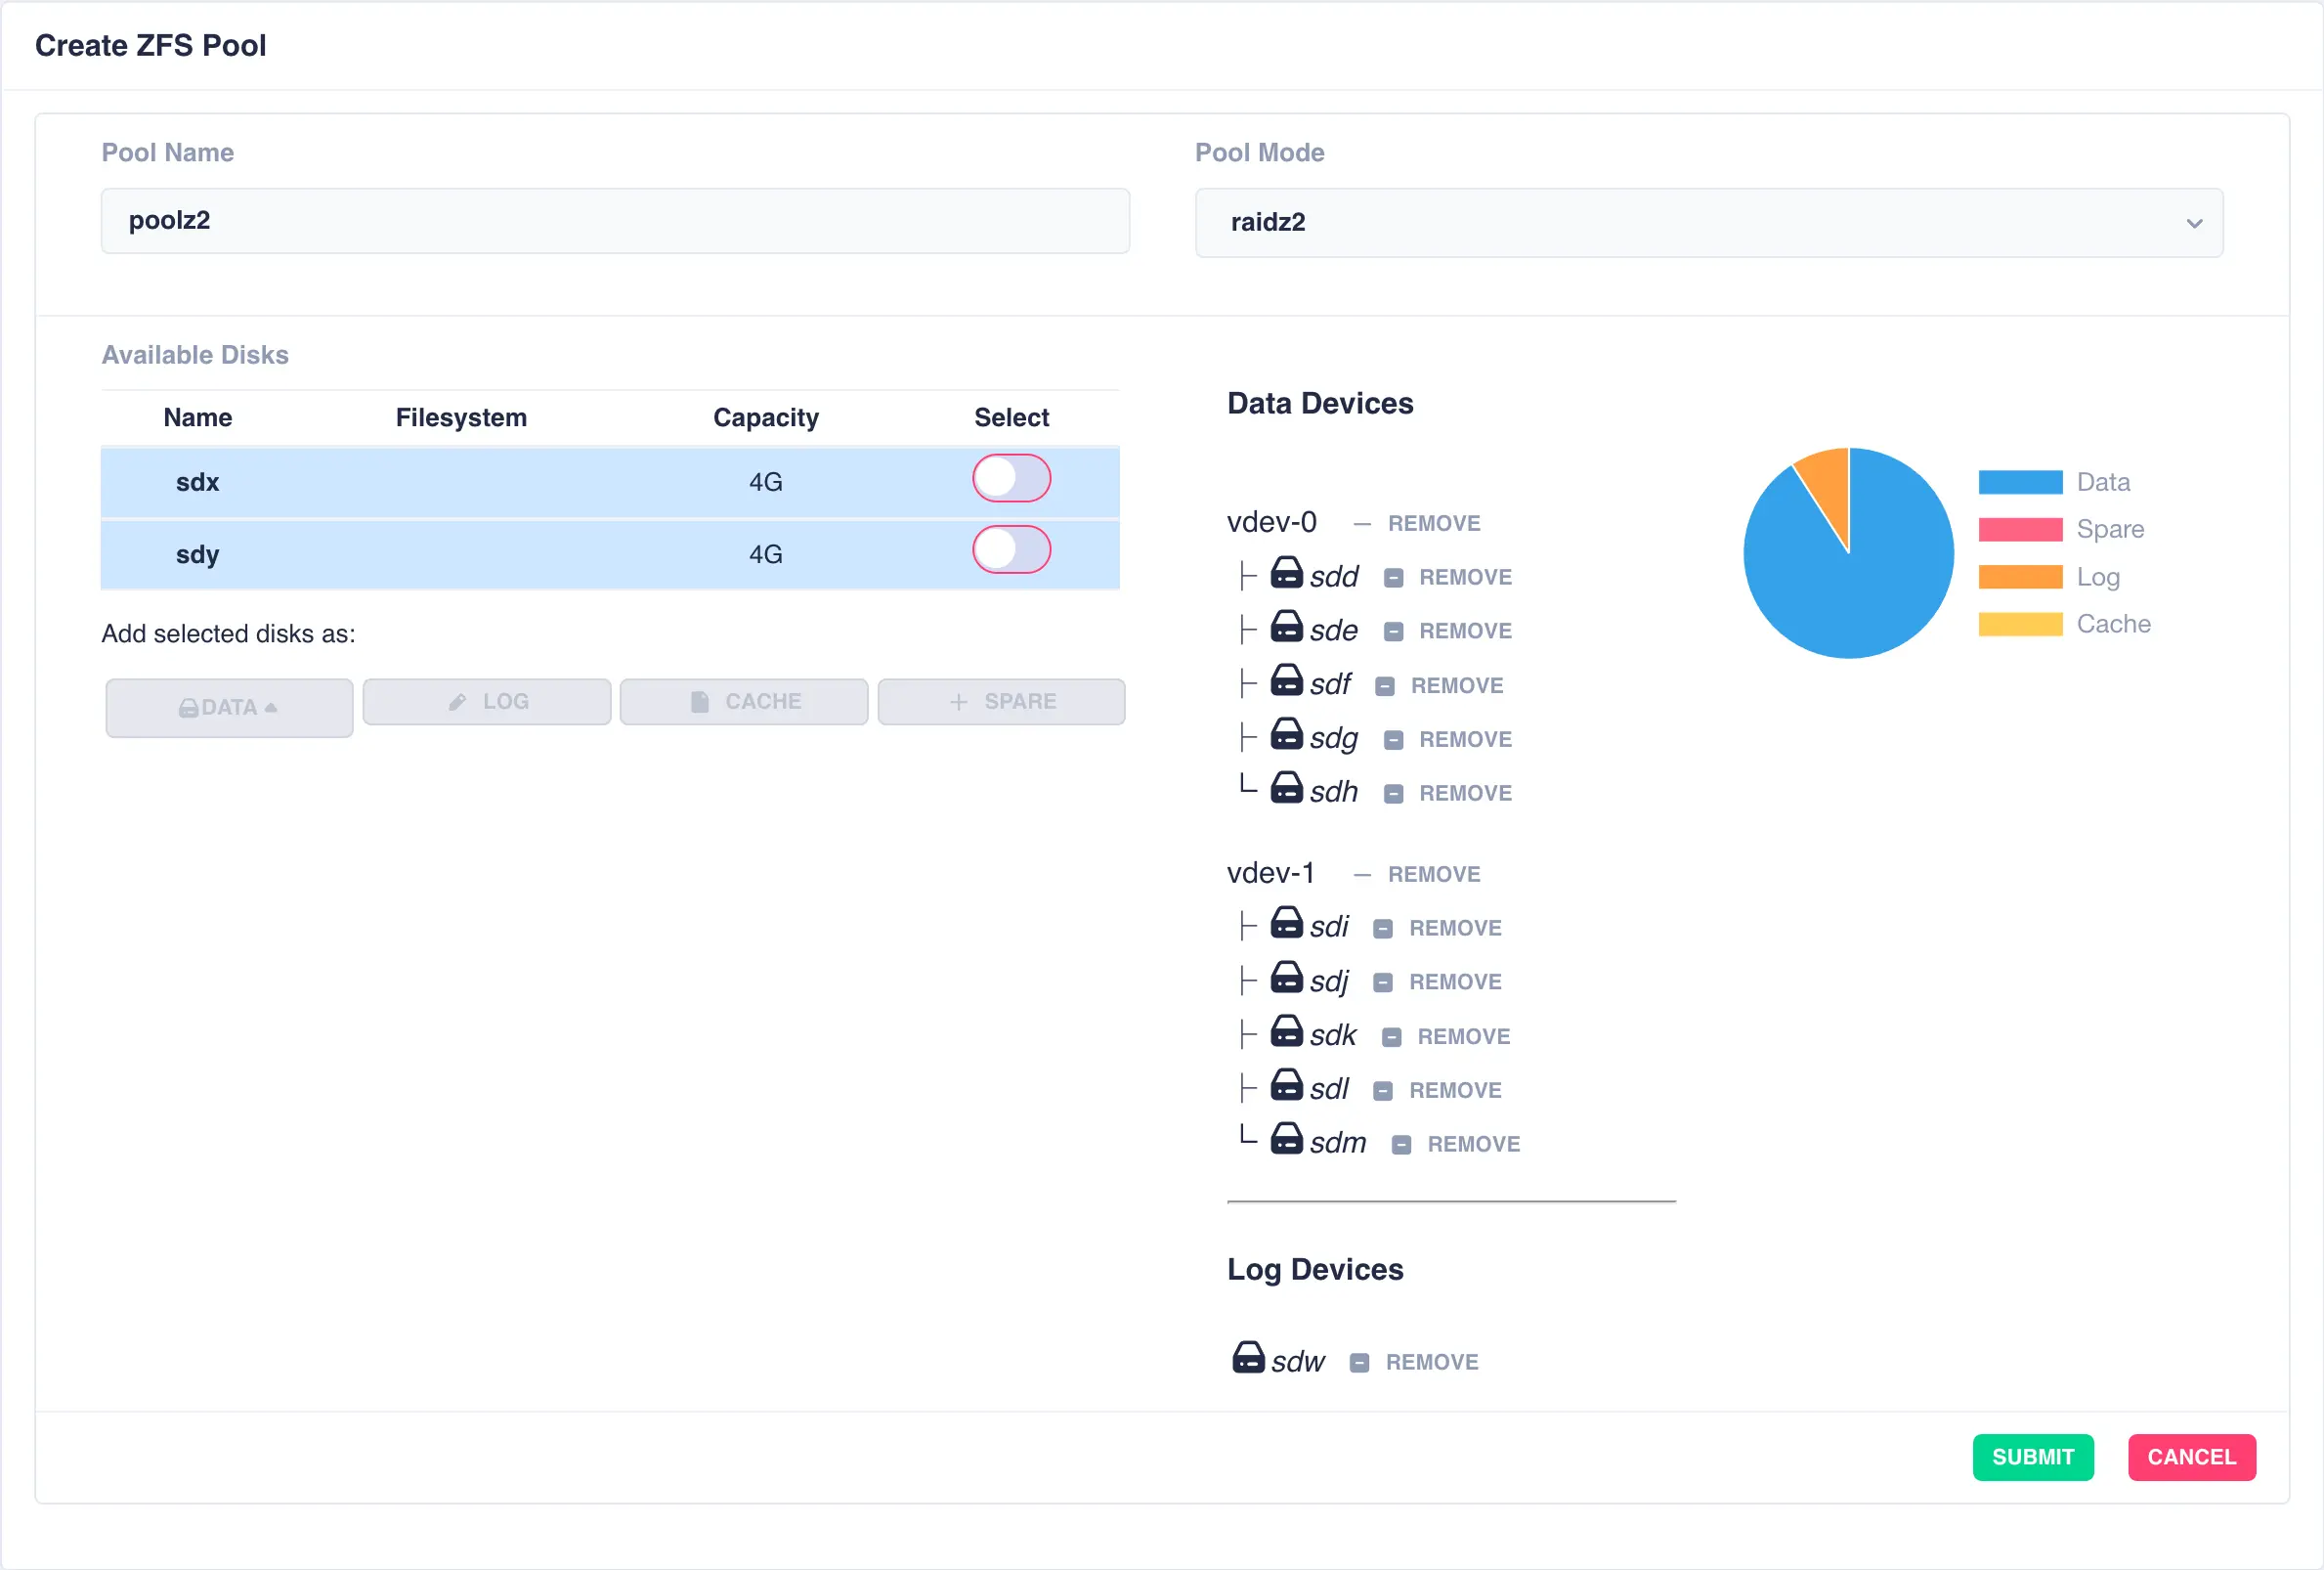
The same is done for a cache and spare device giving the final configuration:
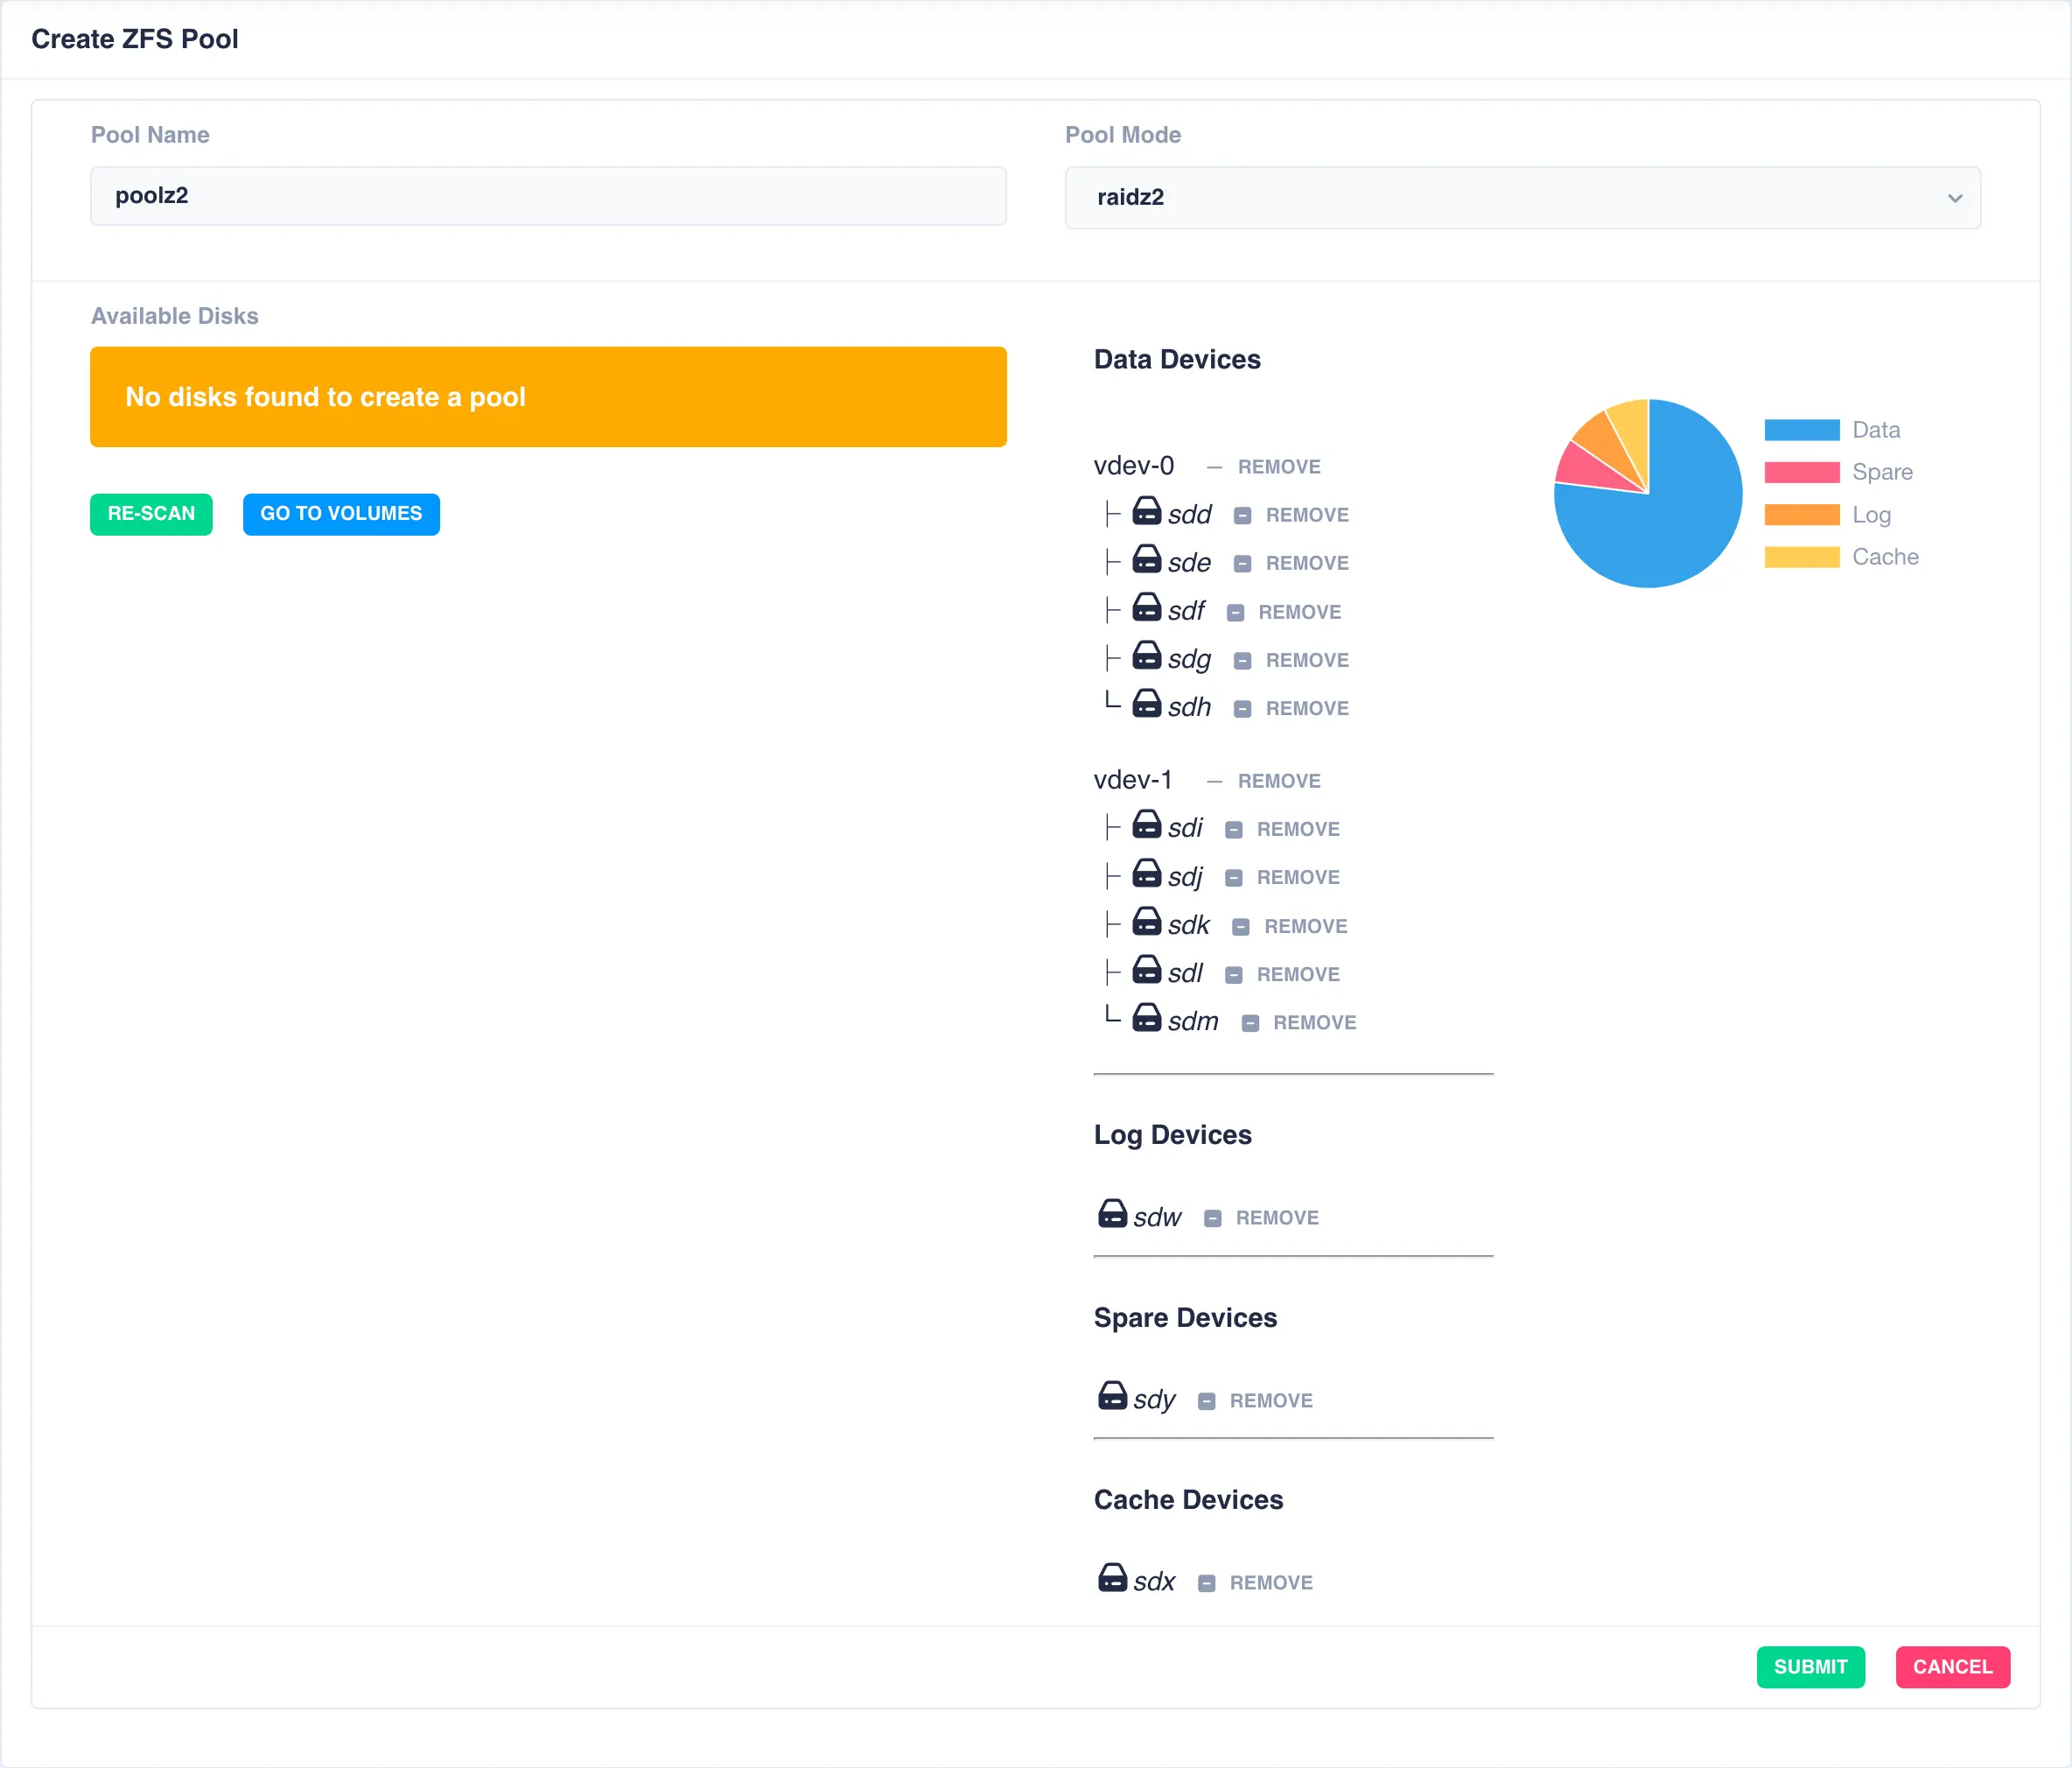
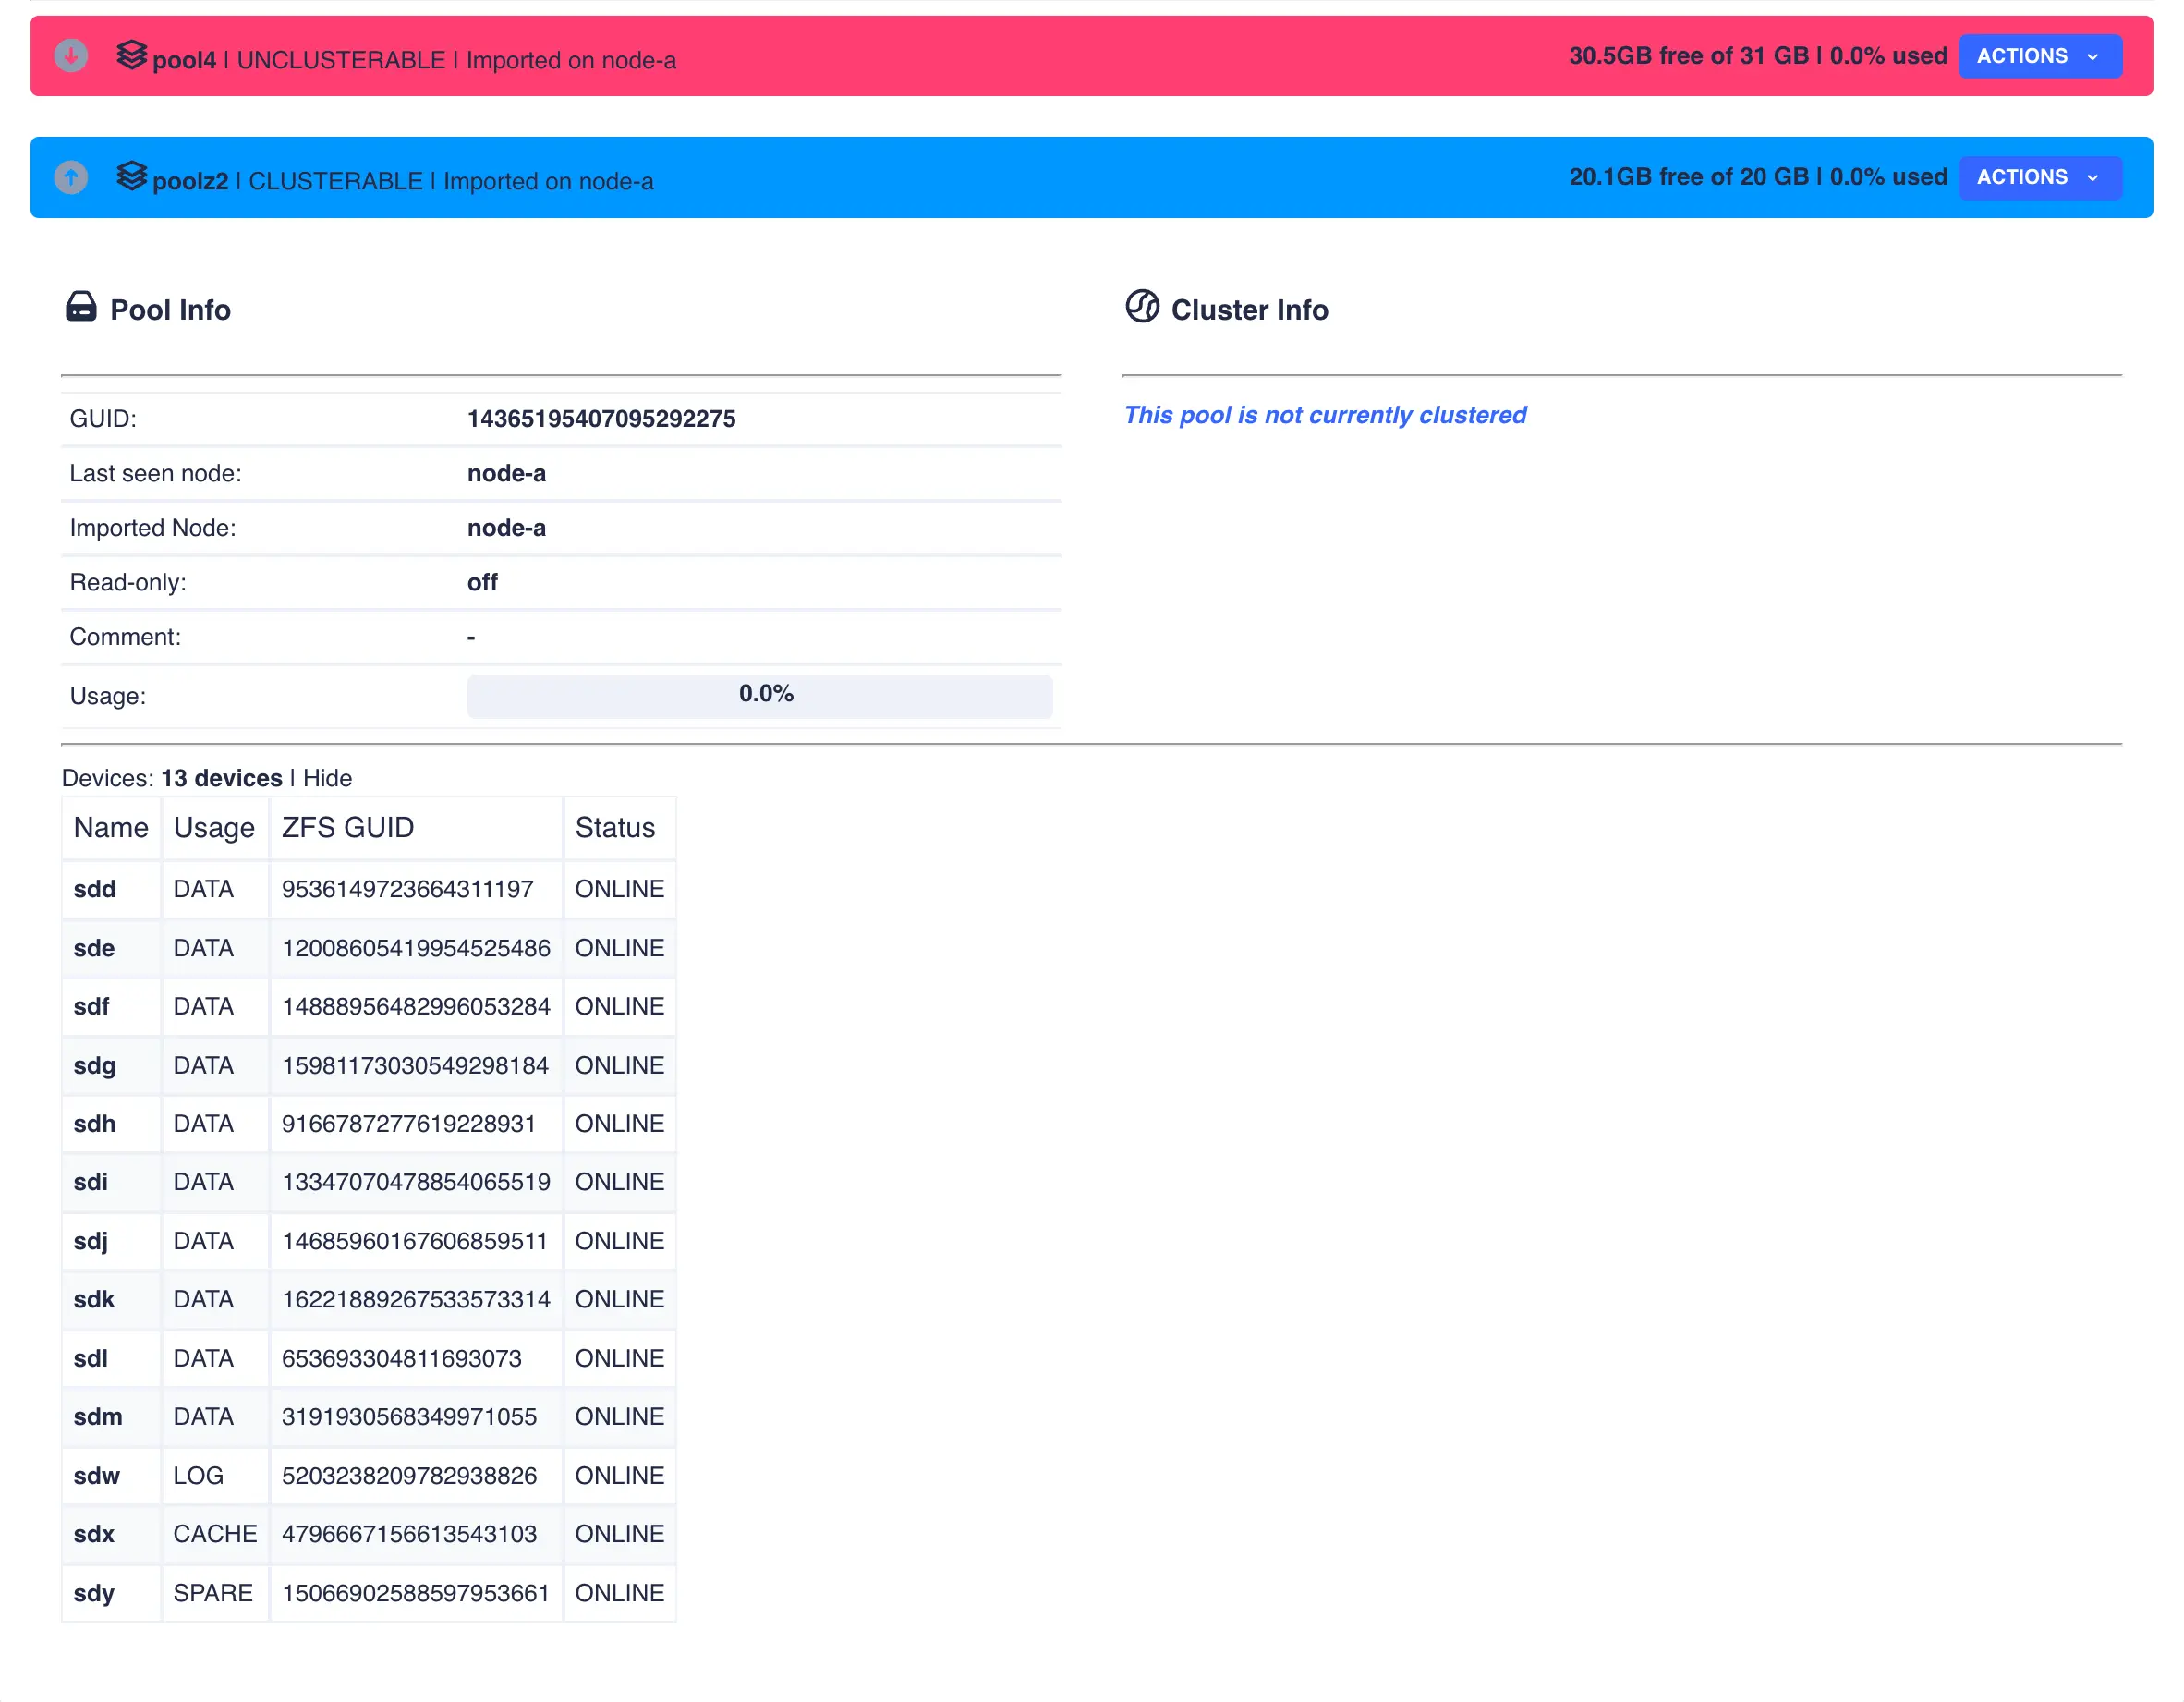
Finally click SUBMIT - the pool will now be created and will show up in the main pools page.
Toggle the down arrow ![]() next to the pool name for details. Device information is shown by clicking
next to the pool name for details. Device information is shown by clicking Show on the devices
line:
Mirrored Pool
Mirrored pools are created by striping together individual mirrored vdevs.
Start by creating an individual mirrored vdev (in this example a two way mirror is created, but three, four way, etc. mirrors can be created if required):
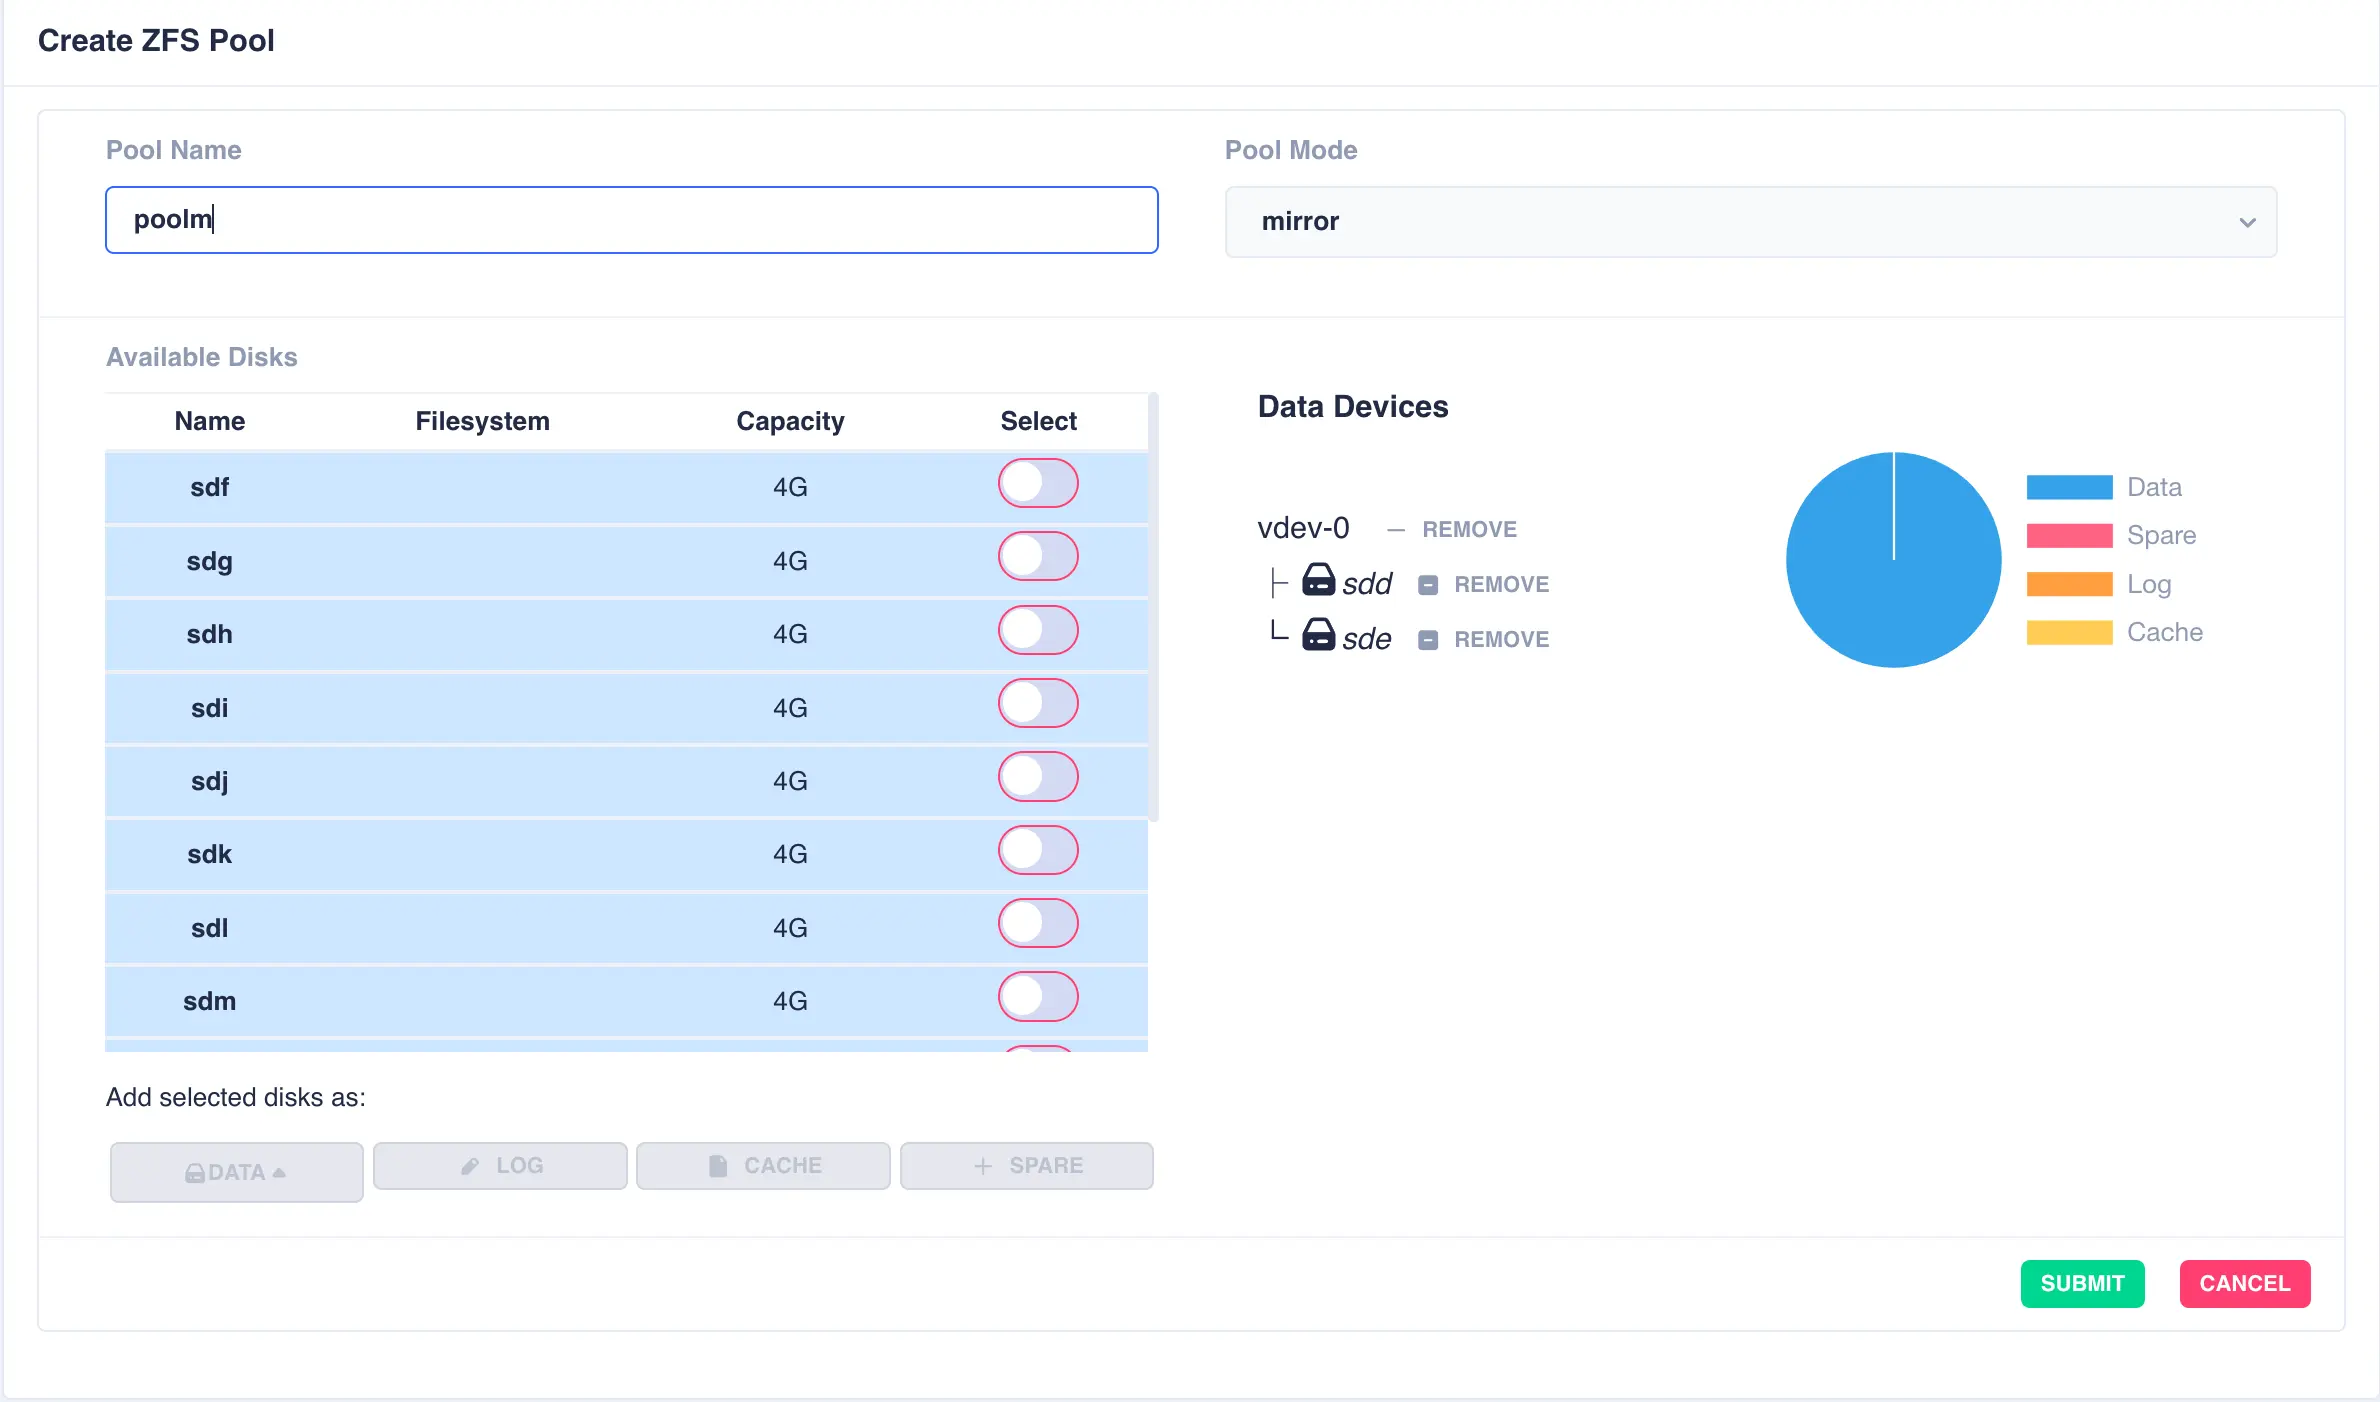
Continue adding new mirrored vdevs as required:
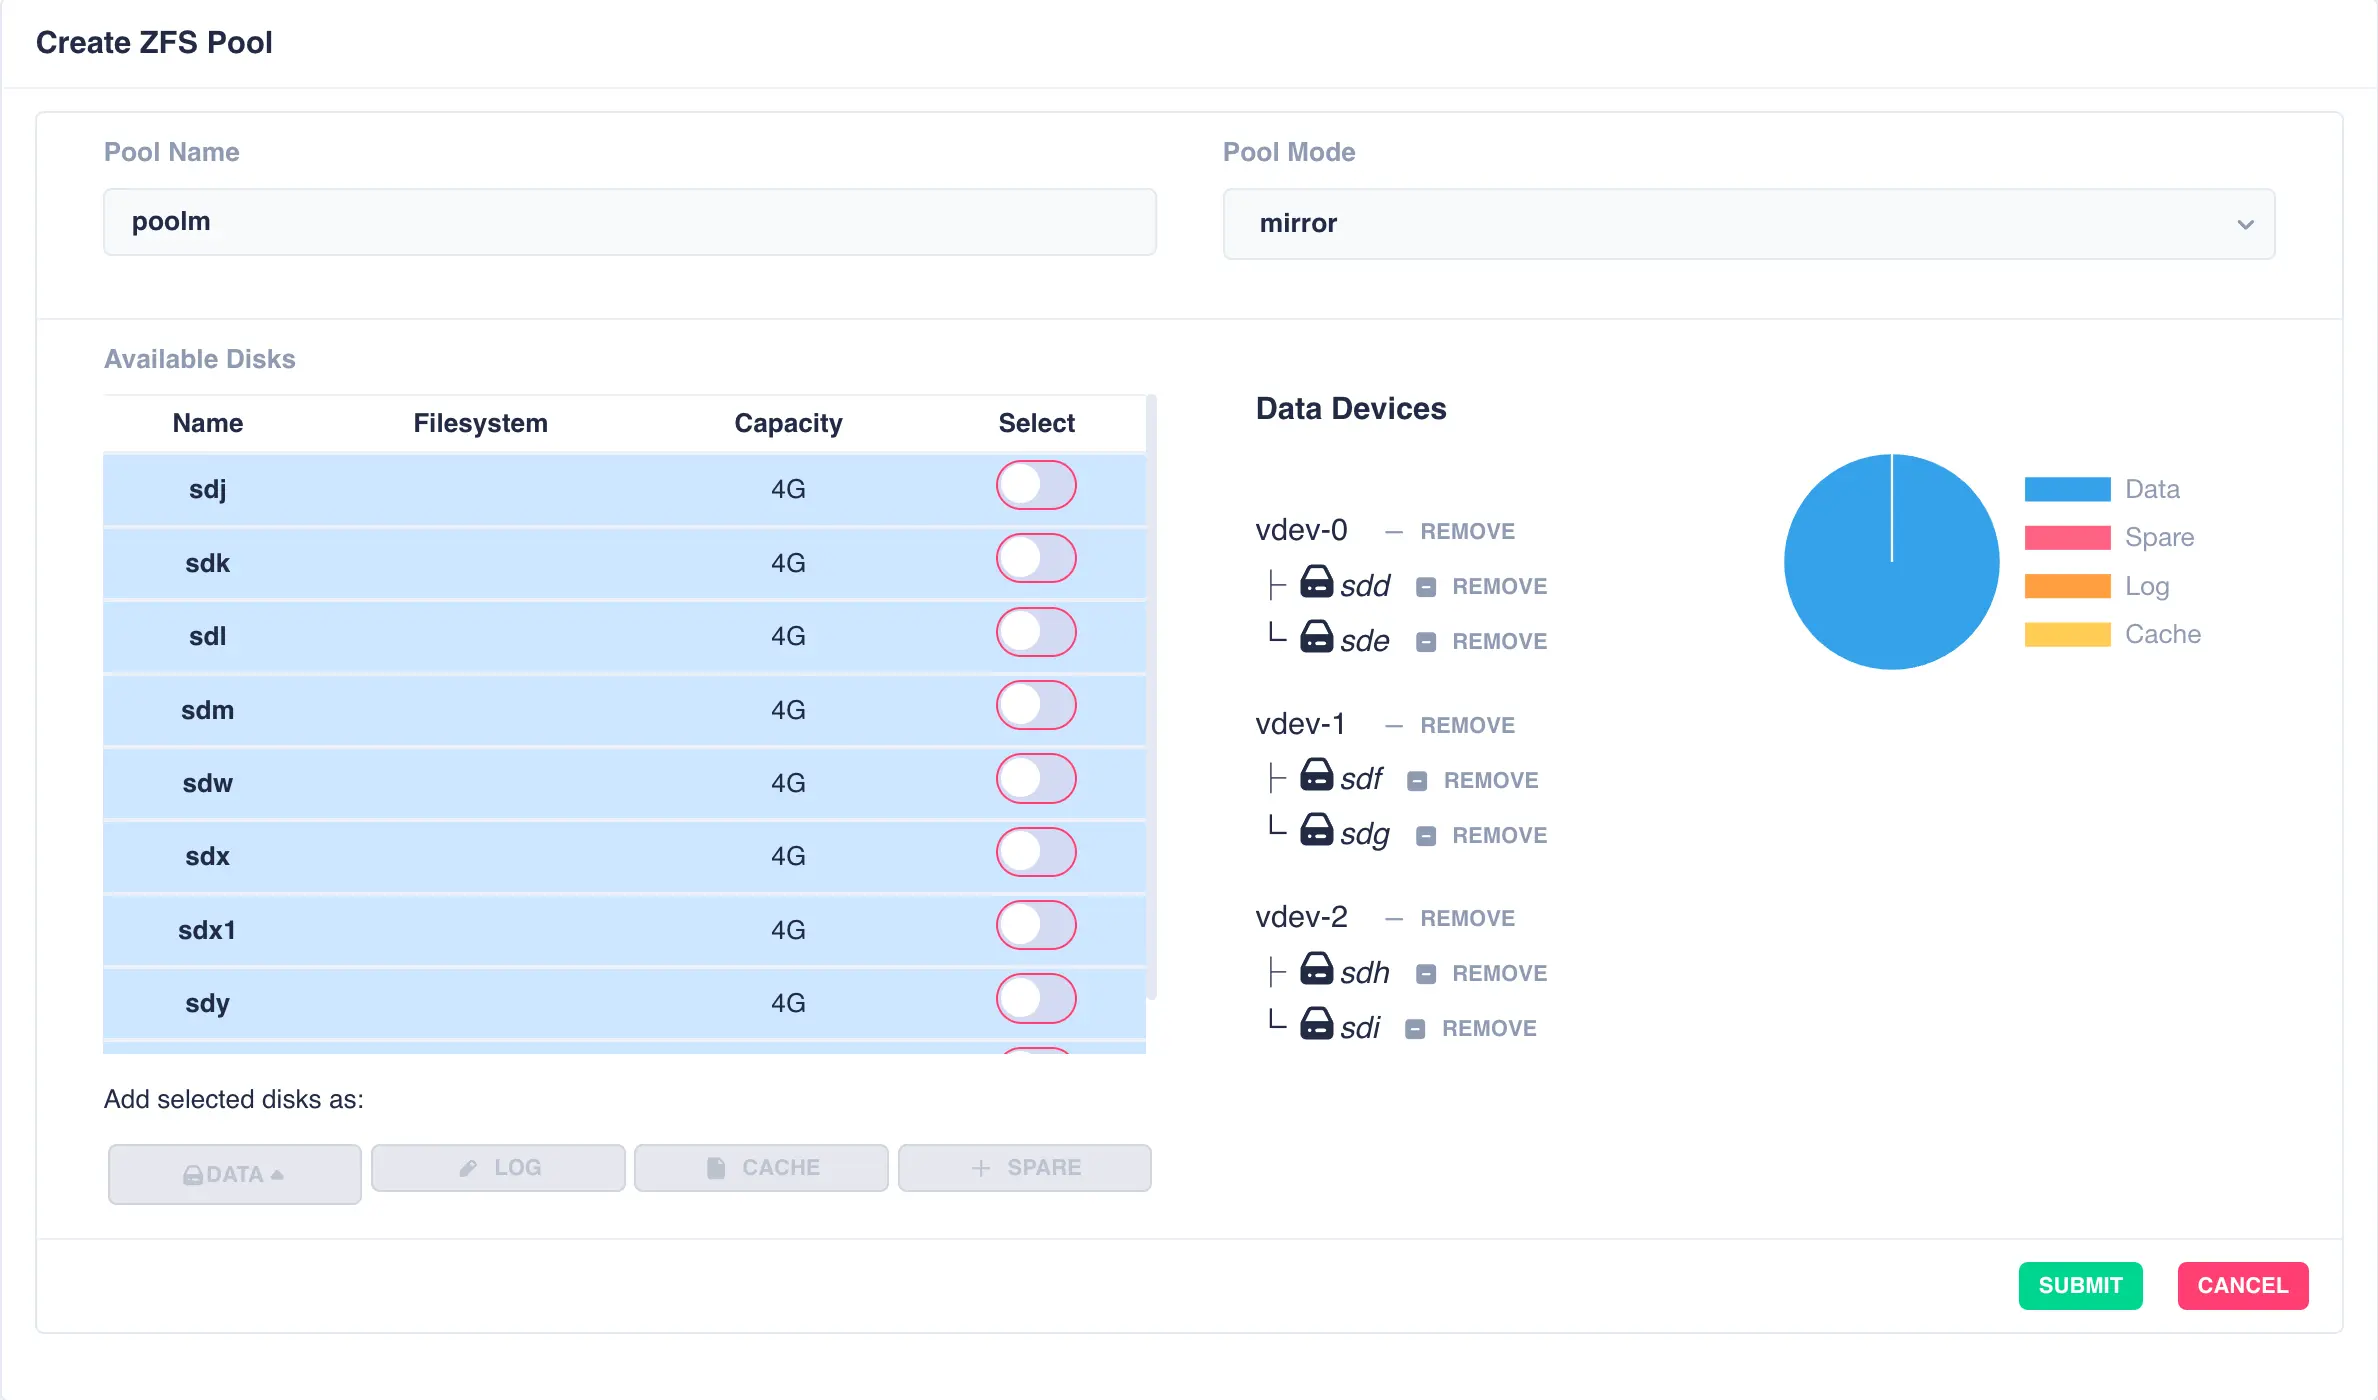
Finally click SUBMIT - the pool will be created and displayed in the main pools page.
JBOD Pool (single stripe)
A jbod pool is a stripe of disks in a single vdev with no redundancy. Select individual disks and add them
to the vdev using the data button:
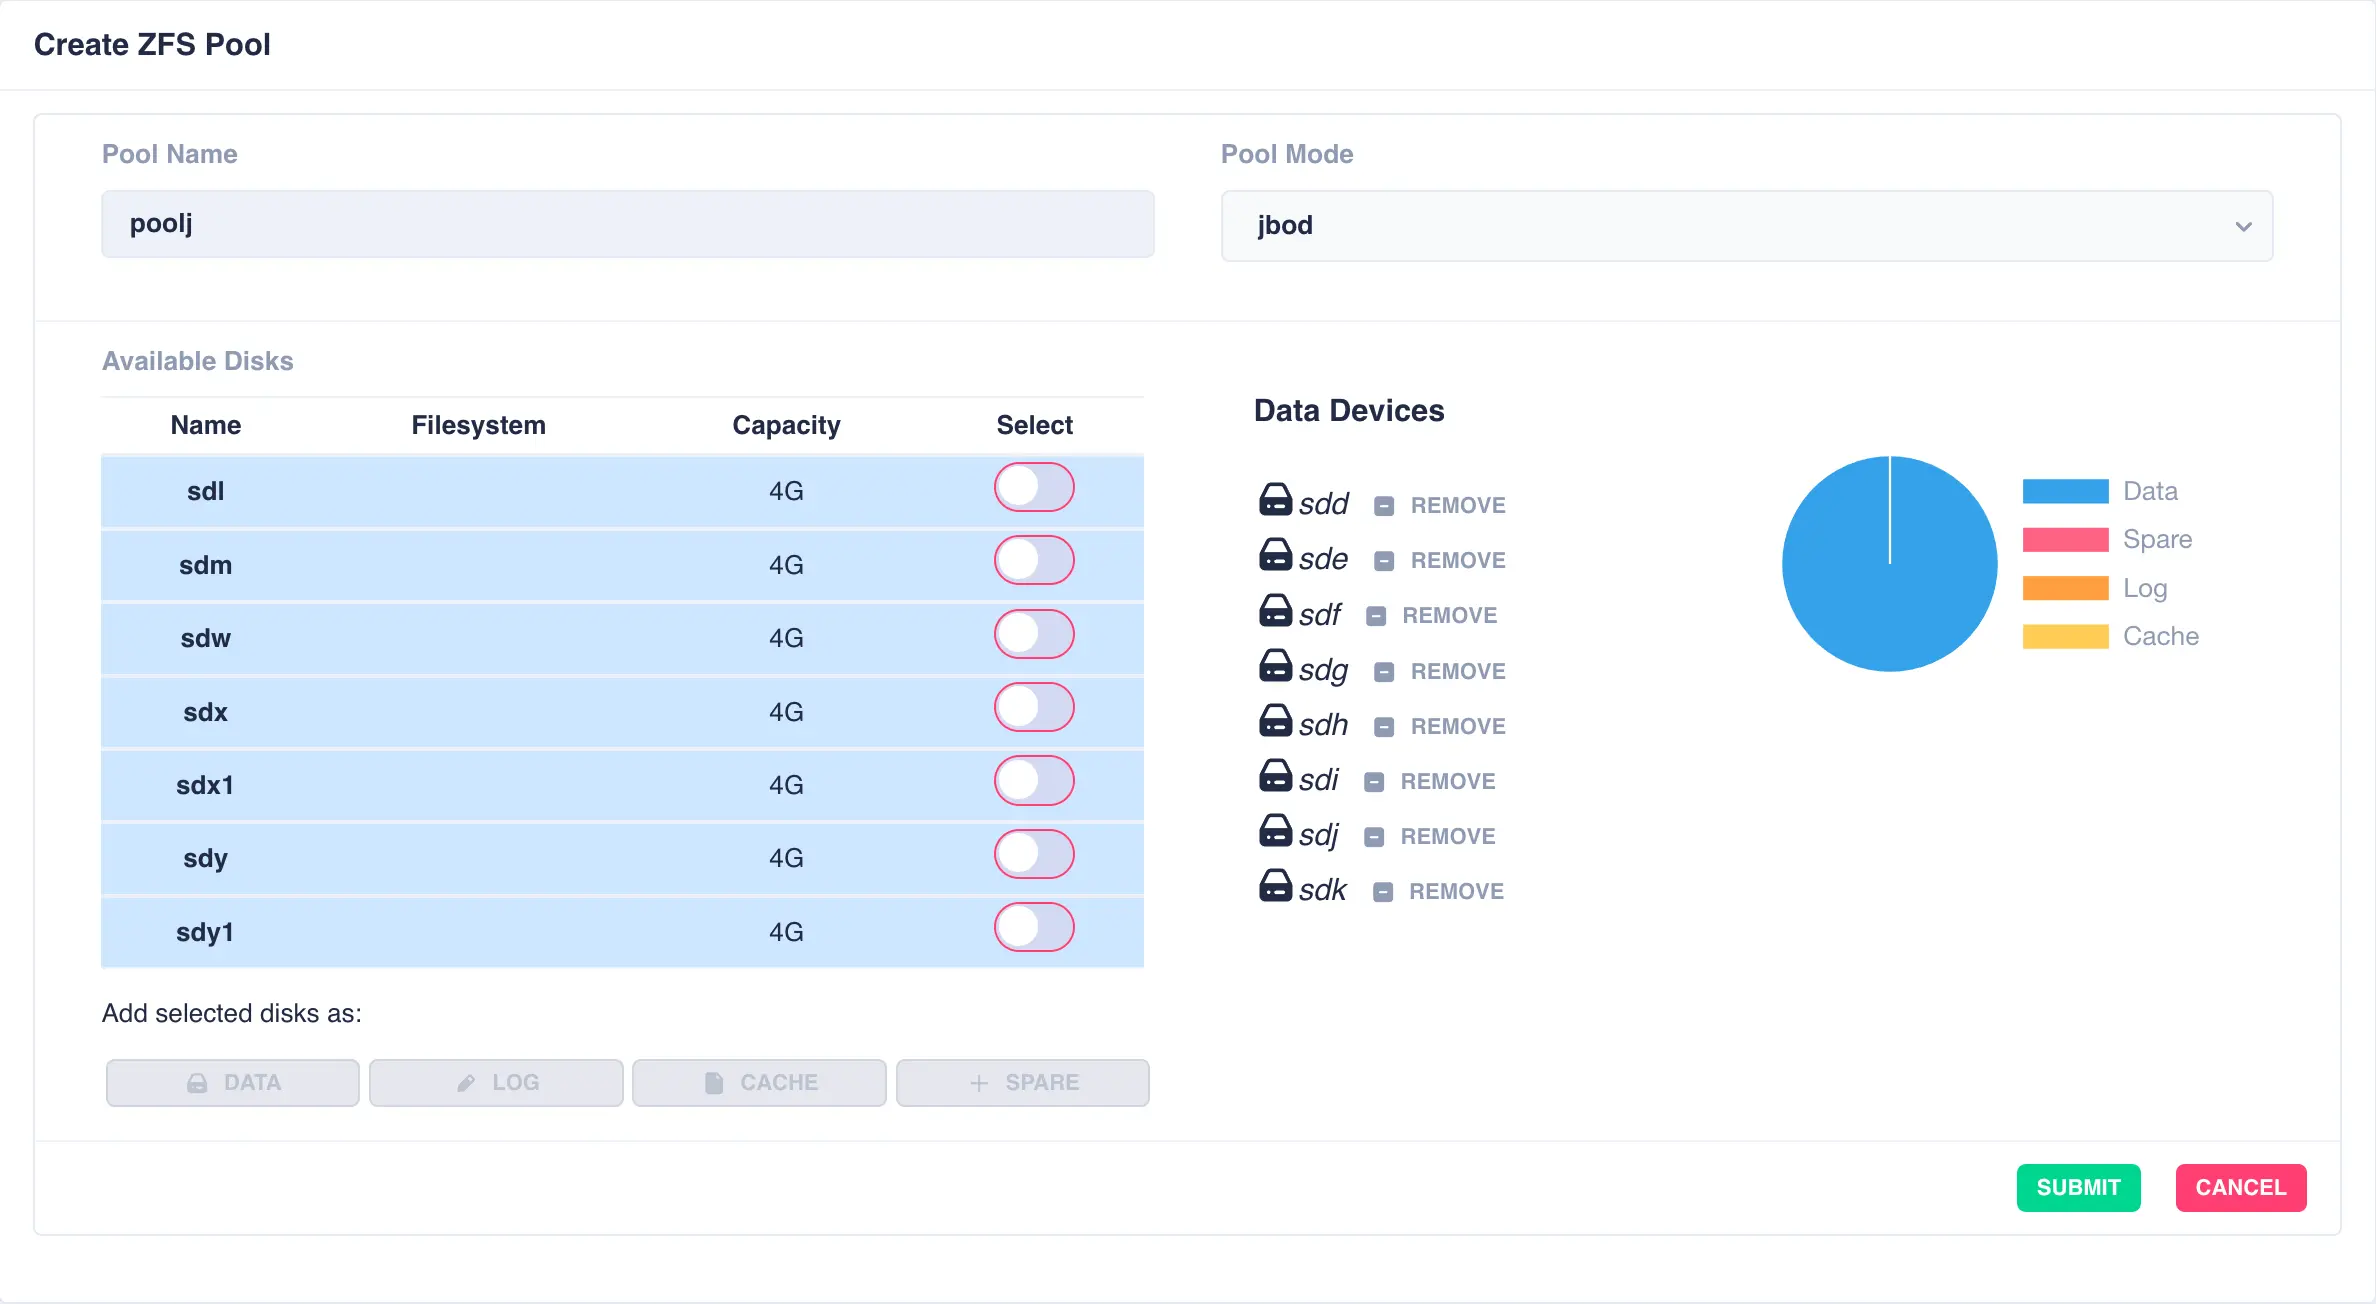
Finally click SUBMIT - the pool will be created and displayed in the main pools page.
Preparing a Pool to Cluster
Pools must be imported on one of the nodes before they can be
clustered. Check their status by selecting the Pools option on the
side menu.
Shared-nothing clusters
For a shared-nothing cluster, the pools will need
to have the same name and be individually imported on each node
manually.
In the following example pool1 and pool2 are already clustered and pool3 is going to be added to the cluster:

Firstly the pool need to be imported; select the Import Pool item from the Actions menu:
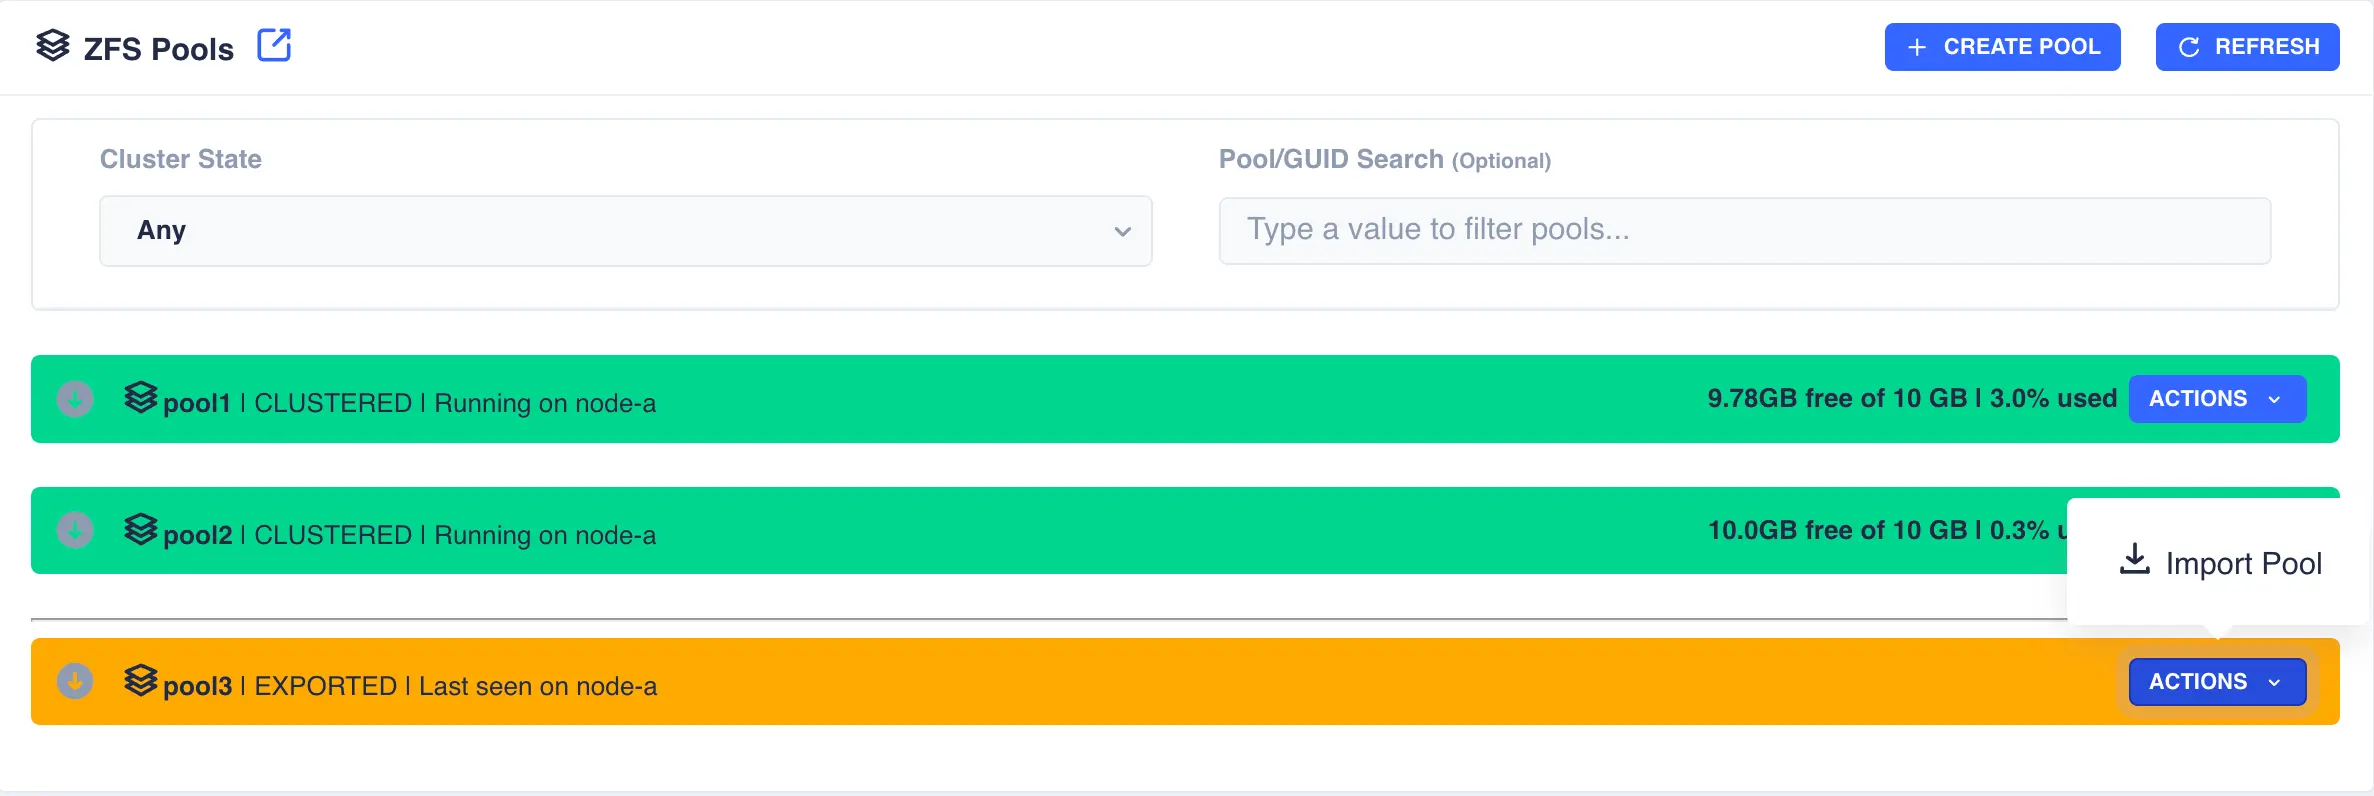
The status of the pool should now change to Imported and CLUSTERABLE:

The pool is now ready for clustering.
Unclusterable Pools
Should any issues be encountered when importing the pool it will
be marked as UNCLUSTERABLE. Check the RestAPI log
(/opt/HAC/RSF-1/log/rest-operations.log) for details on why the
import failed.
With a shared-nothingcluster, this may happen if
the pools aren't imported on both nodes.
Clustering a Pool
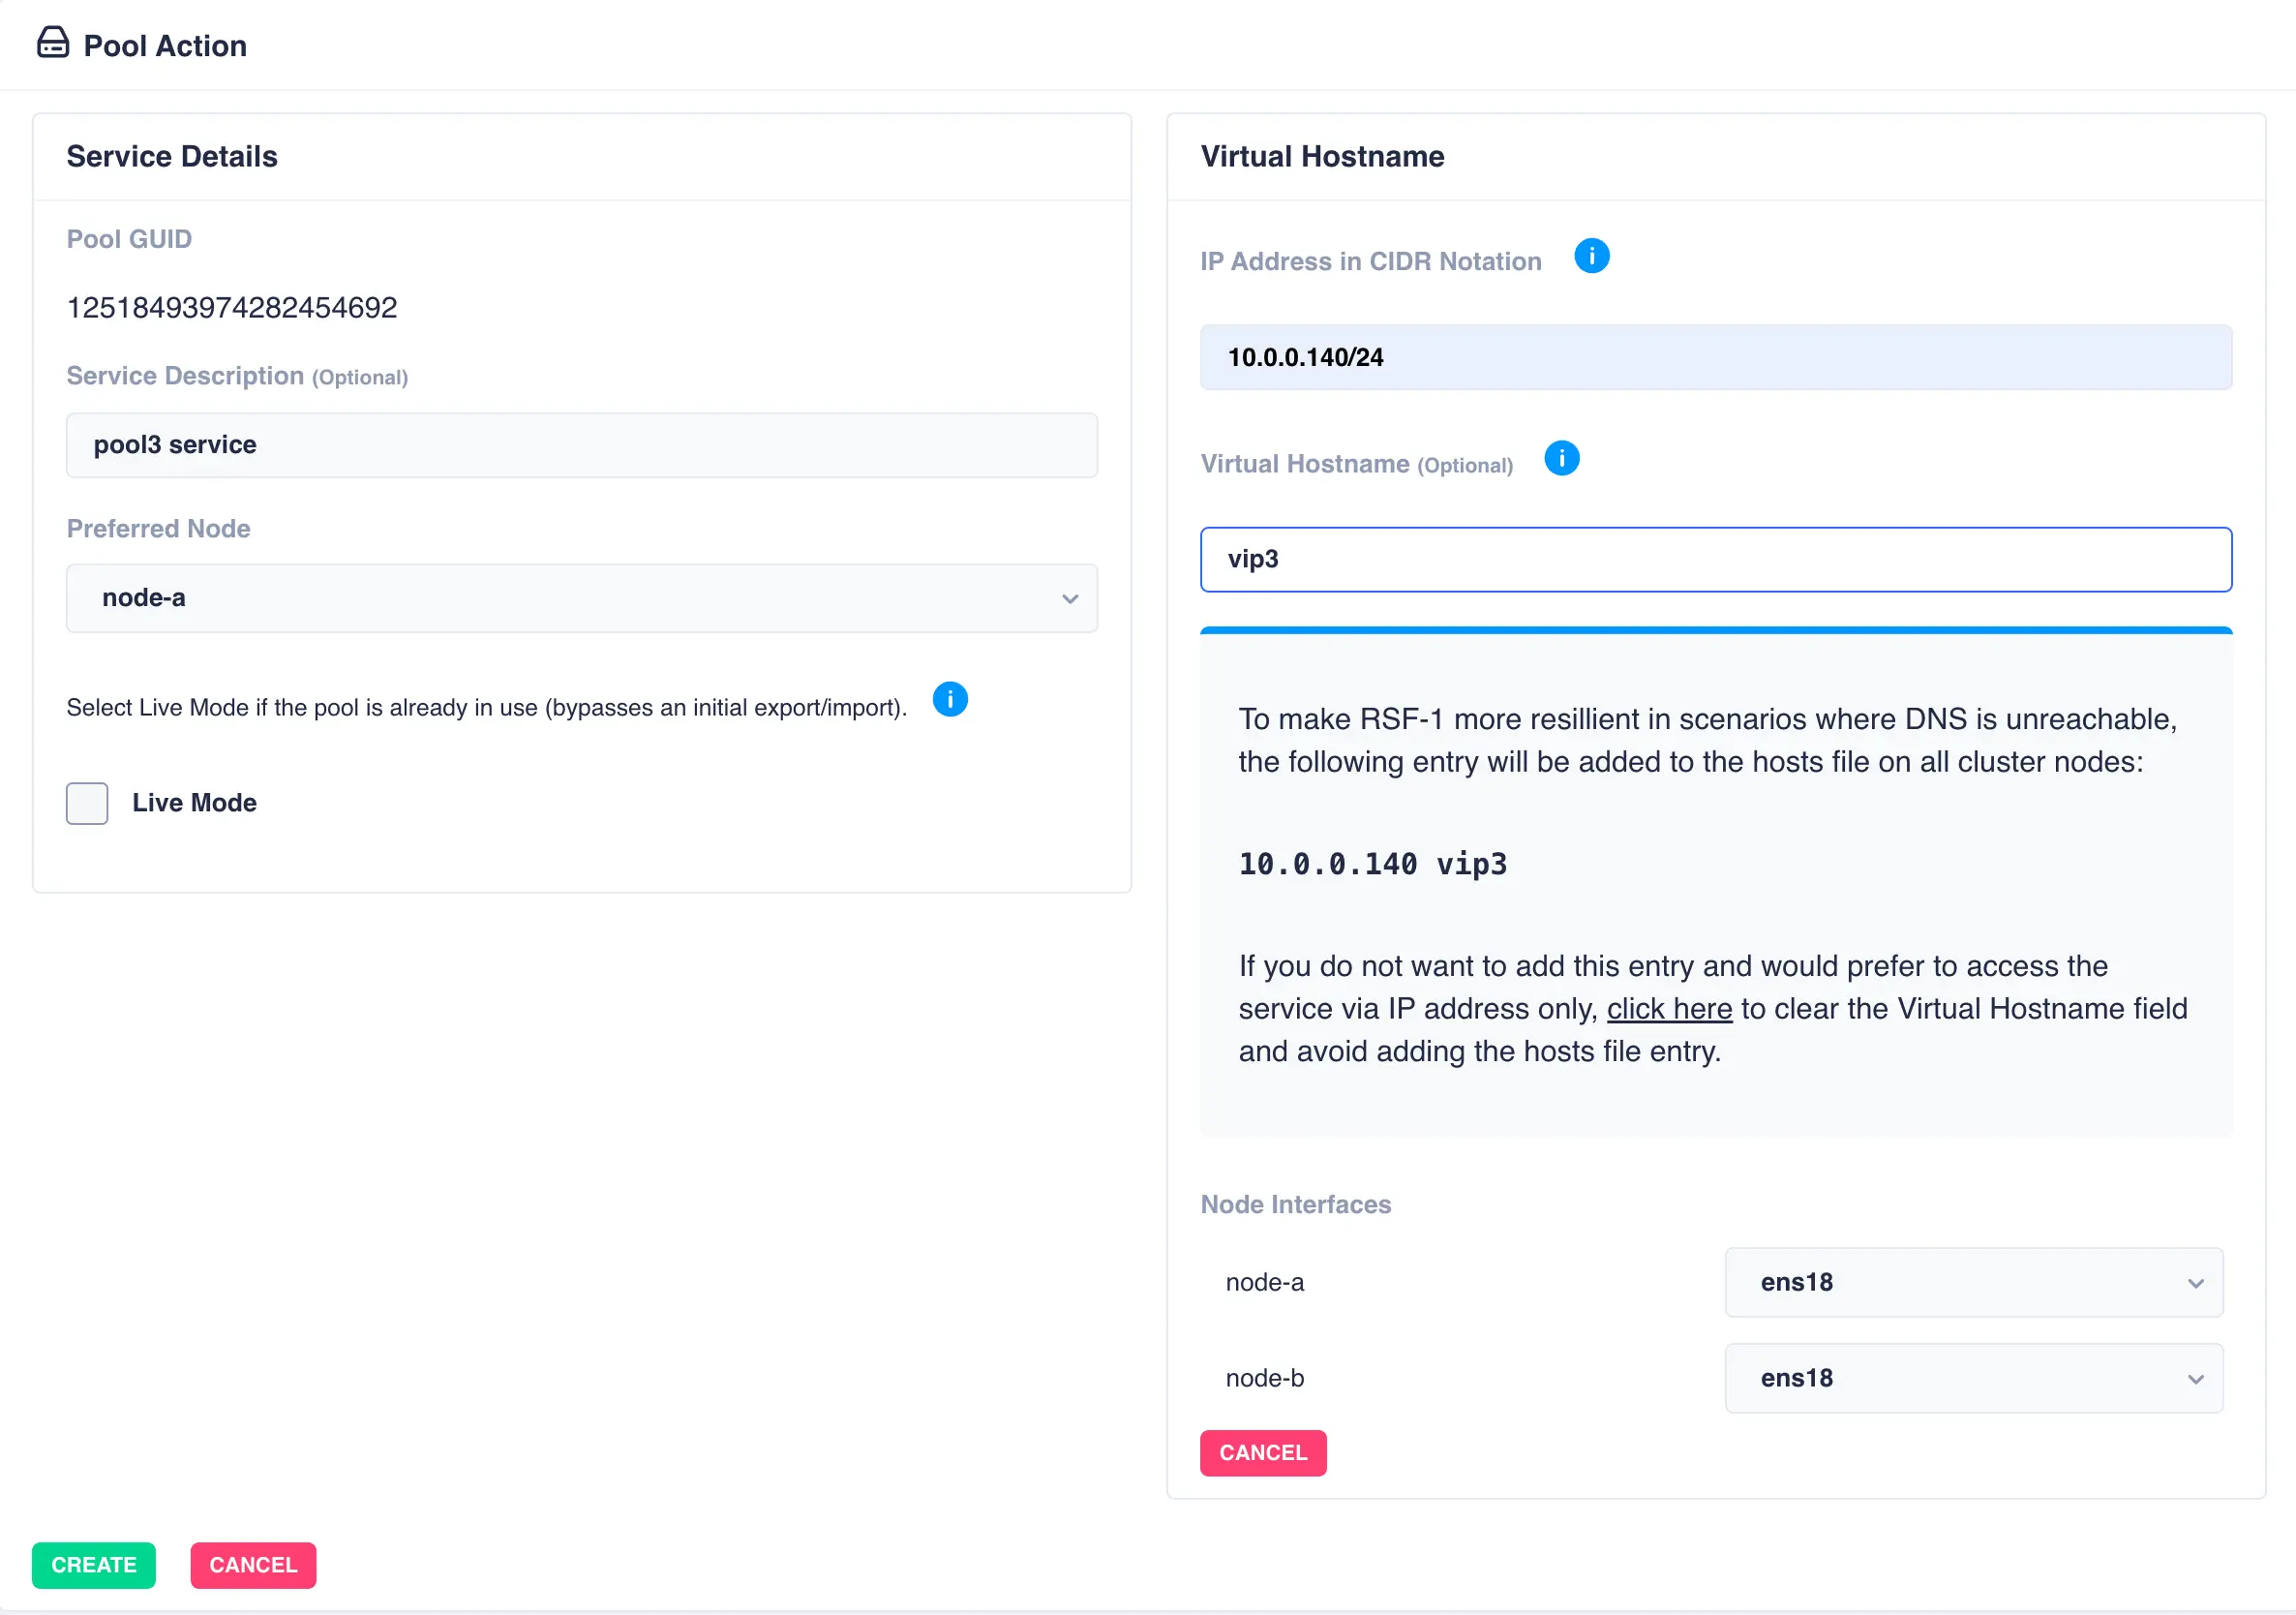
Select the Cluster this pool item from the Actions menu:

Fill out the description and select the preferred node for the service:
What is a preferred node
When a service is started, RSF-1 will initially attempt to run it on it's preferred node. Should that node be unavailable (node is down, service is in manual etc) then the service will be started on the next available node.
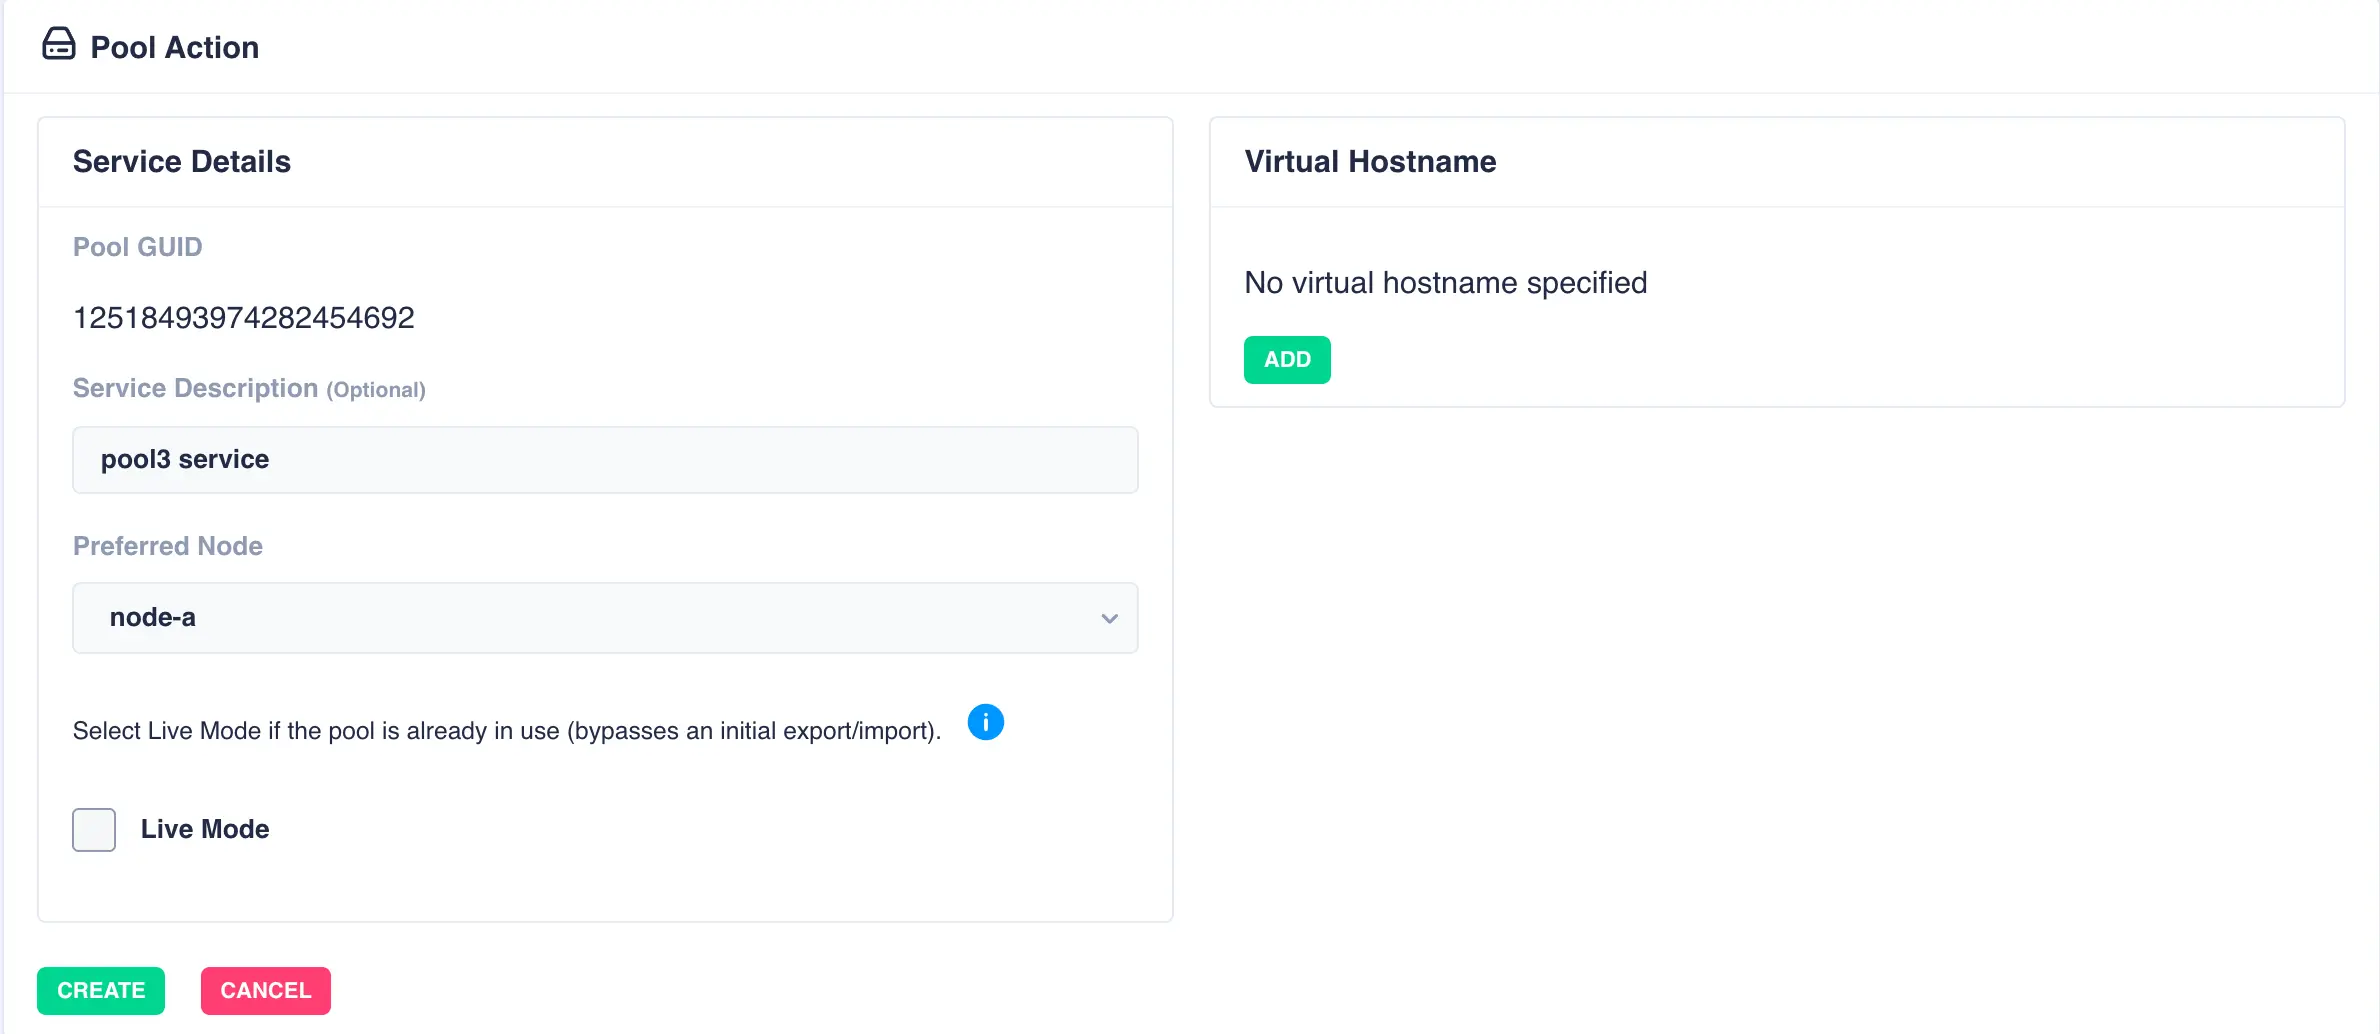
With a shared-nothing pool the GUID's for each pool will be shown:
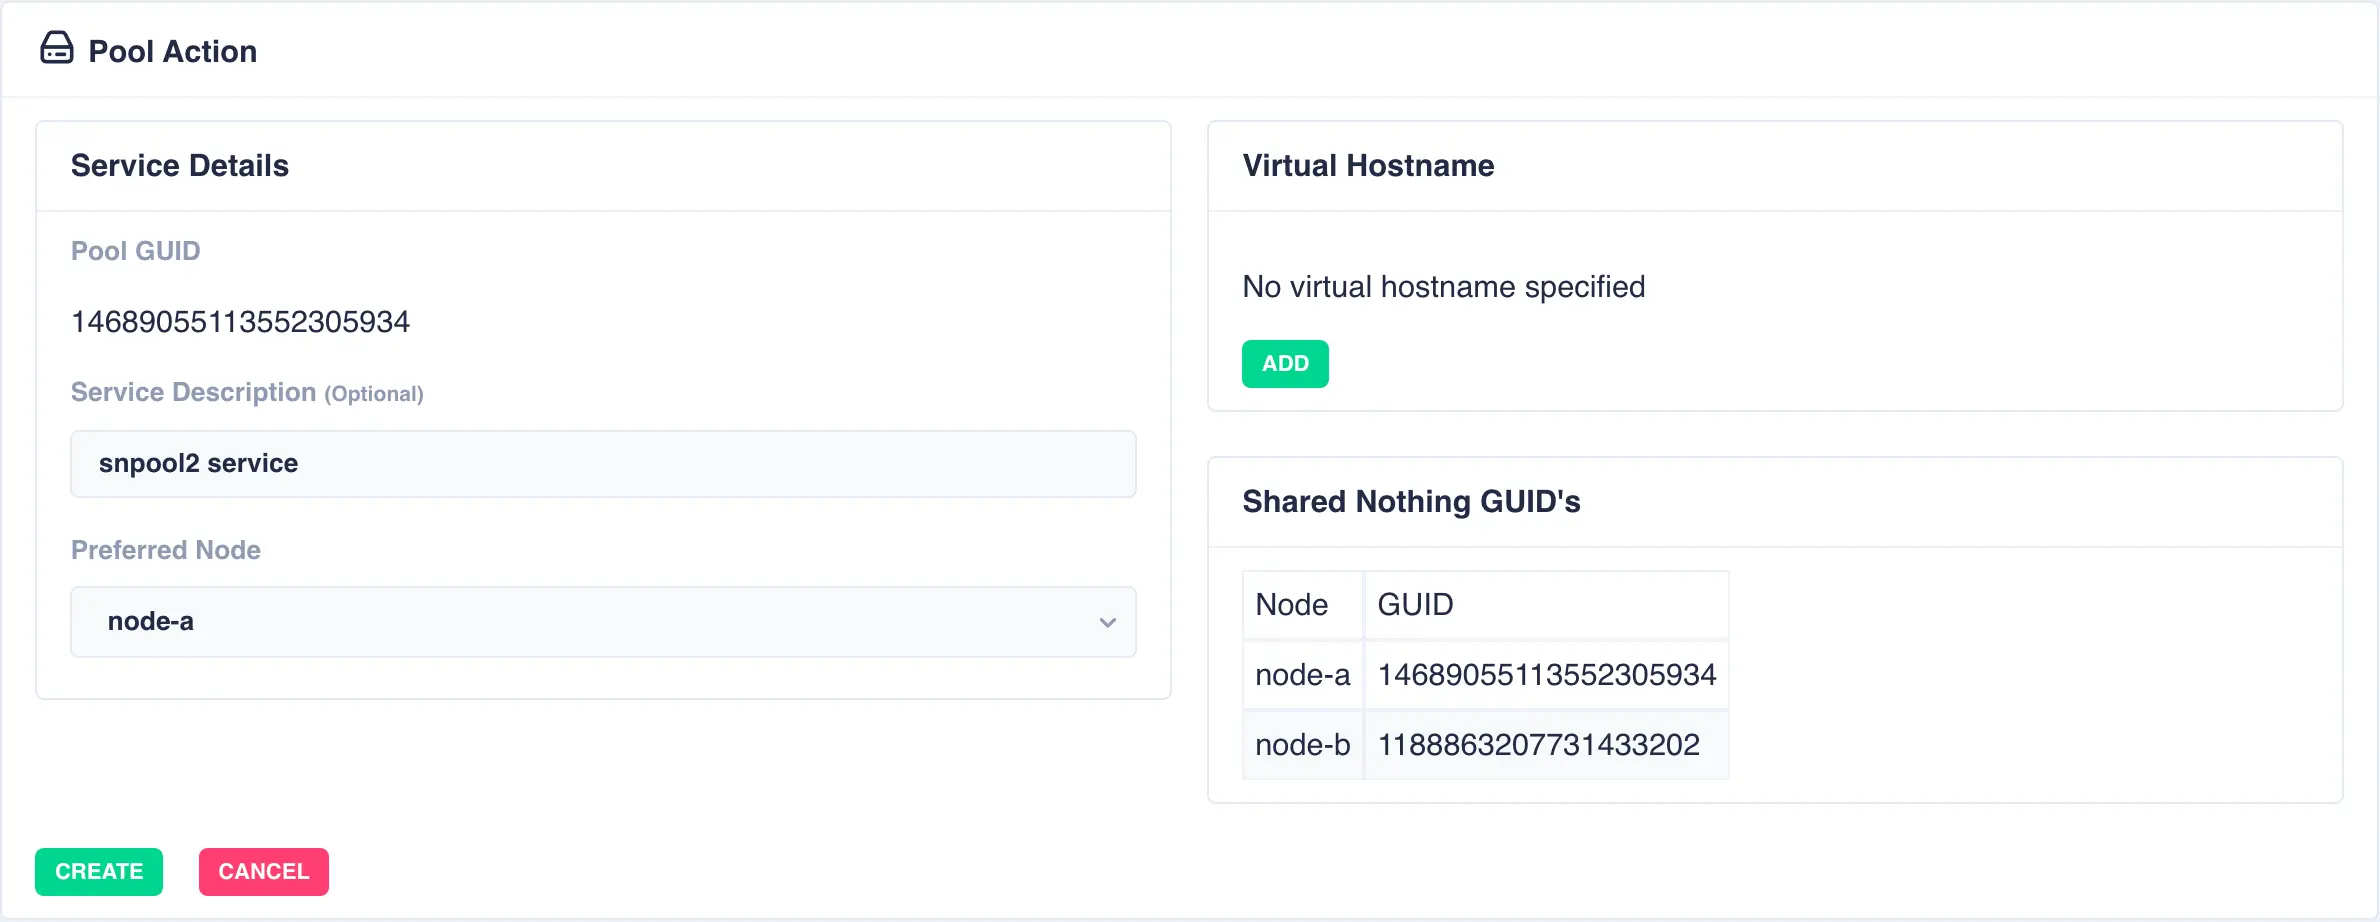
To add a virtual hostname to the service click Add in the Virtual
Hostname panel. Enter the IP address, and optionally a hostname.
For nodes with multiple network interfaces, use the drop down
lists to select which interface the virtual hostname should be assigned
to:
Finally, click the Create button; the pool will now show as CLUSTERED:
Snapshots
Creating Snapshots
A zfs snapshot is a read-only copy of a ZFS dataset or zvol. Snapshots are created almost instantly and initially consume no additional disk space within the pool. They are a valuable tool both for system administrators needing to perform backups and other users who need to save the state of their file system at a particular point in time and possibly restore it later. It is also possible to extract individual files from a snapshot.
The following steps will show the process of creating a snapshot from a clustered pool.
Note
Snapshots cannot be created in shared-nothing clusters as the cluster software is responsible for creating and synchronising snapshots at regular intervals.
-
To create a snapshot navigate to
ZFS -> Snapshotsand clickCREATE SNAPSHOT:
-
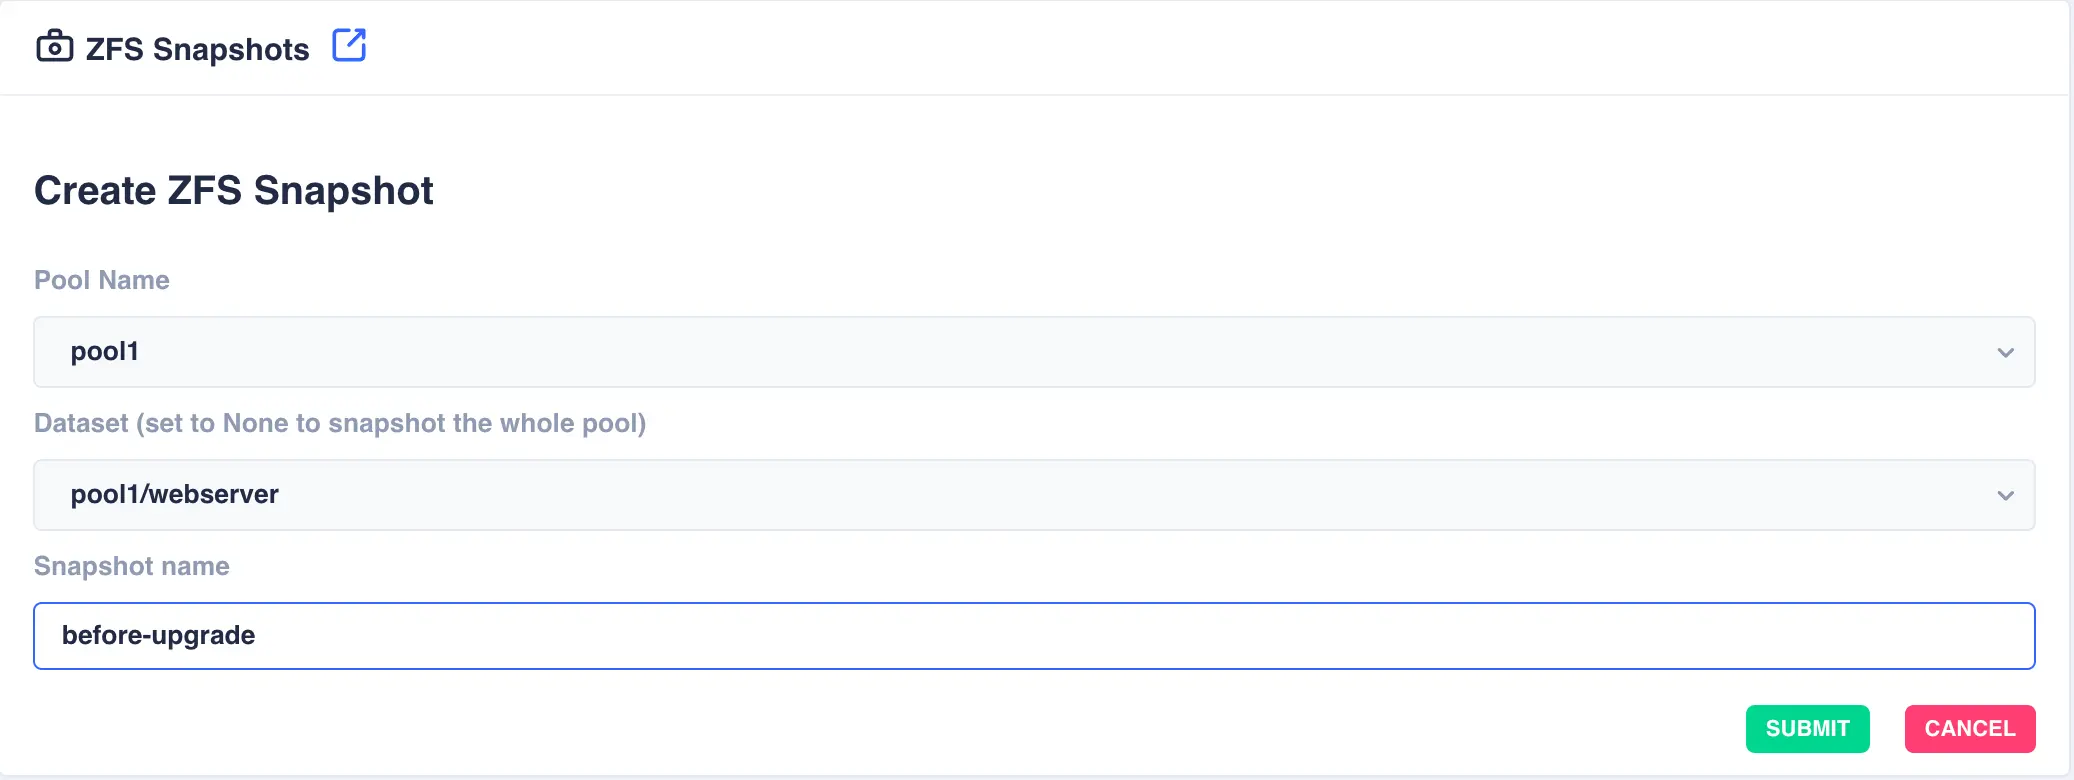
Select the
Pool Nameand theDatasetwithin the pool (set this field toNoneto snapshot the whole of the selected pool). Finally specify a snapshot name and clickSUBMIT:Snapshot name
The cluster software automatically prefixes the snapshot name with pool/dataset name followed by the '@' symbol. Therefore when entering a snapshot name the '@' symbol cannot be used.
-
Click
SUBMITto create - the Zvol is now created in the pool.
Restoring Snapshots
Restoring a snapshot will revert the dataset/pool back to the position it was in when the snapshot was taken. This process is known as rolling back.
Restoration is one way
Any changes made to a dataset/pool since the snapshot was taken will be discarded, therefore use with care.
Deleting Snapshots
Use the DELETE button to remove a snapshot. Once removed any space used by the snapshot will be recovered.
Zvols
Creating Zvols
Zvols are block storage devices, cannot be mounted and primarily used for iSCSI backing stores. The size and compression used can be set for each individual backing store.
The following steps will show the process of creating a zvol within clustered and non clustered pools.
Note
Zvols can only be created or edited on the node where the service is running.
-
To create a zvol navigate to
ZFS -> Zvolsand clickCREATE ZVOL:
-
Select the
Parent Pooland enter aZvol Nameand set any options required: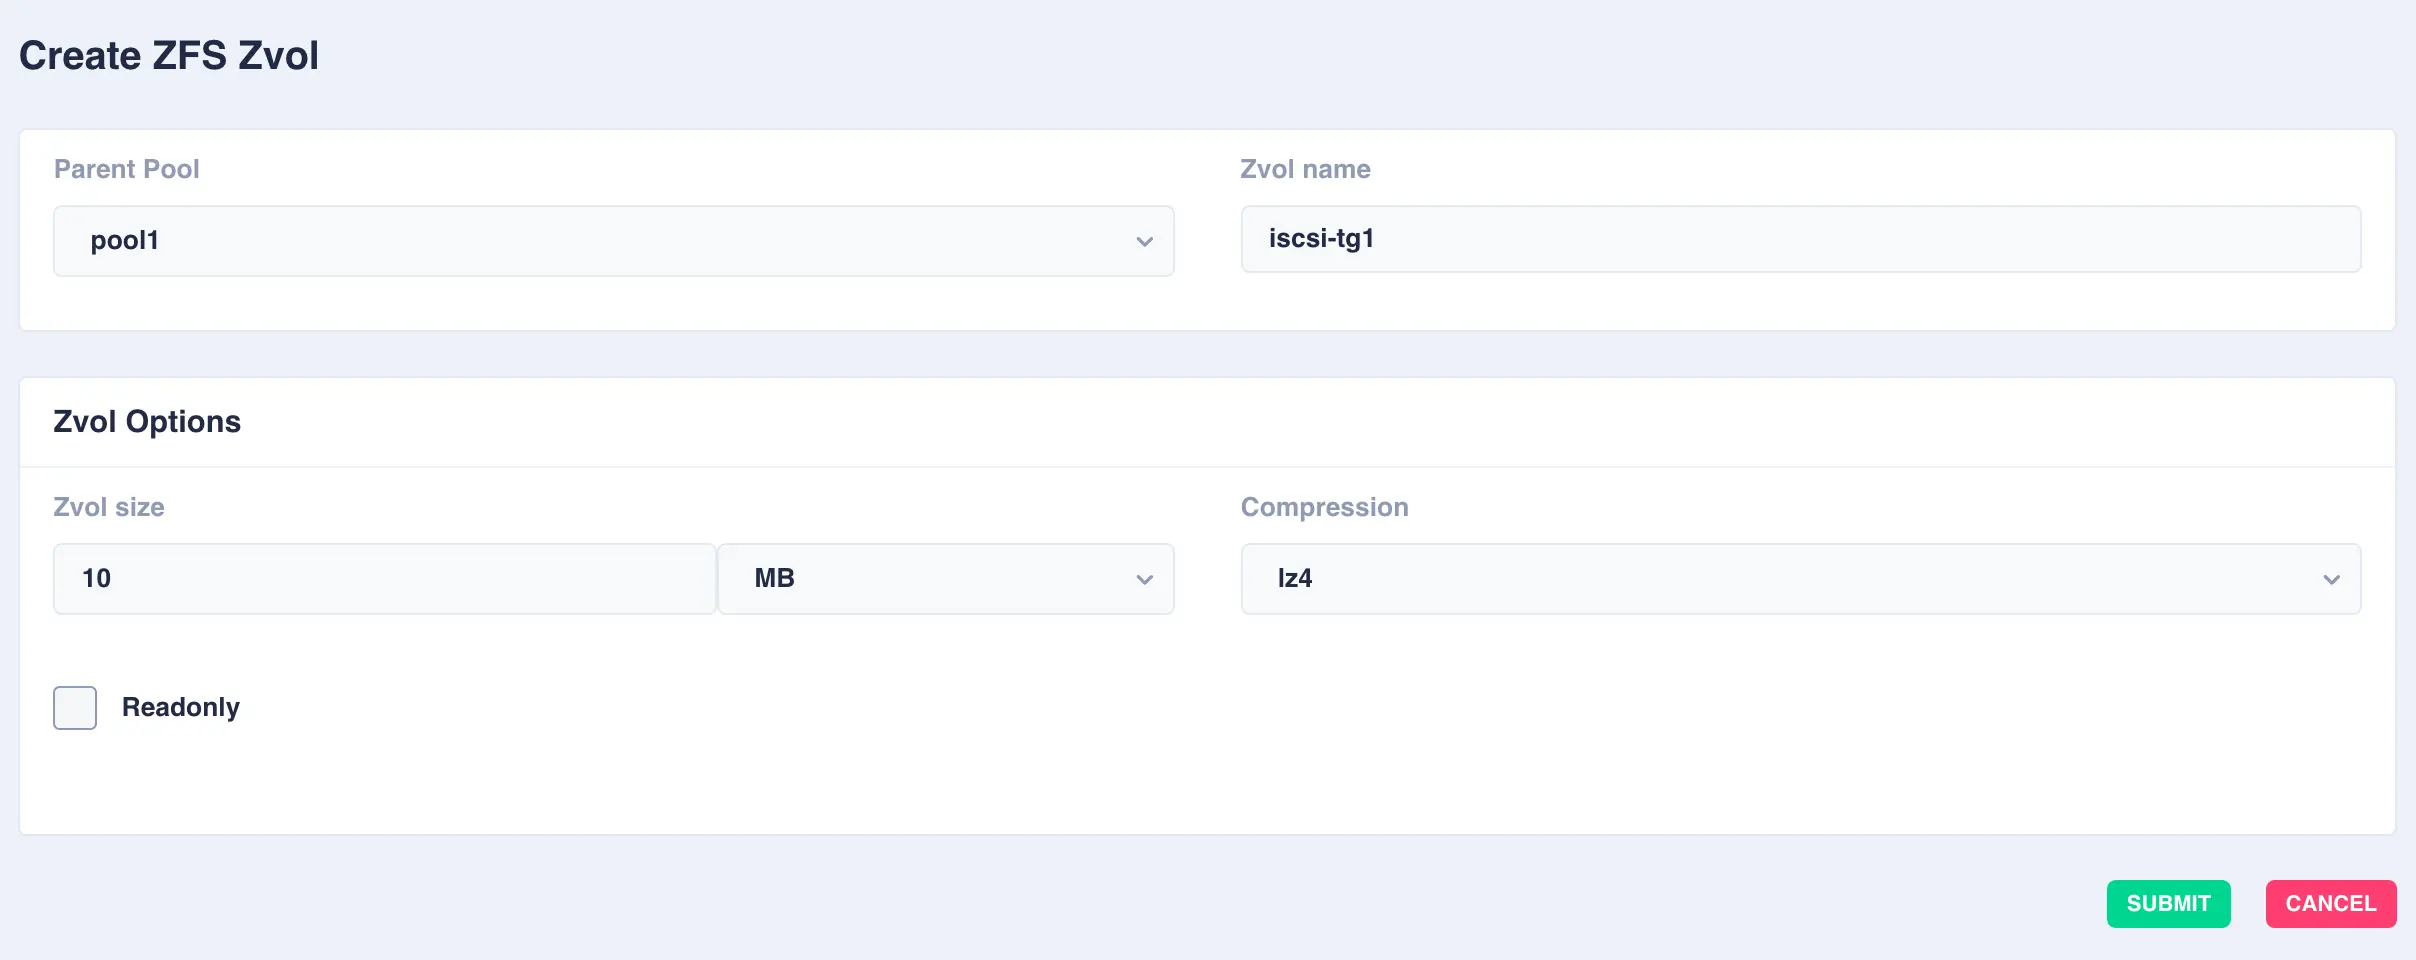
Available options:
OptionDescription Zvol sizeSize of the zvol to create - can be specified in units of KB, MB, GB, TB and PB CompressionEnable compression or select an alternative compression type (lz4/zstd) - on - The current default compression algorithm will be used (does not select a fixed compression type; as new compression algorithms are added to ZFS and enabled on a pool, the default compression algorithm may change).
- off - No compression.
- lz4 - A high-performance compression and decompression algorithm, as well as a moderately higher compression ratio than the older lzjb (the original compression algorithm).
- zstd - Provides both high compression ratios and good performance and is preferable over lz4.
-
Click
SUBMITto create - the Zvol will be created in the selected pool:
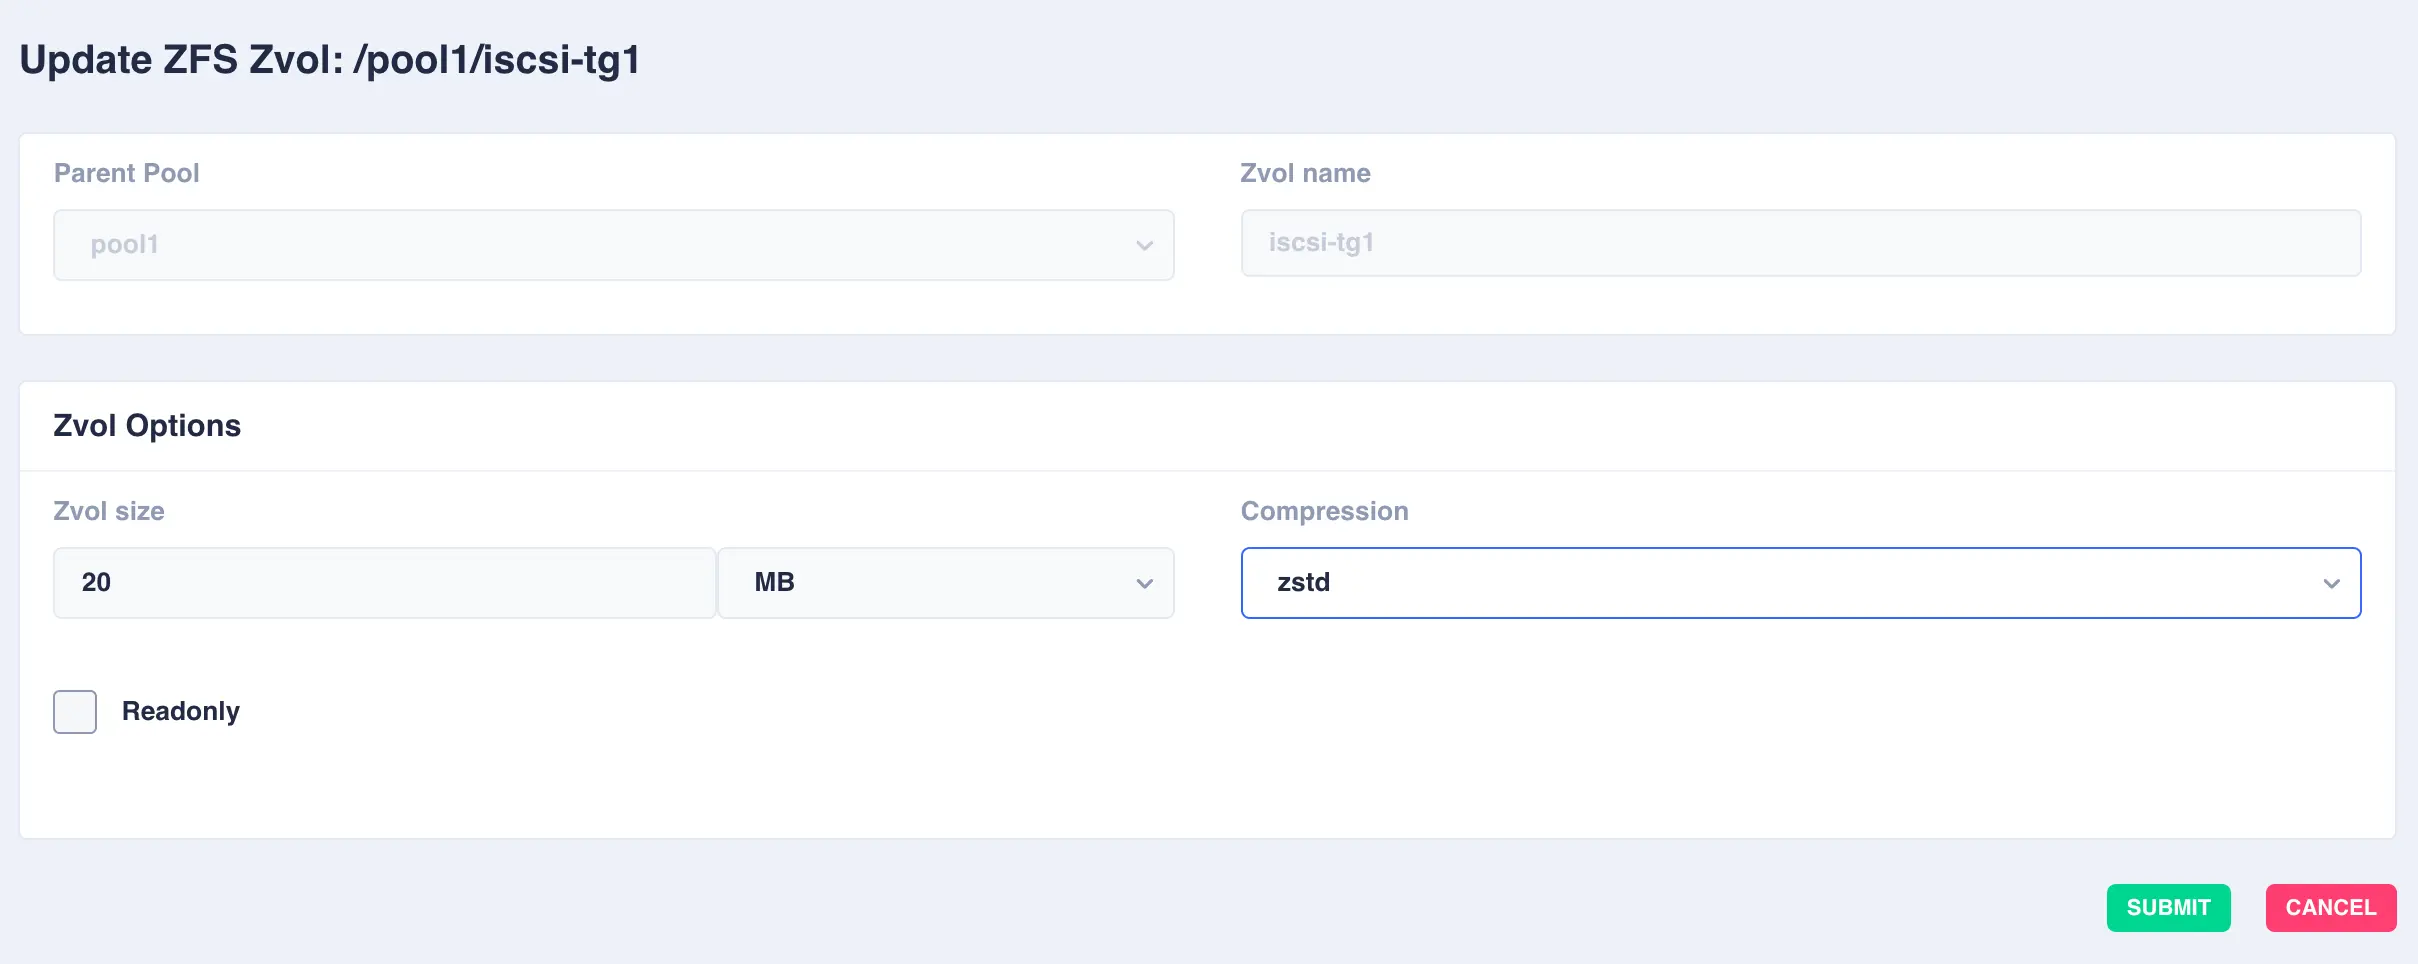
Modifying Zvols
To modify an existing zvol, click the ![]() icon to the right of the zvol:
icon to the right of the zvol:
Deleting Zvols
To delete a zvol, click the ![]() icon to the right of the zvol and confirm
by clicking the
icon to the right of the zvol and confirm
by clicking the REMOVE ZVOL option.
Note
If a Zvol is currently in use as part of an iSCSI share it cannot be deleted, it must be removed from iSCSI sharing first.
iSCSI
Enabling clustered iSCSI
Note
RSF-1 integrates with LIO subsystem to provide iSCSI targets/LUNs.
Please ensure all relevant packages (i.e. targetcli-fb) are installed
and enabled on all nodes in the cluster.
By default RSF-1 does not manage iSCSI shares -
to enable clustered iSCSI management in RSF-1, navigate to
Shares -> iSCSI and click ENABLE ISCSI SHARE HANDLING:

Note that any existing iSCSI configuration will be imported and displayed, otherwise an empty configuration will be shown:

Existing configurations / Portal address of 0.0.0.0
- If any targets of an imported configuration uses the portal address of 0.0.0.0
to listen on, then LIO will block any other portal being created
on addresses other than this.
It is therefore important to either remove any IQN's with this portal address or modify the address withtargetclito use an IP other than 0.0.0.0 - Any targets not using a clustered pool/VIP combination will not be eligible for failover.
Clustering an iSCSI Share: Tranditional and Proxmox
RSF-1 supports two types of iSCSI share. A traditional approach where backing store (Zvol) is made available to clients through the use of a target IQN, accessed via a portal and controlled by ACL's. For this type of share an existing Zvol is required.
The second type of iSCSI share is specific to Proxmox, which has the ability to use an external ZFS based cluster as a
storage backend for its virtual machines. This approach is known in Proxmox as ZFS over iSCSI and when configured
correctly Proxmox is able to automate the process of creating a ZFS volume and then using that volume as an installation/boot
disk for a virtual machine.
When creating a Proxmox share it is NOT necessary to specify the backing store, rather Proxmox will independantly manage it's own zvol's and LUNs within a pool. More information on configuring clustered iSCSI backed storage for Proxmox can be found here.
-
Navigate to
Shares -> iSCSIand click+ADD TARGET: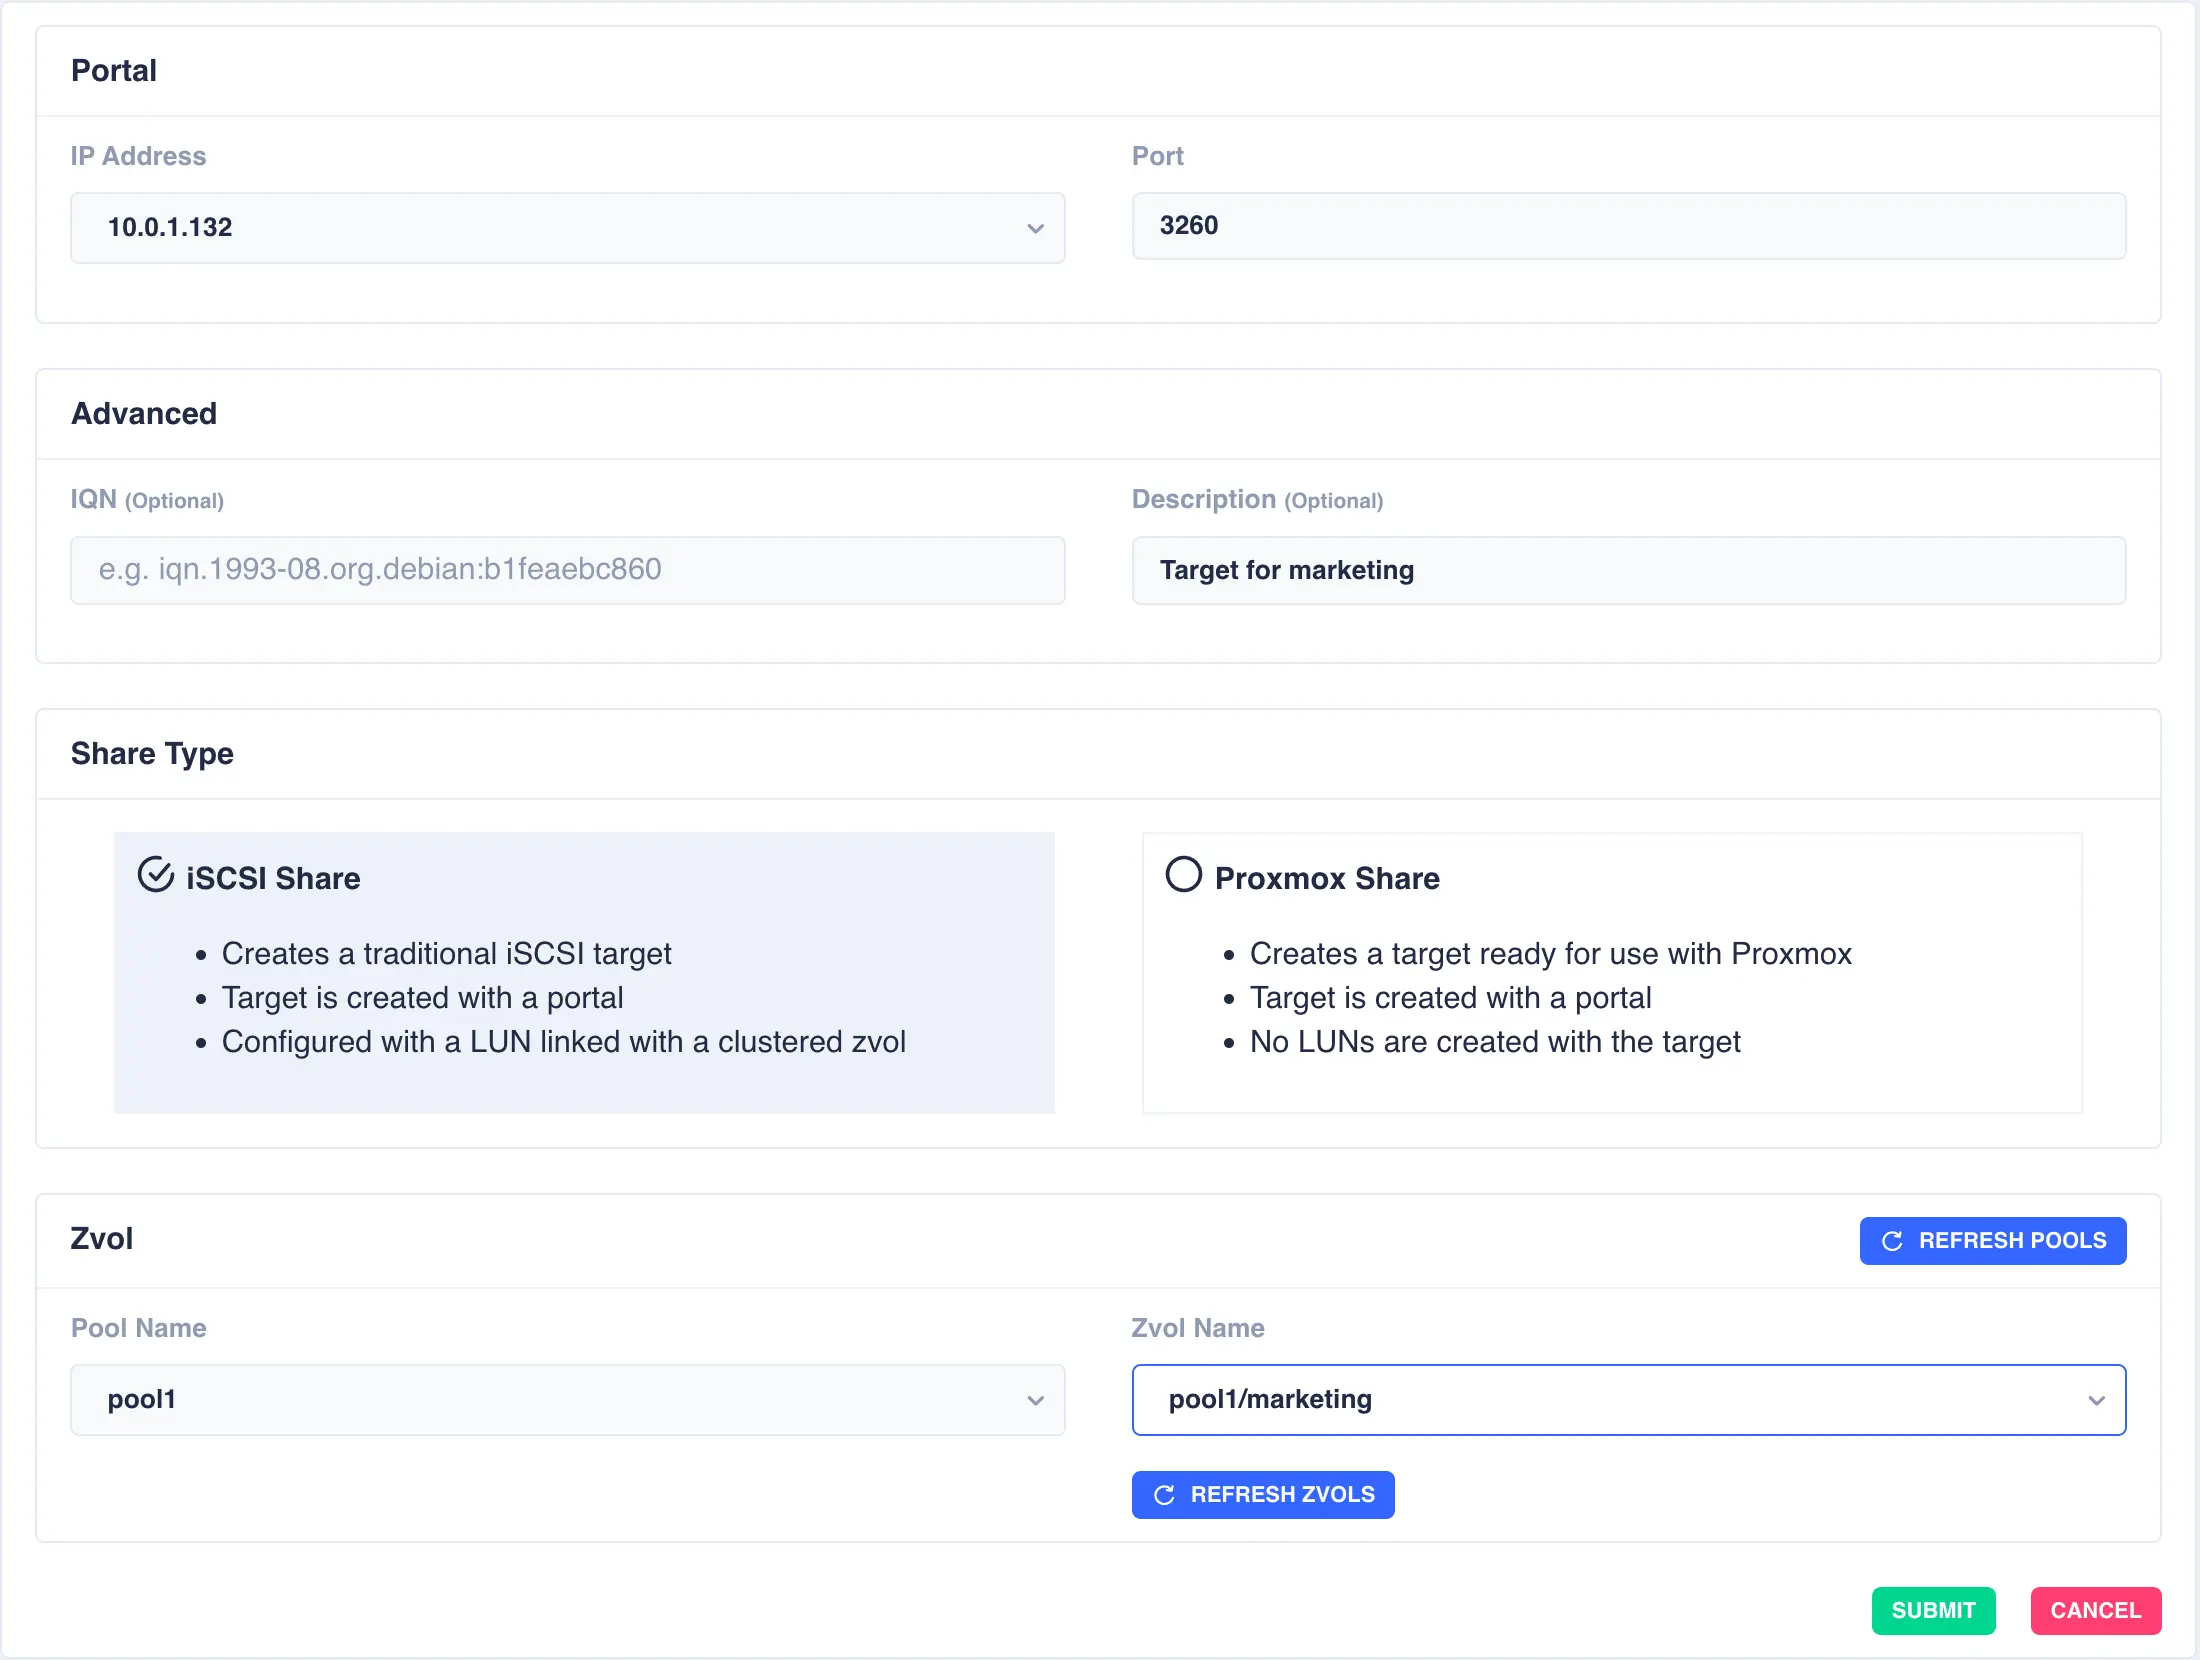
The available options are:
IP Address- Select the VIP to add the portal of the share toPort- The port to use for the portalIQN (Optional)- Enter a custom IQN target nameDescription (Optional)- Enter a description to help easily identify targets
-
Select why type of share to create (in this example a traditional iSCSI share is being created):
iSCSI Share- Creates an iSCSI target with a Portal and LUN using a clustered ZvolProxmox Share- Creates an iSCSI target to be used with Proxmox and ZFS over iSCSI
-
If creating an iSCSI share select the pool and zvol to use as the backing store.
-
When done, click
SUBMIT
The target will now be displayed in a collapsed form along with the description entered:

Click the ![]() icon on the left hand side of a target for more detailed information:
icon on the left hand side of a target for more detailed information:
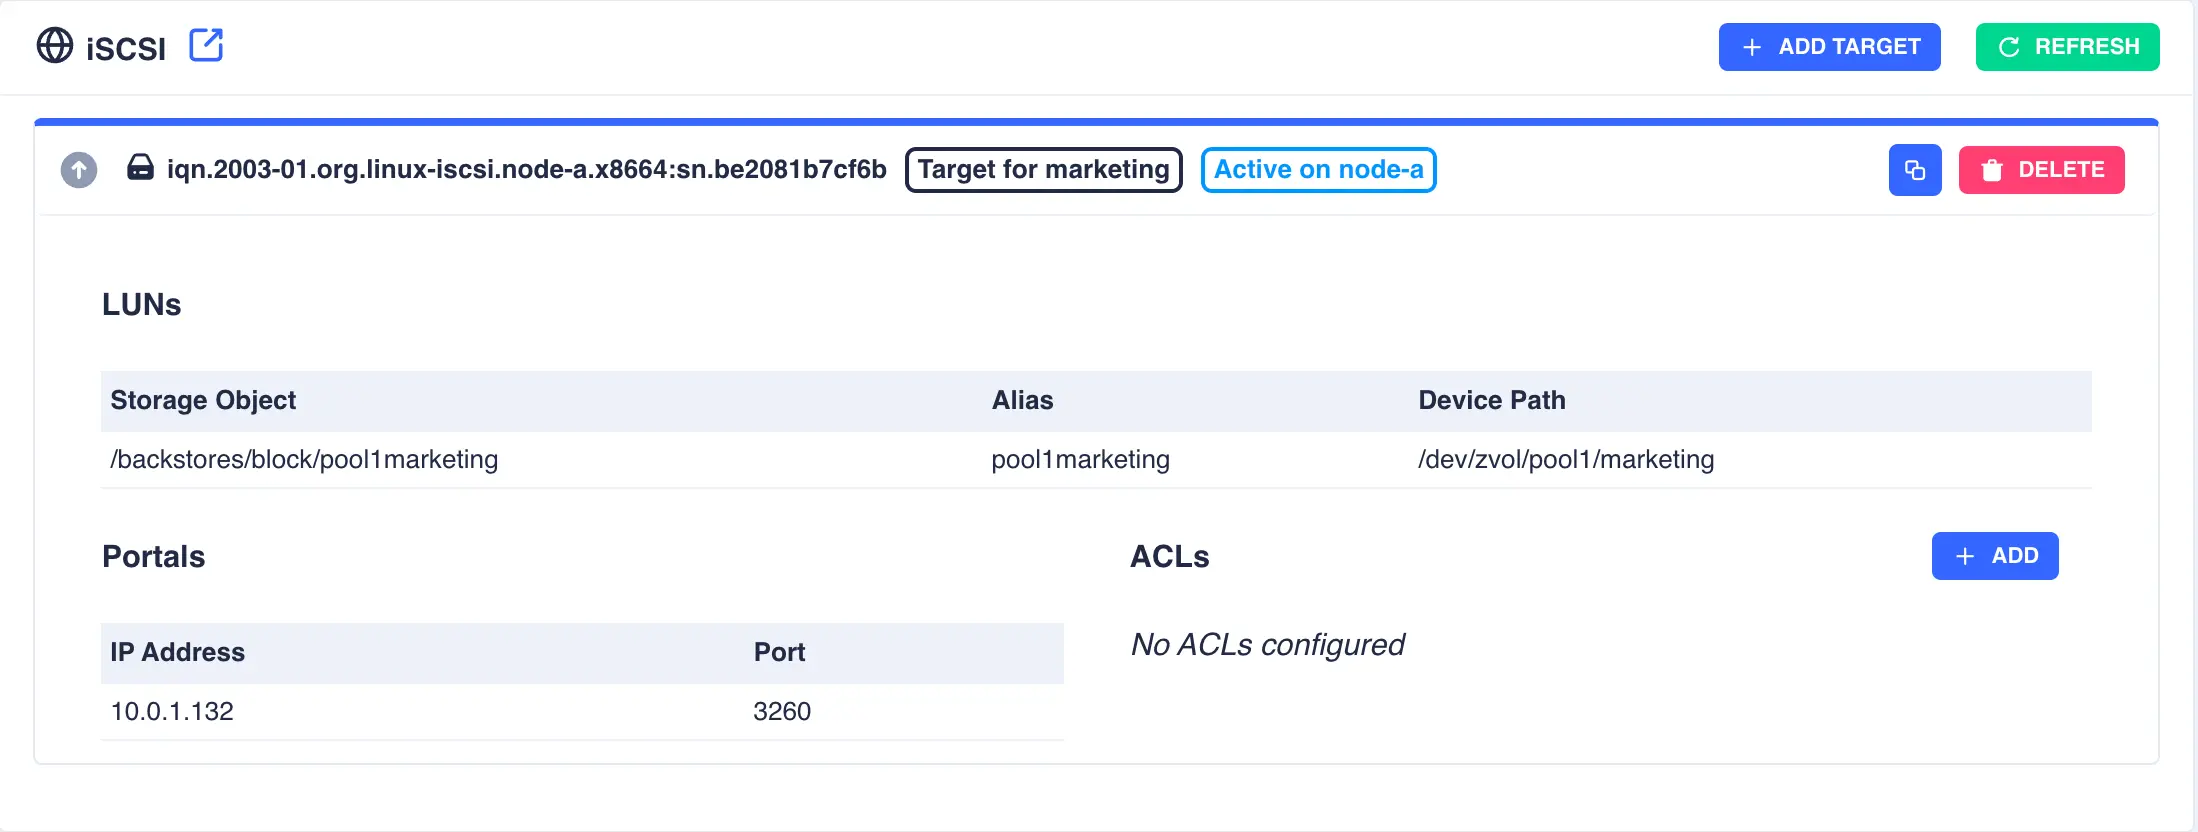
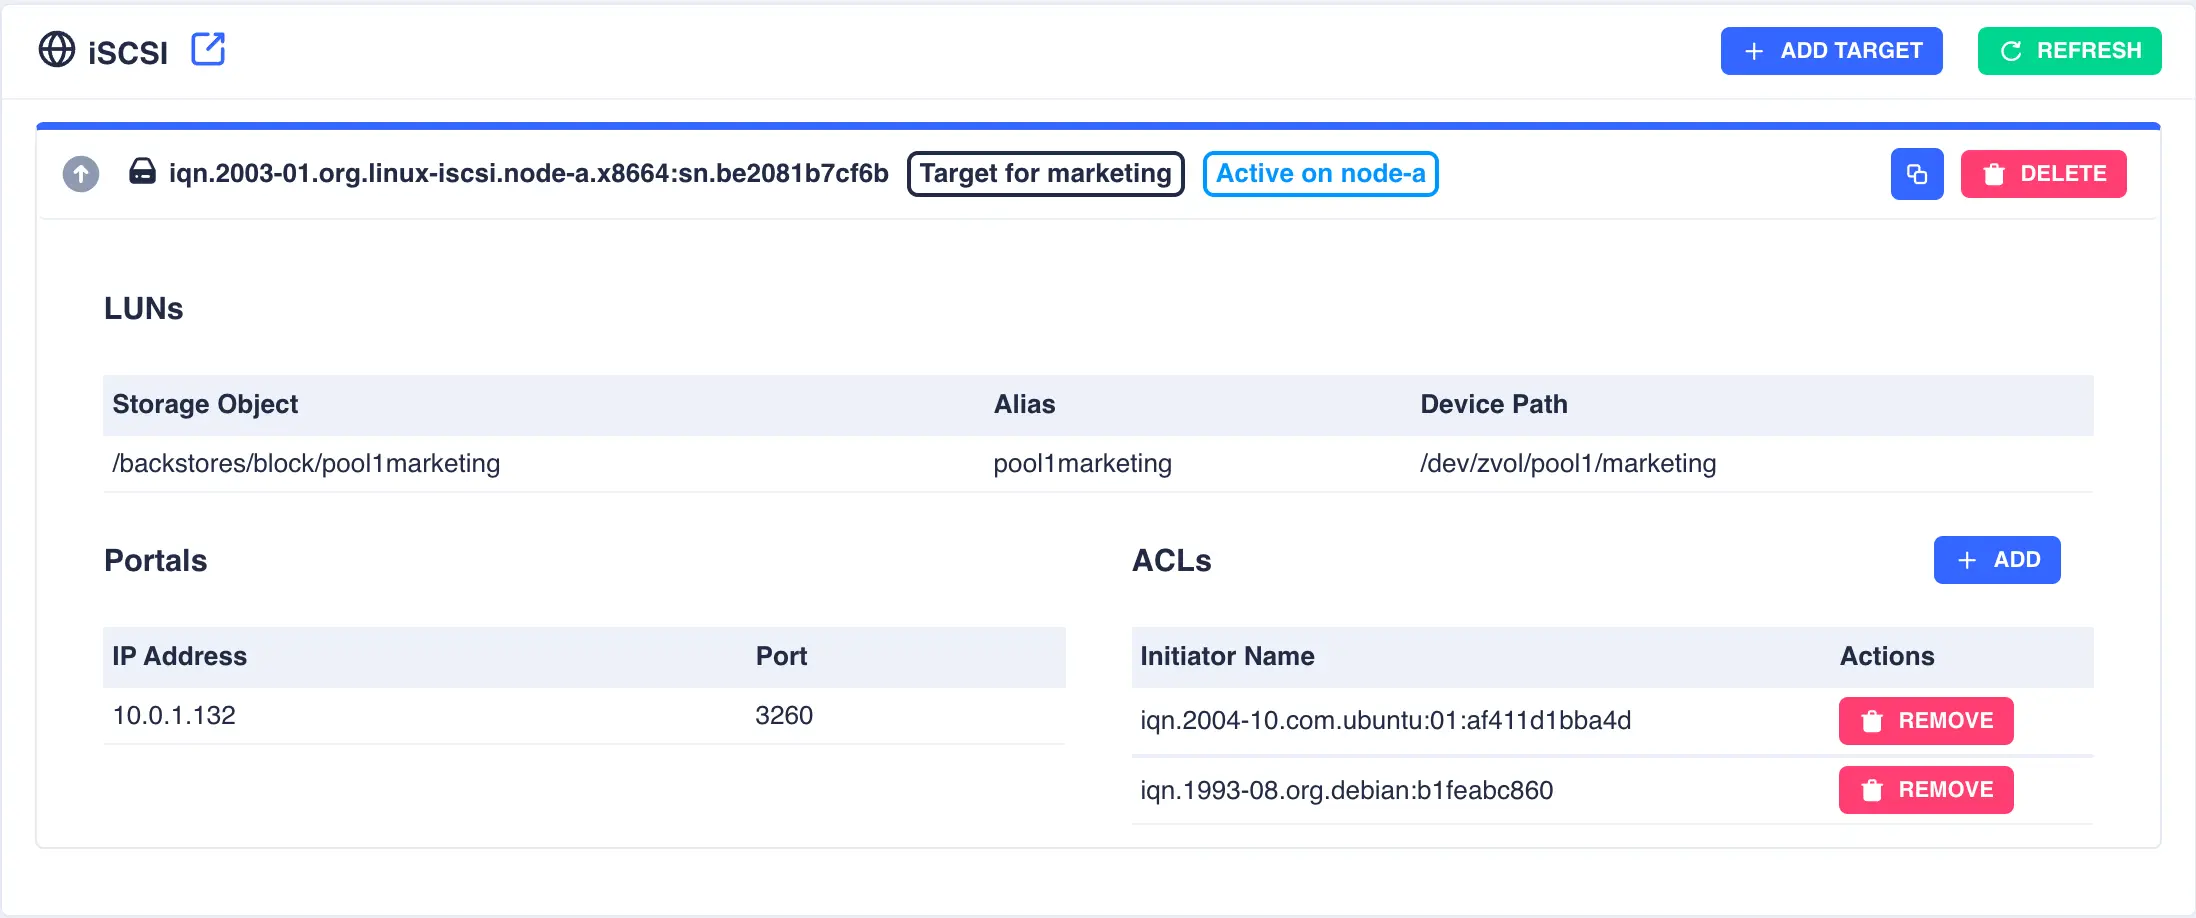
Optionally, restrict access to the target using ACL's. To add an ACL click the + ADD button, enter the remote initiator name and finally click the SUBMIT button:

As many ACL as required can be added to each target:
Combining iSCSI shares
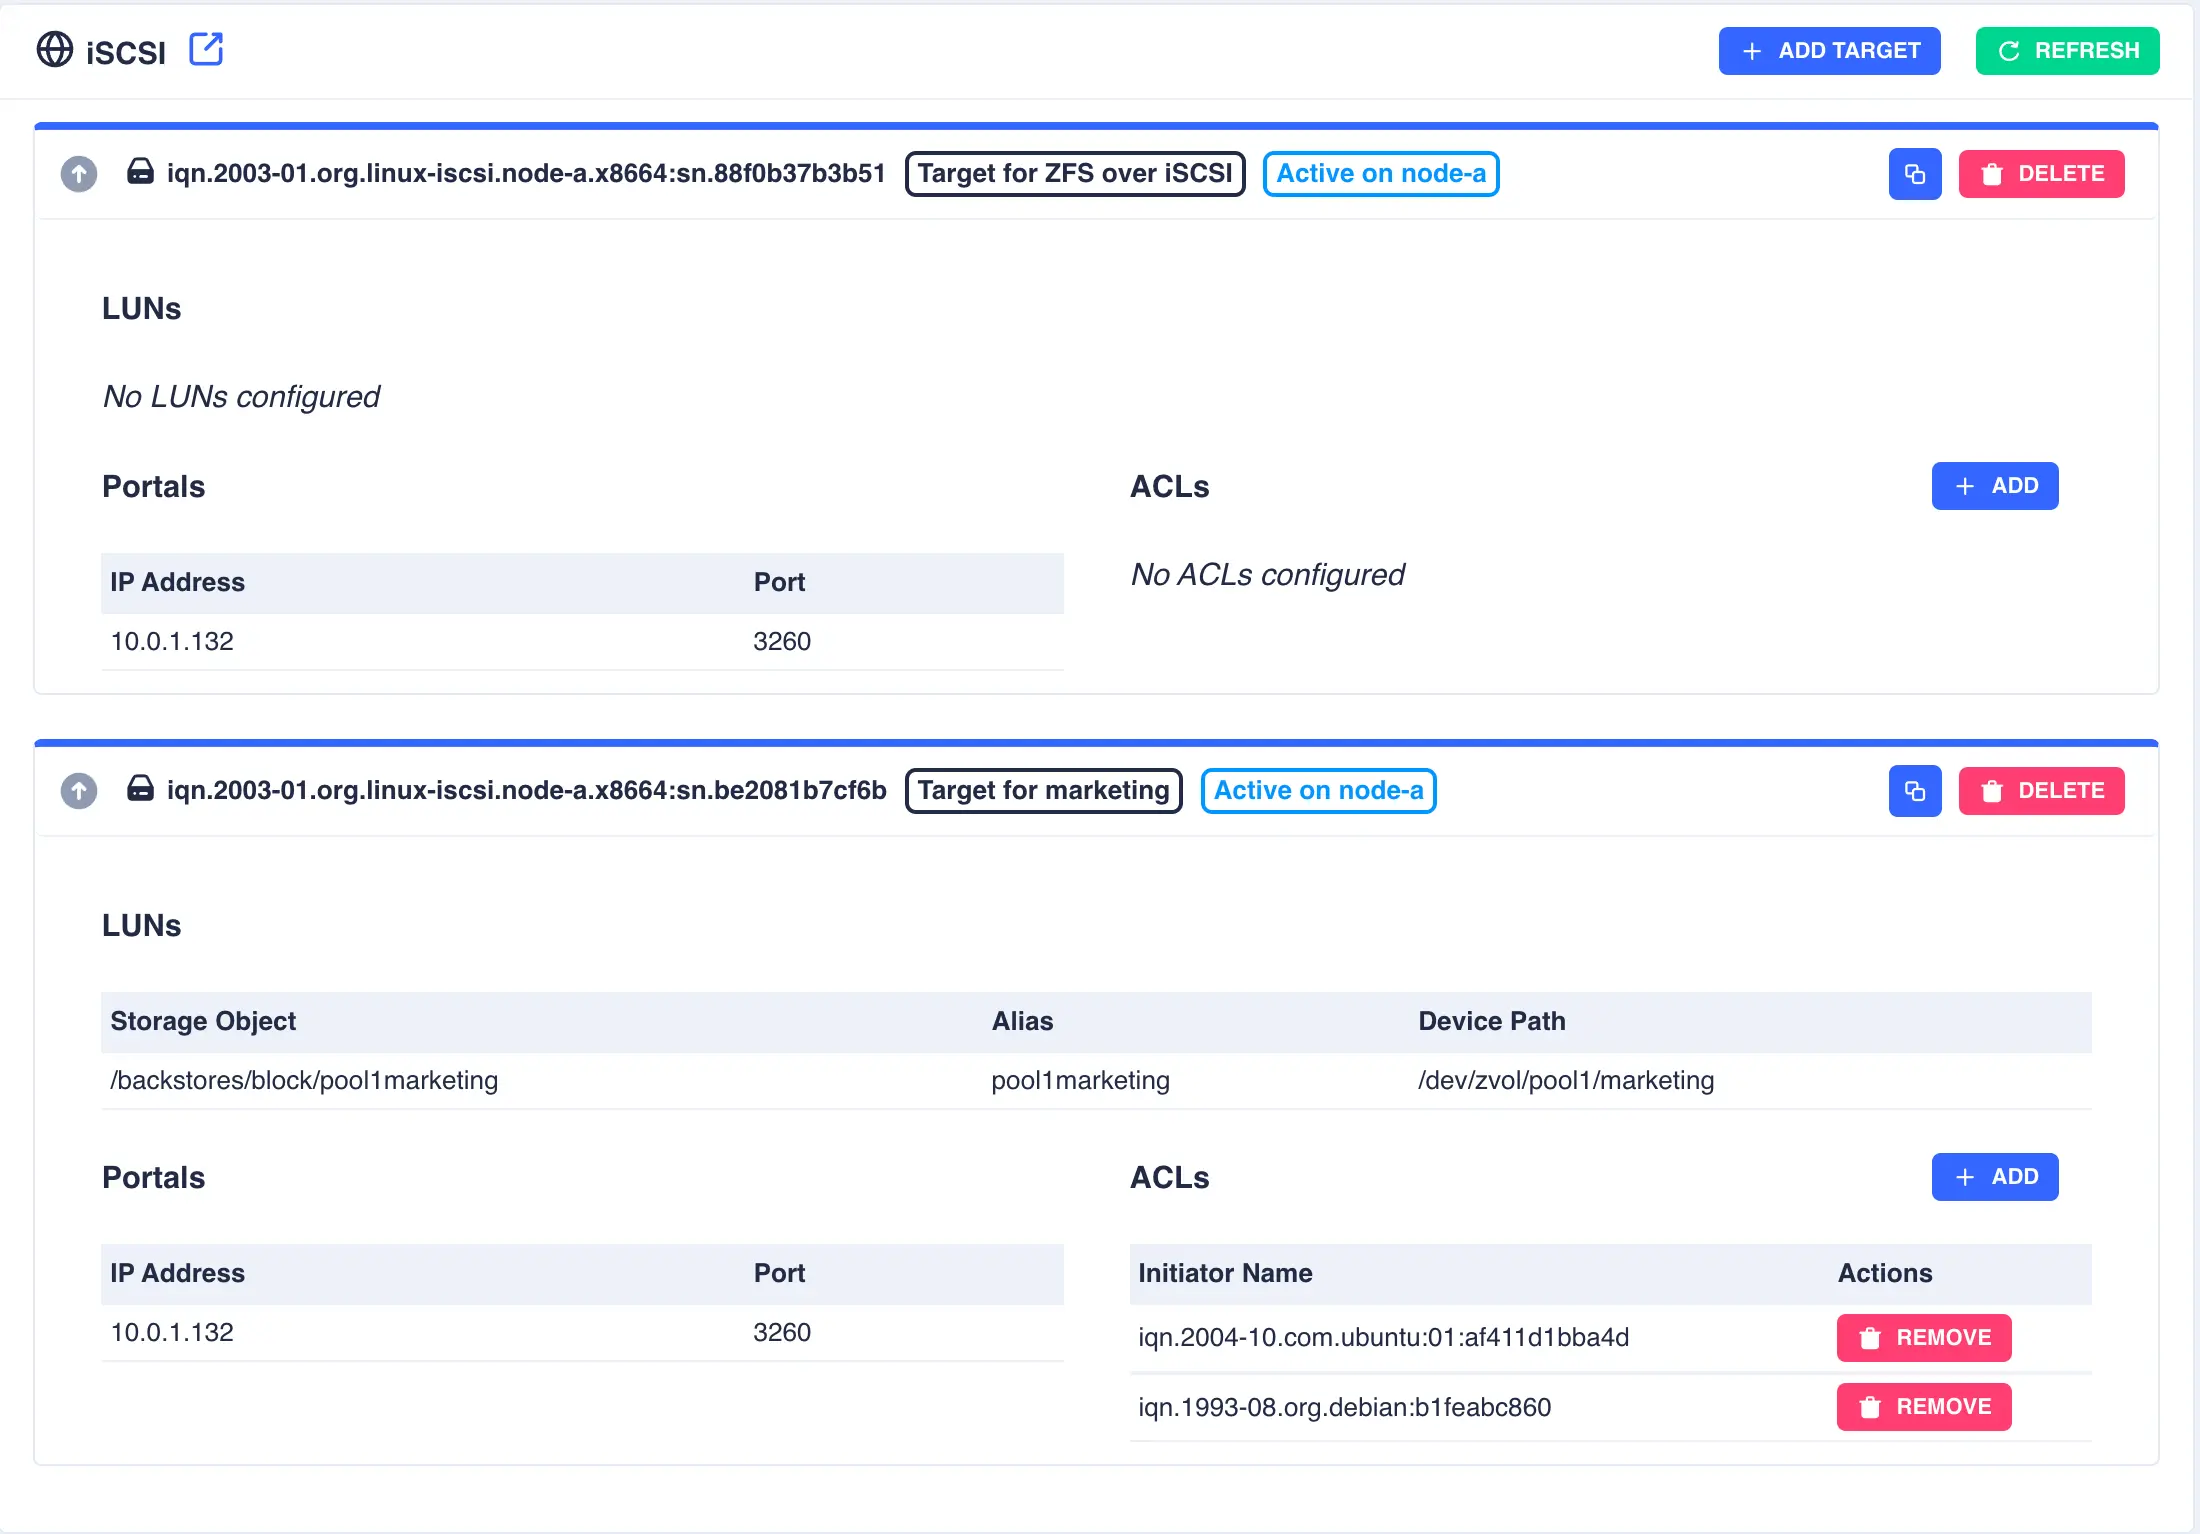
The cluster supports the use of both types of iSCSI share simultaneously. The main difference being when Proxmox shares
are first created they will have no LUN's configured:
Deleting an iSCSI Share
To delete an iSCSI share click on the DELETE button next to the target and click CONFIRM:

NFS shares
Enabling clustered NFS
Note
Before enabling NFS please ensure all relevant packages (i.e. nfs-kernel-server) are installed and enabled on all nodes in the cluster.
By default RSF-1 does not manage NFS shares - the contents of the /etc/exports file are
left to be managed by the system administrator manually on each node in the cluster.
To enable the management of the exports file from the webapp and
synchronise it across all cluster nodes, navigate to
Shares -> NFS and click ENABLE NFS SHARE HANDLING:

Once enabled the shares table will be shown:

Before creating new shares the option to import the existing
/etc/exports file is available (this option is disabled once any new
shares are added via the webapp):
Clustering an NFS share
-
Navigate to
Shares -> NFSand click+Addon the NFS table to fill in the required info. The available options are:Description- Description of the Share (optional)Path- Path of the directory/dataset to share - for example/pool1/webserverExport Options- Follow the convention of<host1>(<options>) <hostN>(<options>)where the host part can be an individual host or the wildcard character*. For a more detailed description of the available options click theSHOW NFS OPTIONS EXAMPLESbutton.

-
Click
✓to add the share:
The share will now be available and clustered.
FSID setting for failover
NFS identifies each file system it exports using a file system UUID or the device number of the device holding the file system. NFS clients use this identifier to ensure consistency in mounted file systems; if this identifier changes then the client considers the mount stale and typically reports "Stale NFS file handle" meaning manual intervention is required.
In an HA environment there is no guarantee that these identifiers will be the same on failover to another node (it may for example have a different device numbering). To alleviate this problem each exported file system should be assigned a unique identifier (starting at 1 - see the note below on the root setting) using the NFS fsid= option, for example:
/tank      10.10.23.4(fsid=1)
/sales     10.01.23.5(fsid=2,sync,wdelay,no_subtree_check,ro,root_squash)
/accounts  accounts.dept.foo.com(fsid=3,rw,no_root_squash)
Here each exported file system has been assigned a unique fsid thereby ensuring that no matter which cluster node exports the filesystem it will always have a consistent identifier exposed to clients.
For NFSv4 the option fsid=0 or fsid=root is reserved for the "root" export. When present all other exported directories must be below it, for example:
/srv/nfs       192.168.7.0/24(rw,fsid=root)
/srv/nfs/data  192.168.7.0/24(fsid=1,sync,wdelay,no_subtree_check,ro,root_squash)
As /srv/nfs is marked as the root export then the export /srv/nfs/data
is mounted by clients as nfsserver:/data. For further details see the NFS manual page.
Modifying an NFS Share
To modify an NFS chare, click the ![]() icon to the left of the dataset:
icon to the left of the dataset:

When done, click ✓ to update the share.
Deleting an NFS Share
To delete an NFS share click the ![]() icon and then confirm the deletion:
icon and then confirm the deletion:

SMB
Enabling Samba/SMB in the cluster
Note
Before enabling SMB please ensure all relevant Samba packages (i.e. Samba, NMB, Winbind) are installed and enabled on all nodes in the cluster.
By default RSF-1 does not manage SMB shares - the smb.conf file is
left to be managed by the system administrator manually on each node in the cluster.
To enable the management of the SMB from the webapp and
synchronise it across all cluster nodes, navigate to
Shares -> SMB and click ENABLE SMB SHARE HANDLING:

You will now be presented with the main SMB shares screen consisting of a number of tabs to handle different aspects of SMB configuration.
Initial SMB configuration
SMB/Samba provides numerous ways to configure authentication and sharing depending upon the environment and the complexity required. This guide documents two commonly used configurations:
- User Authentication - standalone clustered SMB sharing with local user authentication.
- ADS Authentication - member of an Active Directory domain with authentication managed by a domain controller.
Local User Authentication
With local user authentication, cluster users must be created with the SMB support enabled. A user created this way will have the same login name, UID and GID on all nodes in the cluster along with an equivalent Samba user entry to provide the required SMB authentication. See Unix users in this guide for further details.
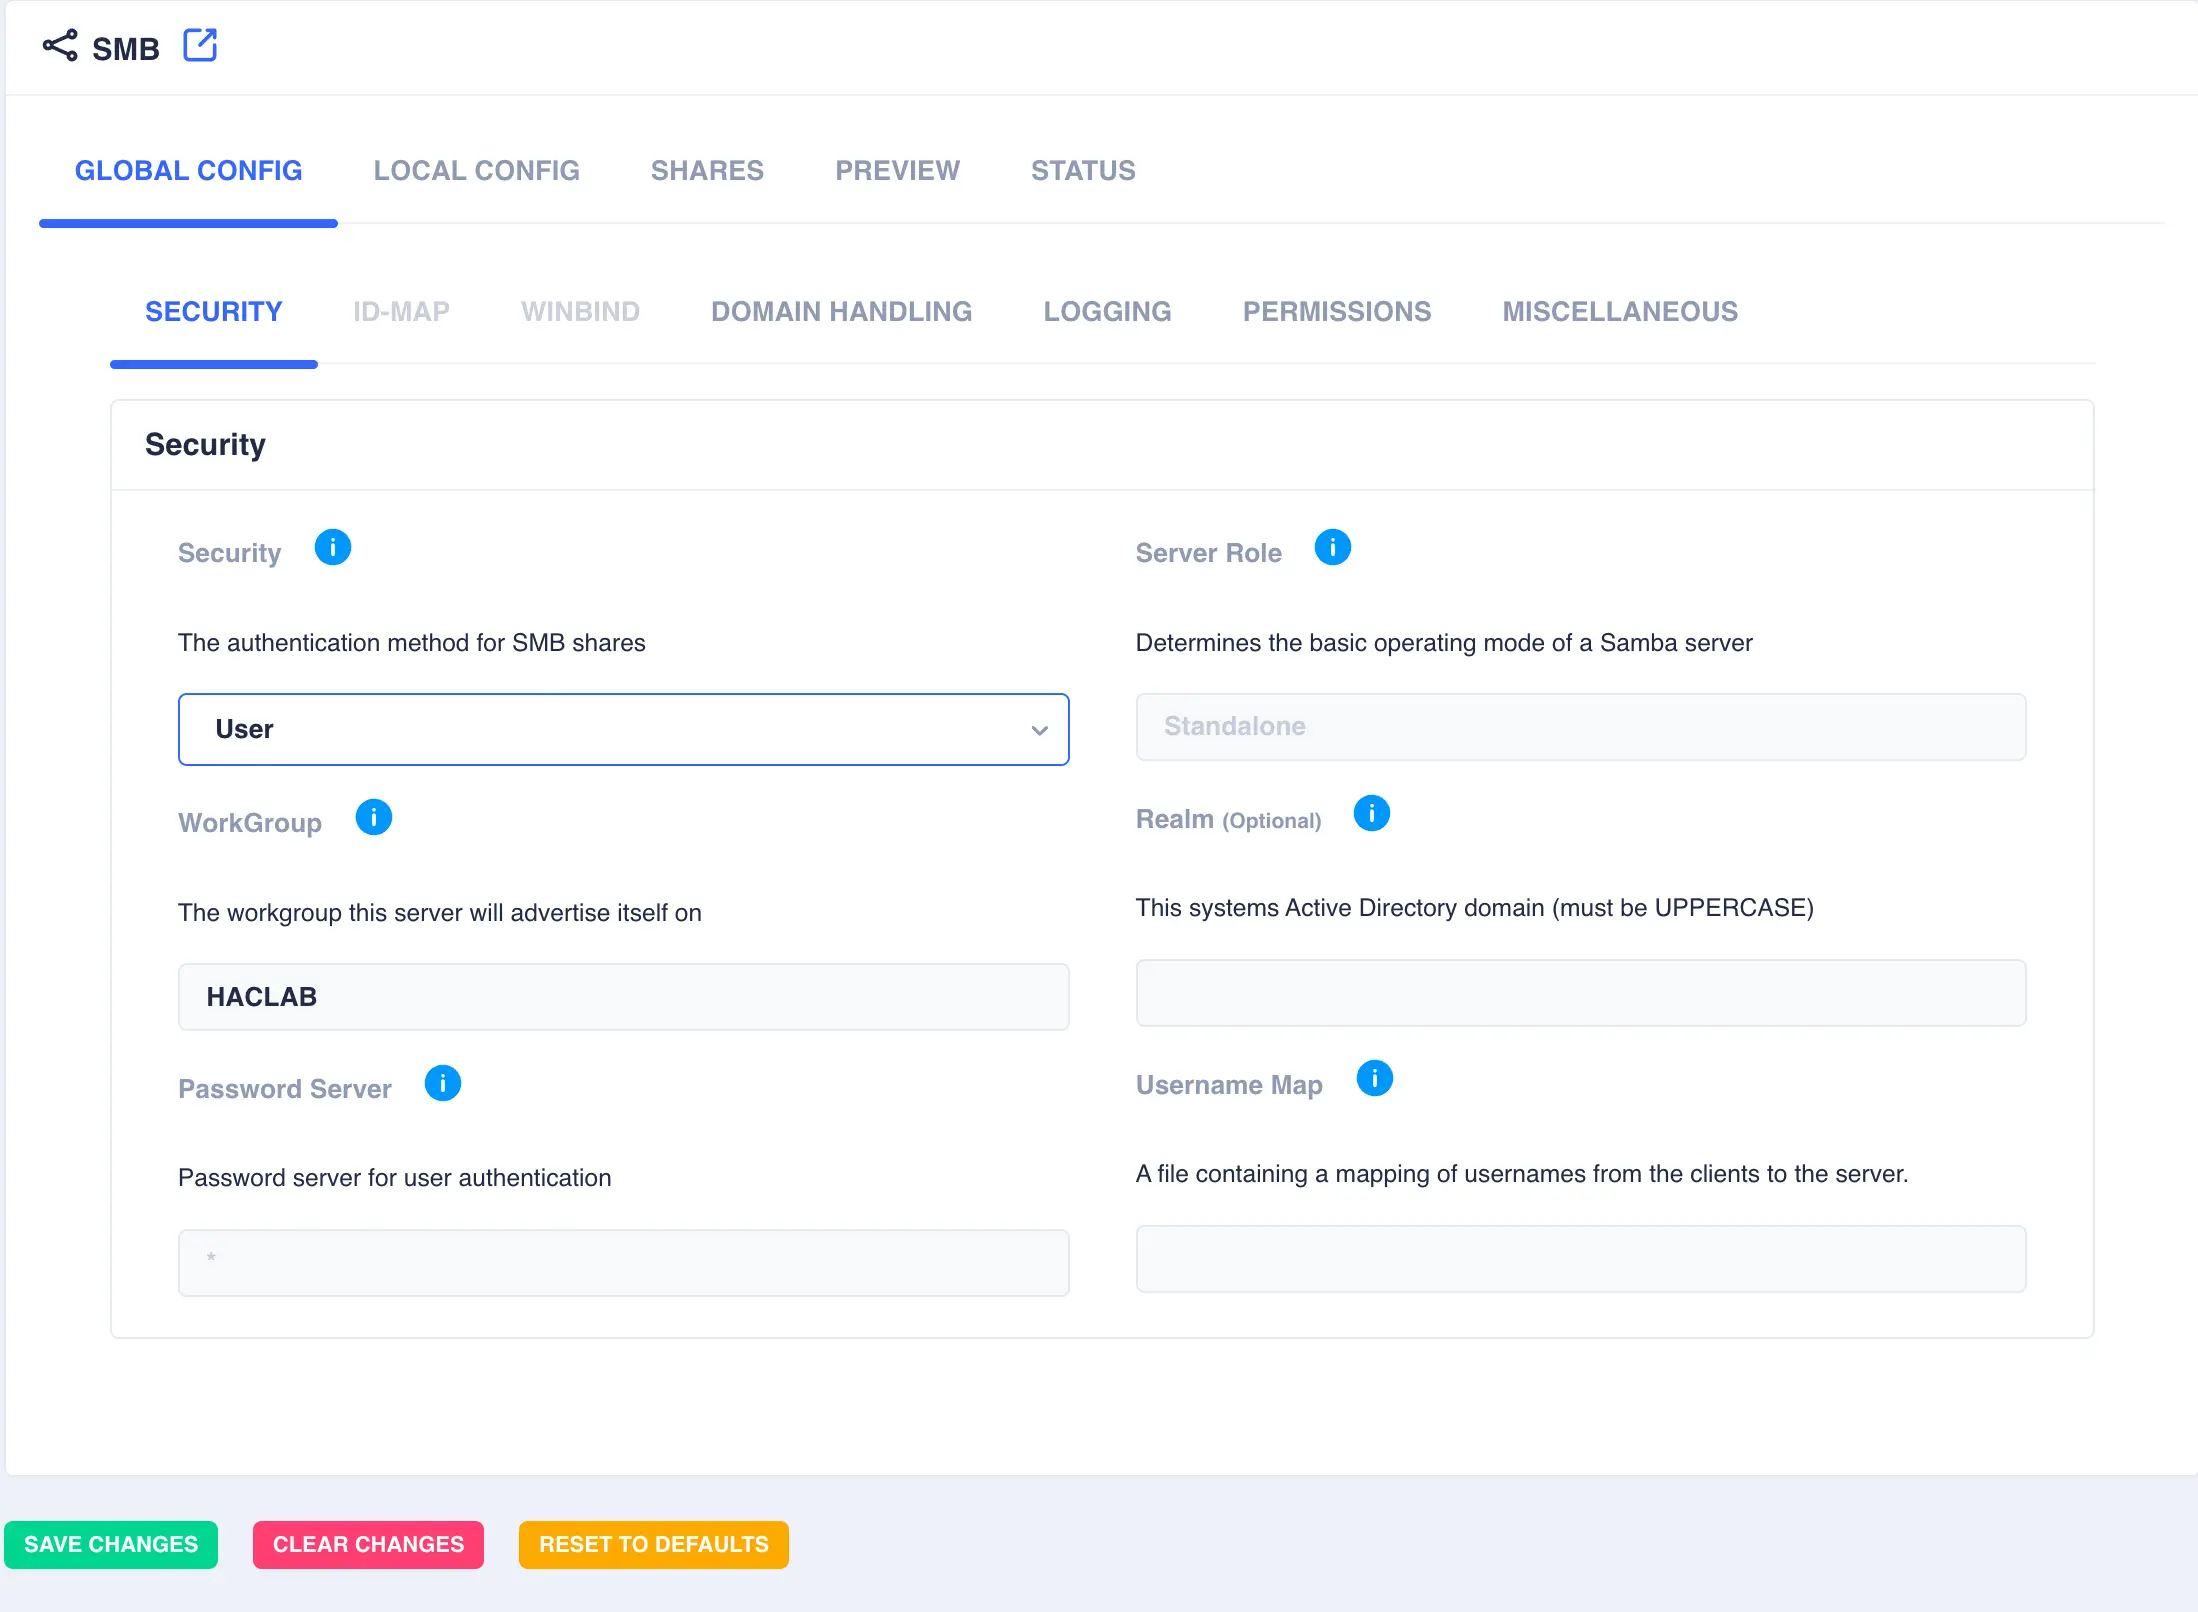
Configuring Samba Globals for User Authentication
Navigate to Shares -> SMB, select the GLOBAL CONFIG -> SECURITY tab, then select User from the drop down security
list and optionally set the desired workgroup name. Click SAVE CHANGES:
ADS Authentication
RSF-1 can also be configured to use Active Directory for user authentication (ADS) when being deployed for use in a Microsoft environment.
In a Microsoft environment users are identified using security identifiers (SIDs). A SID is not just a number, it has a structure and
is composed of several values, whereas Unix user and group identifiers consist of just a single number. Therefore a mechanism needs to be
chosen to map SIDs to Unix identifiers. Winbind (part of the Samba suite) is capable of performing that mapping using a number of such
mechanisms known as Identity Mapping Backends; two of the most commonly used being tdb (Trivial Data Base) and rid (Relative IDentifier).
tdb - The default idmap backend is not advised for an RSF-1 cluster as tdb generates and stores UIDs/GIDs locally on each cluster node,
and works on a "first come first served" basis. When allocating UIDs/GIDs it simply uses the next available number with no consideration
given to a clustered environment, which can lead to UID/GID mismatches between cluster nodes.
rid - This mechanism is recommended as the idmap backend for a clustered environment. rid implements a read-only API to retrieve account and group information
from an Active Directory (AD) Domain Controller (DC) or NT4 primary domain controller (PDC). Therefore using this approach ensures UID/GID continuity on all cluster nodes.
When using the rid backend, a windows SID (for example S-1-5-21-1636233473-1910532501-651140701-1105) is mapped to a UNIX UID/GID by
taking the relative identifier part of the SID (the last set of digits - 1105 in the above example) and combining it with a preallocated range of numbers to provide
a unique identifier that can be used for the UNIX UID/GID. This preallocated range is configured using the Samba IDMAP entry.
Configuring Samba Globals for ADS Authentication
-
Navigate to
Shares -> SMB, select theGLOBAL CONFIG -> Securitytab, then selectADSfrom the drop down security list, set the workgroup and realm name. Clicksave changes:
-
Open the
GLOBAL CONFIG -> ID-MAPtab. By default a wildcard entry is preconfigured (this is used by Samba as a catchall and is a required entry). Click+Addand configure an entry for theridmapping. Enter the same workgroup name used in the security settings and enter the desired range of numbers to use for mapping the IDs. Select a range that starts after the wildcard range and provide enough scope to cover the expected maximum number of windows users in the domain. Click the✓to update the mapping table: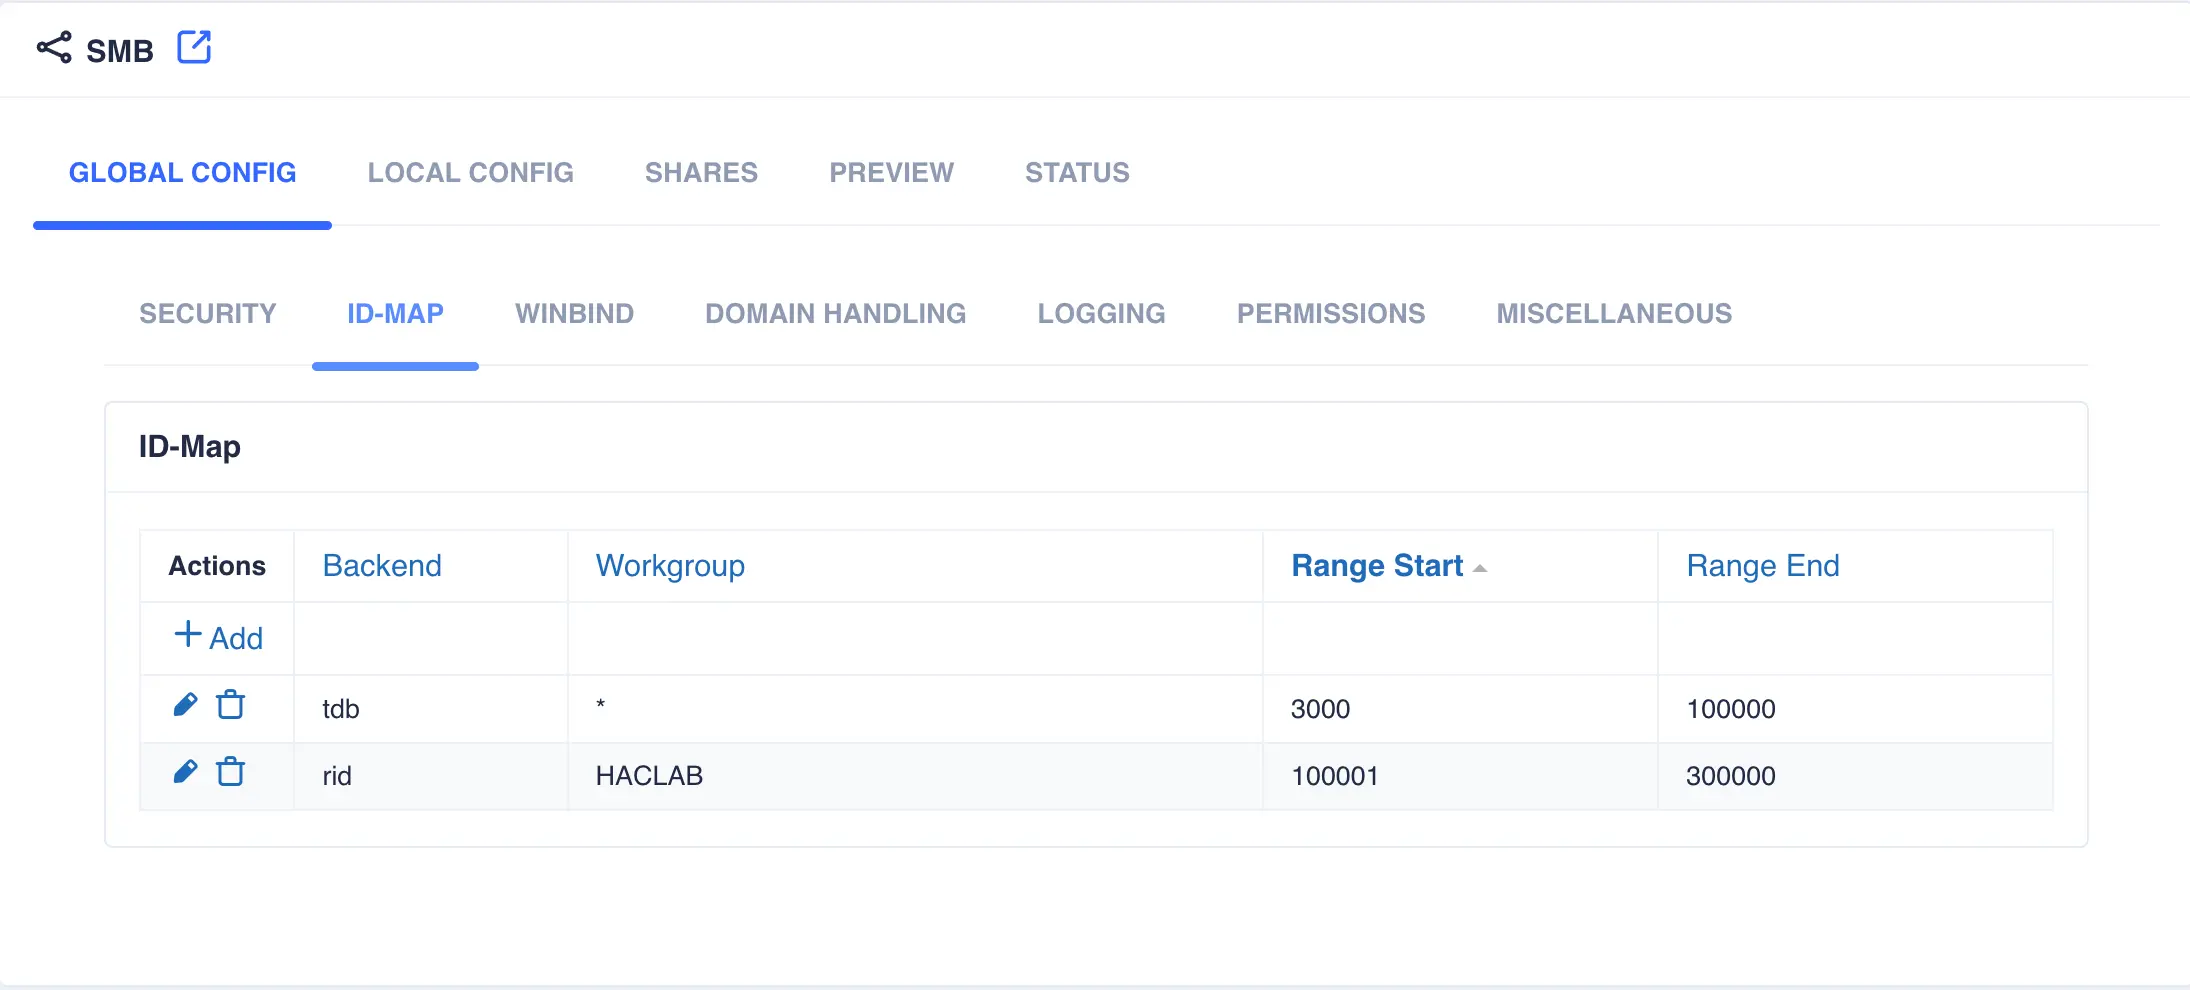
-
Click
SAVE CHANGES. The resulting configuration file (viewable from theCONFIGtab) should look similar to the following:[global] encrypt passwords = Yes idmap config * : backend = tdb idmap config * : range = 3000-100000 idmap config HACLAB : backend = rid idmap config HACLAB : range = 100001-300000 realm = HACLAB.COM security = ADS server role = Member Server workgroup = HACLAB
Samba is now configured to use ADS authentication.
Testing ADS authentication (optional)
ADS authentication can be tested by allowing users from the windows domain to login to the Unix cluster hosts. A successful login proves that Samba is able to authenticate using the Windows Domain Controller.
Some additional configuration is required as follows (remember to do this on all nodes in the cluster):
-
Configure winbind authentication for users and groups in the name service switch file
/etc/nsswitch.conf. Addwinbindas a resolver for users and groups:This tells the operating system to lookup users locally first (passwd: files winbind systemd group: files winbind systemd/etc/passwd), followed bywinbind. -
Change DNS in
/etc/resolv.confso it refers to the Active Directory server:domain haclab.com search haclab.com nameserver 10.254.254.111 -
Join the active directory domain.
# net ads join -U Administrator Password for [HACLAB\Administrator]: Using short domain name -- HACLAB Joined 'WCALMA1' to dns domain 'haclab.com' No DNS domain configured for wcalma1. Unable to perform DNS Update. DNS update failed: NT_STATUS_INVALID_PARAMETER # net ads info LDAP server: 10.254.254.111 LDAP server name: ws2022.haclab.com Realm: HACLAB.COM Bind Path: dc=HACLAB,dc=COM LDAP port: 389 Server time: Fri, 13 Sep 2024 17:07:32 BST KDC server: 10.254.254.111 Server time offset: 1 Last machine account password change: Fri, 13 Sep 2024 16:57:04 BST -
Restart
winbind.# systemctl restart winbind -
Query
winbindto confirm it is able to query the Active Directory server:# wbinfo -U HACLAB\administrator HACLAB\guest HACLAB\krbtgt HACLAB\hacuser1 HACLAB\hacuser2
Samba can be further configured to allow AD users to login if so desired. Two further steps are required:
-
Enable auto creation of home directories. For Debian based systems:
For RedHat based systems:# vi /etc/pam.d/common-session # add to the end if you need (auto create a home directory at initial login) session optional pam_mkhomedir.so skel=/etc/skel umask=077Navigate to# authselect enable-feature with-mkhomedir # systemctl enable --now oddjobdShares -> SMB, select theGLOBAL CONFIG -> SECURITYtab, then selectUserfrom the drop down security -
Configure a login shell for Samba. Navigate to
Shares -> SMB, select theGLOBALS -> MISCELLANEOUStab and set an appropriate login shell for the system: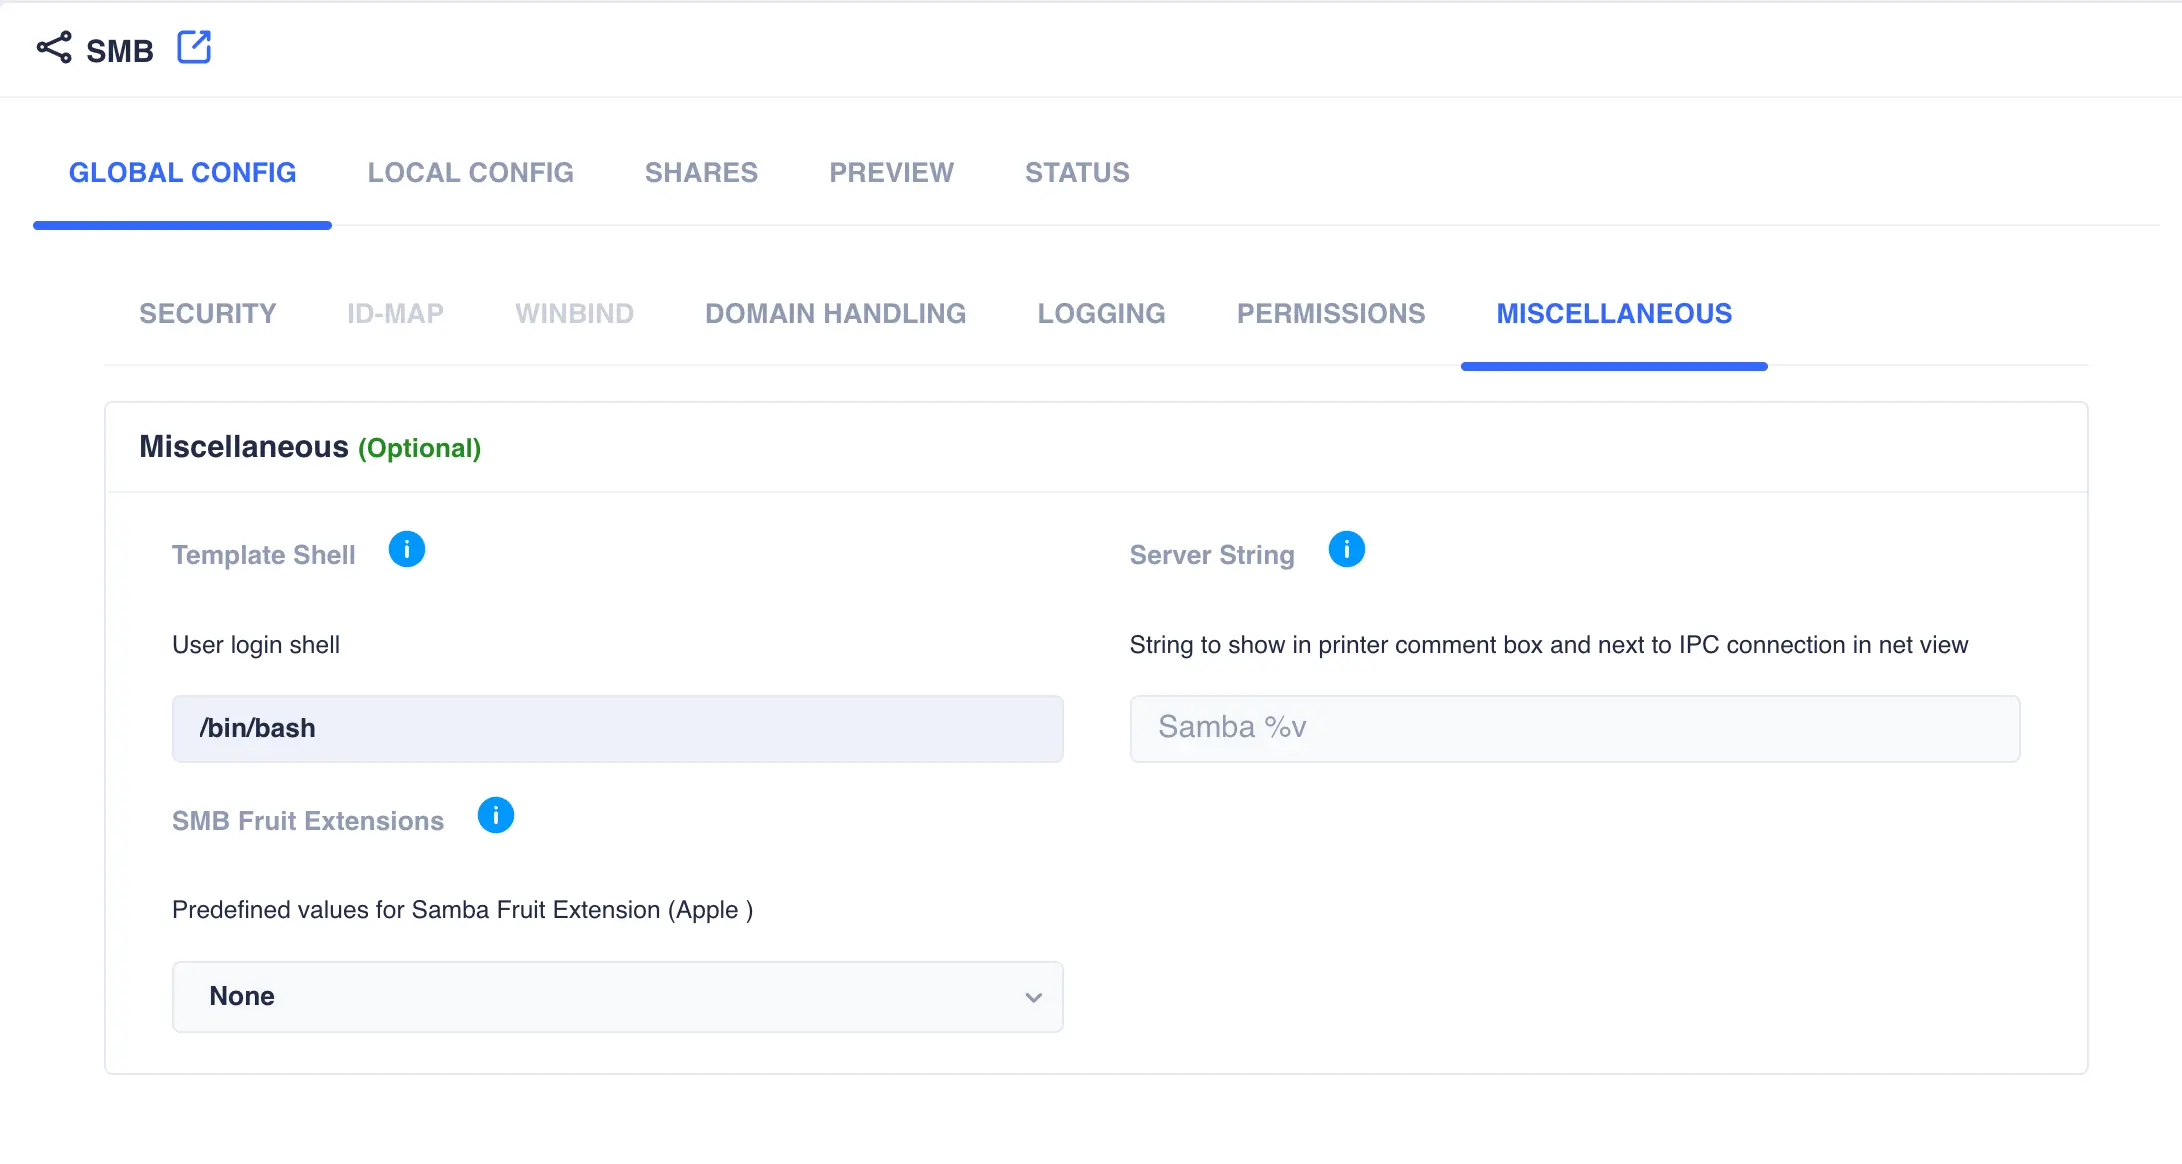
-
Finally, restart
winbind.# systemctl restart winbind
It should now be possible to login to the Unix servers using AD users.
Clustering an SMB Share
These steps show the process of creating a clustered SMB share.
-
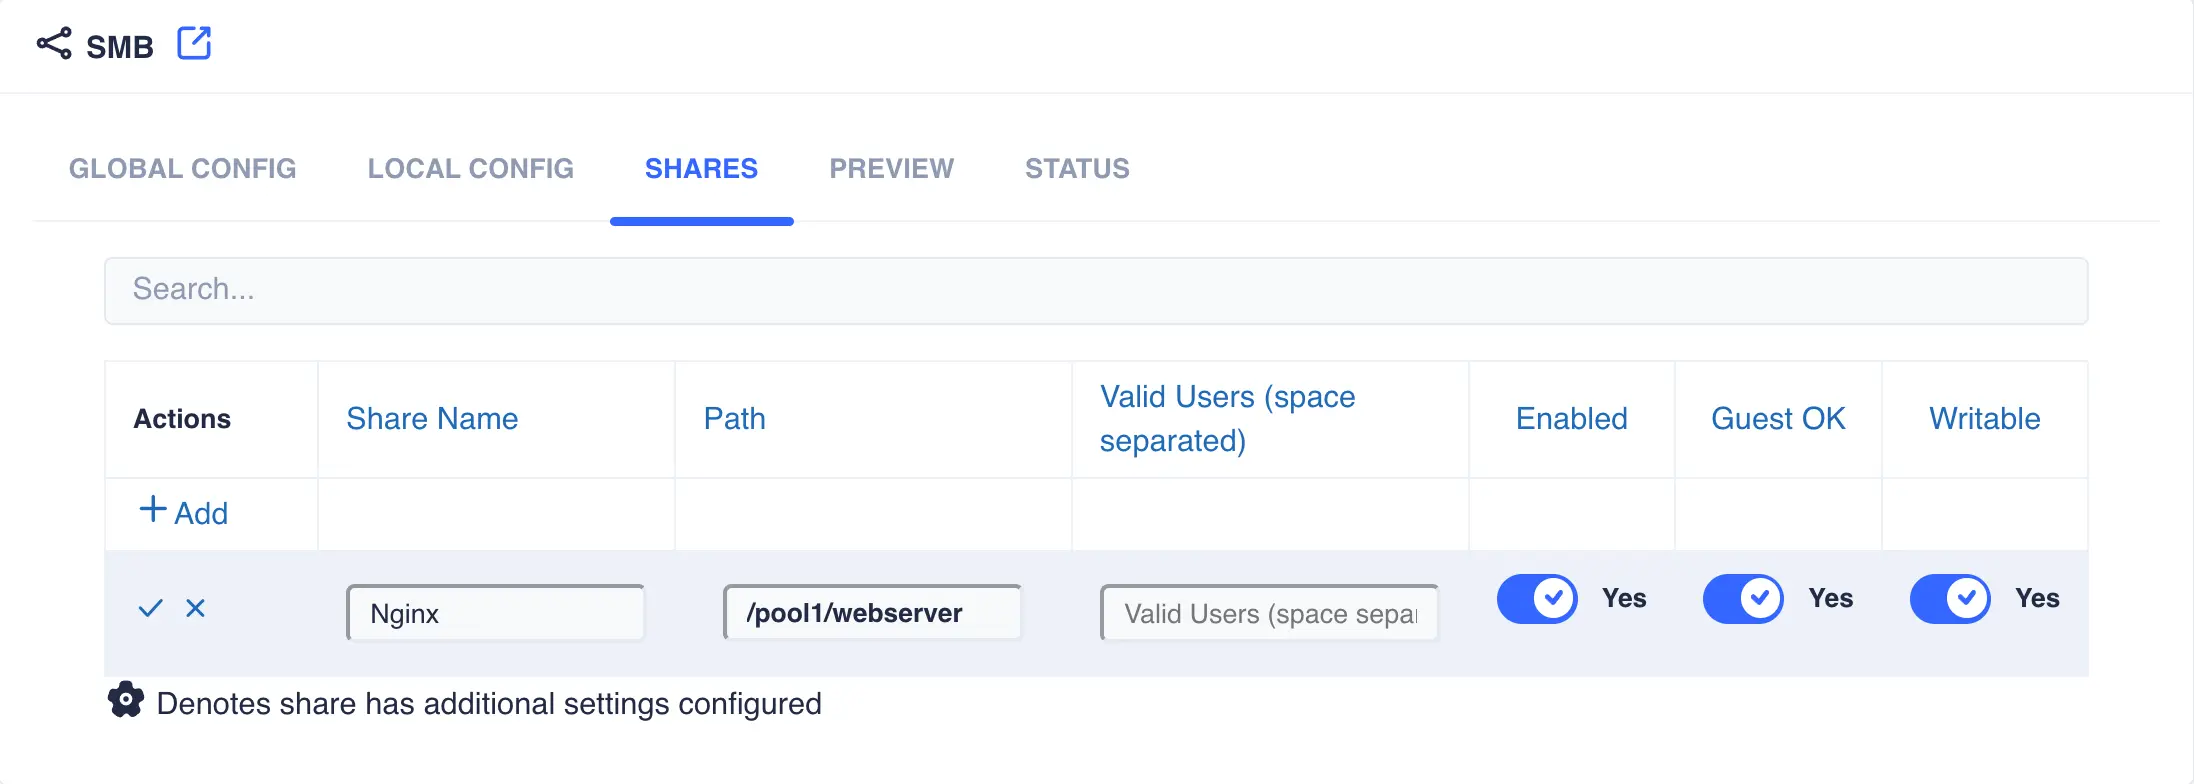
Shares are managed via the
SHAREStab. Click+Addto create a new SMB ShareAvailable options:
Share NameThe name of the SMB sharePathPath of the folder to be shared, for example/pool1/SMBValid UsersA space separated list of Valid users. When User authentication is in effect these will be Unix Cluster users; for ADS authentication this can be local Unix cluster and Windows domain users.
-
Click
✓when done. The share will now be available and clustered (a Samba reload is automatically applied):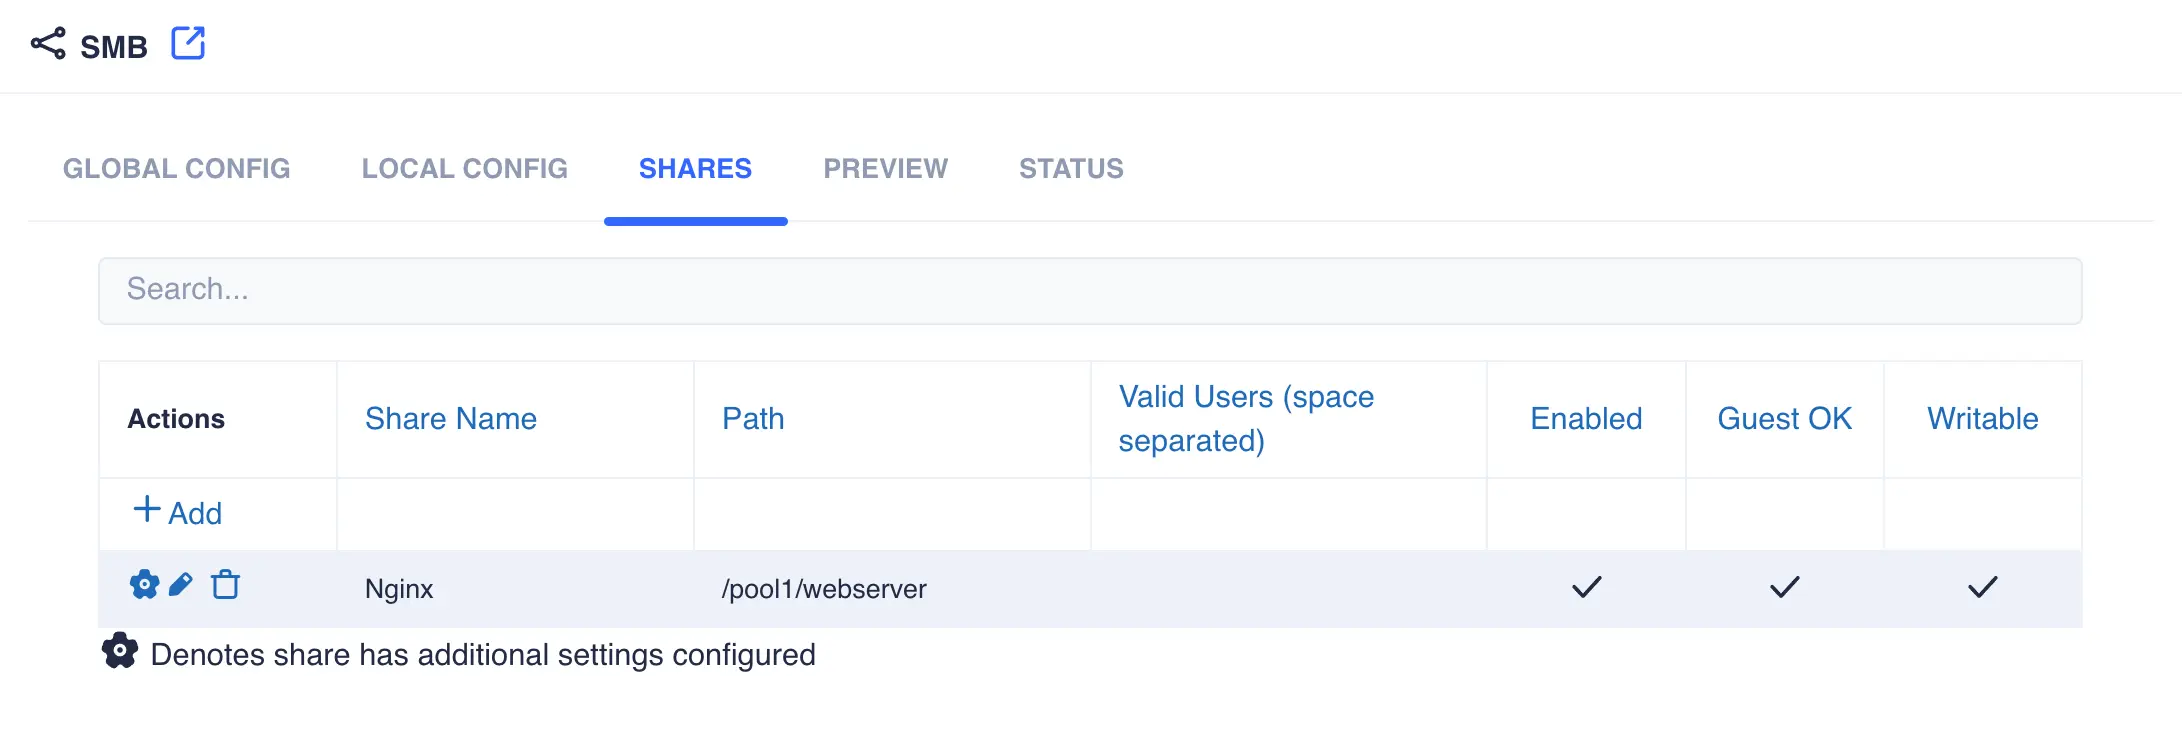
-
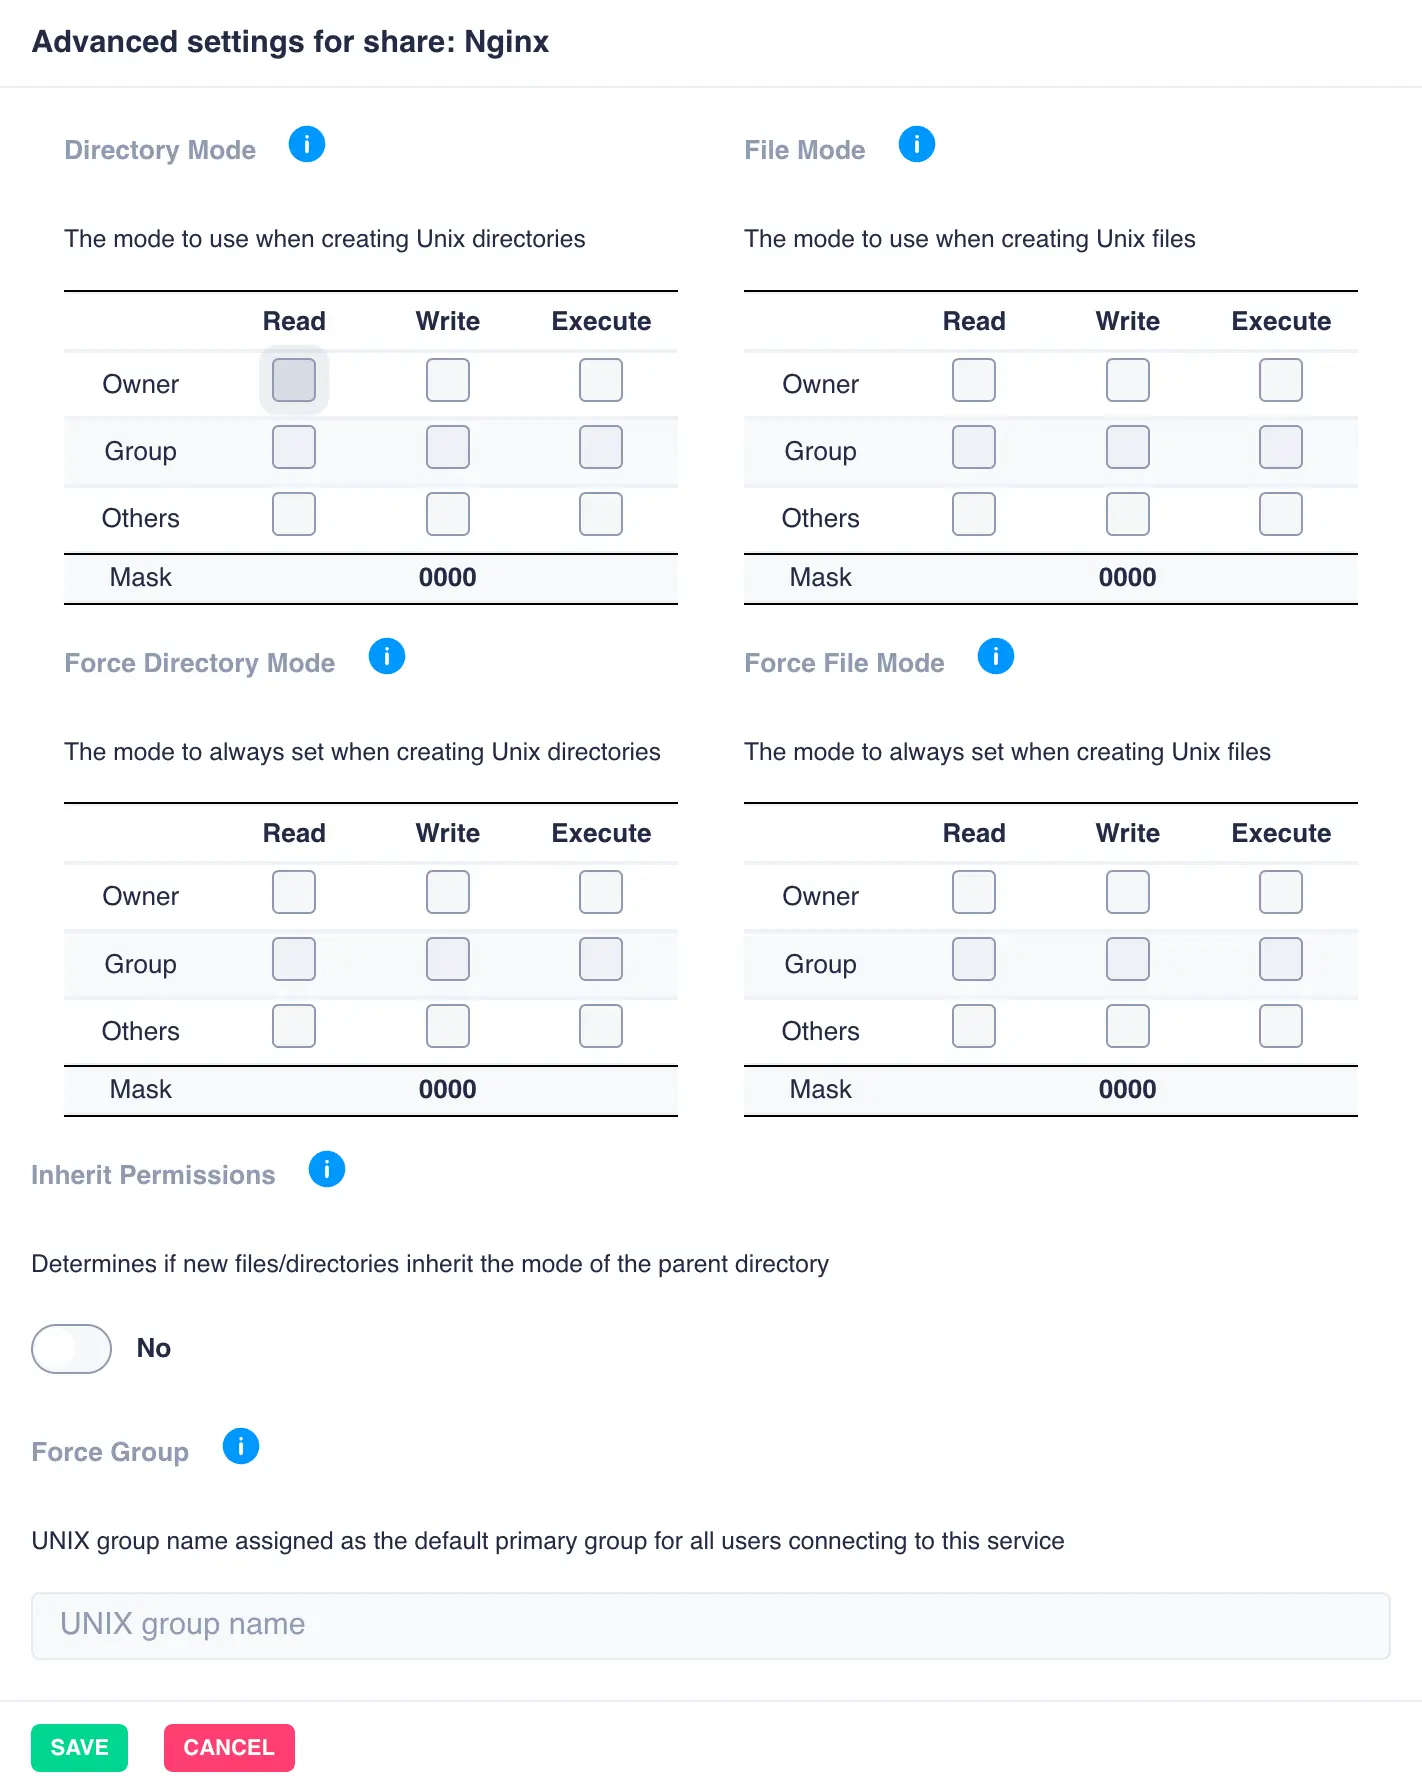
Advanced share settings can be applied once the share is created by clicking the cog on the left hand side of each individual share:
Additional SMB settings
LOCAL CONFIG
This tab is used to apply Samba configuration settings specific to each node rather than all cluster nodes. One example
of this is the netbios name which needs to be unique on each node in the Windows Domain.

Note
Entries in the local config should be indented by two spaces to align correctly with other entries in the [global] section.
PREVIEW
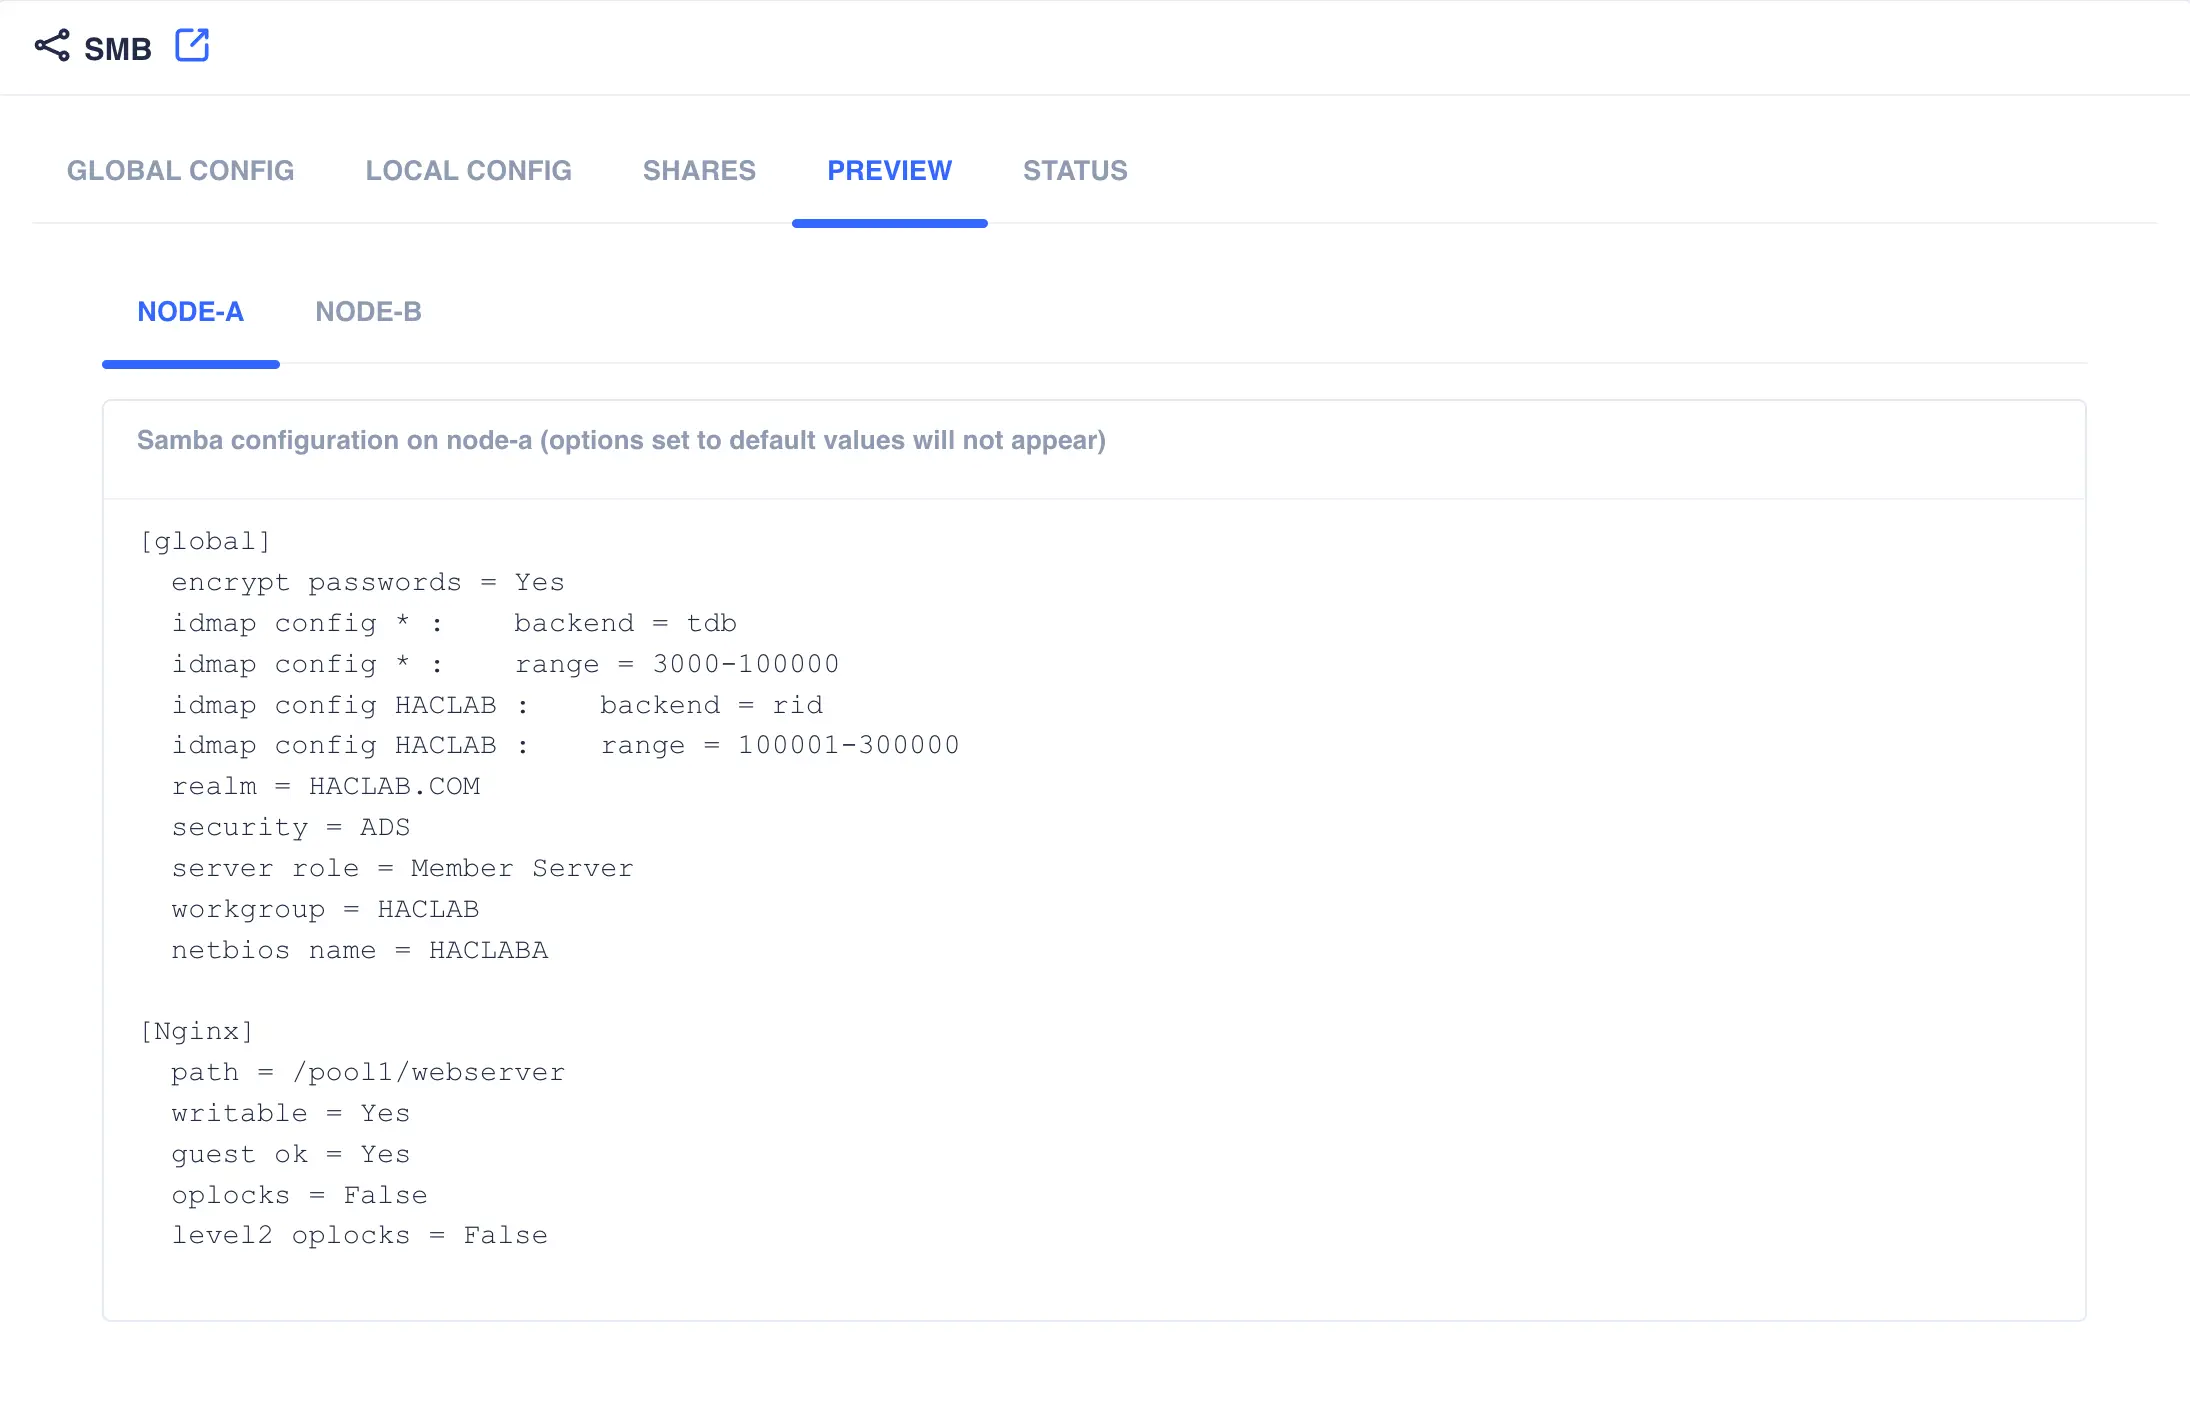
The tab shows the current Samba configuration for each cluster node; this view includes the globals, shares and local configuration.
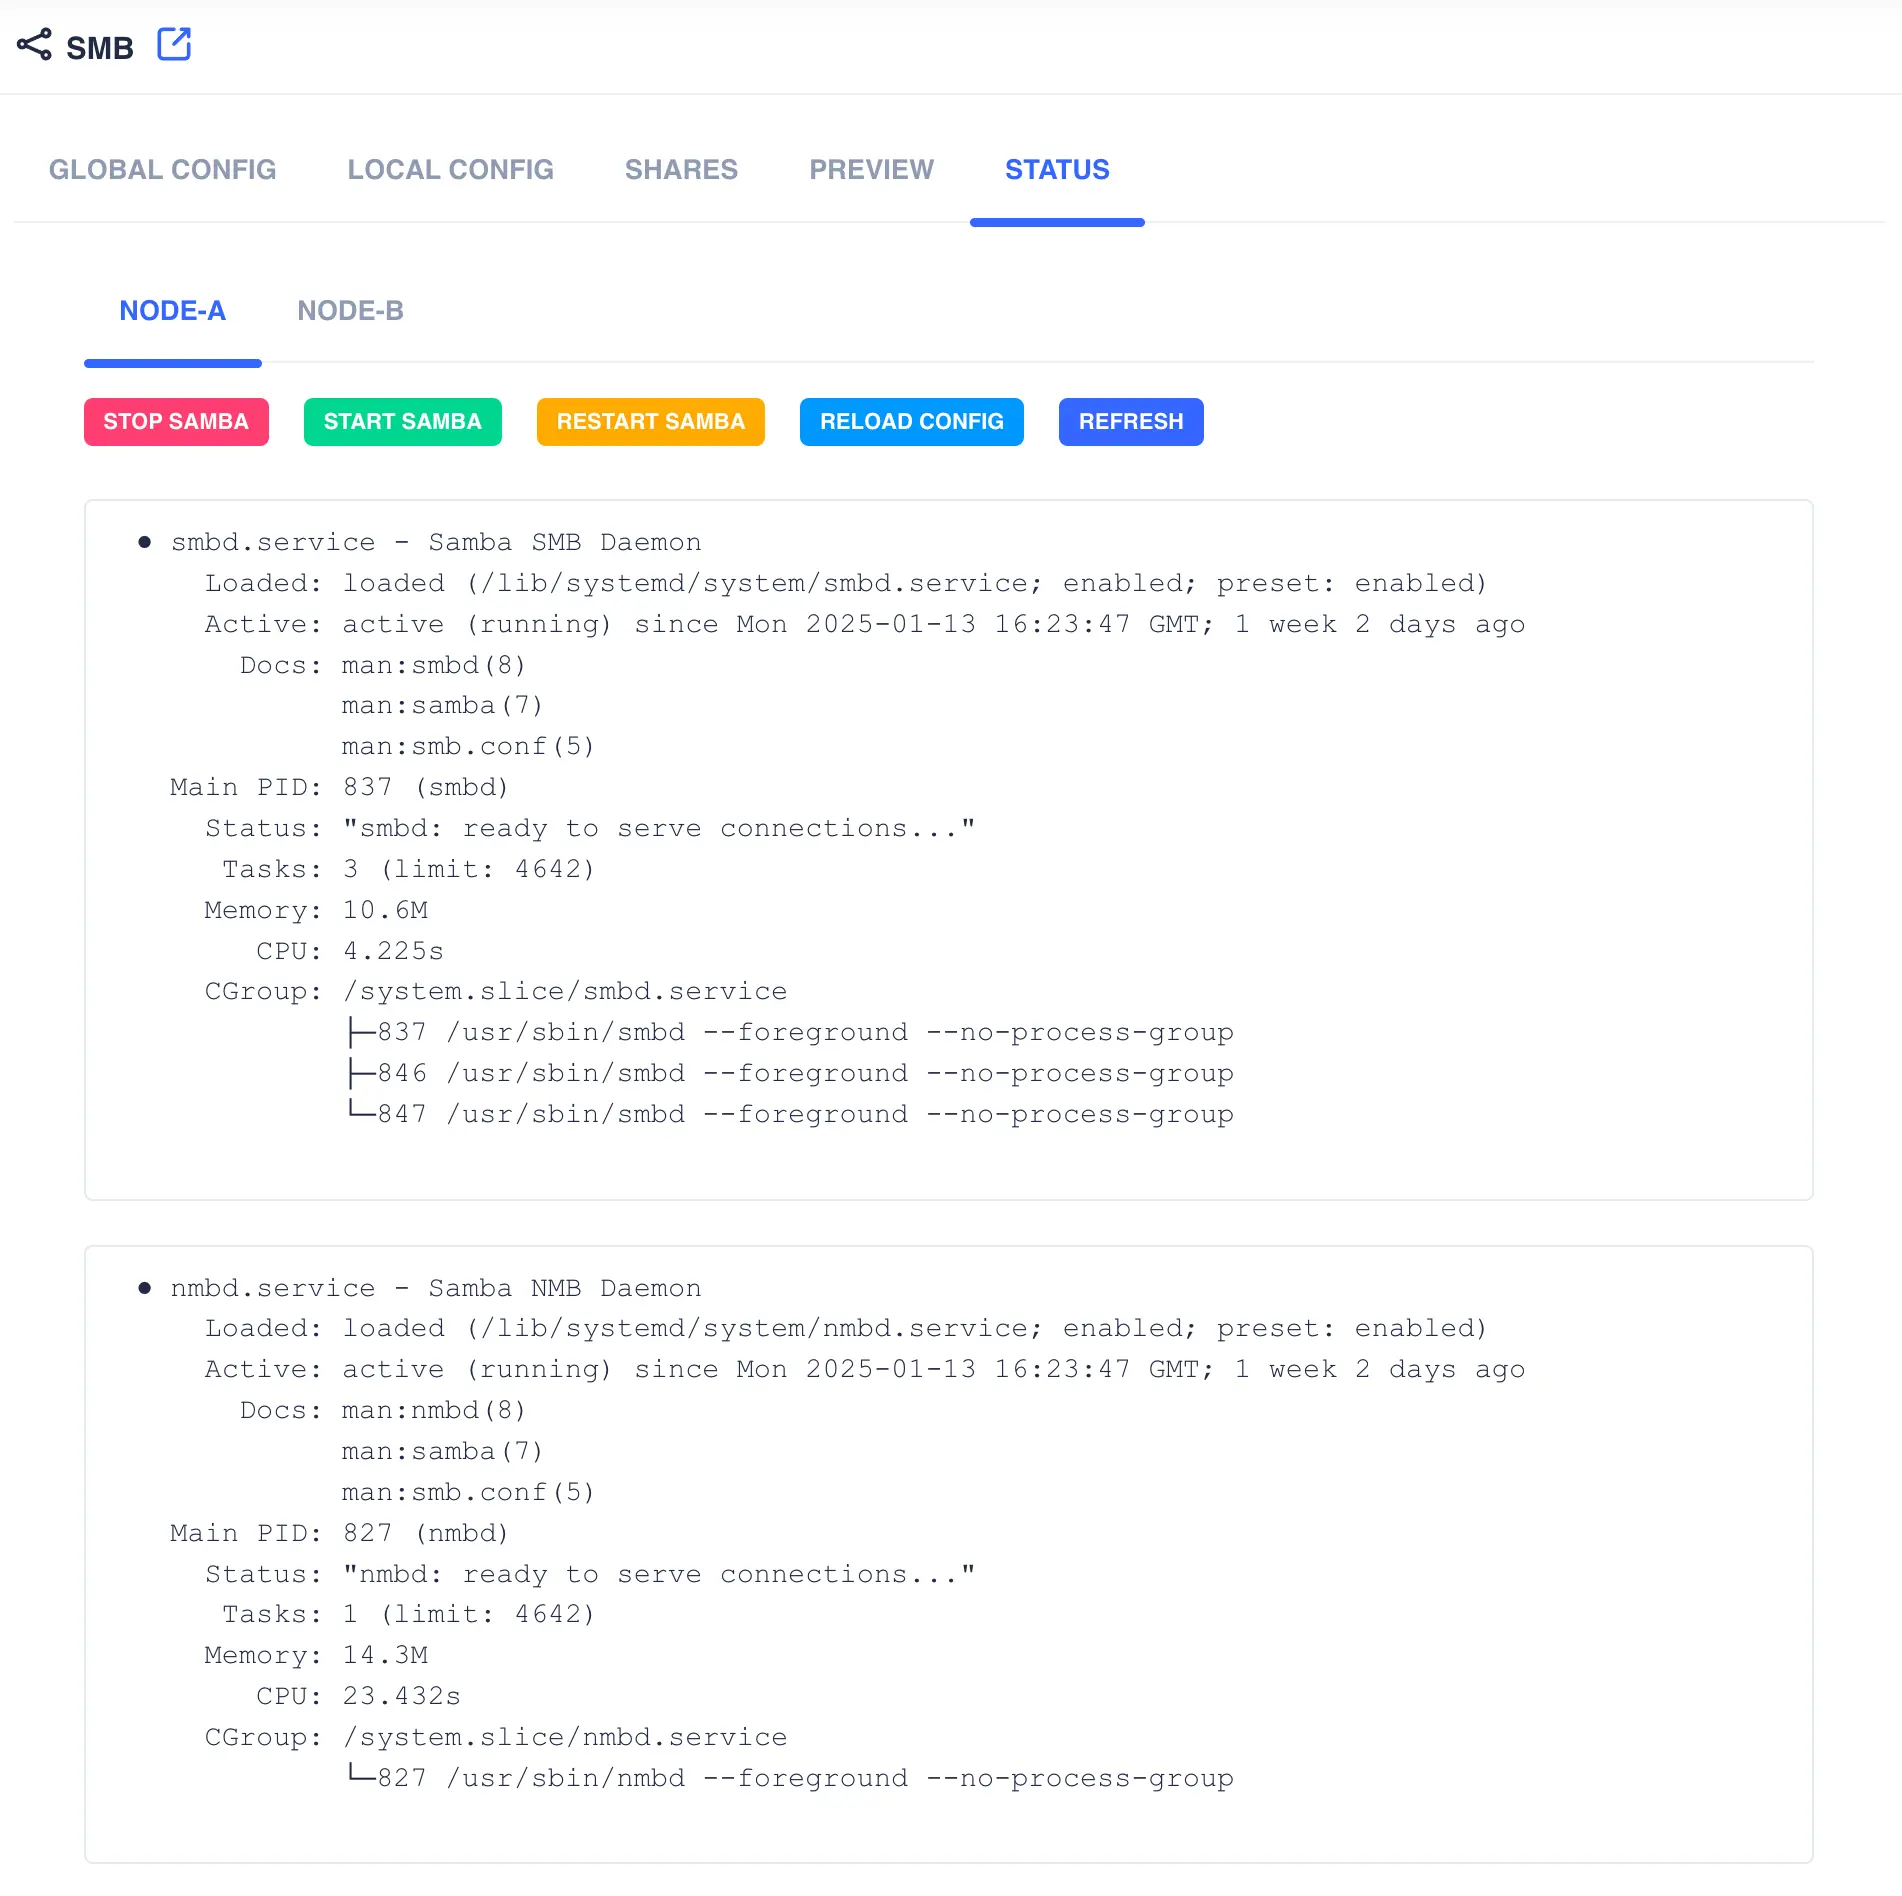
STATUS
This tab shows the status of the Samba daemon services that are running. It also allows management of the services per node.
General
This page contains settings that apply to the whole cluster including the webapp:
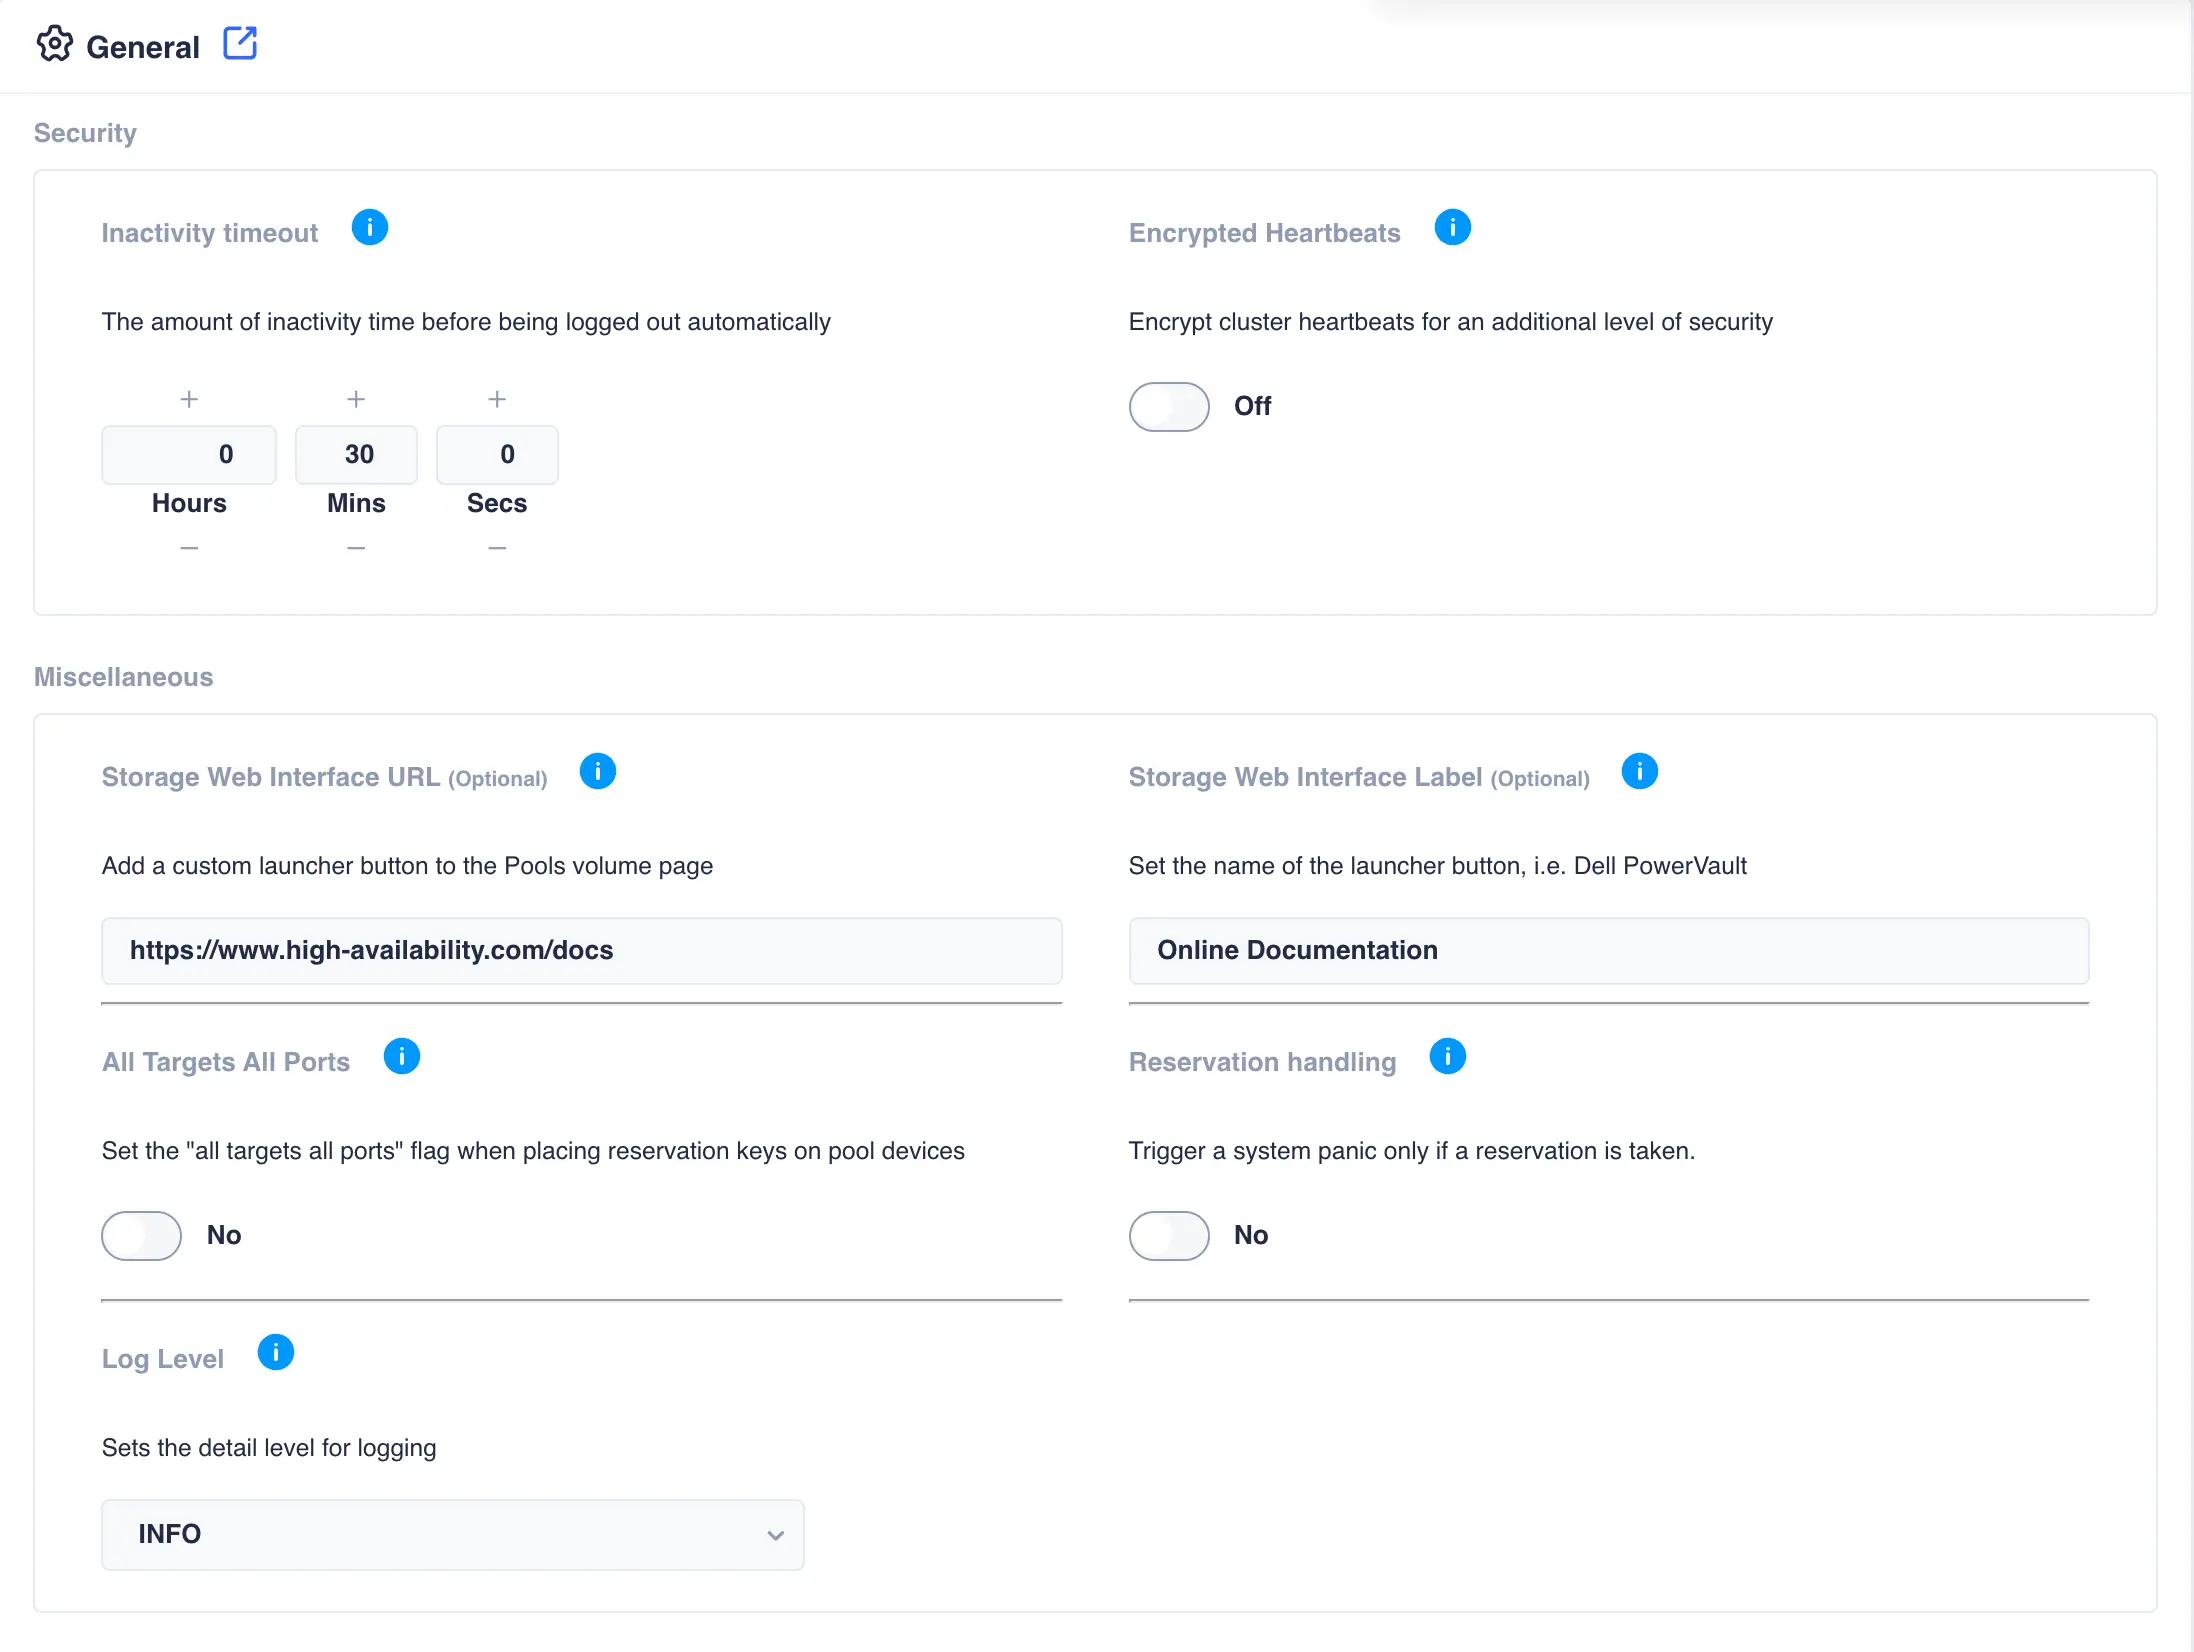
Security settings
Setting |
Description |
|---|---|
Inactivity timeout |
The period of time during which a user can be inactive in the webapp (that is, not interact with the system in any way) without any impact on their session. After the timeout expires, the user is logged out of the session and will have to log back in. |
Encrypted Heartbeats |
By enabling this option heartbeats exchanged between cluster nodes will be encrypted. This provides an extra level of security. |
Miscellaneous settings
Setting |
Description | ||||||||
|---|---|---|---|---|---|---|---|---|---|
Storage Web Interface URL (Optional) |
By entering a valid URL, a custom launcher button will be added to the ZFS->Pools page. When clicked the URL will be opened in a new browser window. This is intended to provide a shortcut the connected storage interface. Note please prefix the URL with http:// or https:// |
||||||||
Storage Web Interface Label (Optional) |
Sets the name of the label on the storage interface launcher button. | ||||||||
All Targets All Ports |
Some disk arrays don't follow the scsi persistent reservations specification when making key registrations per I_T NEXUS. Instead the registration is shared by all target ports connected to a given host. This causes PGR3 reservations to fail whenever it tries to register a key, since it will receive a registration conflict on some of the paths. This issue manifests itself when RSF-1 is attempting to place reservation keys on a disk. In the rsfmon log file a message of the form: MHDC(nnn): Failed to register key on diskis indicative of this issue. This setting remedies the problem by making a registration unique to each target port. |
||||||||
Log Level |
Sets the detail level for logging:
|
||||||||
Reservation handling |
In normal operation the cluster will panic a node if it detects it has lost, or another node has taken, a reservation. In certain configurations this may not be the desired behaviour, rather it is only when another node takes reservations that a panic should be triggered. An example of this would be when a JBOD in a mirrored configuration is power cycled thus clearing its reservations. These missing reservations would normally trigger a panic; however, in this case this is not the desired outcome as the cluster will continue to run using the other half of the mirror. |
Shares
This page contains settings that apply to share content in the cluster
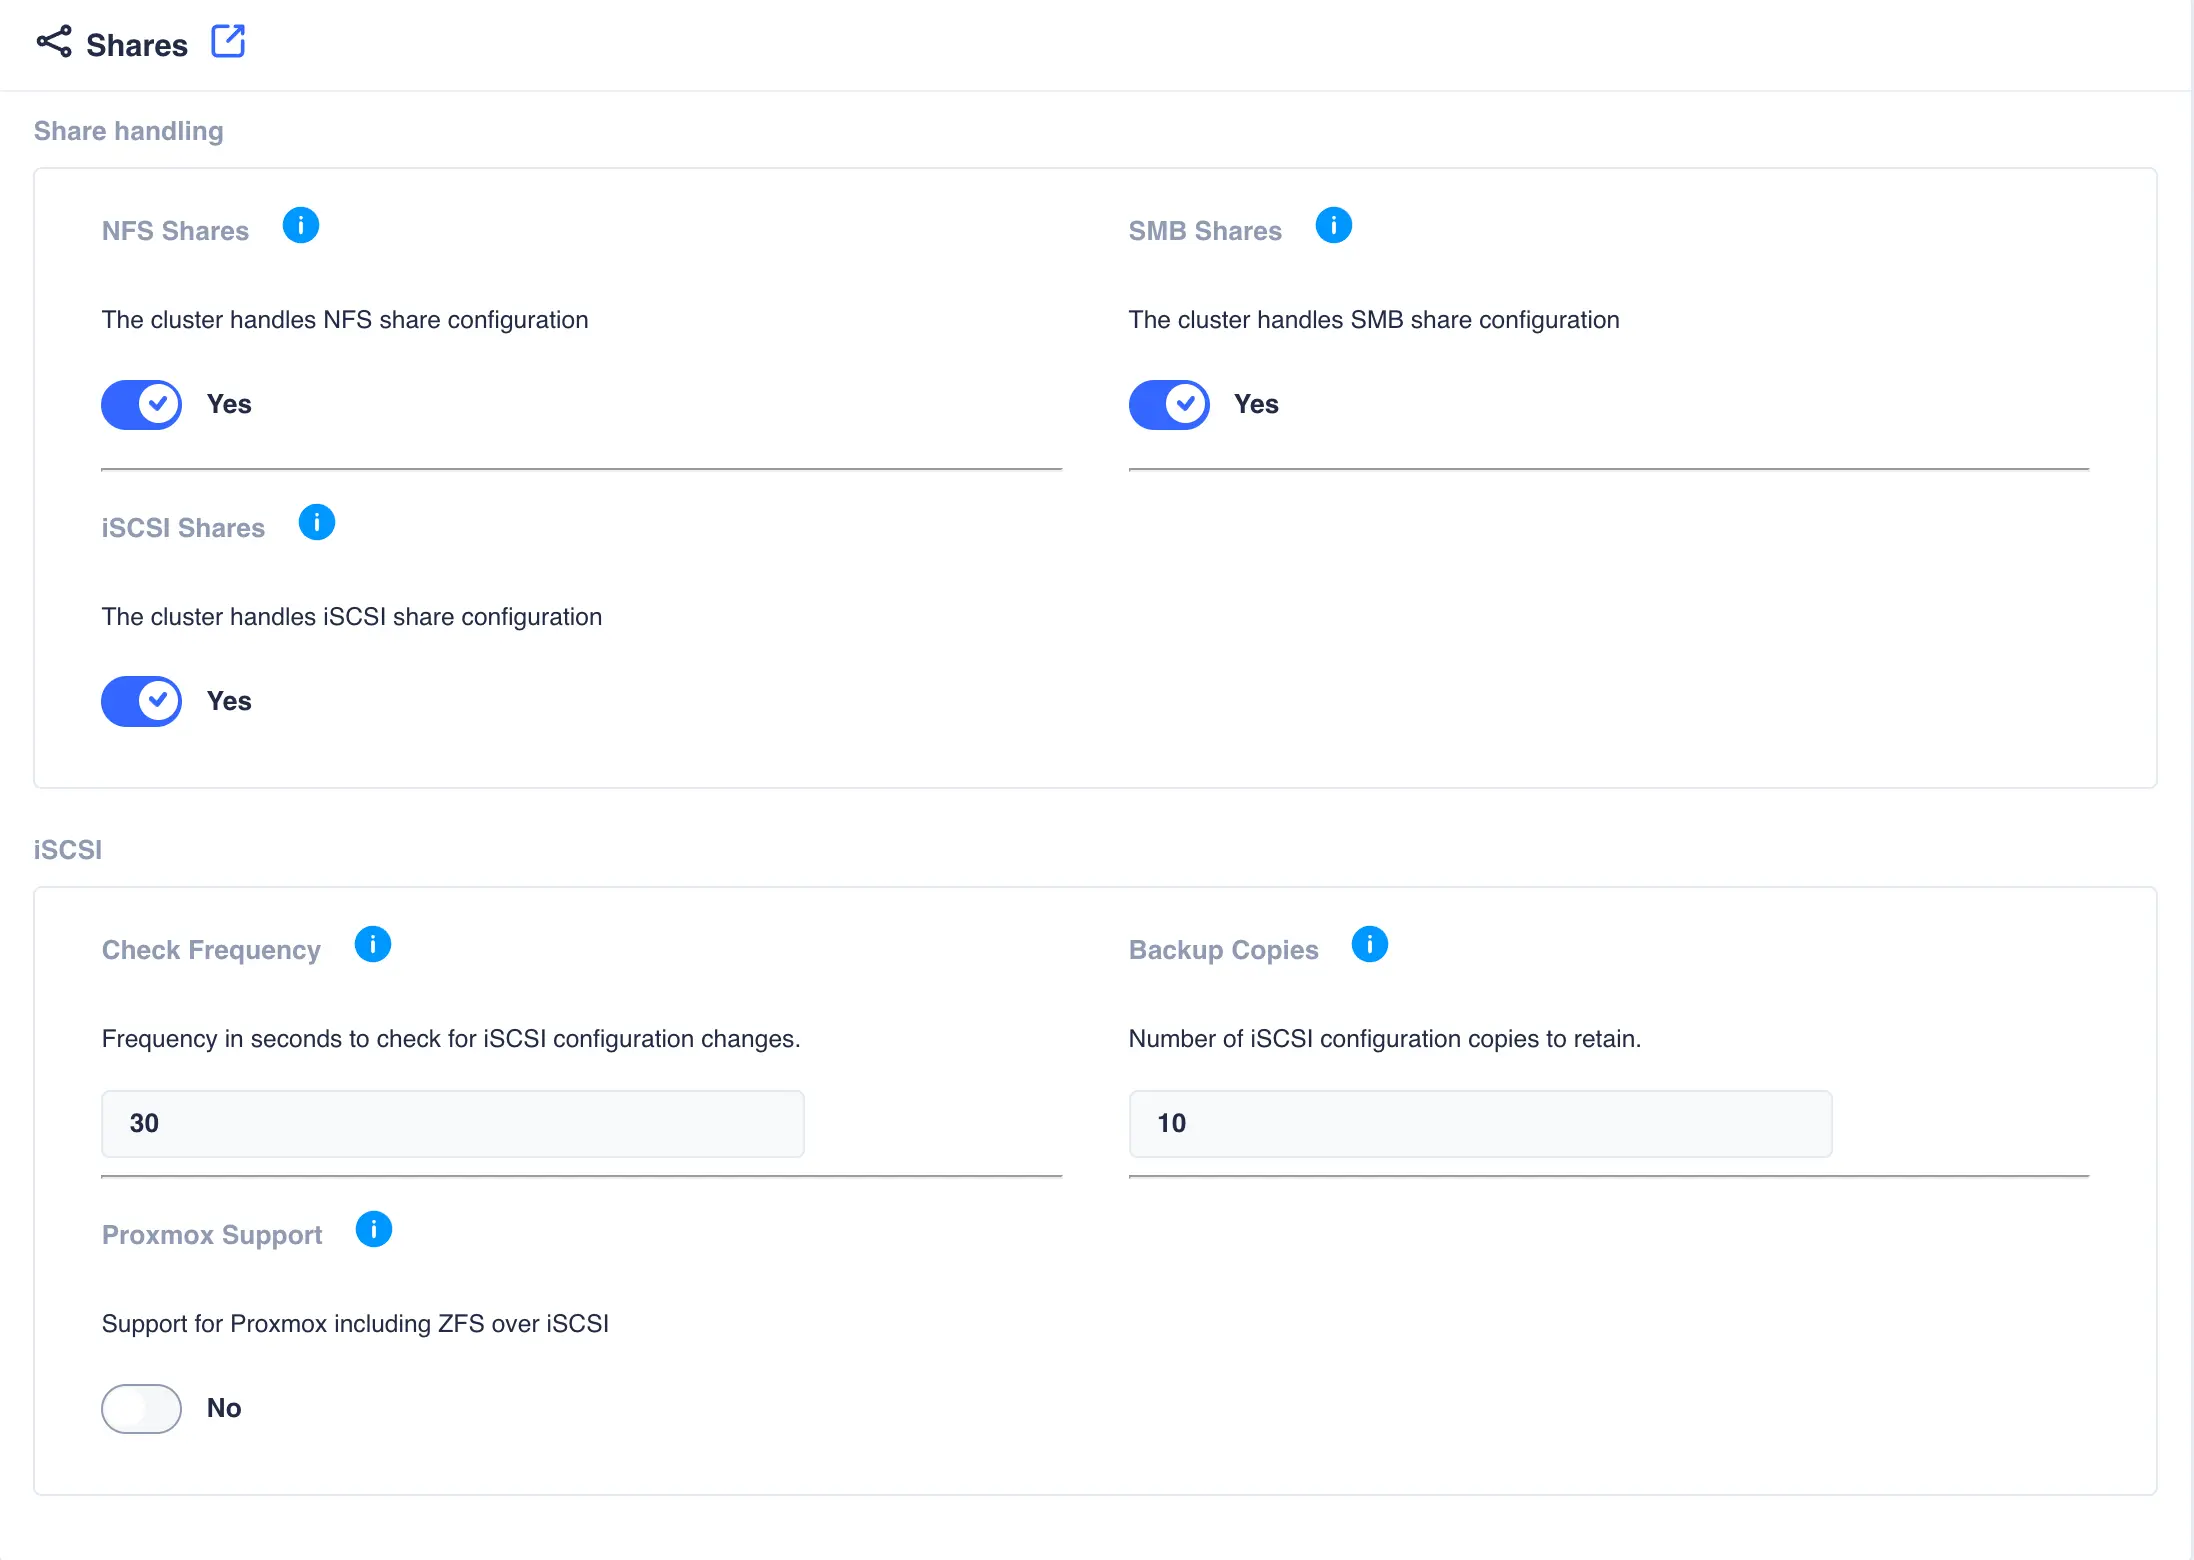
Share handling
Setting |
Description |
|---|---|
NFS Shares |
By enabling NFS share handling the cluster assumes responsibility for the NFS exports file and its contents. Shares are configured using the Shares->NFS page (visible only when cluster share handling is enabled). NFS shares created or modified are distributed across all cluster nodes.Note ensure NFS server packages are installed on all cluster nodes when enabling NFS sharing (specifically the NFS kernel server). |
SMB Shares |
By enabling SMB share handling the cluster assumes responsibility for the SMB configuration file and its contents. Shares are configured using the Shares->SMB page (visible only when cluster share handling is enabled). SMB shares created or modified are distributed across all cluster nodes.Note ensure Samba packages are installed on all cluster nodes when enabling SMB sharing (Samba/Winbind etc.). |
iSCSI Shares |
By enabling iSCSI share handling the cluster will save and migrate iSCSI configuration for any clustered ZFS pools/volumes. Shares are configured using the Shares->iSCSI page (visible only when cluster share handling is enabled) iSCSI shares created or modified are synchronised across all cluster nodes.Note ensure the targetcli package is installed on all cluster nodes when enabling iSCSI sharing. |
ISCSI
Setting |
Description |
|---|---|
Check Frequency |
The RSF-1 iSCSI agent checks the local iSCSI configuration for any changes, with any found being applied to the clusters stored configuration. This setting configures how often that check is made. |
Backup Copies |
Each time a pool failover occurs, a backup copy of the current iSCSI configuration for that pool is created. This setting configures the number of backup copies to retain. |
Proxmox Support |
Additional support for proxmox including ZFS over iSCSI extensions to create volume links used by the proxmox remote client. Proxmox depends on the link /dev/<zvolname> for ZFS over iSCSI operations; however, some OS's (for example Ubuntu and derivatives) only create /dev/zvol/<zvolname> and not /dev/<zvolname> when importing a pool, preventing Proxmox from operating correctly. Enabling this option resolves this issue. |
Shared Nothing
This page contains settings specific for a Shared-Nothing Cluster
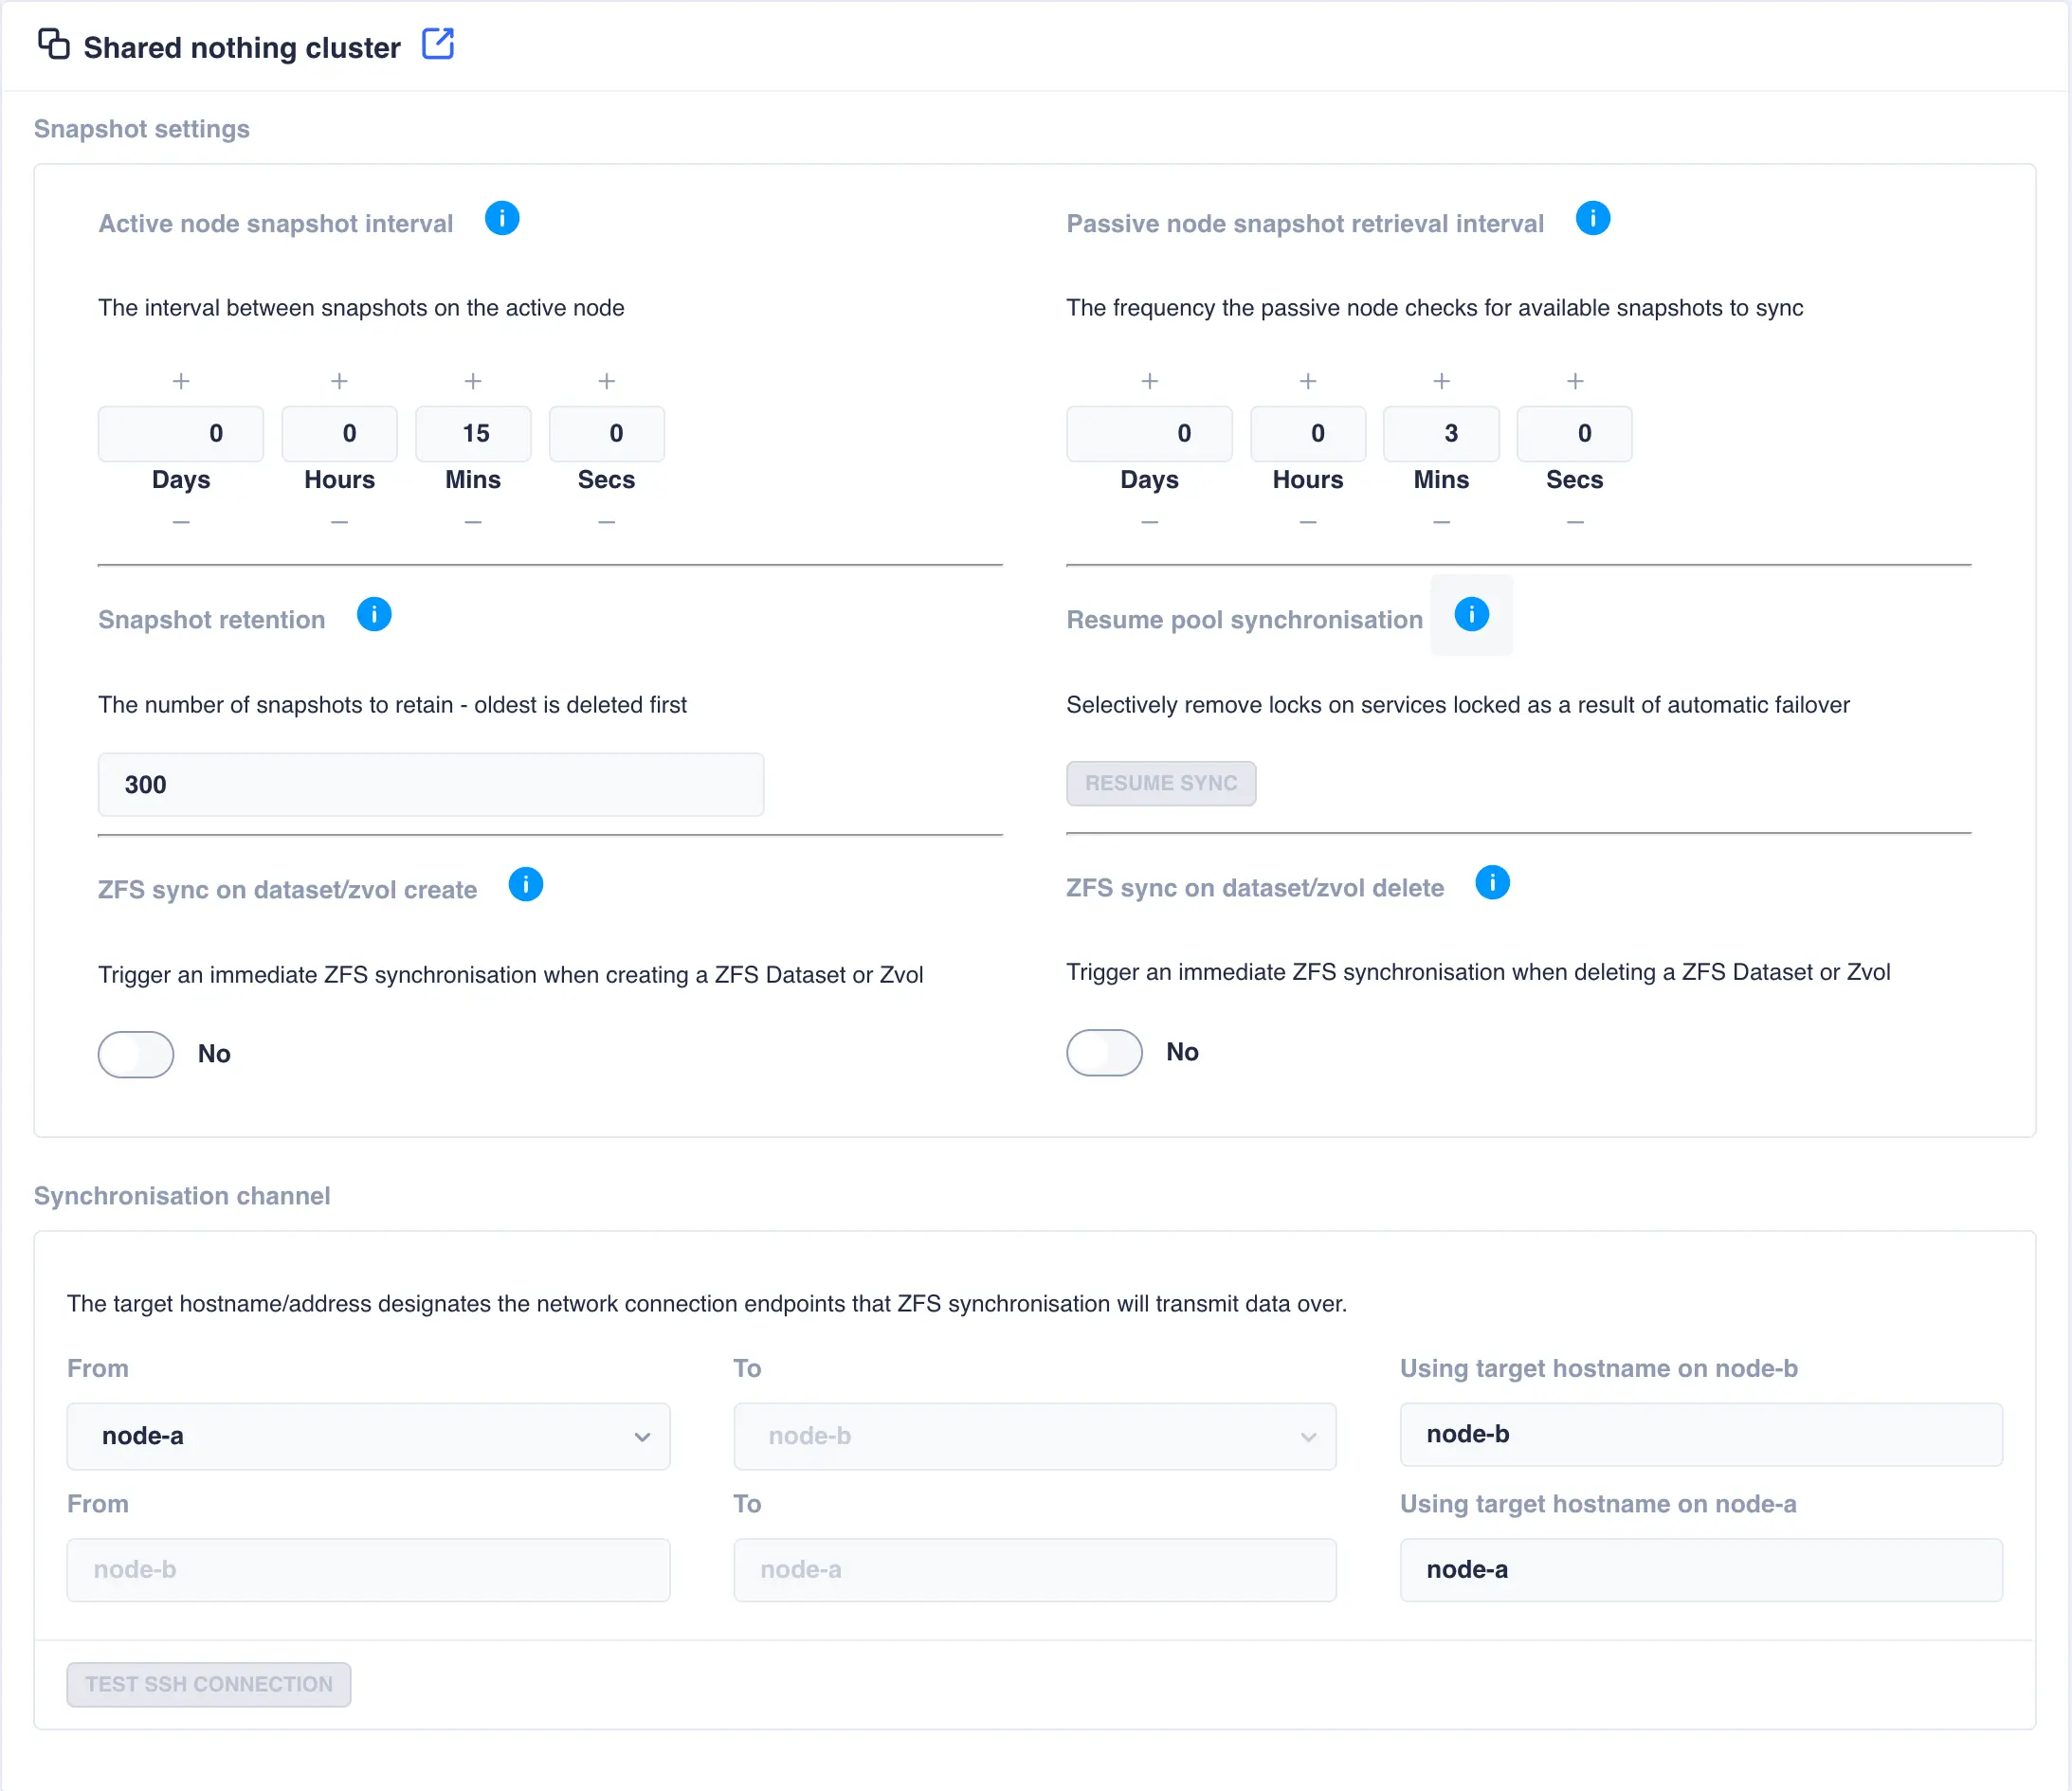
Setting |
Description |
|---|---|
Active node snapshot interval |
Sets the frequency by which snapshots are taken of a pool on its active node. The passive node is responsible for replicating these snapshots using ZFS send/receive. The amount of snapshots kept locally is governed by the snapshot retention value. |
Passive node snapshot retrieval interval |
Sets the frequency by which the passive node checks an active node to ensure it has up-to-date copies of all active pool snapshots. Any missing snapshots will be synchronised using ZFS send/receive and any expired snapshots (as dictated by the snapshot retention value) will be removed. Using a pull mechanism ensures any node recovering after a crash will immediately synchronize any missing snapshots. Using this approach also removes the requirement for the active node to continually attempt to send snapshots to the passive node, which could be unavailable. |
Snapshot Retention |
The amount of snapshots to be retained for each pool on all nodes. Once the retention number is reached, and as new snapshots are taken, the oldest are purged to maintain the snapshot retention level. |
Resume pool synchronisation |
In the event of an aotomatic failover due to a system failure, once the failed node recovers, synchronisation is suspended to prevent data loss as there maybe existing data that had not yet been synchronised when the node failed - for a more detailed explanation of this scenario please see this description. Once remedial action has been taken click the RESUME SYNC button to resume synchronisation on selectable service basis. |
ZFS sync on dataset/zvol create |
When a dataset/zvol is created it is synchronised over to the other node during the scheduled snapshot/synchronisation cycle. Enabling ZFS sync on dataset/zvol create means that as soon as a dataset/zvol is created a snapshot is taken and a remote synchronisation will be performed, after which the normal synchronisation cycle resumes. |
ZFS sync on dataset/zvol delete |
When a dataset/zvol is deleted, the delete is performed on the remote node as part of the scheduled synchronisation cycle. Enabling ZFS sync on dataset/zvol delete means that when a dataset/zvol is deleted locally, it will also be deleted on the remote node. |
Synchronisation channel |
In a shared nothing cluster, snapshots are synchronised using a ssh tunnel, which by default uses the interfaces the cluster hostnames are plumbed in on. However, if other channels exist between the two nodes (for example a high-speed private network) then use this option to change which channels the cluster uses to send synchronisation data over. To change channel end points, specify the hostname plumbed in on the remote node for the desired channel, for example if a node has a main interface with hostname node-b and a private interface with hostname node-b-priv then set the end point for node-a to be node-b-priv. Note that this configuration should be done for each channel direction. |
Linux
This page contains settings that are specific to a Linux environment:
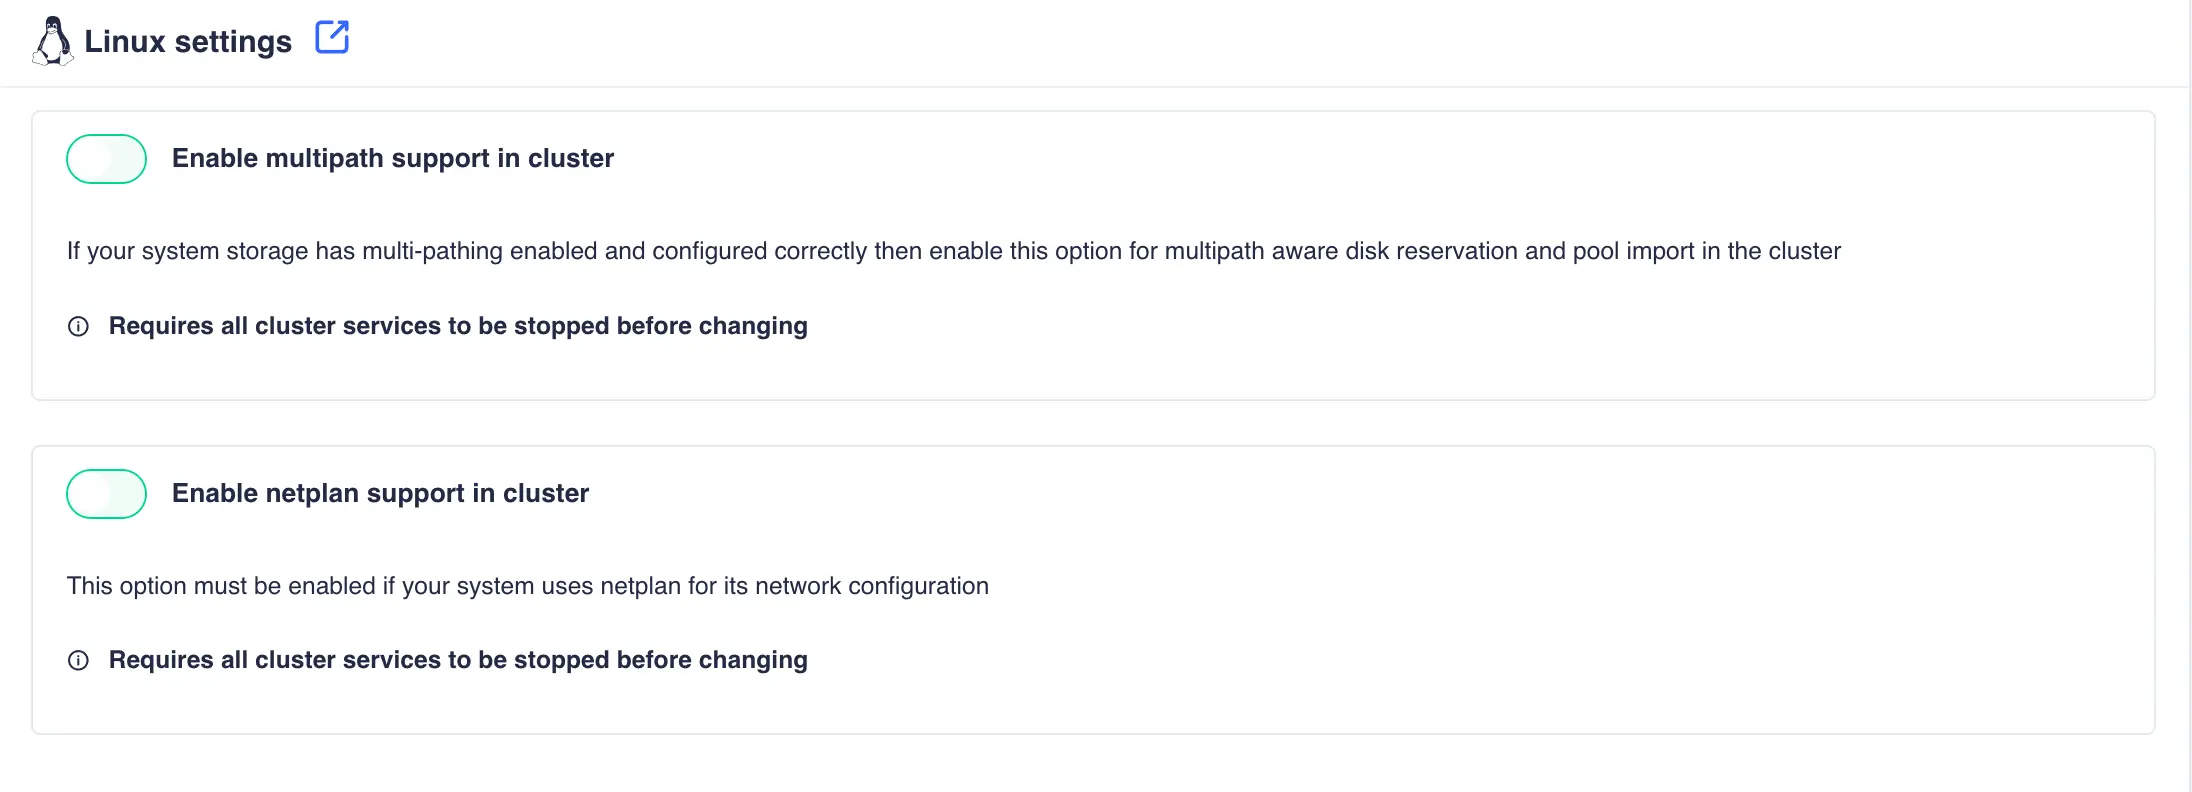
Setting |
Description |
|---|---|
Enable multipath support in cluster |
If your system storage has multi-pathing enabled and configured correctly then enable this option for multipath aware disk reservation and pool import in the cluster |
Enable netplan support in cluster |
This option must be enabled if your system uses netplan for its network configuration |
BSD
This page contains settings that are specific to a BSD environment:

Setting |
Description |
|---|---|
Enable multipath support in cluster |
If your system storage has multi-pathing enabled and configured correctly then enable this option for multipath aware disk reservation and pool import in the cluster |
Unix Users
The Unix Users page System -> Unix Users lists both local and cluster users.
A cluster user is one where a user name and UID are identical on all
nodes of the cluster. This is an important consideration for both
user and group ID's so that cluster credentials remain consistent.
The main page lists both local and cluster users:

Creating Users
To create a cluster user click +Add in the Actions column. This will create the user on all
cluster nodes using the same UID and name.
-
Enter the Username and Password, and provide any of the additional information required:
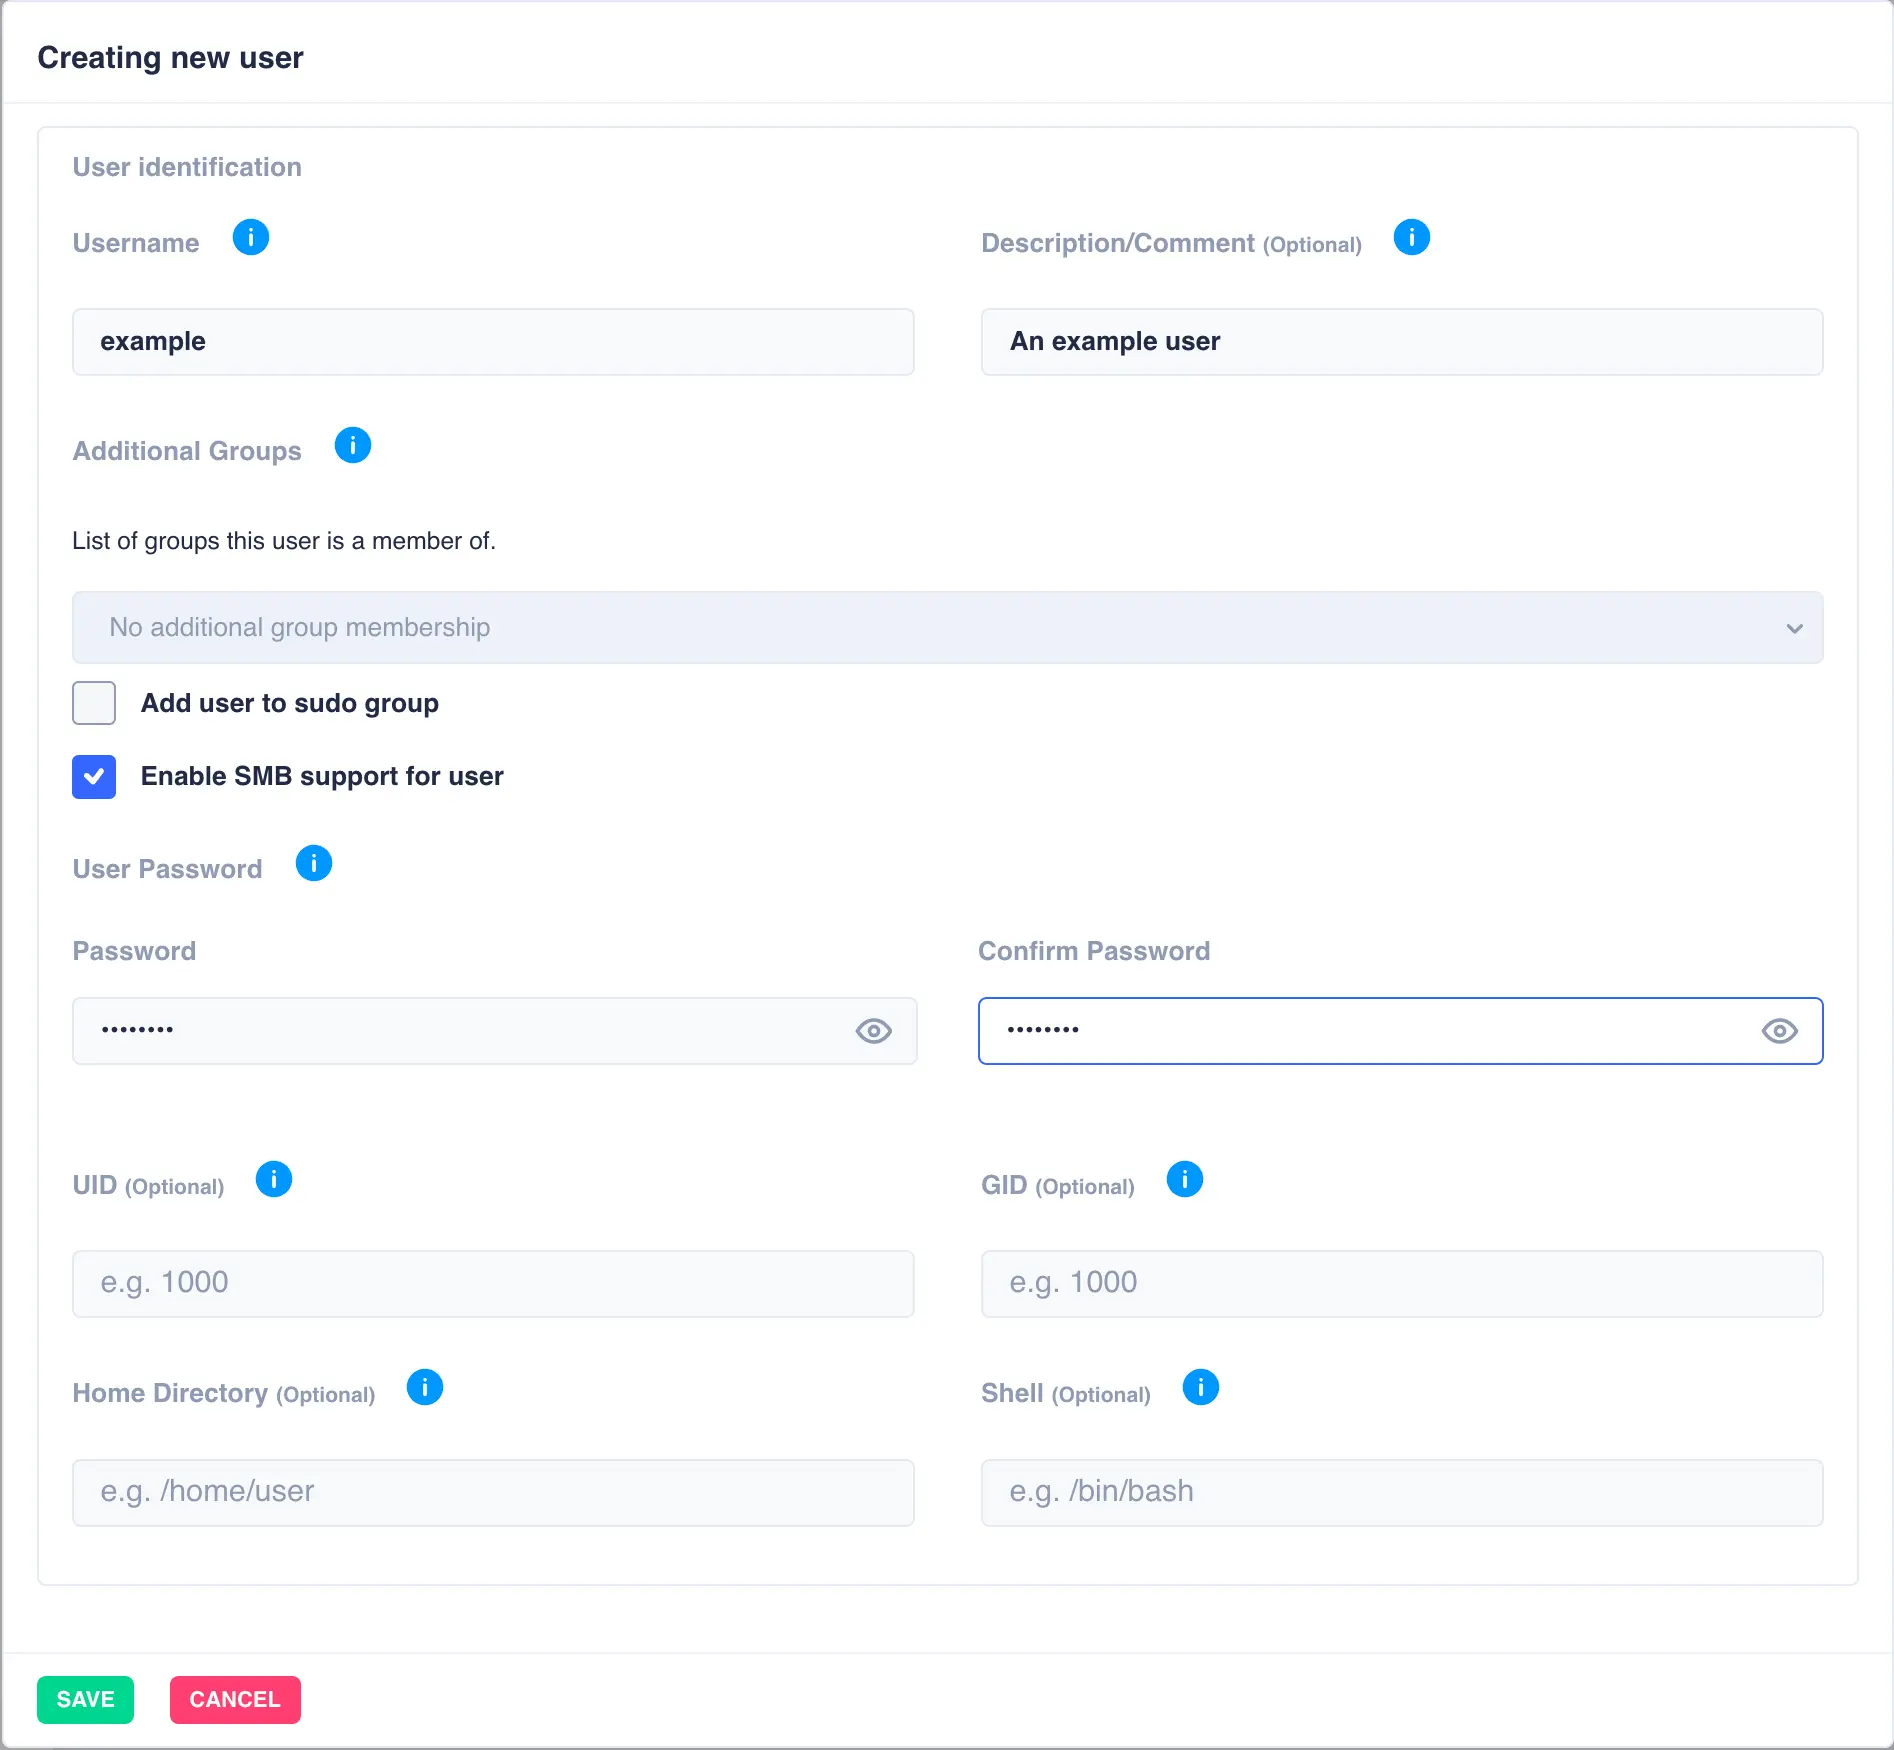
List of Groups- Add the user as a member of additional groups (optional)Add user to sudo group- This user will be able to issue commands as a different user (requires sudo package to be installed).Enable SMB support for user- Adds this user to the valid Samba users.UID/GID- Specify the User ID and Group ID of the user (optional - if unspecified the next available UID/GID will be used).Home Directory- Specify location for the user home directory (optional)Shell- Specify the default shell for the user (optional)
-
When done click
SAVE. Once saved, the user will be created on all nodes in the cluster:
Duplicate users
If the user name or UID specified already exists on any node in the cluster then the user add operation will fail with the message "Error creating user clusterwide..."
Modifying Users
To modify a user, click the ![]() icon on the left hand side of the user list table:
icon on the left hand side of the user list table:
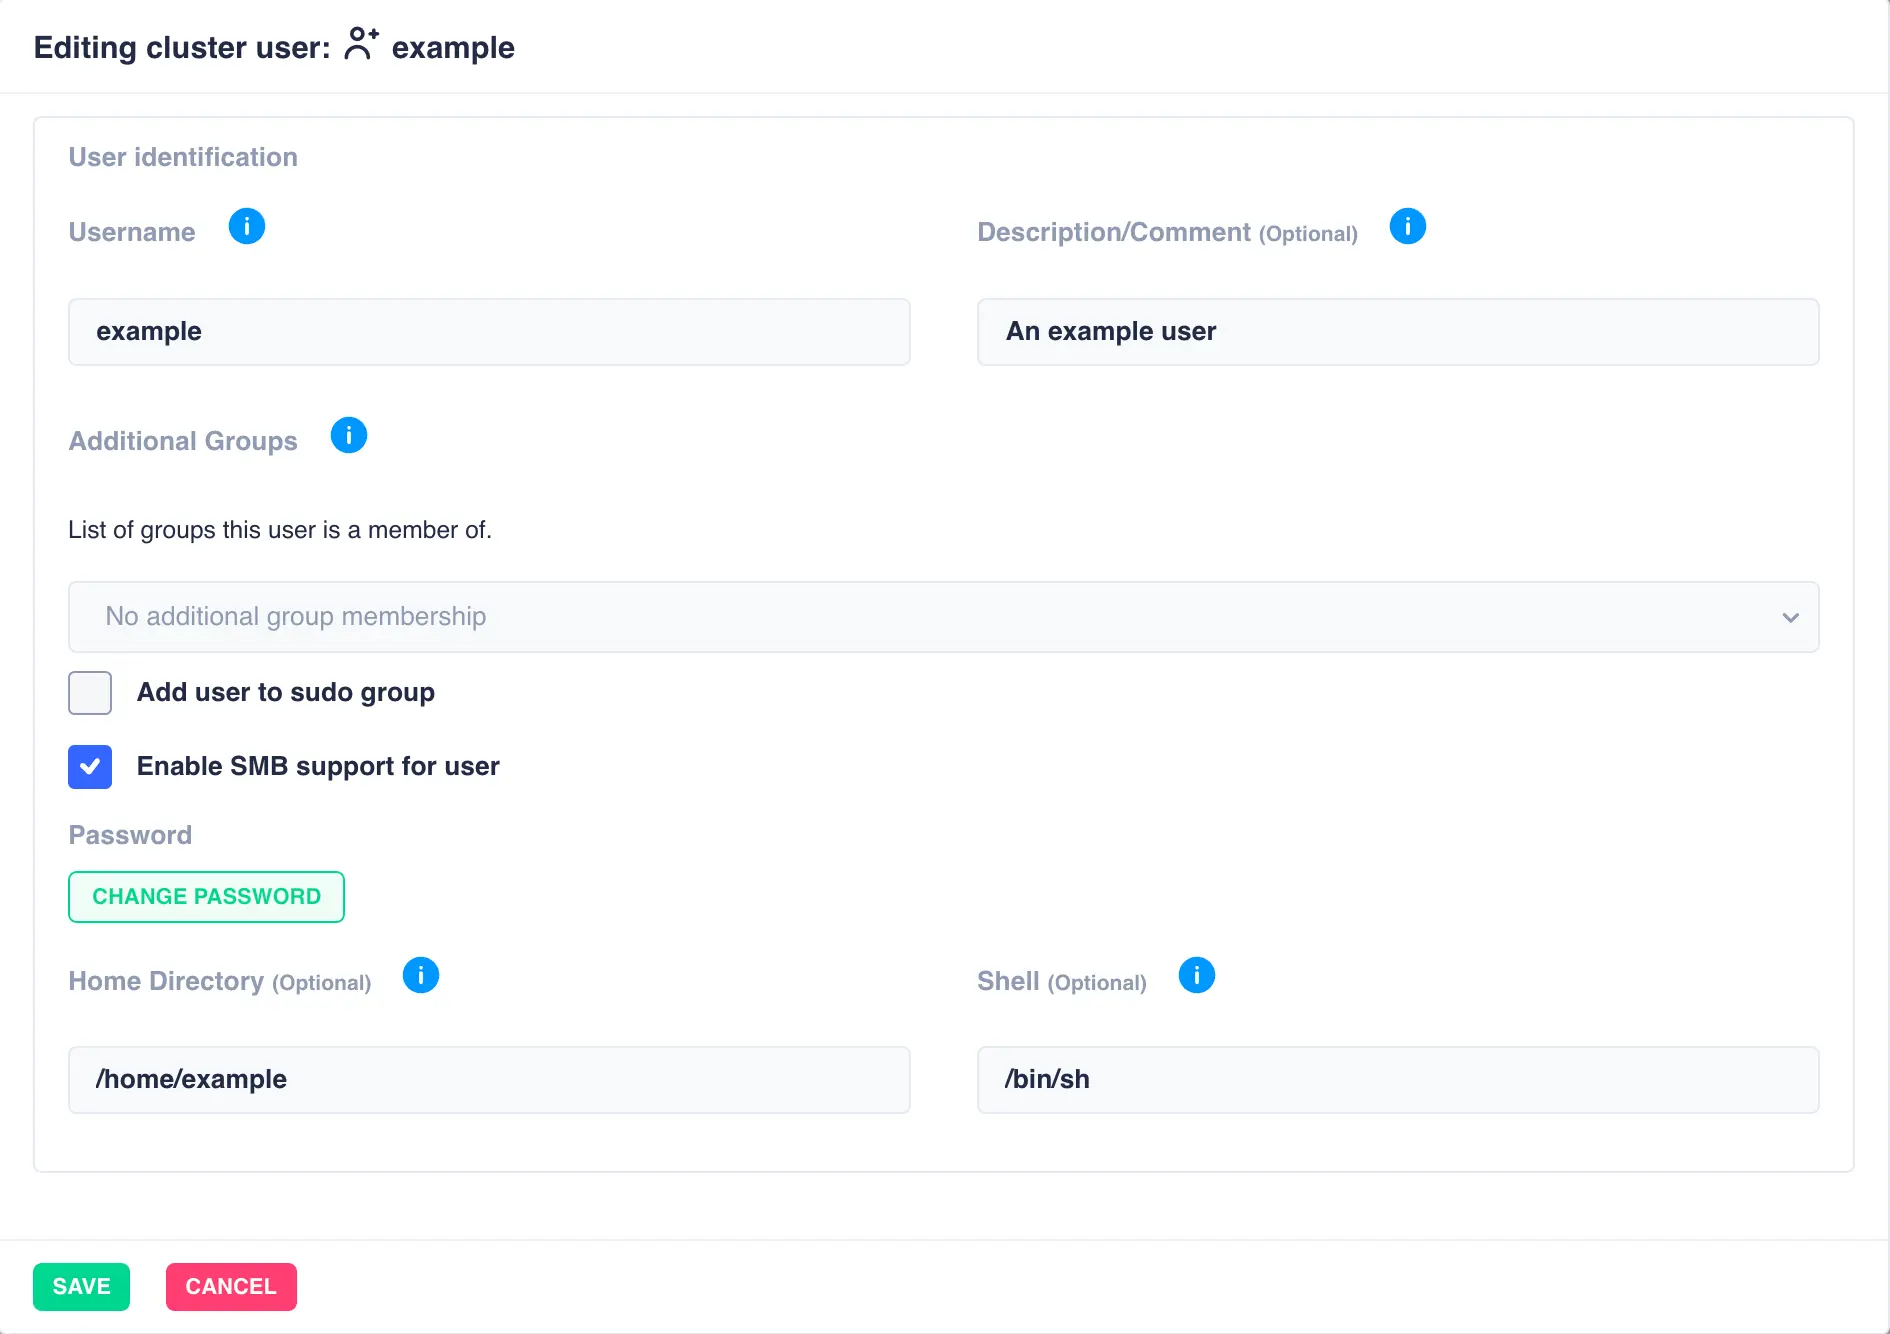
Deleting Users
To delete a user from all cluster nodes click the ![]() icon and then confirm the deletion:
icon and then confirm the deletion:
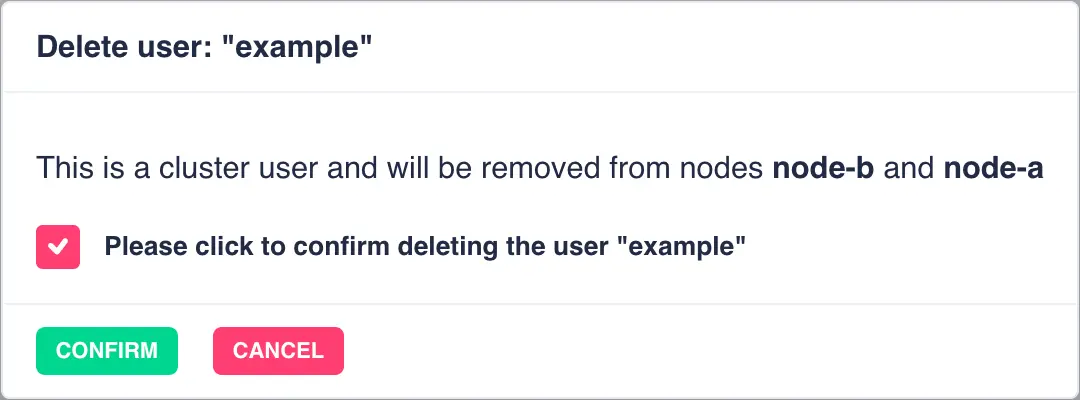
Note
Local users (users that exist on one node only) can only be modified and deleted by logging into the WebApp on the node where the user exists.
Unix Groups
The Unix Groups page System -> UNIX Groups lists both local groups and cluster groups. A cluster group is one where a group
name and GID are identical on all nodes of the cluster. This is an important consideration for both
user and group ID's so that cluster credentials remain consistent.
The main page lists both local and cluster groups:
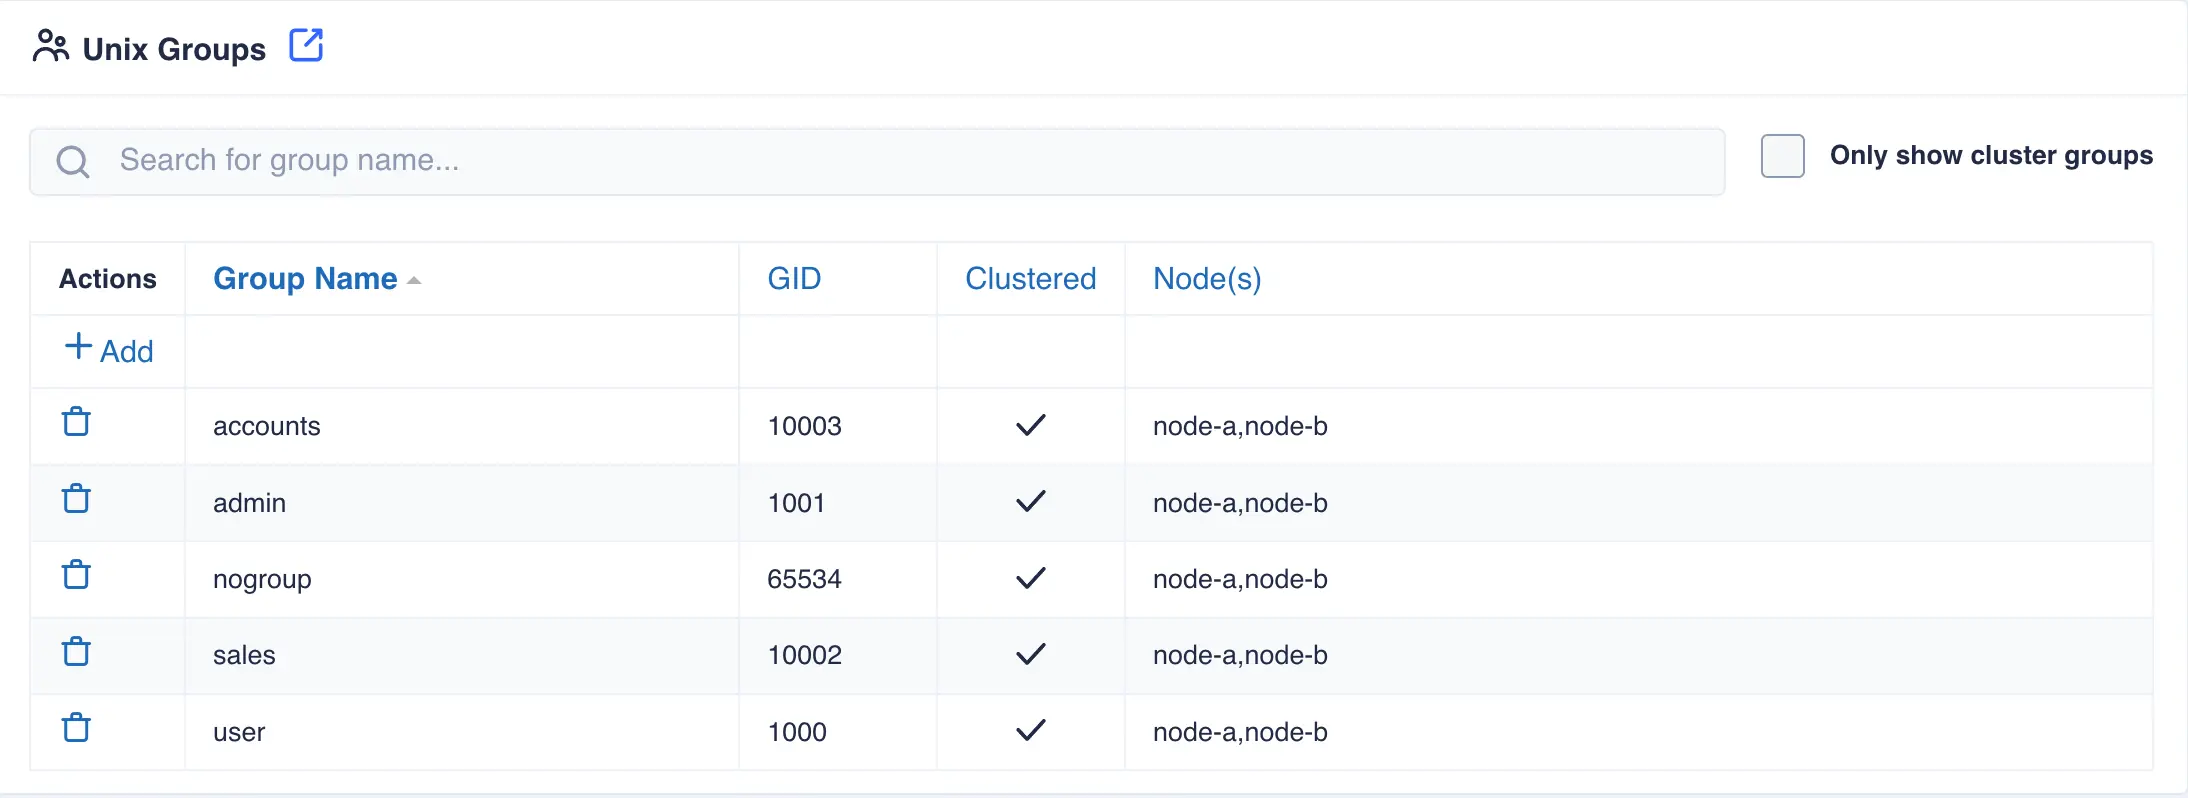
Creating Groups
To create a cluster group click +Add in the Actions column. This will create the group on all
cluster nodes using the same GUID and name.
-
Enter the Groupname and GID:
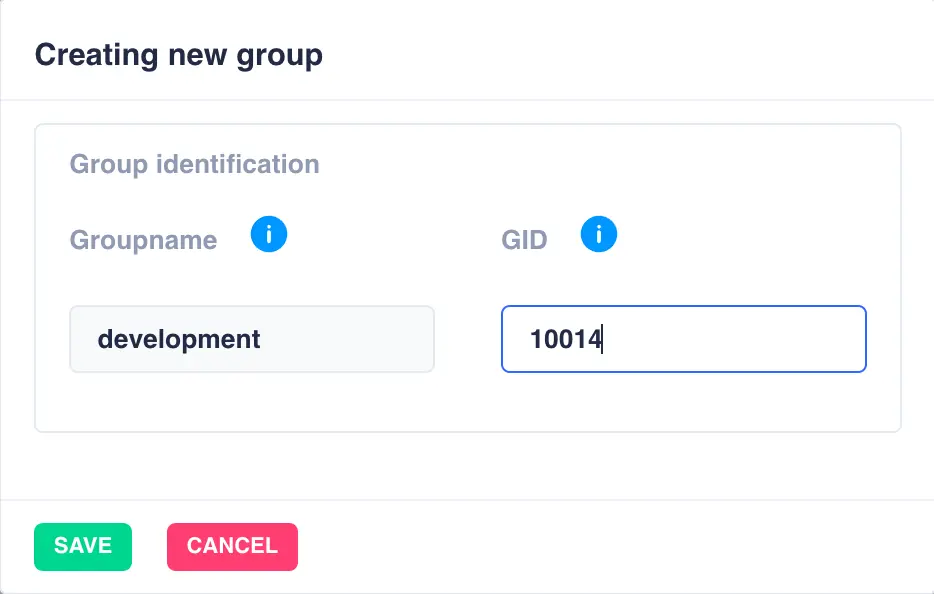
-
When done click
SAVE. Once saved, the group will be created on all nodes in the cluster: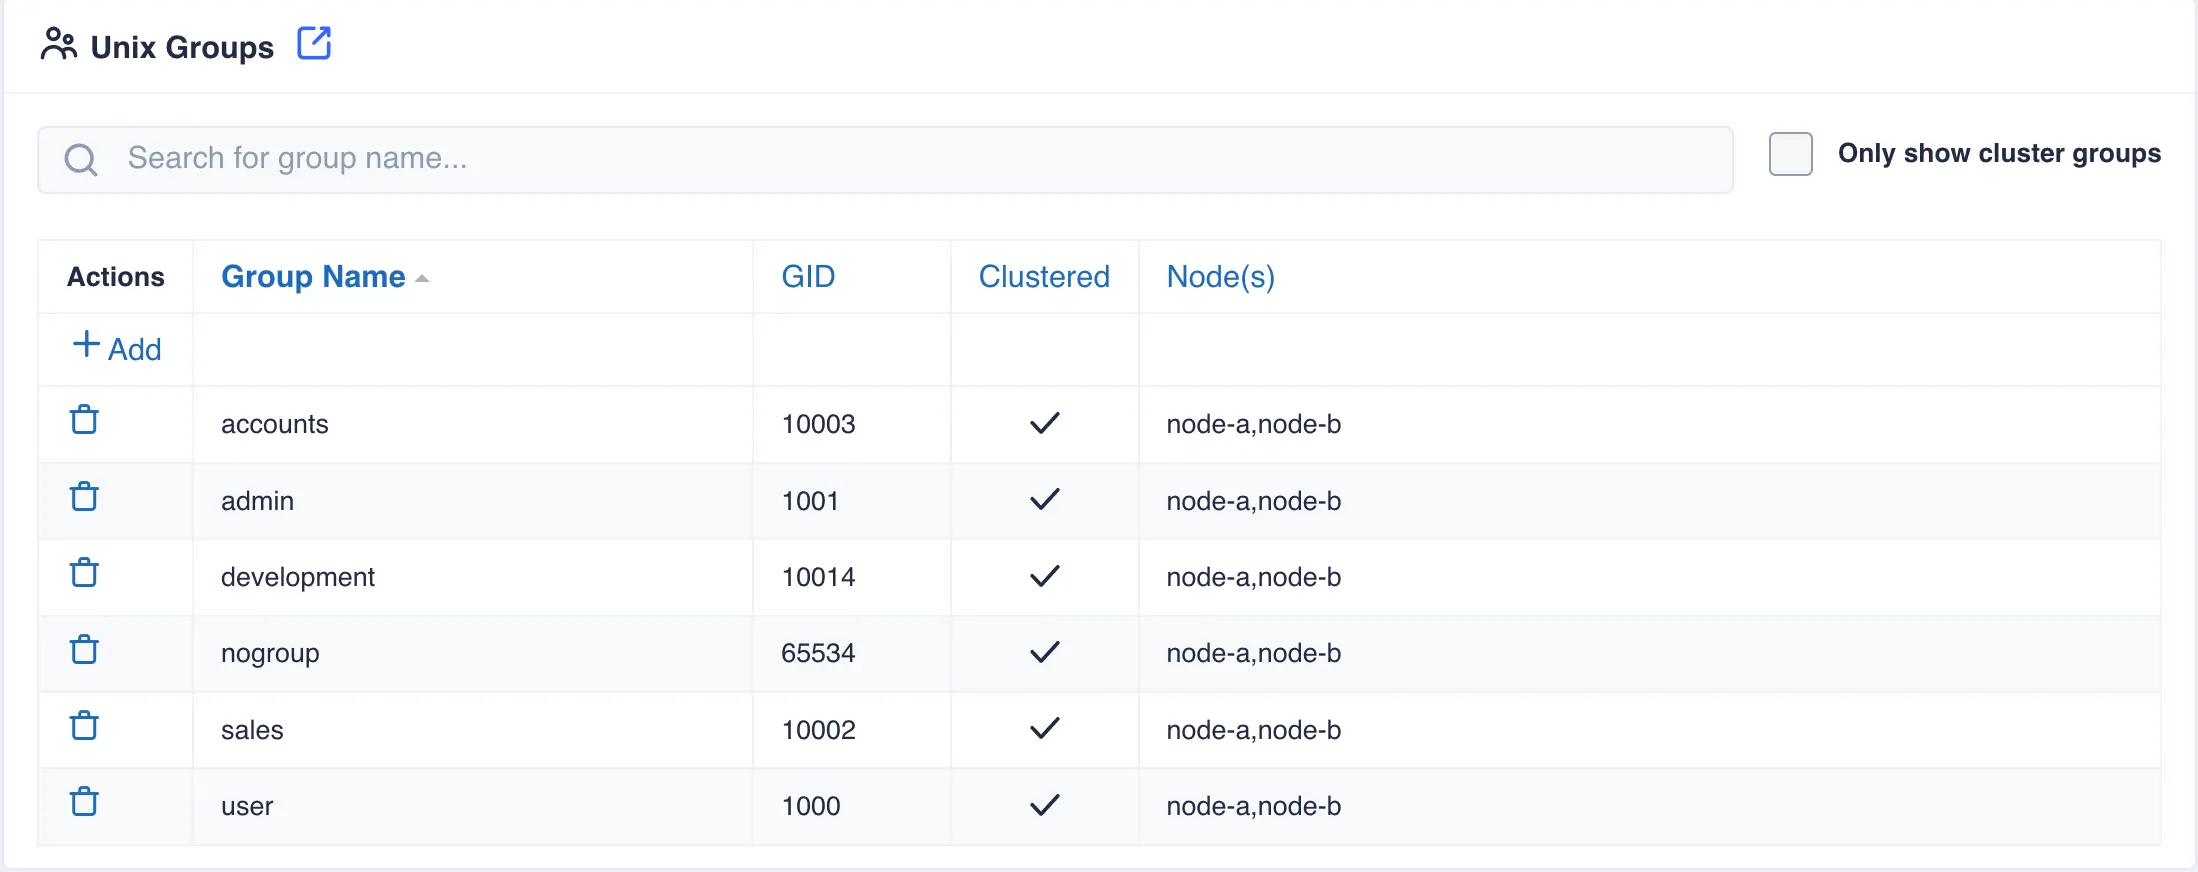
Deleting Groups
To delete a group from all cluster nodes click the ![]() icon and then confirm the deletion:
icon and then confirm the deletion:
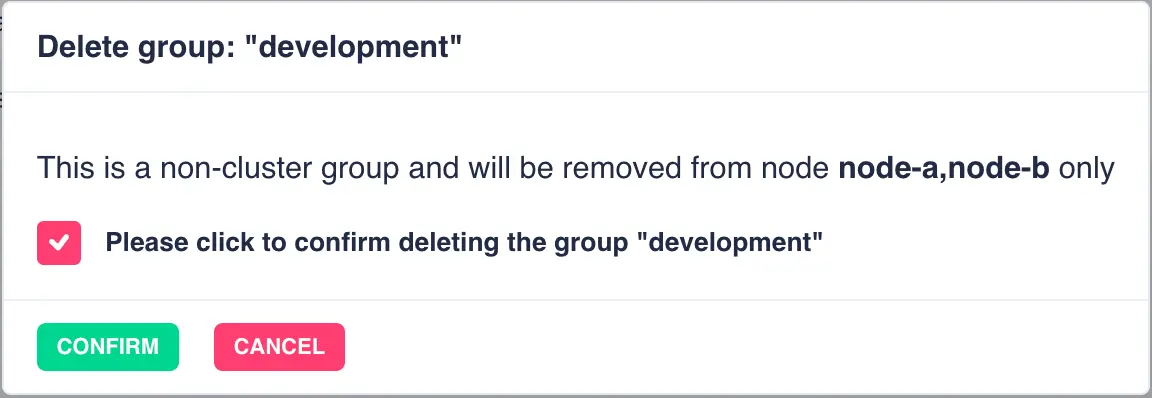
Note
Local groups (groups that exist on one node only) can only be modified and deleted by logging into the WebApp on the node where the group exists.
WebApp Users
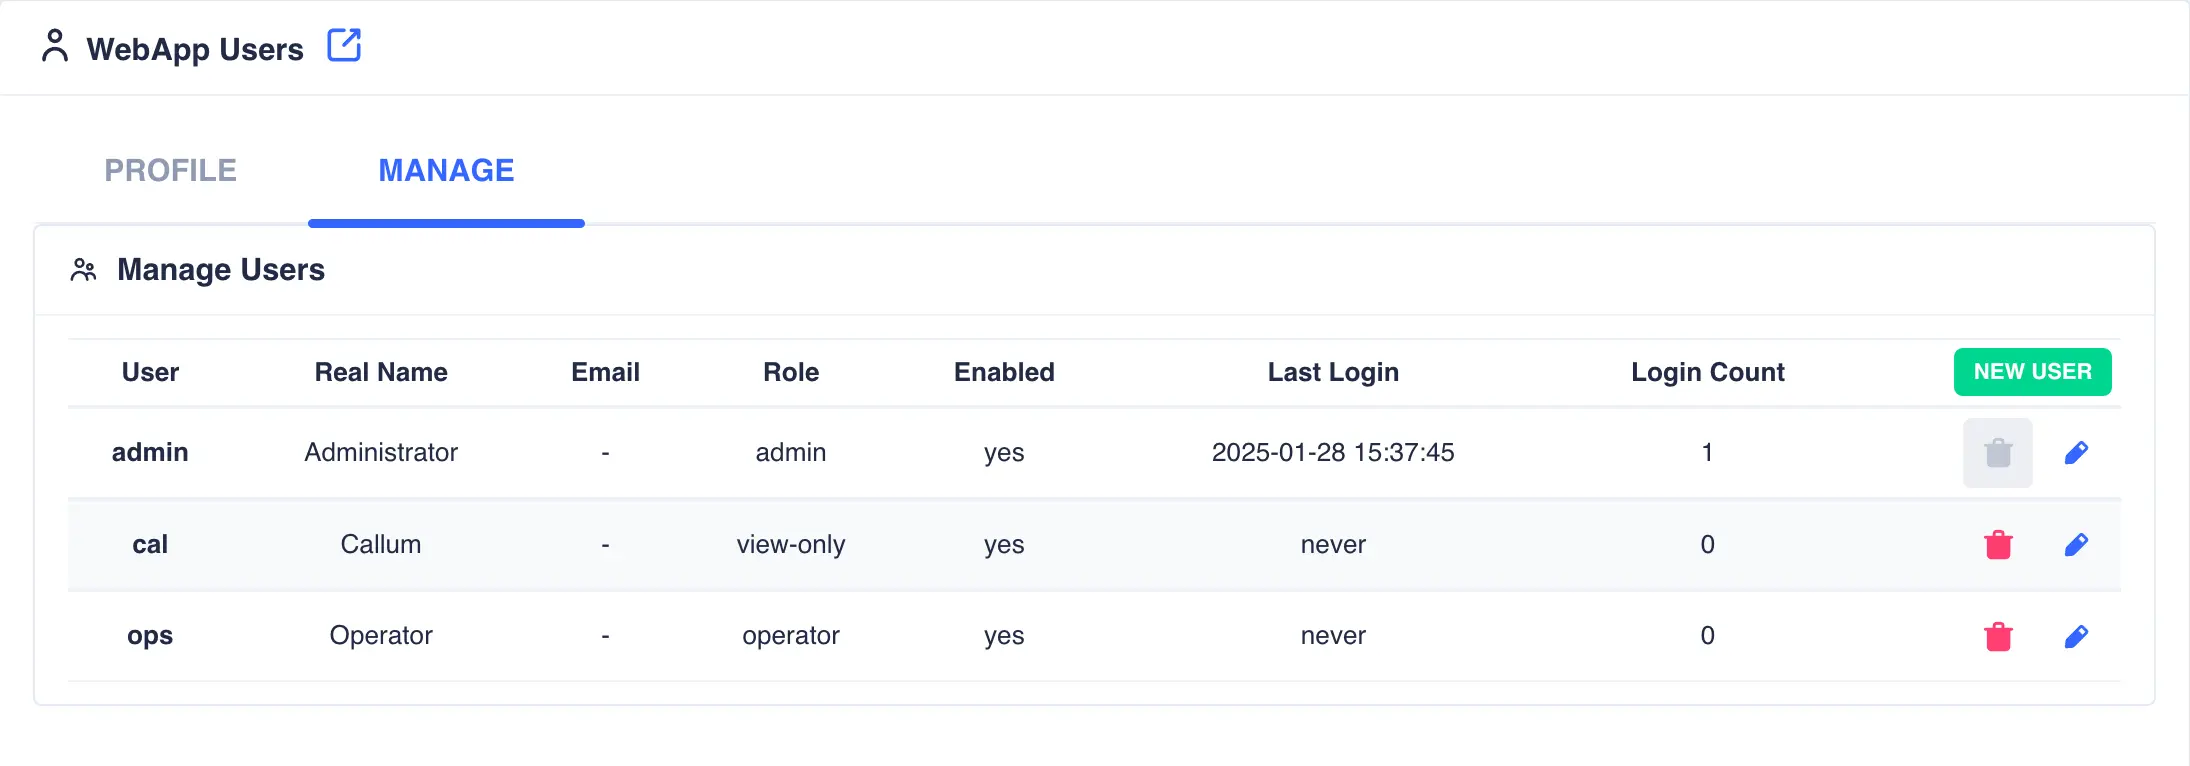
For users with the admin role the page System -> WebApp Users manages WebApp user accounts.
The main page lists the WebApp users under the MANAGE tab. The PROFILE tab provides summary information for the
currently logged in user:
Admin users
There must always be at least one user with the admin role. By default an admin user is added when the cluster is first initialised and can only be removed once additional users with the admin role have been created.
Adding a user
To create a new WebApp user, login as a user with the admin role and click the ADD USER button.
-
Enter the
User Name,Real Name,Passwordand optionally an email address which will be used for alert notifications: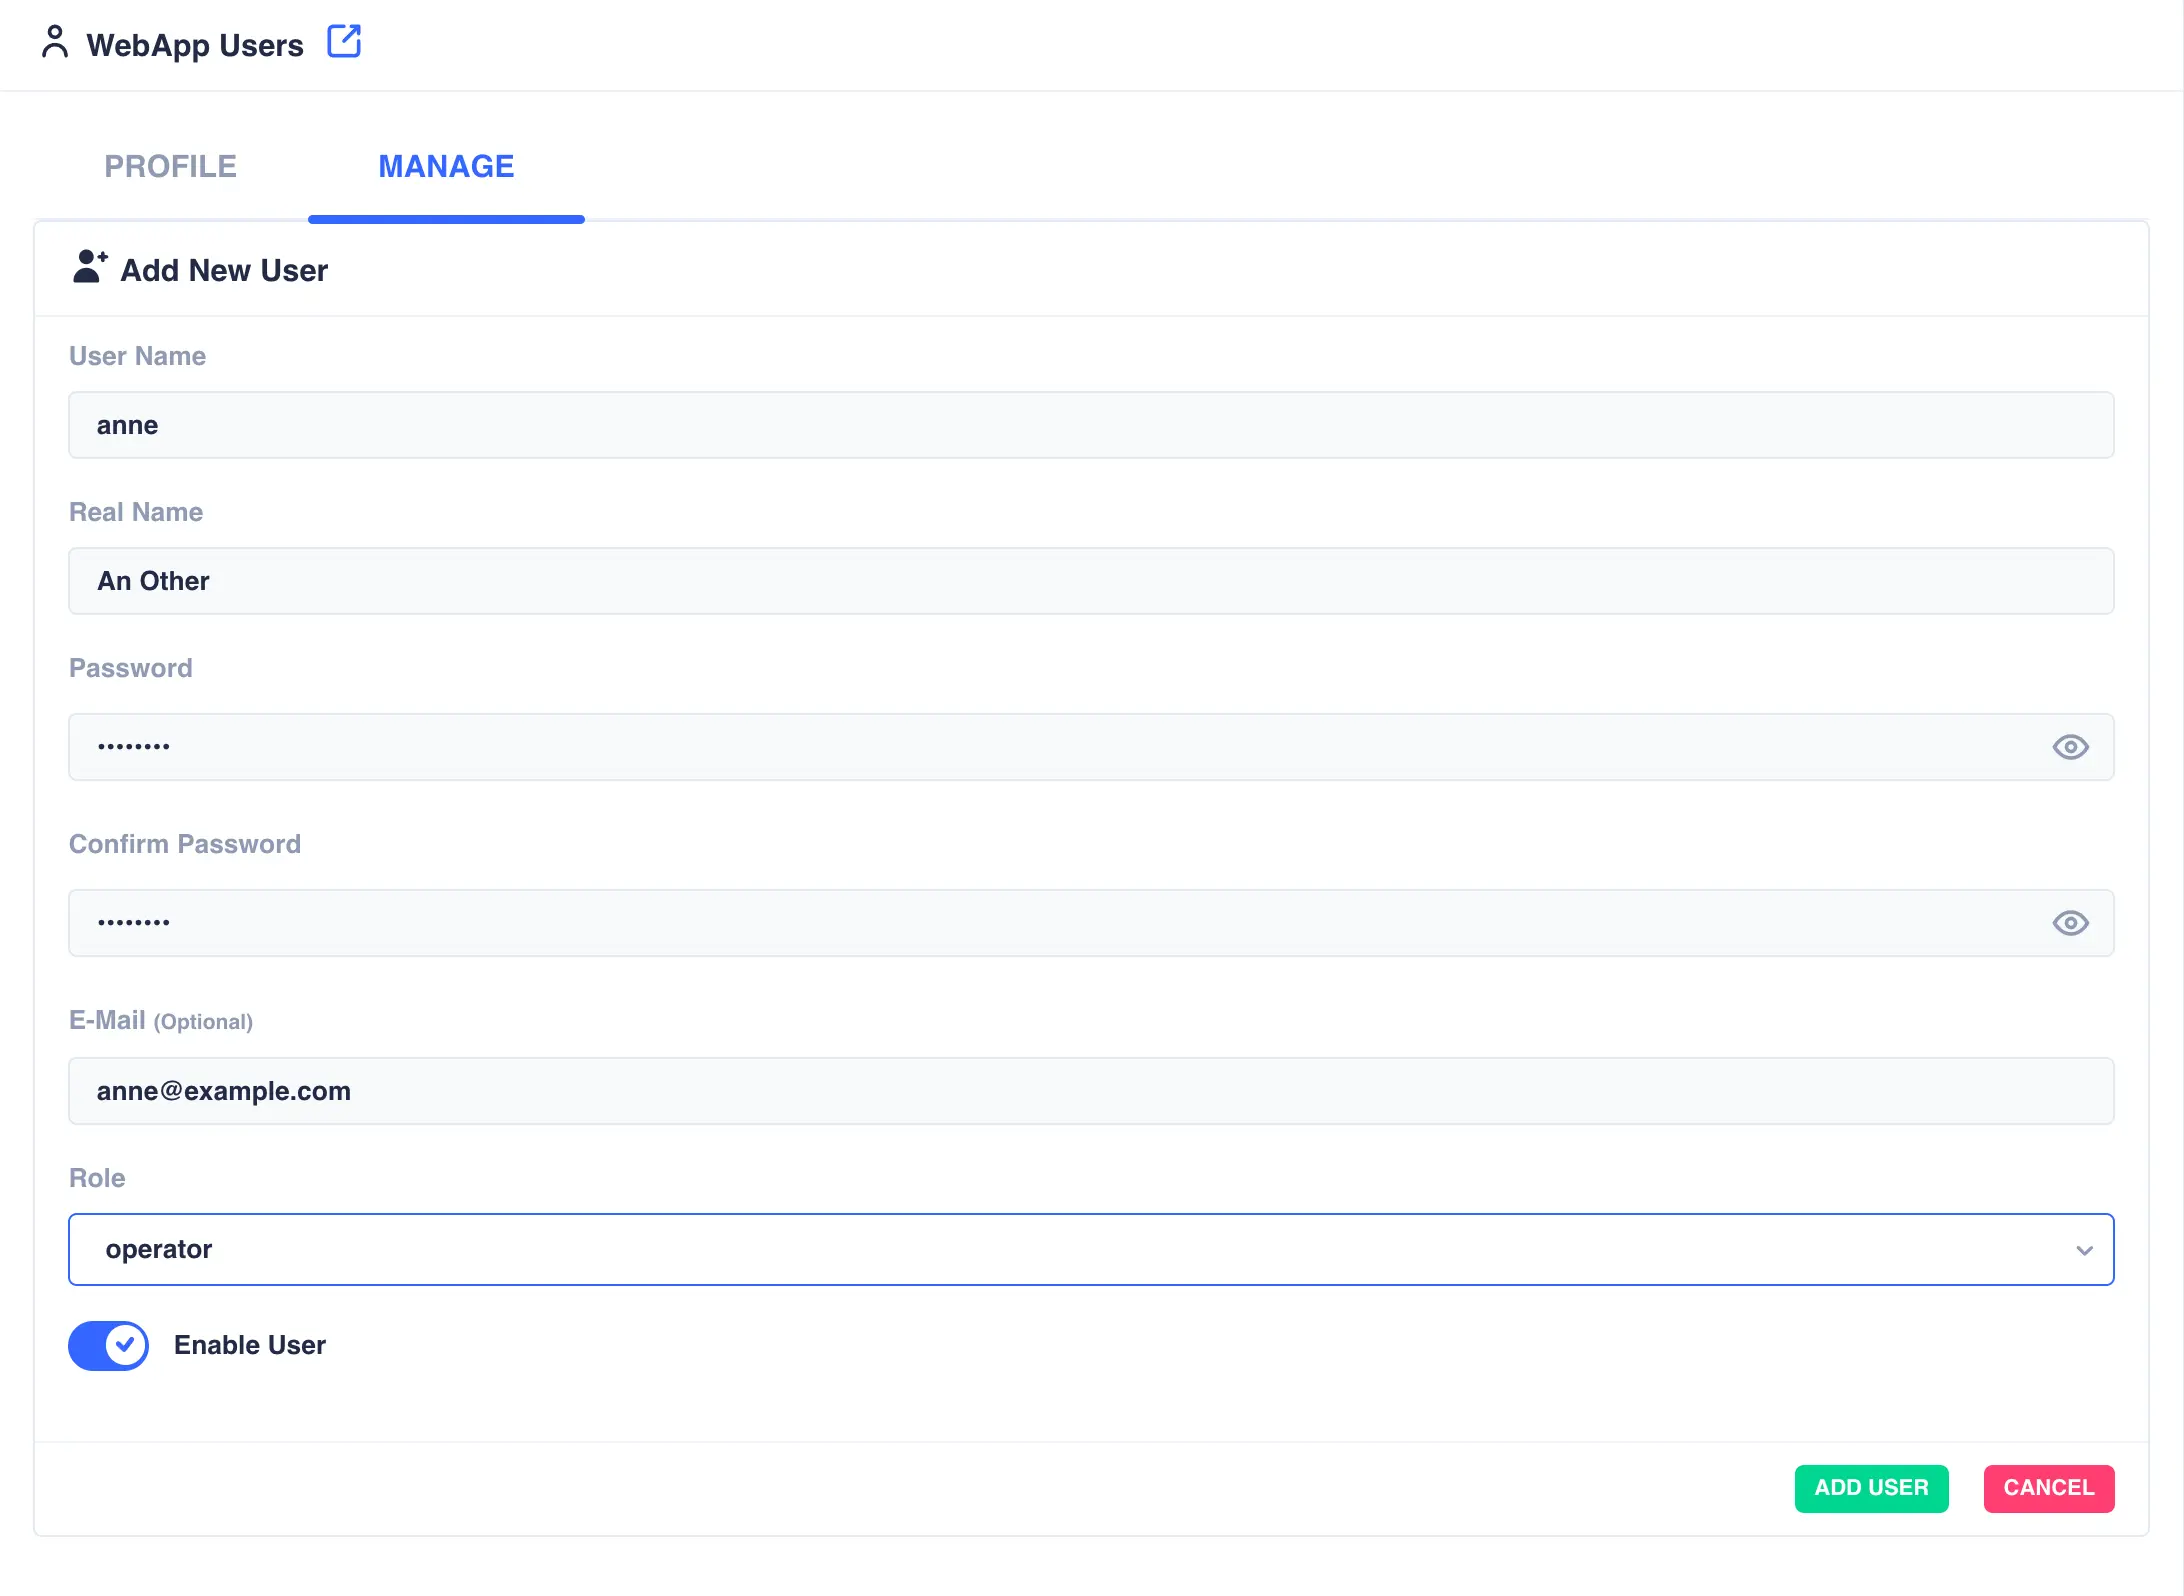
-
Set the role for the user:
Role Description view-onlyUser can only view the status of the cluster, services, heartbeats etc. They will be unable to perform any management operations. operatorUser will be able to manage services in the cluster, stopping, starting, moving etc. They will not be able to delete, create or change services. adminFull control over the cluster with no restrictions. -
Once done click
ADD USER; the new user will be created: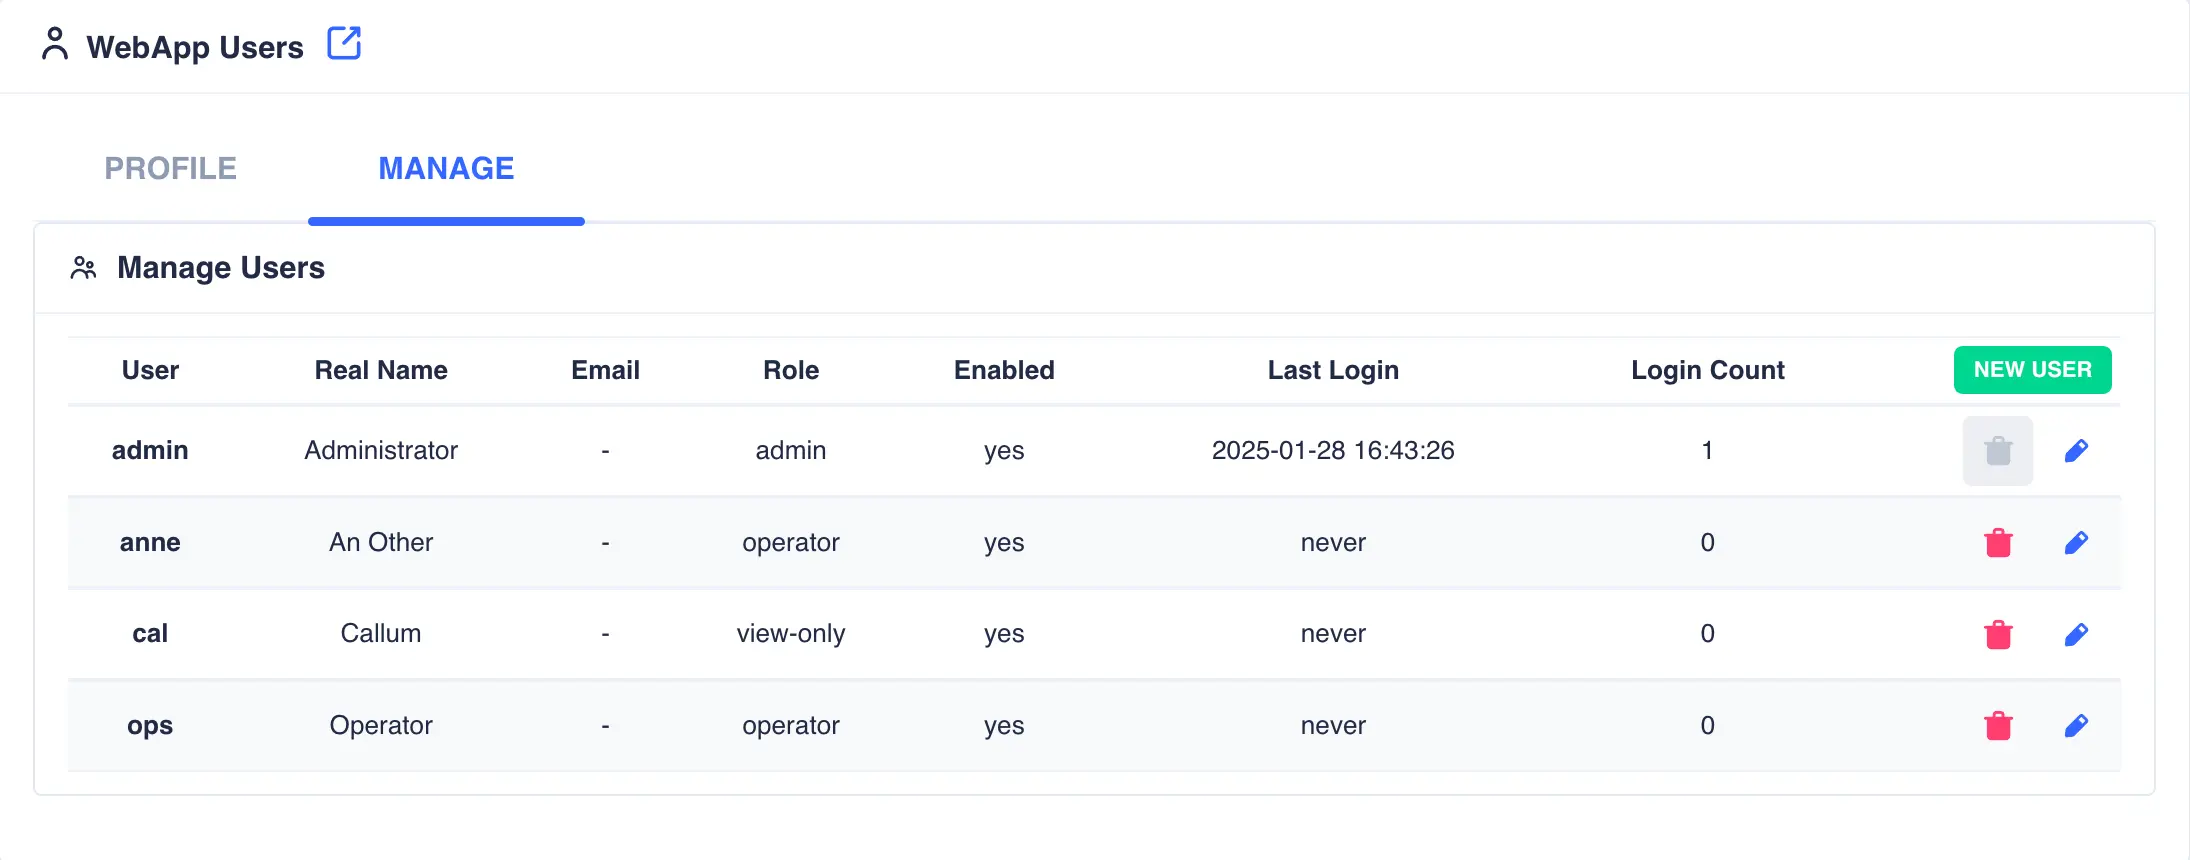
Note
Webapp users are created cluster wide and can login from any node in the cluster.
Modifying Users
To modify a user click the ![]() icon to the right
of the user. The
icon to the right
of the user. The Real Name, Password, E-Mail and Role fields can be modified as required. Login for this user
can also be enabled/disabled by toggling Enable User.
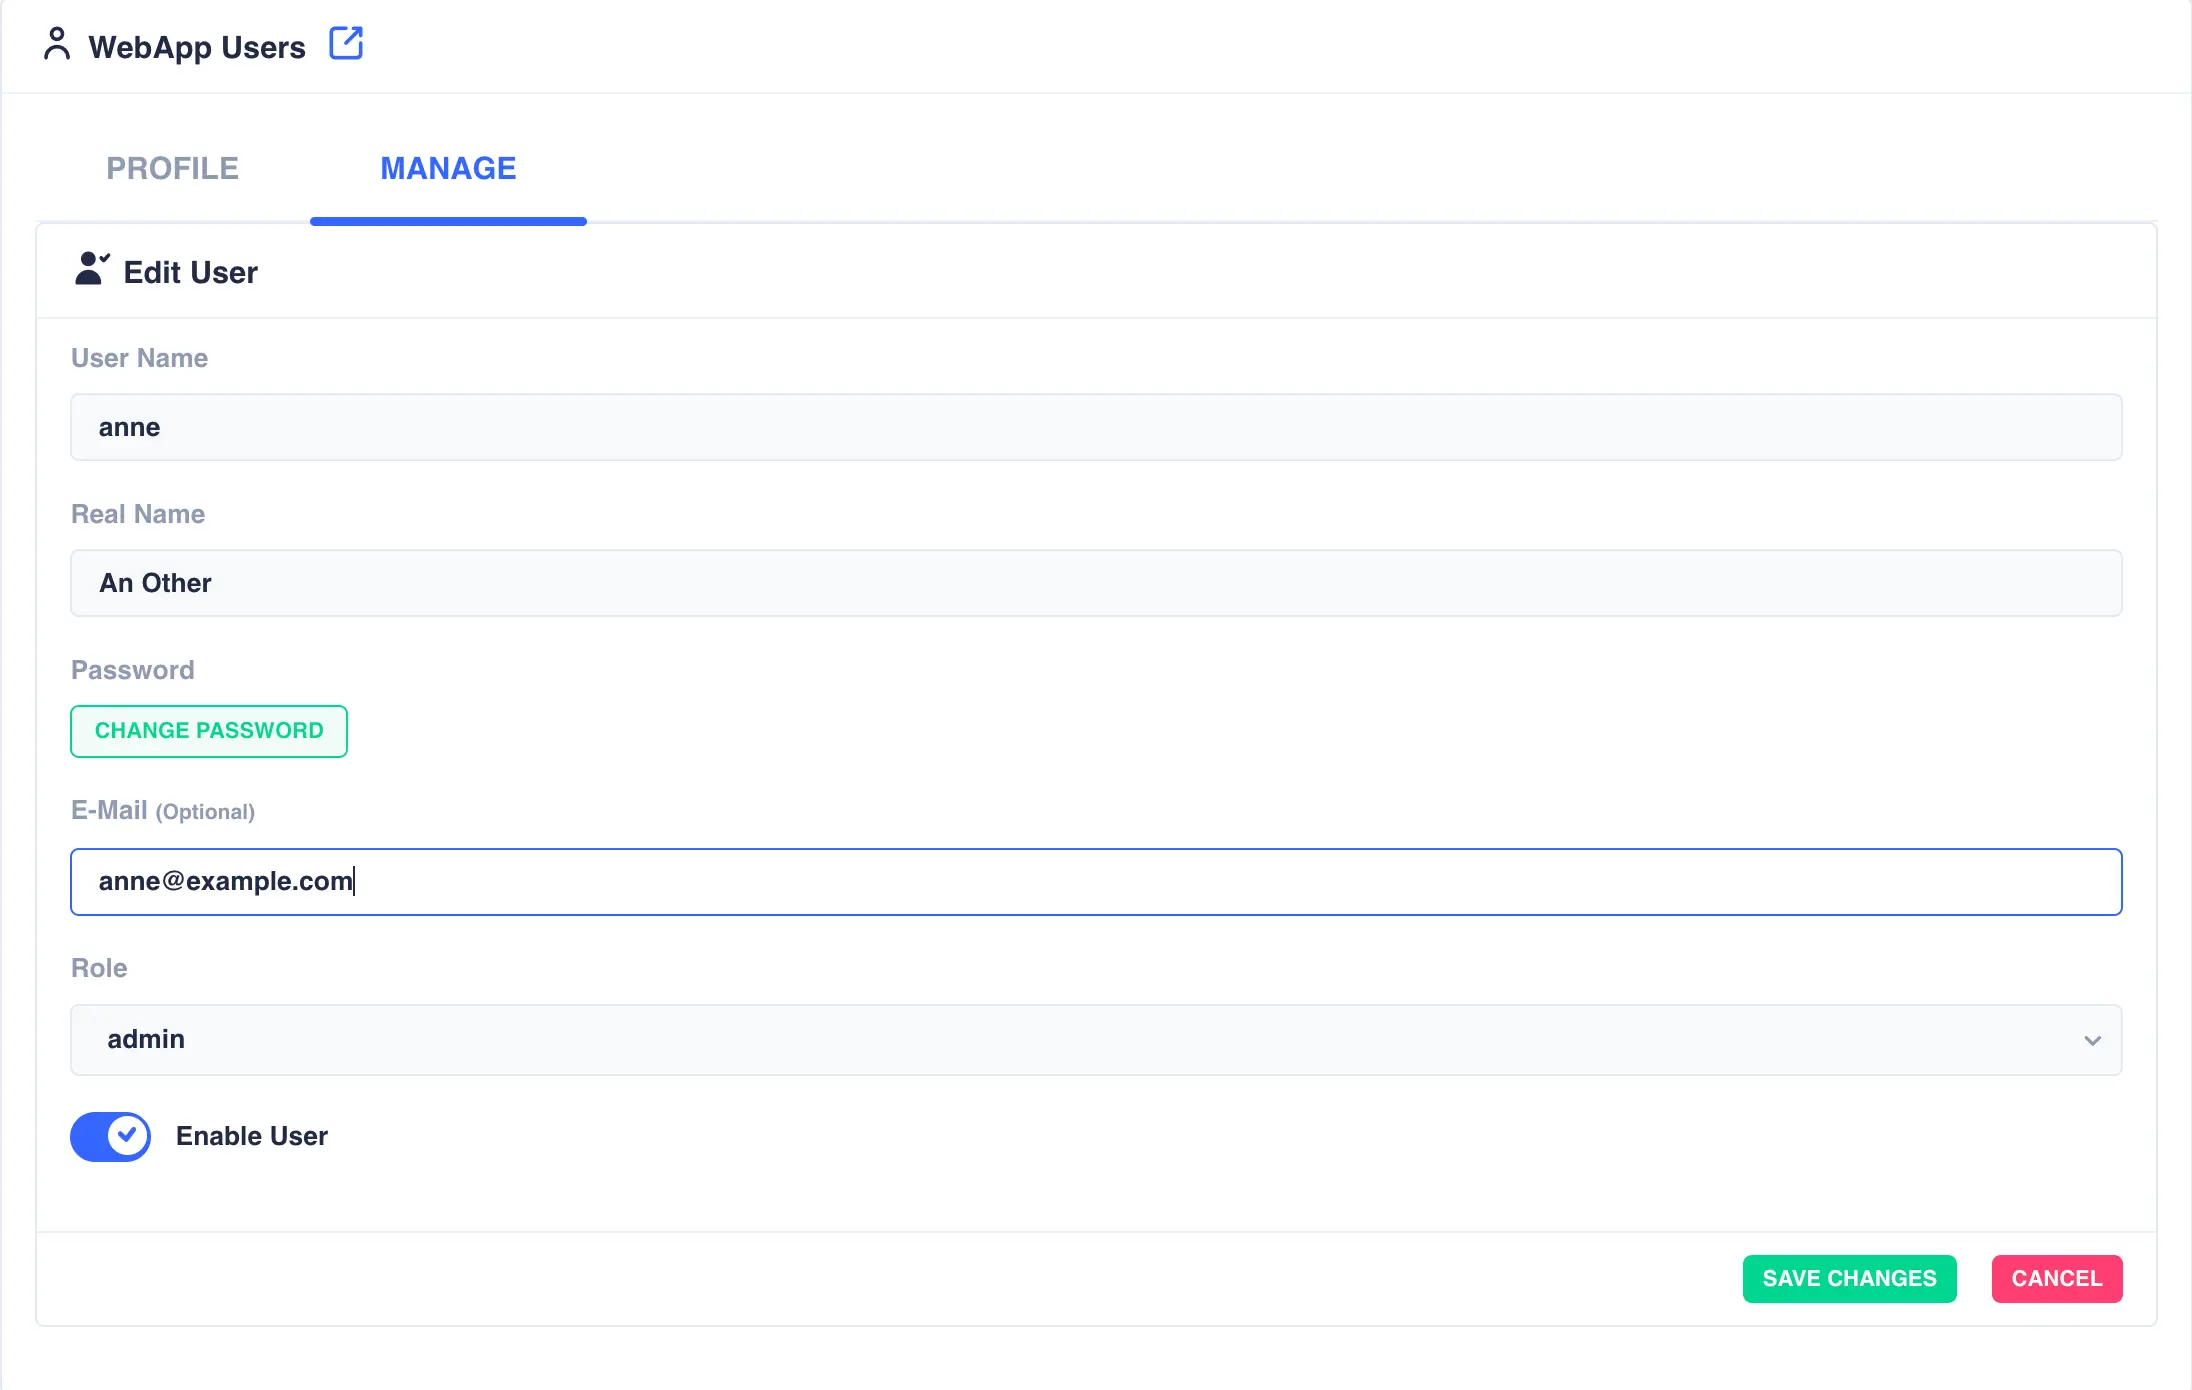
Click SAVE CHANGES when complete.
Deleting Users
To delete a user click the ![]() icon to the
right of the user:
icon to the
right of the user:

Click the REMOVE USER button to confirm.
-
For example
runningandstoppingare members of the active group, whereasstoppedis a member of the inactive group. ↩ -
A
broken_safestate is considered an inactive state as, although the service was unable to start up successfully, it was able to free up all the resources during the shutdown/abort step (hence thesafestate). ↩