Pools
The Pools page is used to both create zpools and to cluster them to create a service. The main page shows the pools discovered on a local node:
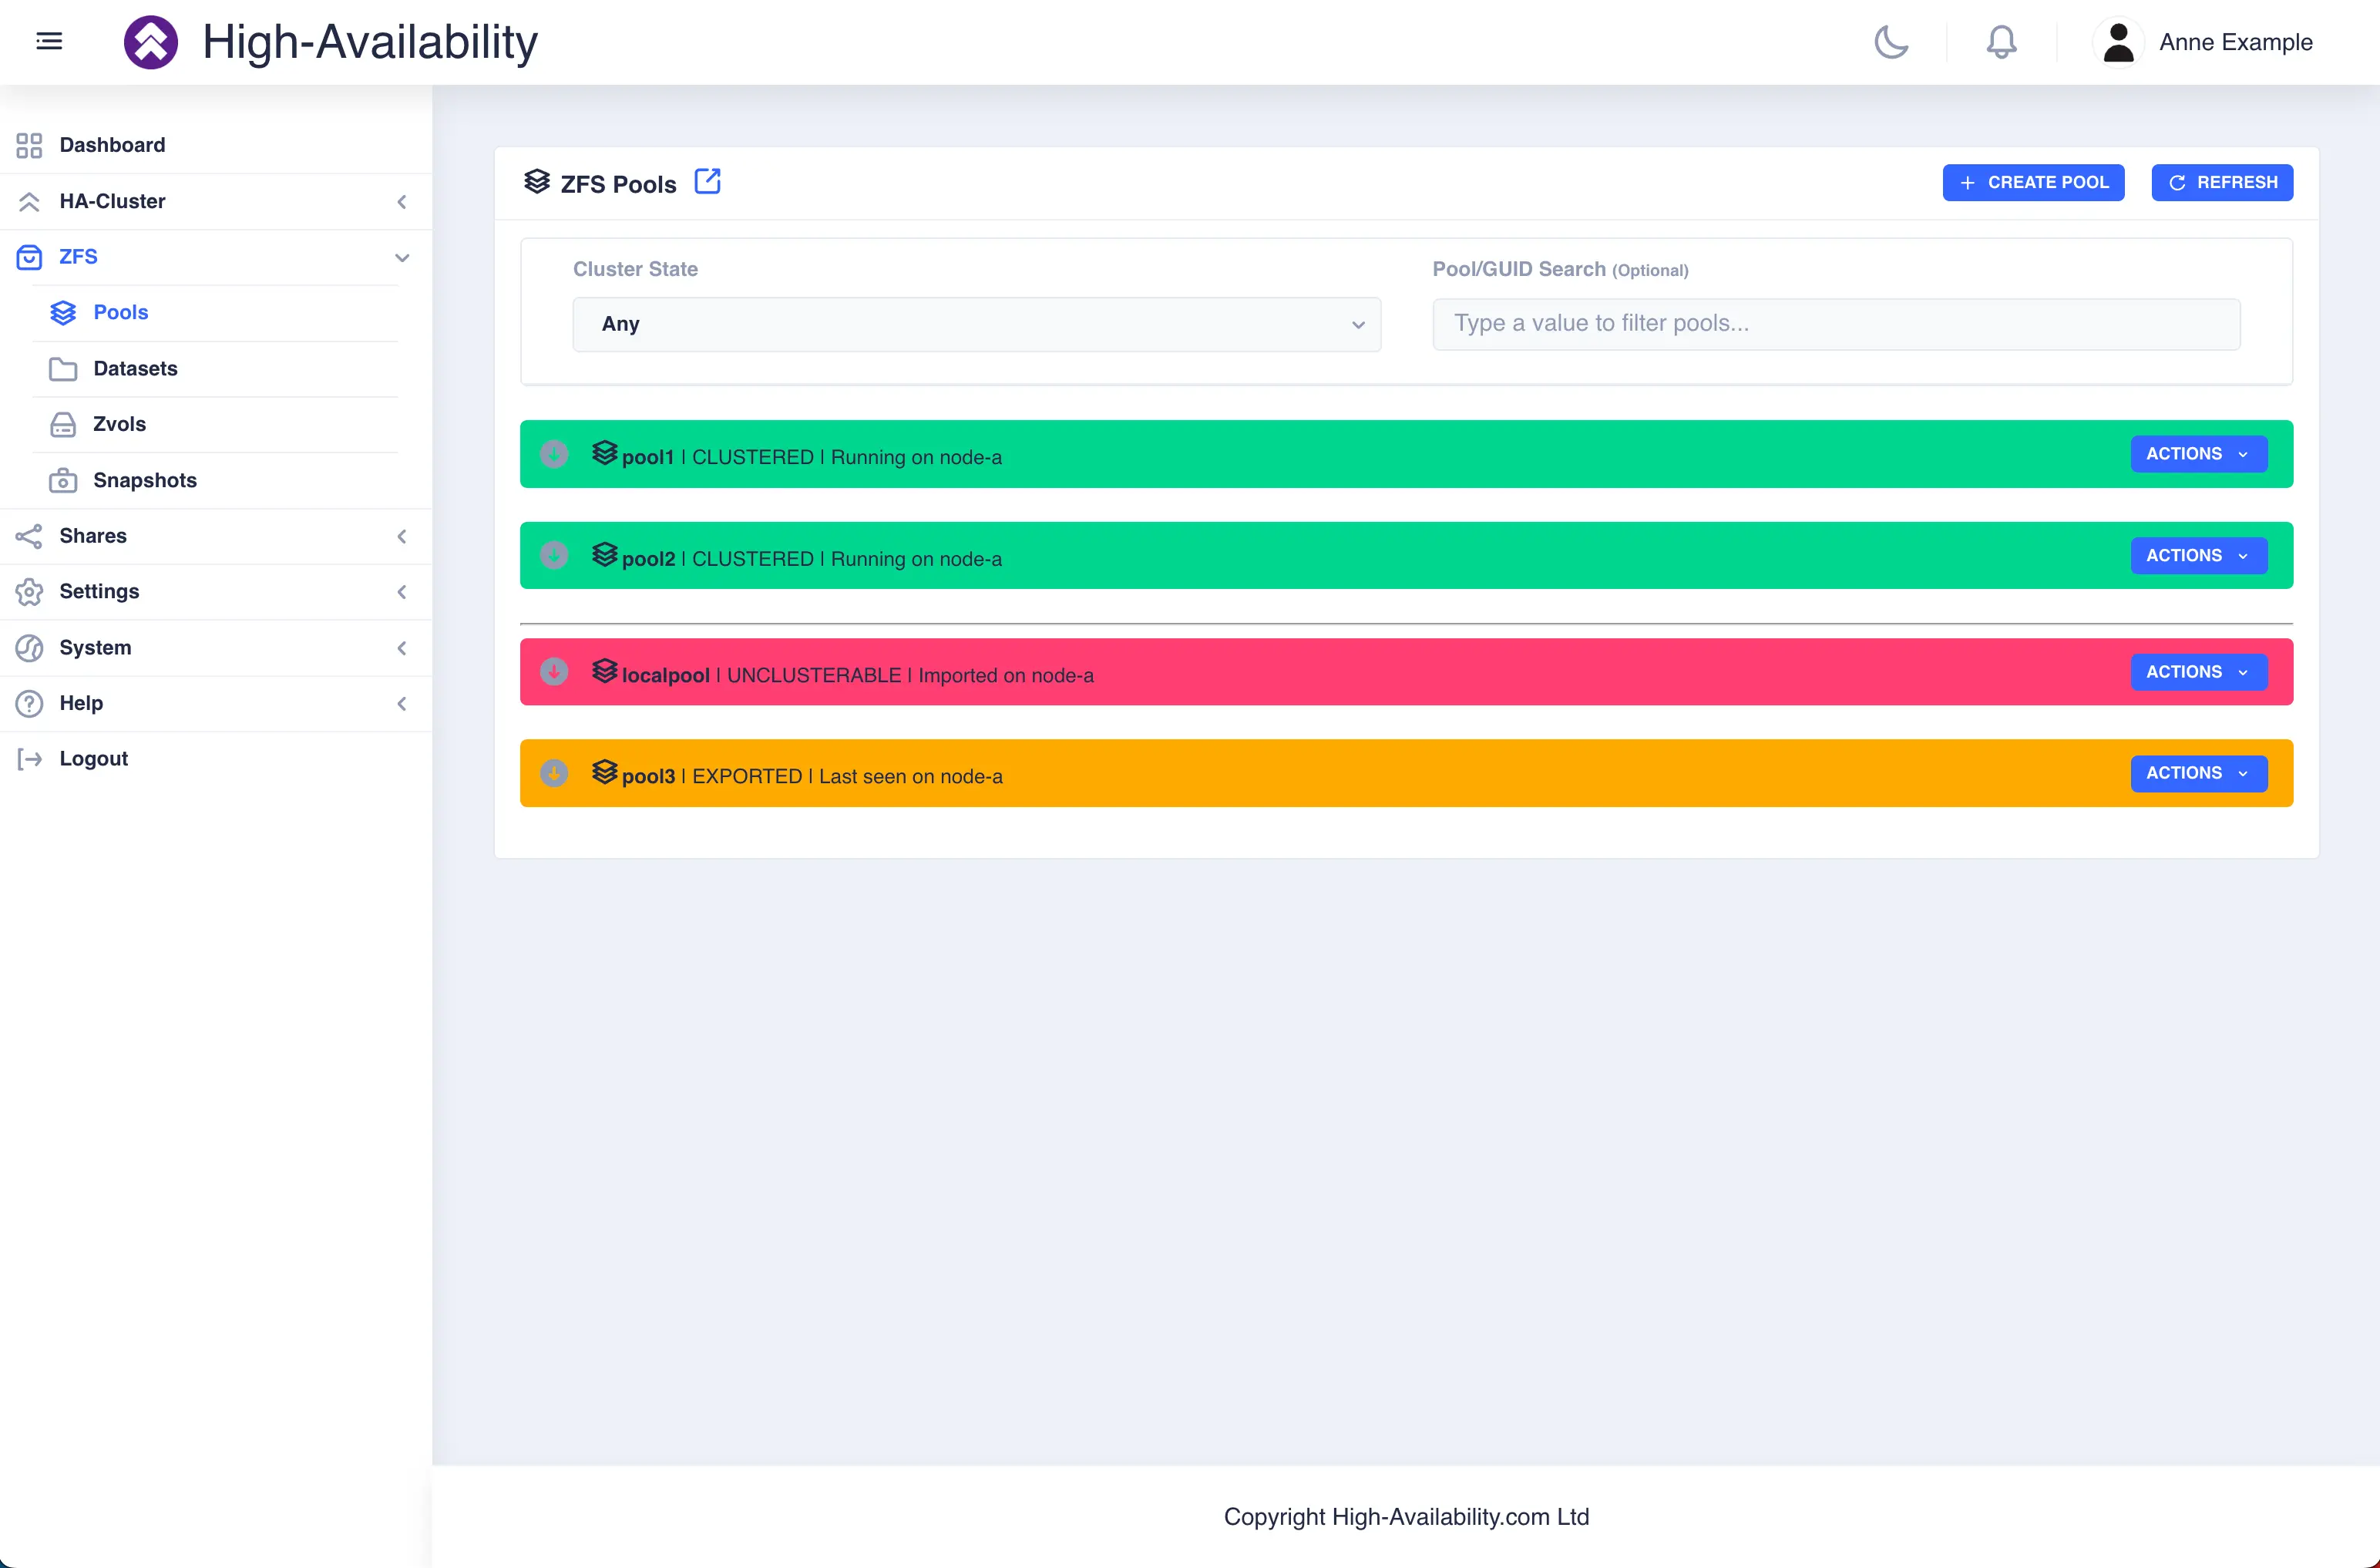
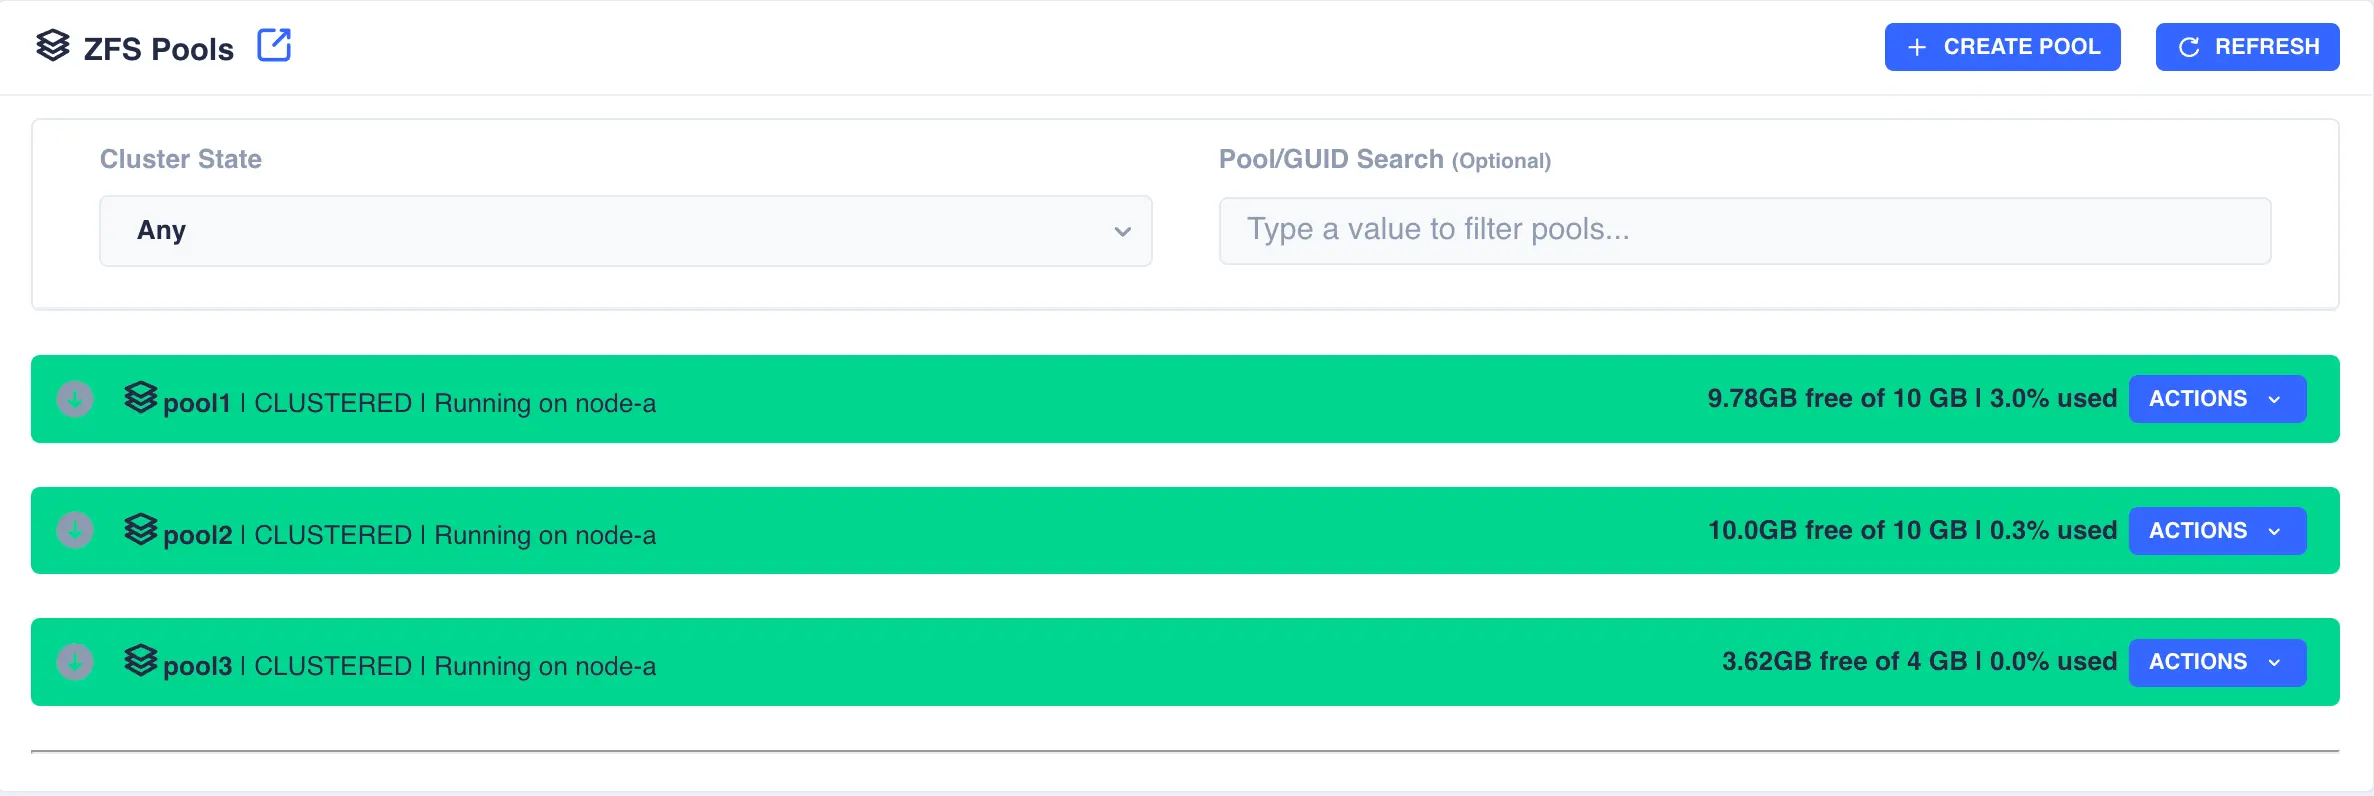
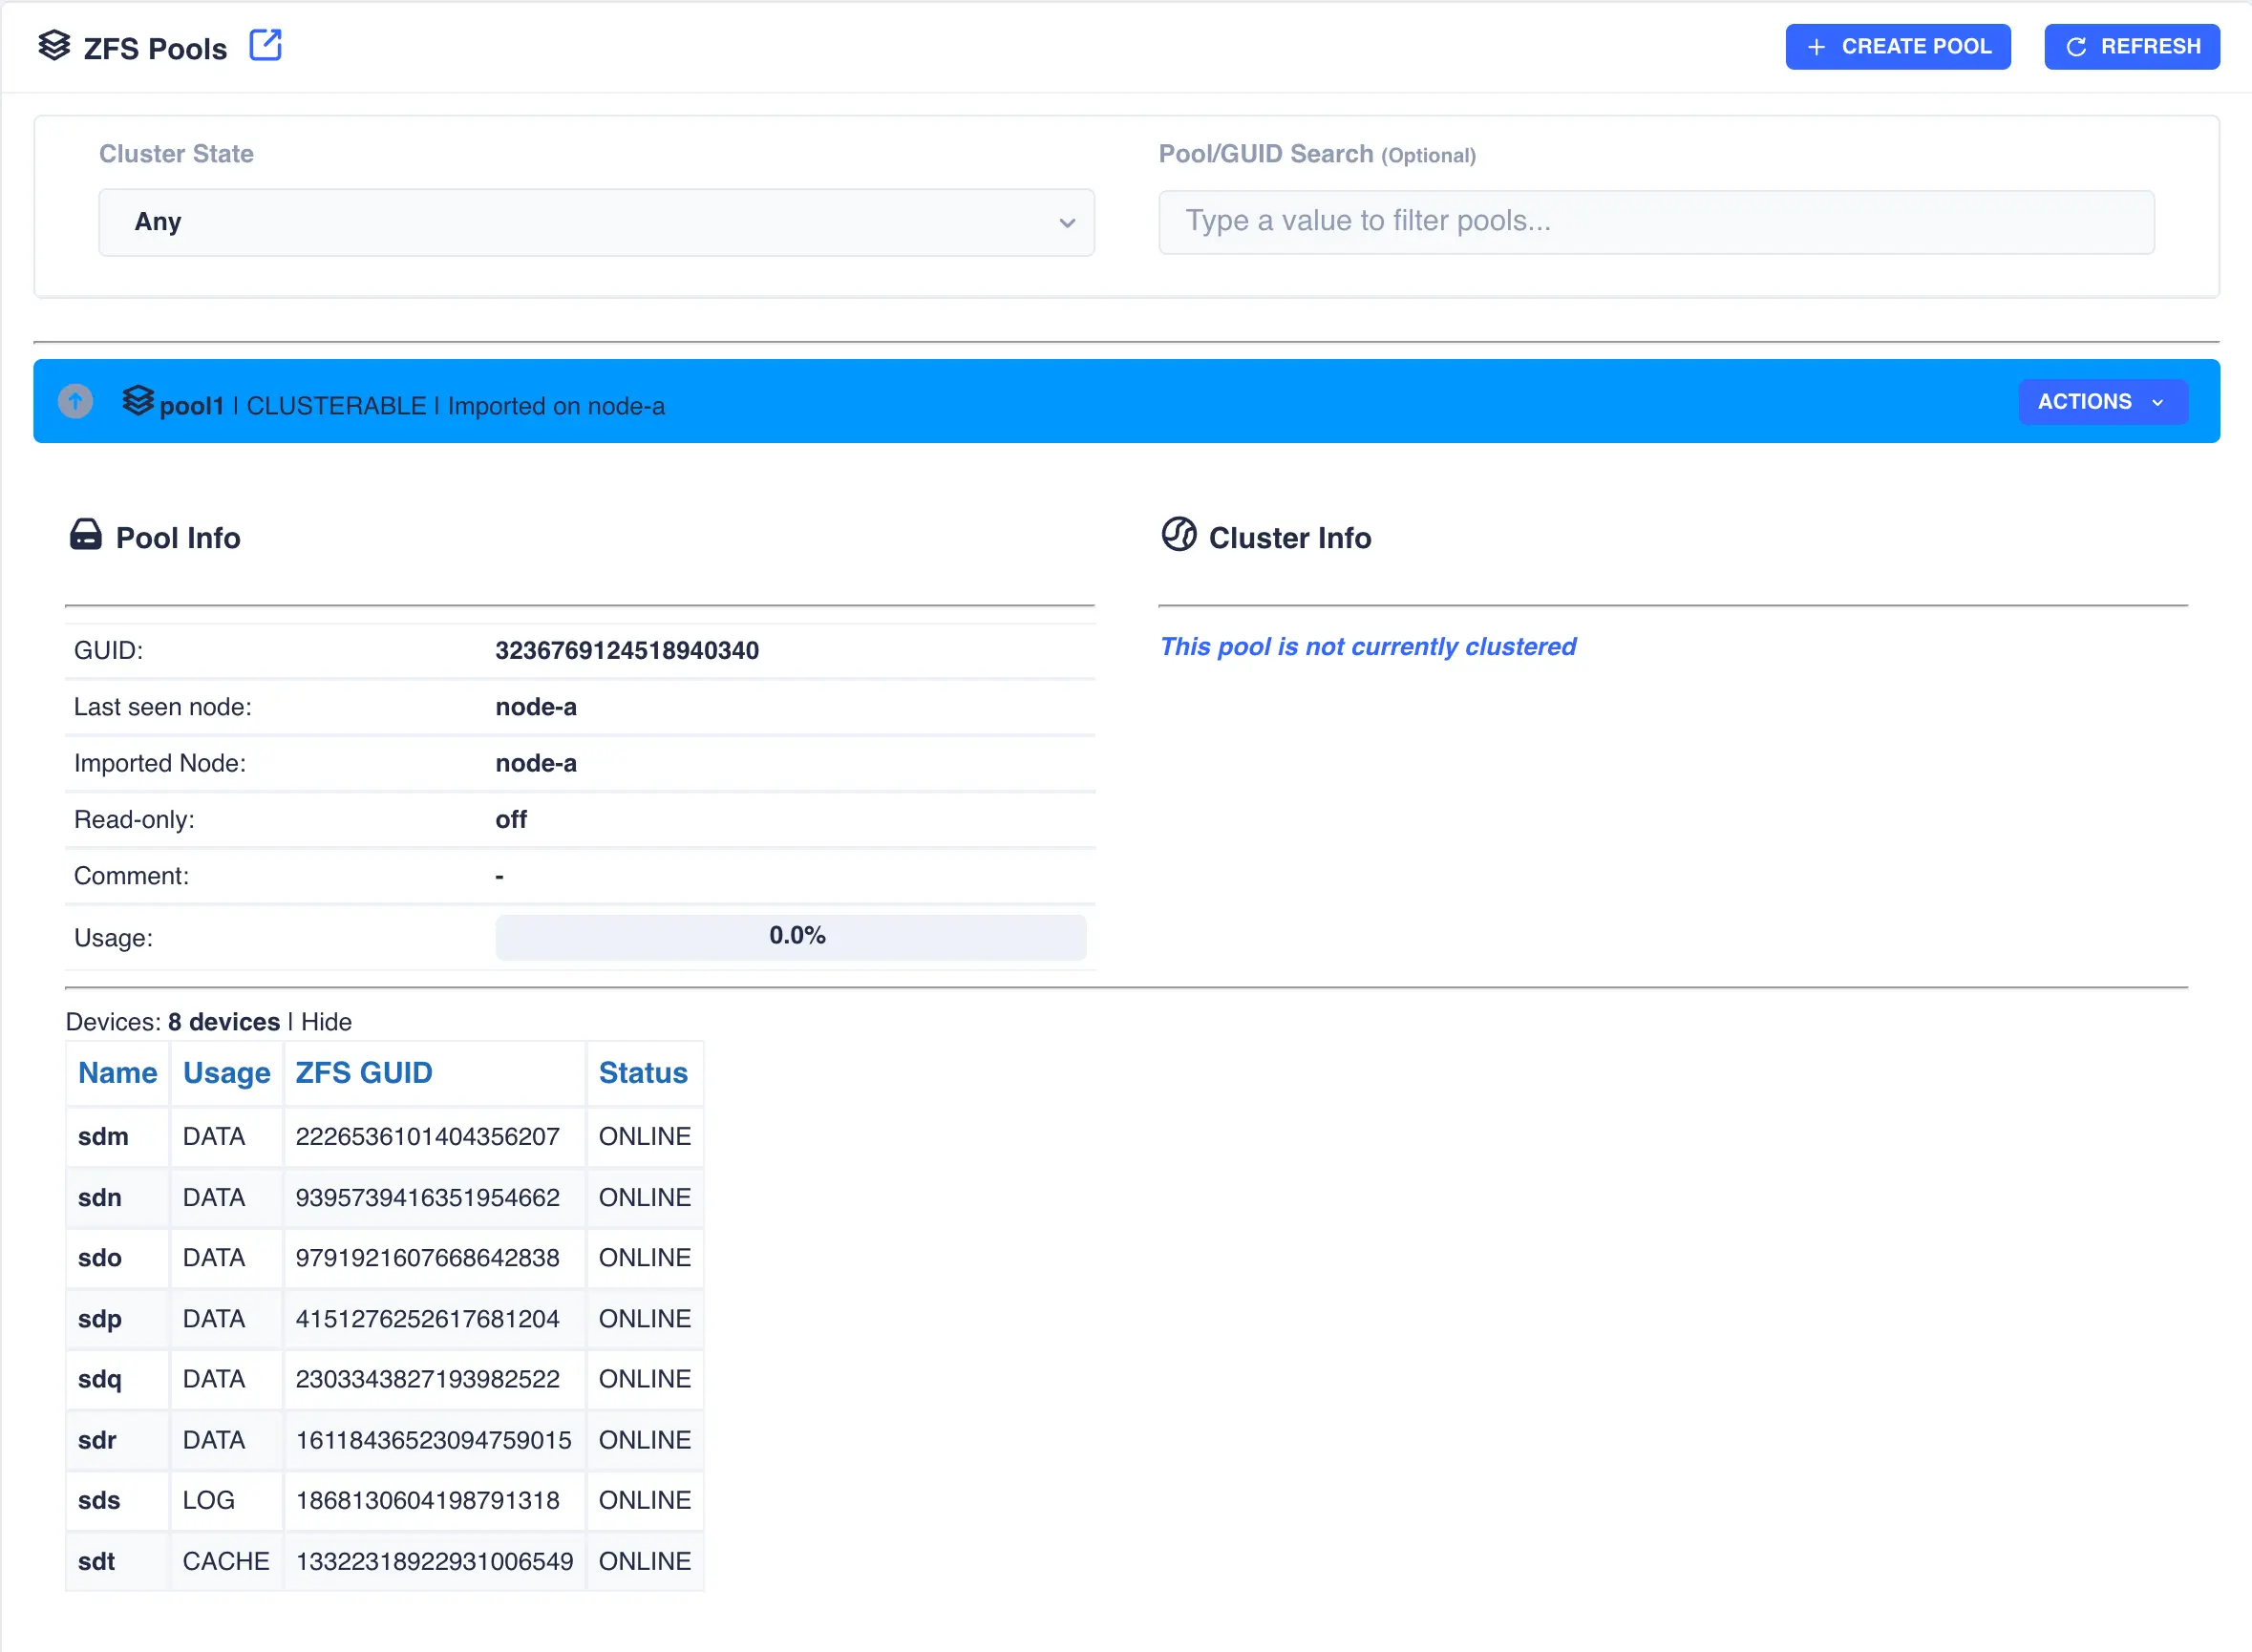
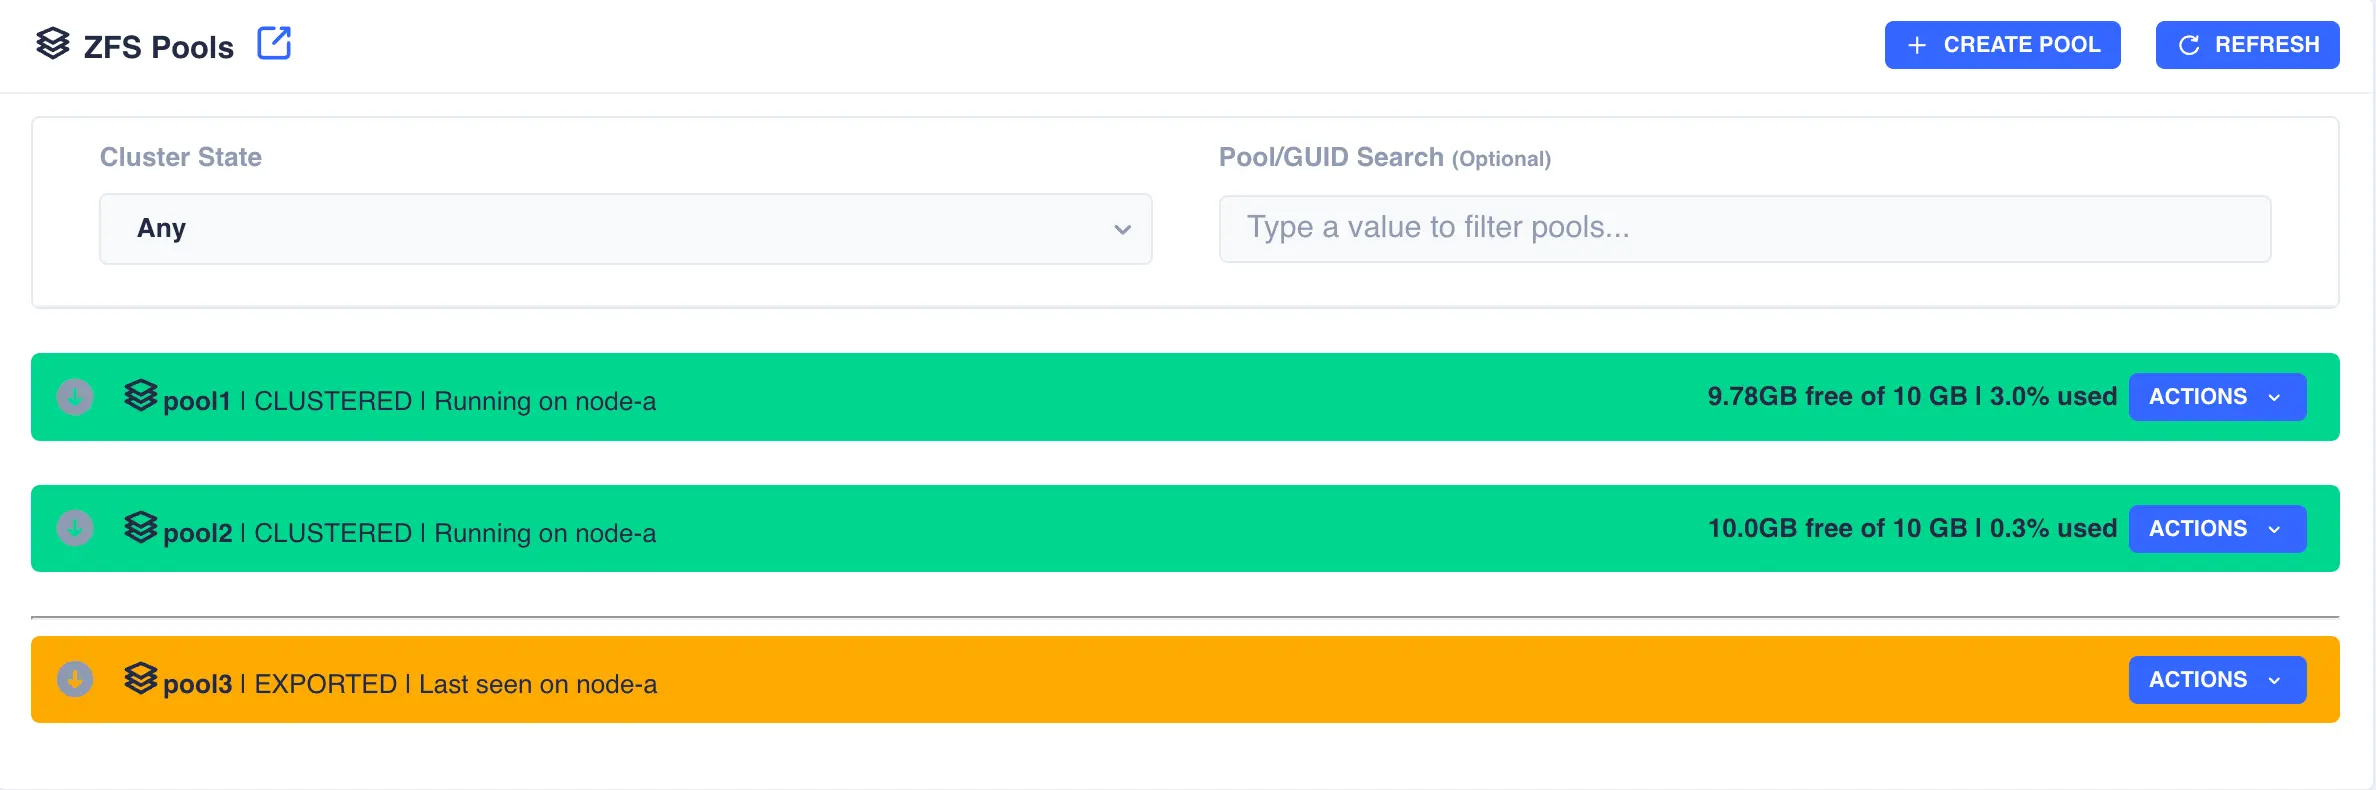
Clusterable pools
For shared storage all of a pools devices must be accessible by both nodes in the cluster; this is normally achieved using SAS drives in a JBOD connected to both nodes (commonly referred to as a Dual Ported JBOD).
In the above example pools pool1 and pool2 are both clustered and running on node-a, pool3 is an exported, unclustered pool
and poollocal is only visible to node-a and therefore cannot be clustered.
Creating a Pool
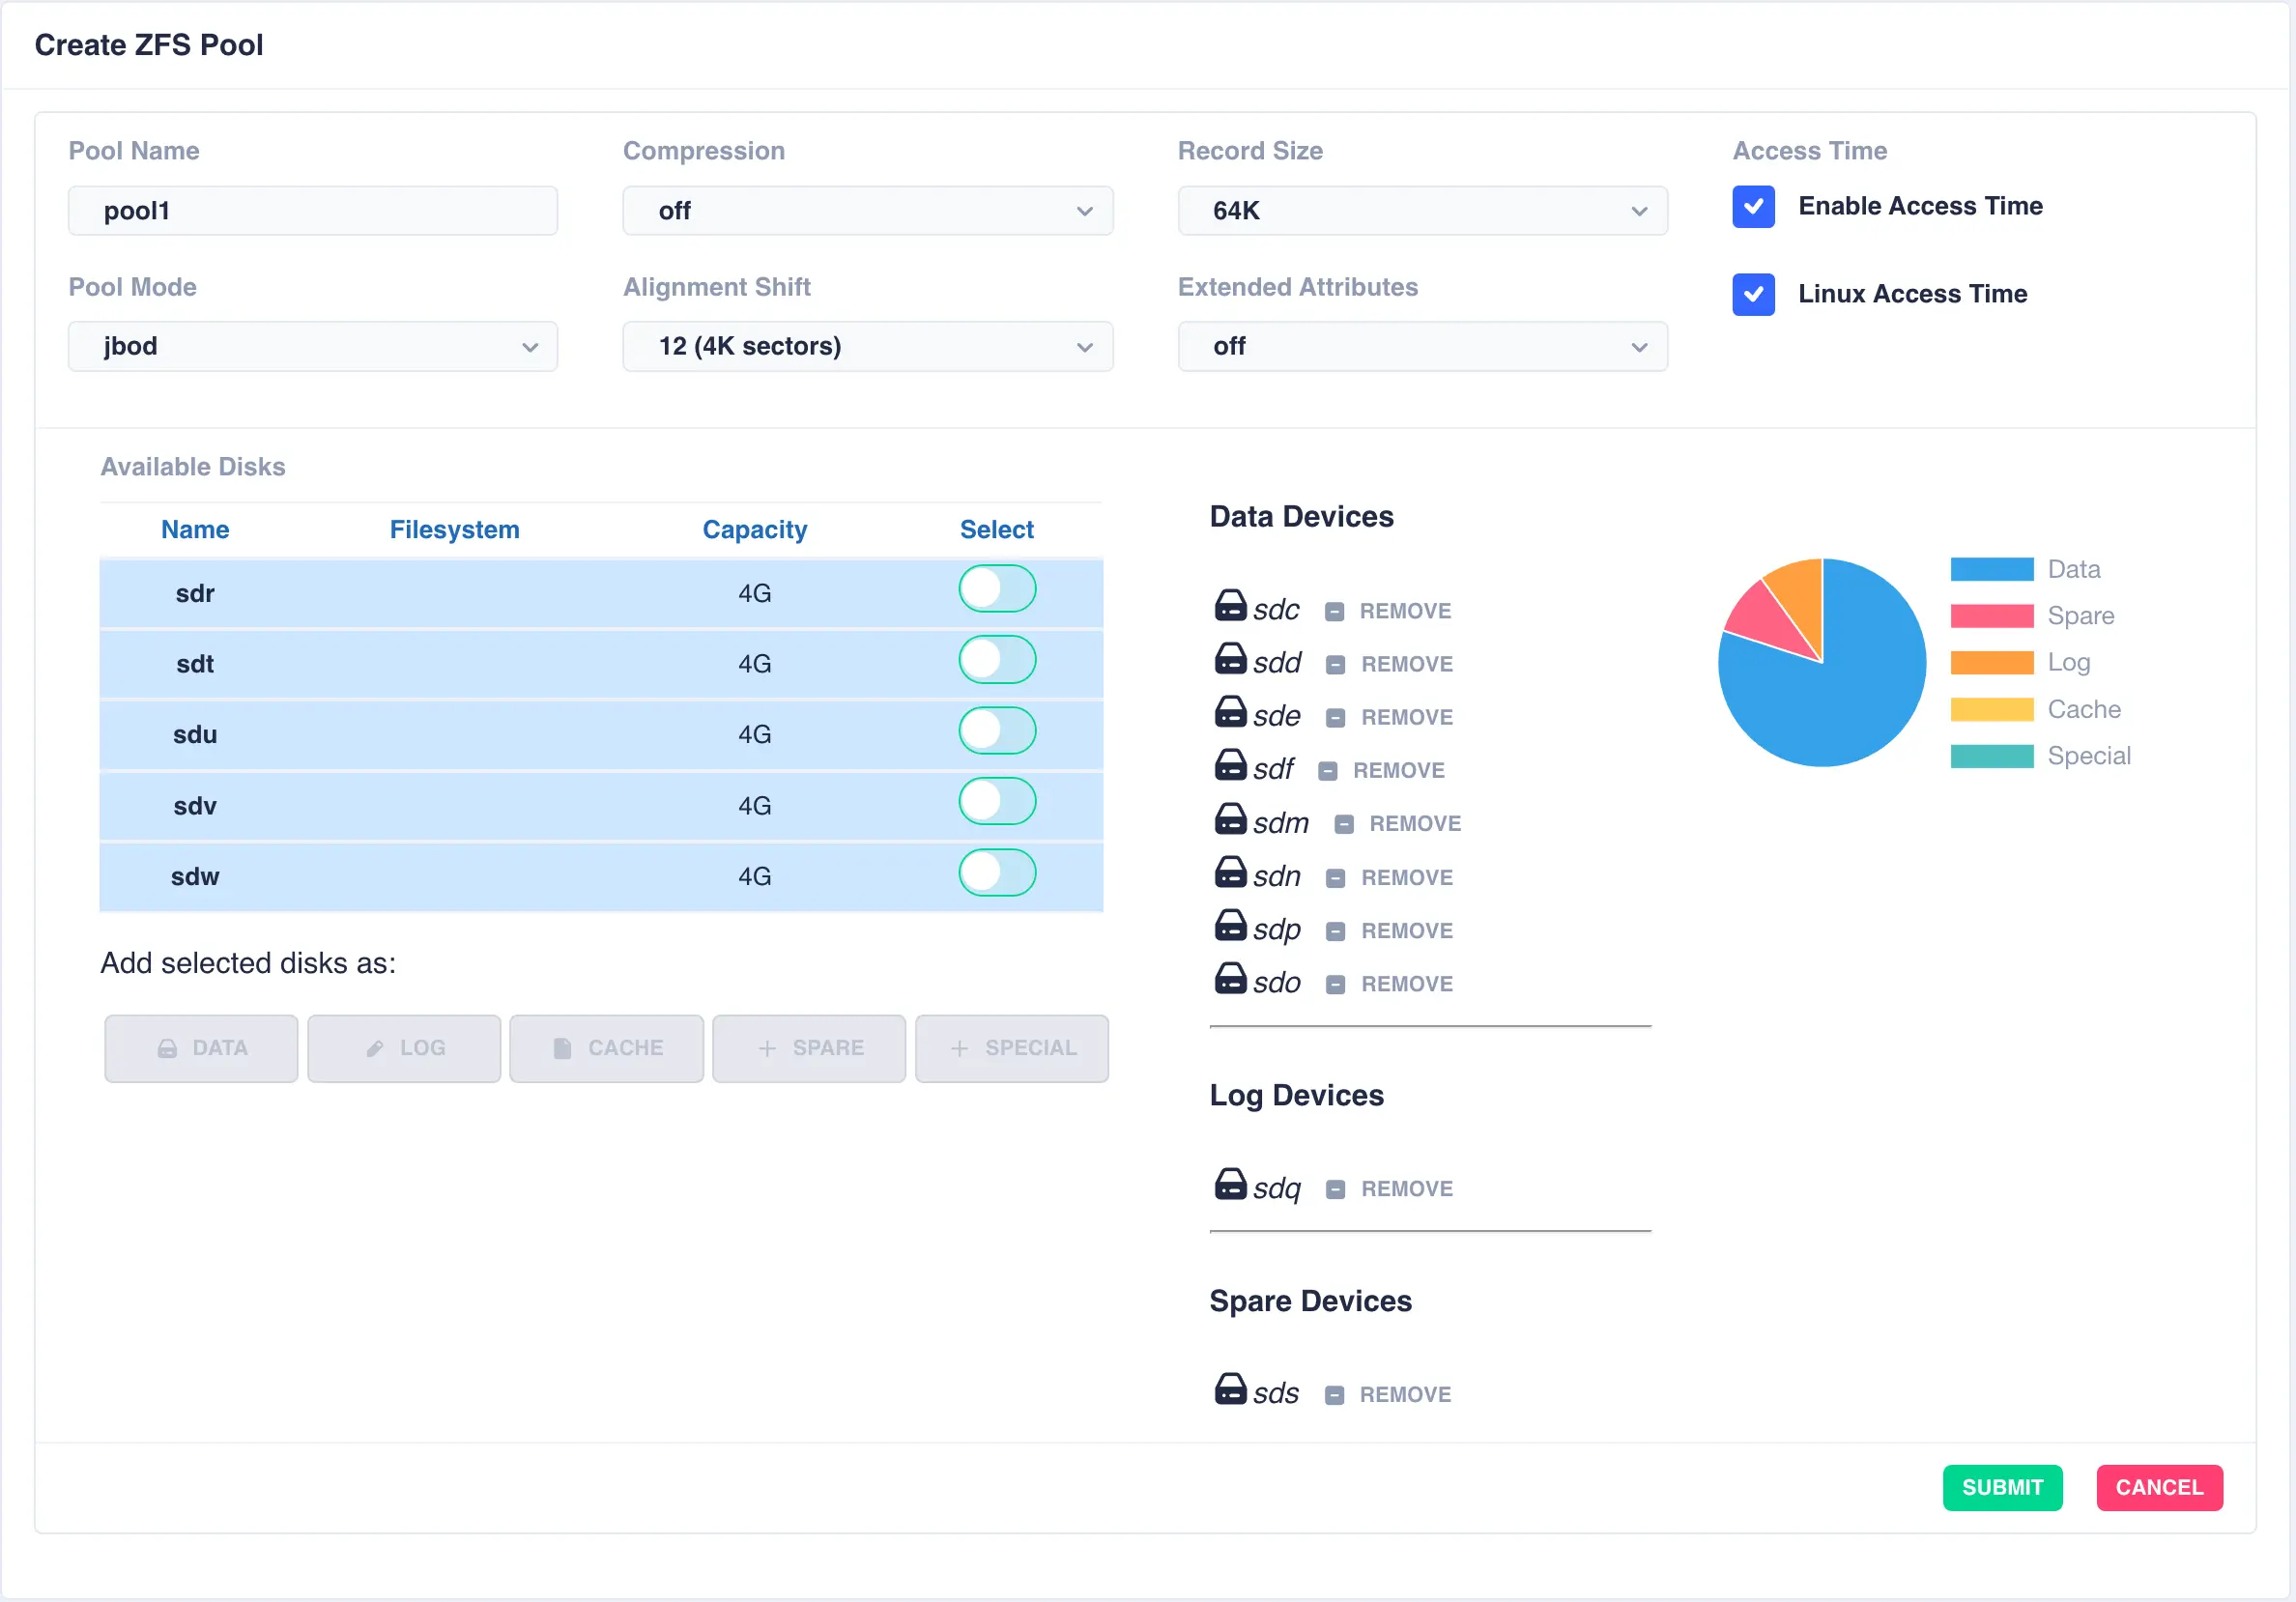
To create a pool, navigate to ZFS -> Pools and then click the + CREATE POOL
button on the main pools page to bring up the pool configuration page:
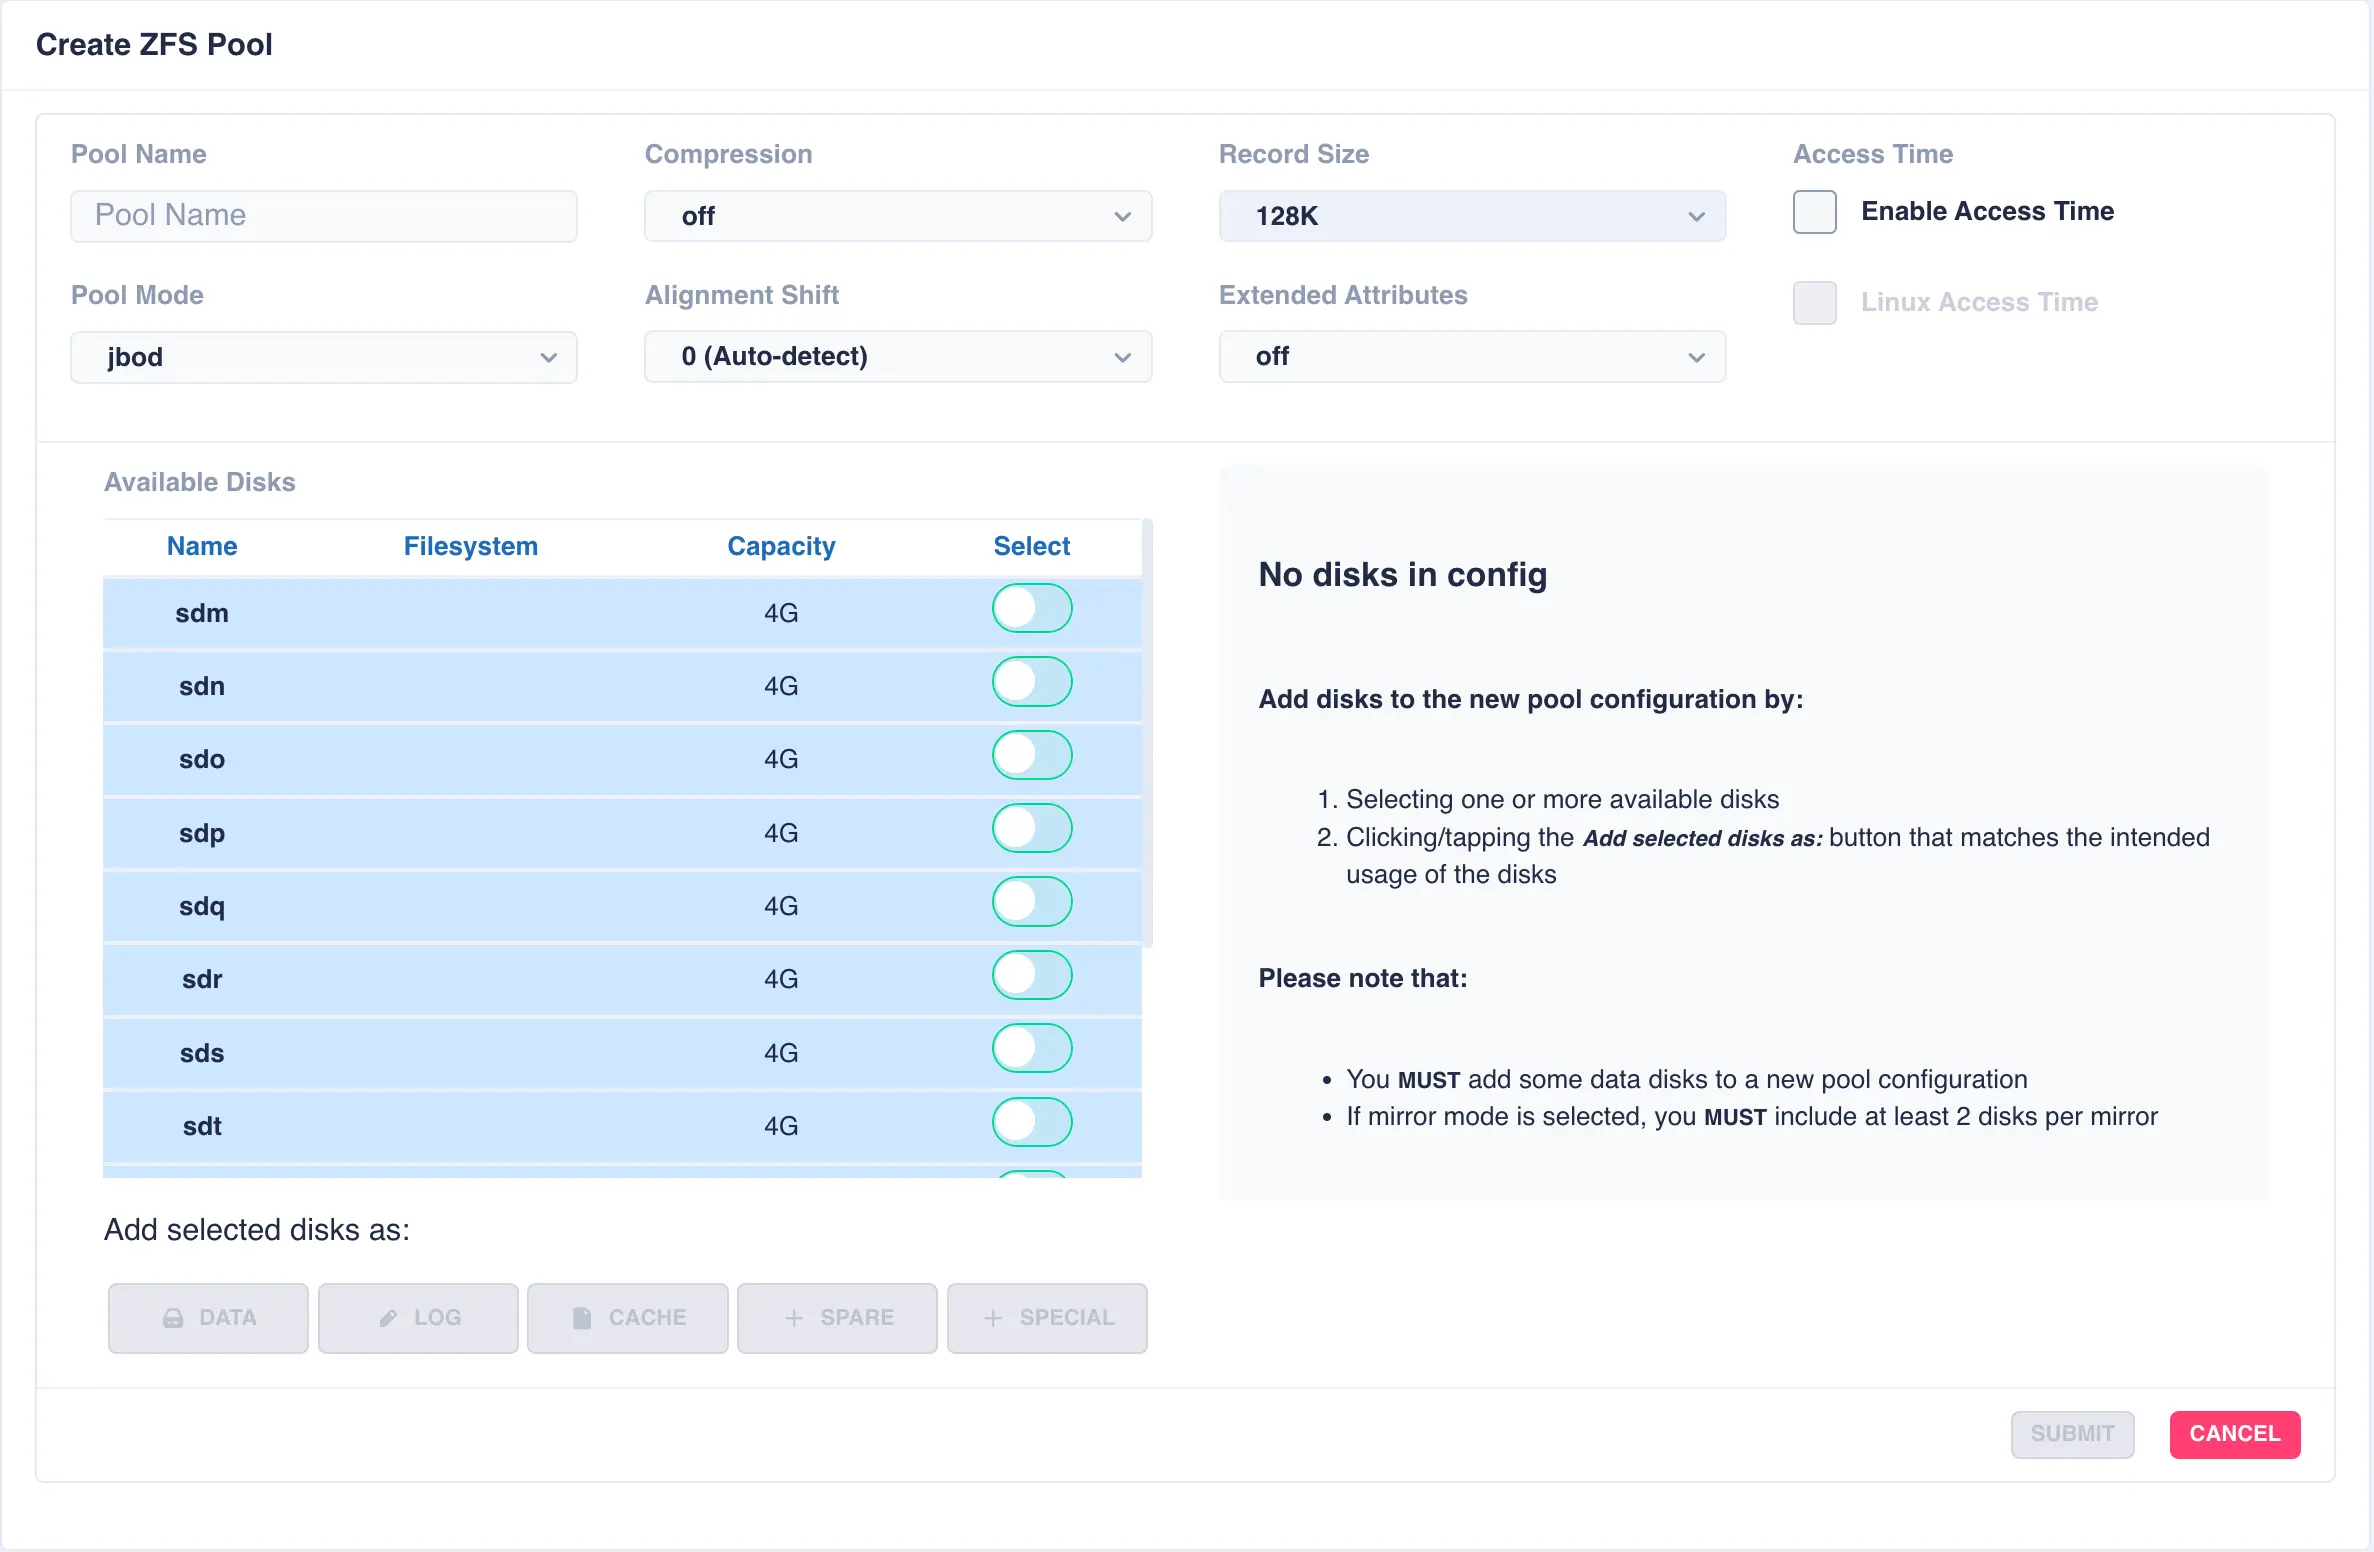
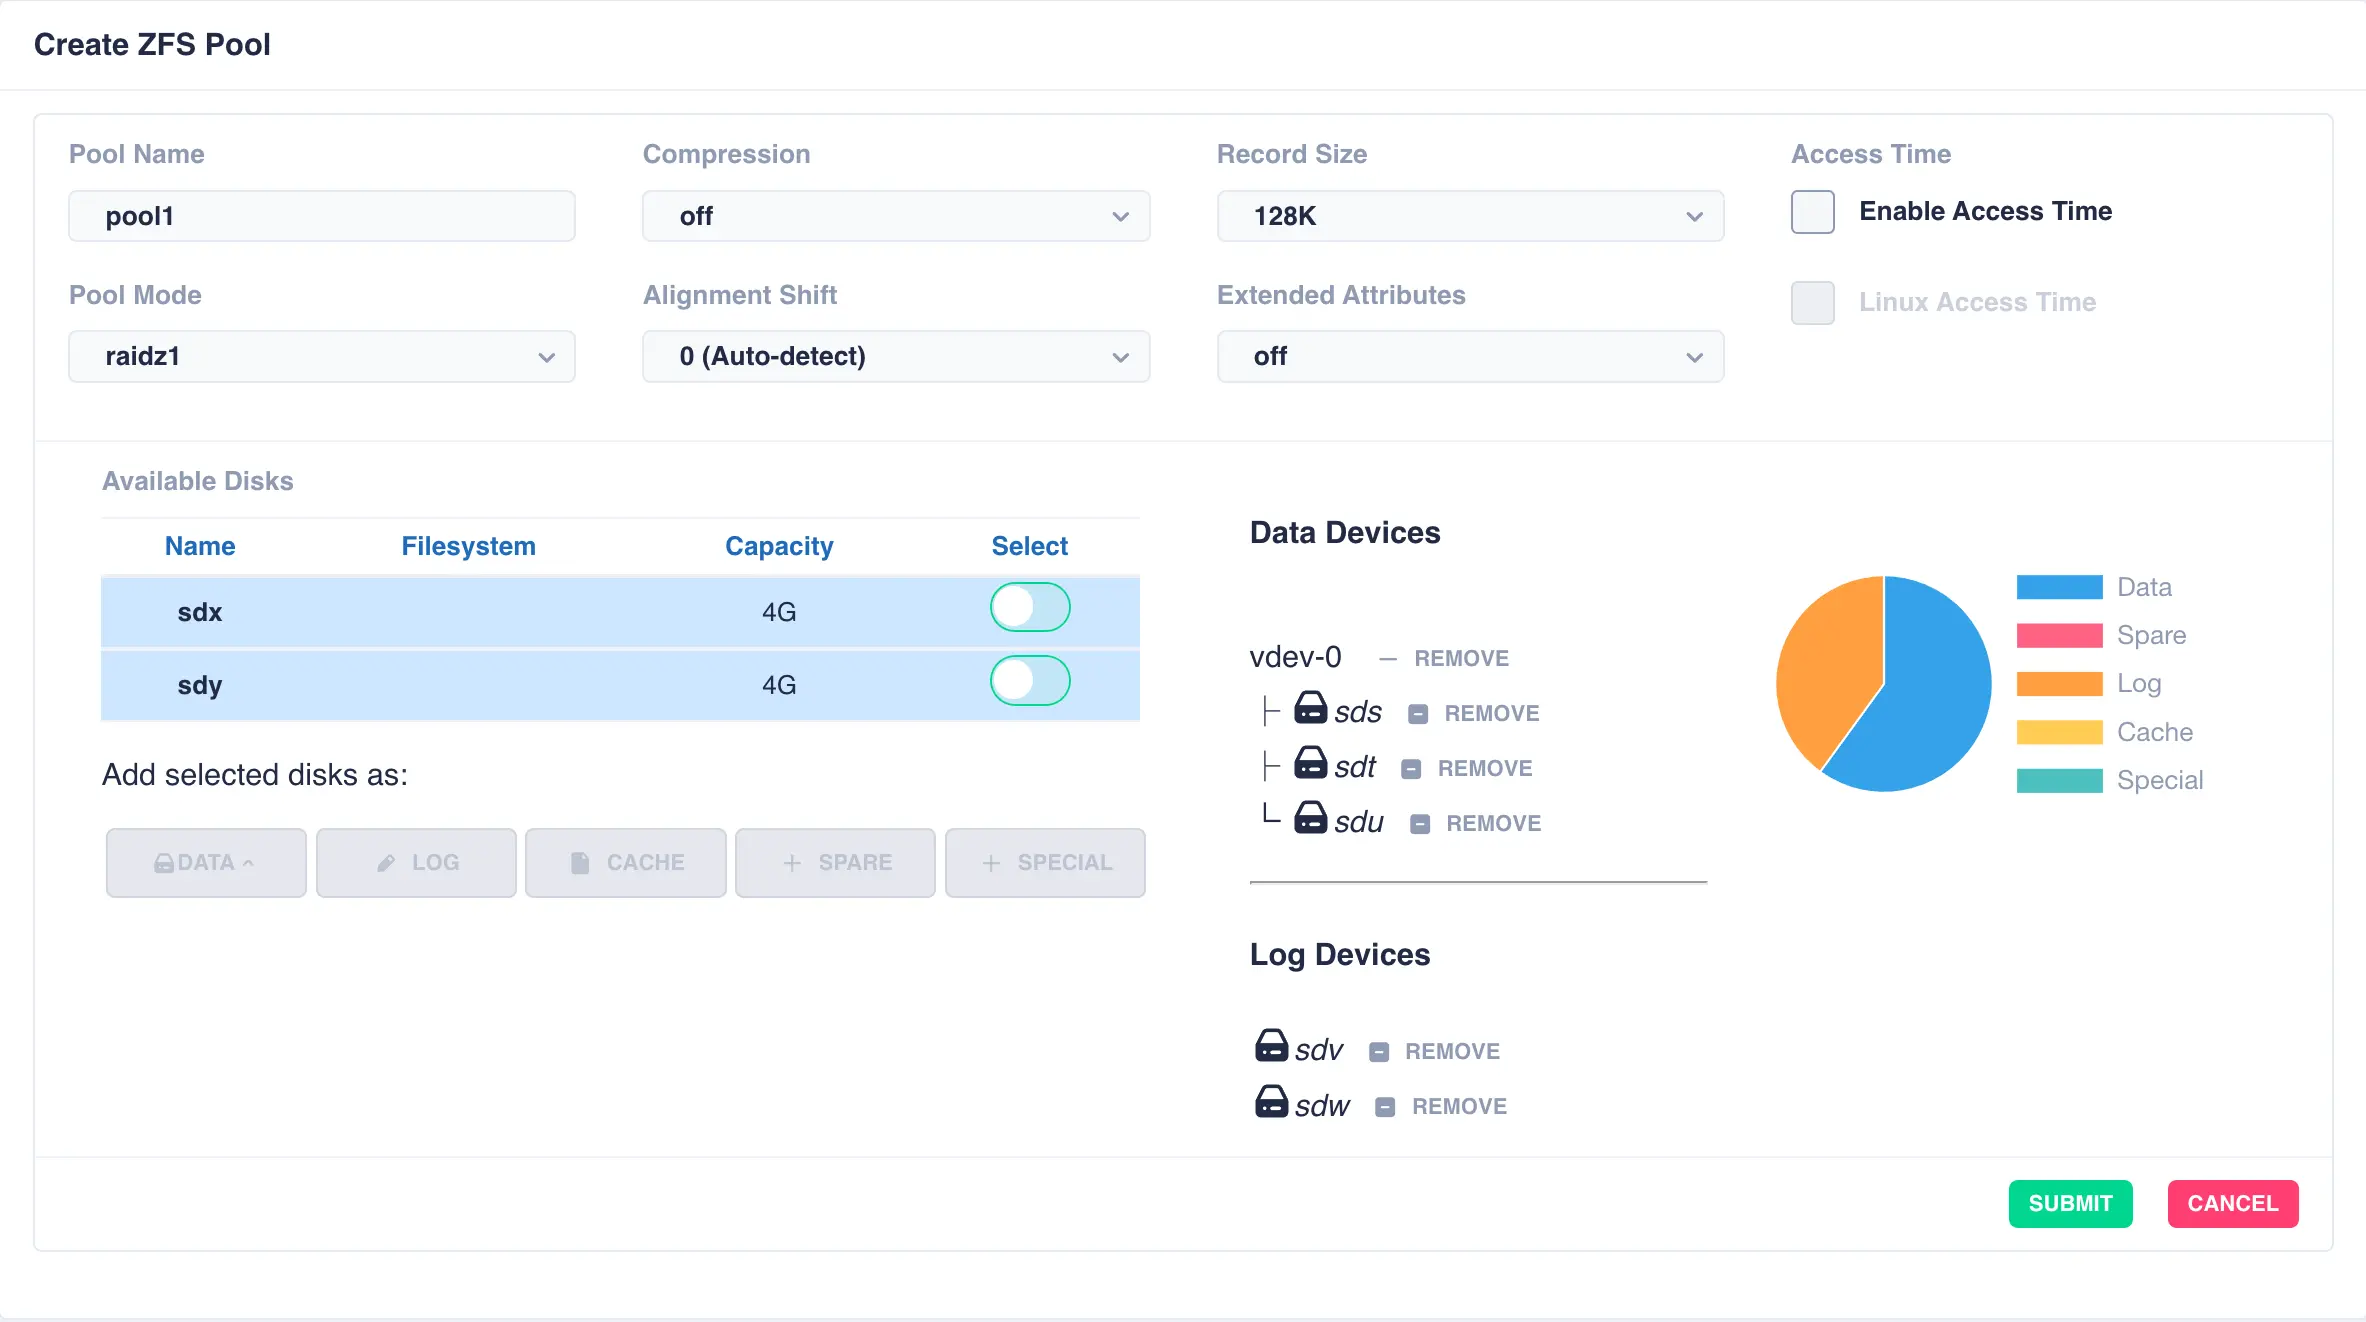
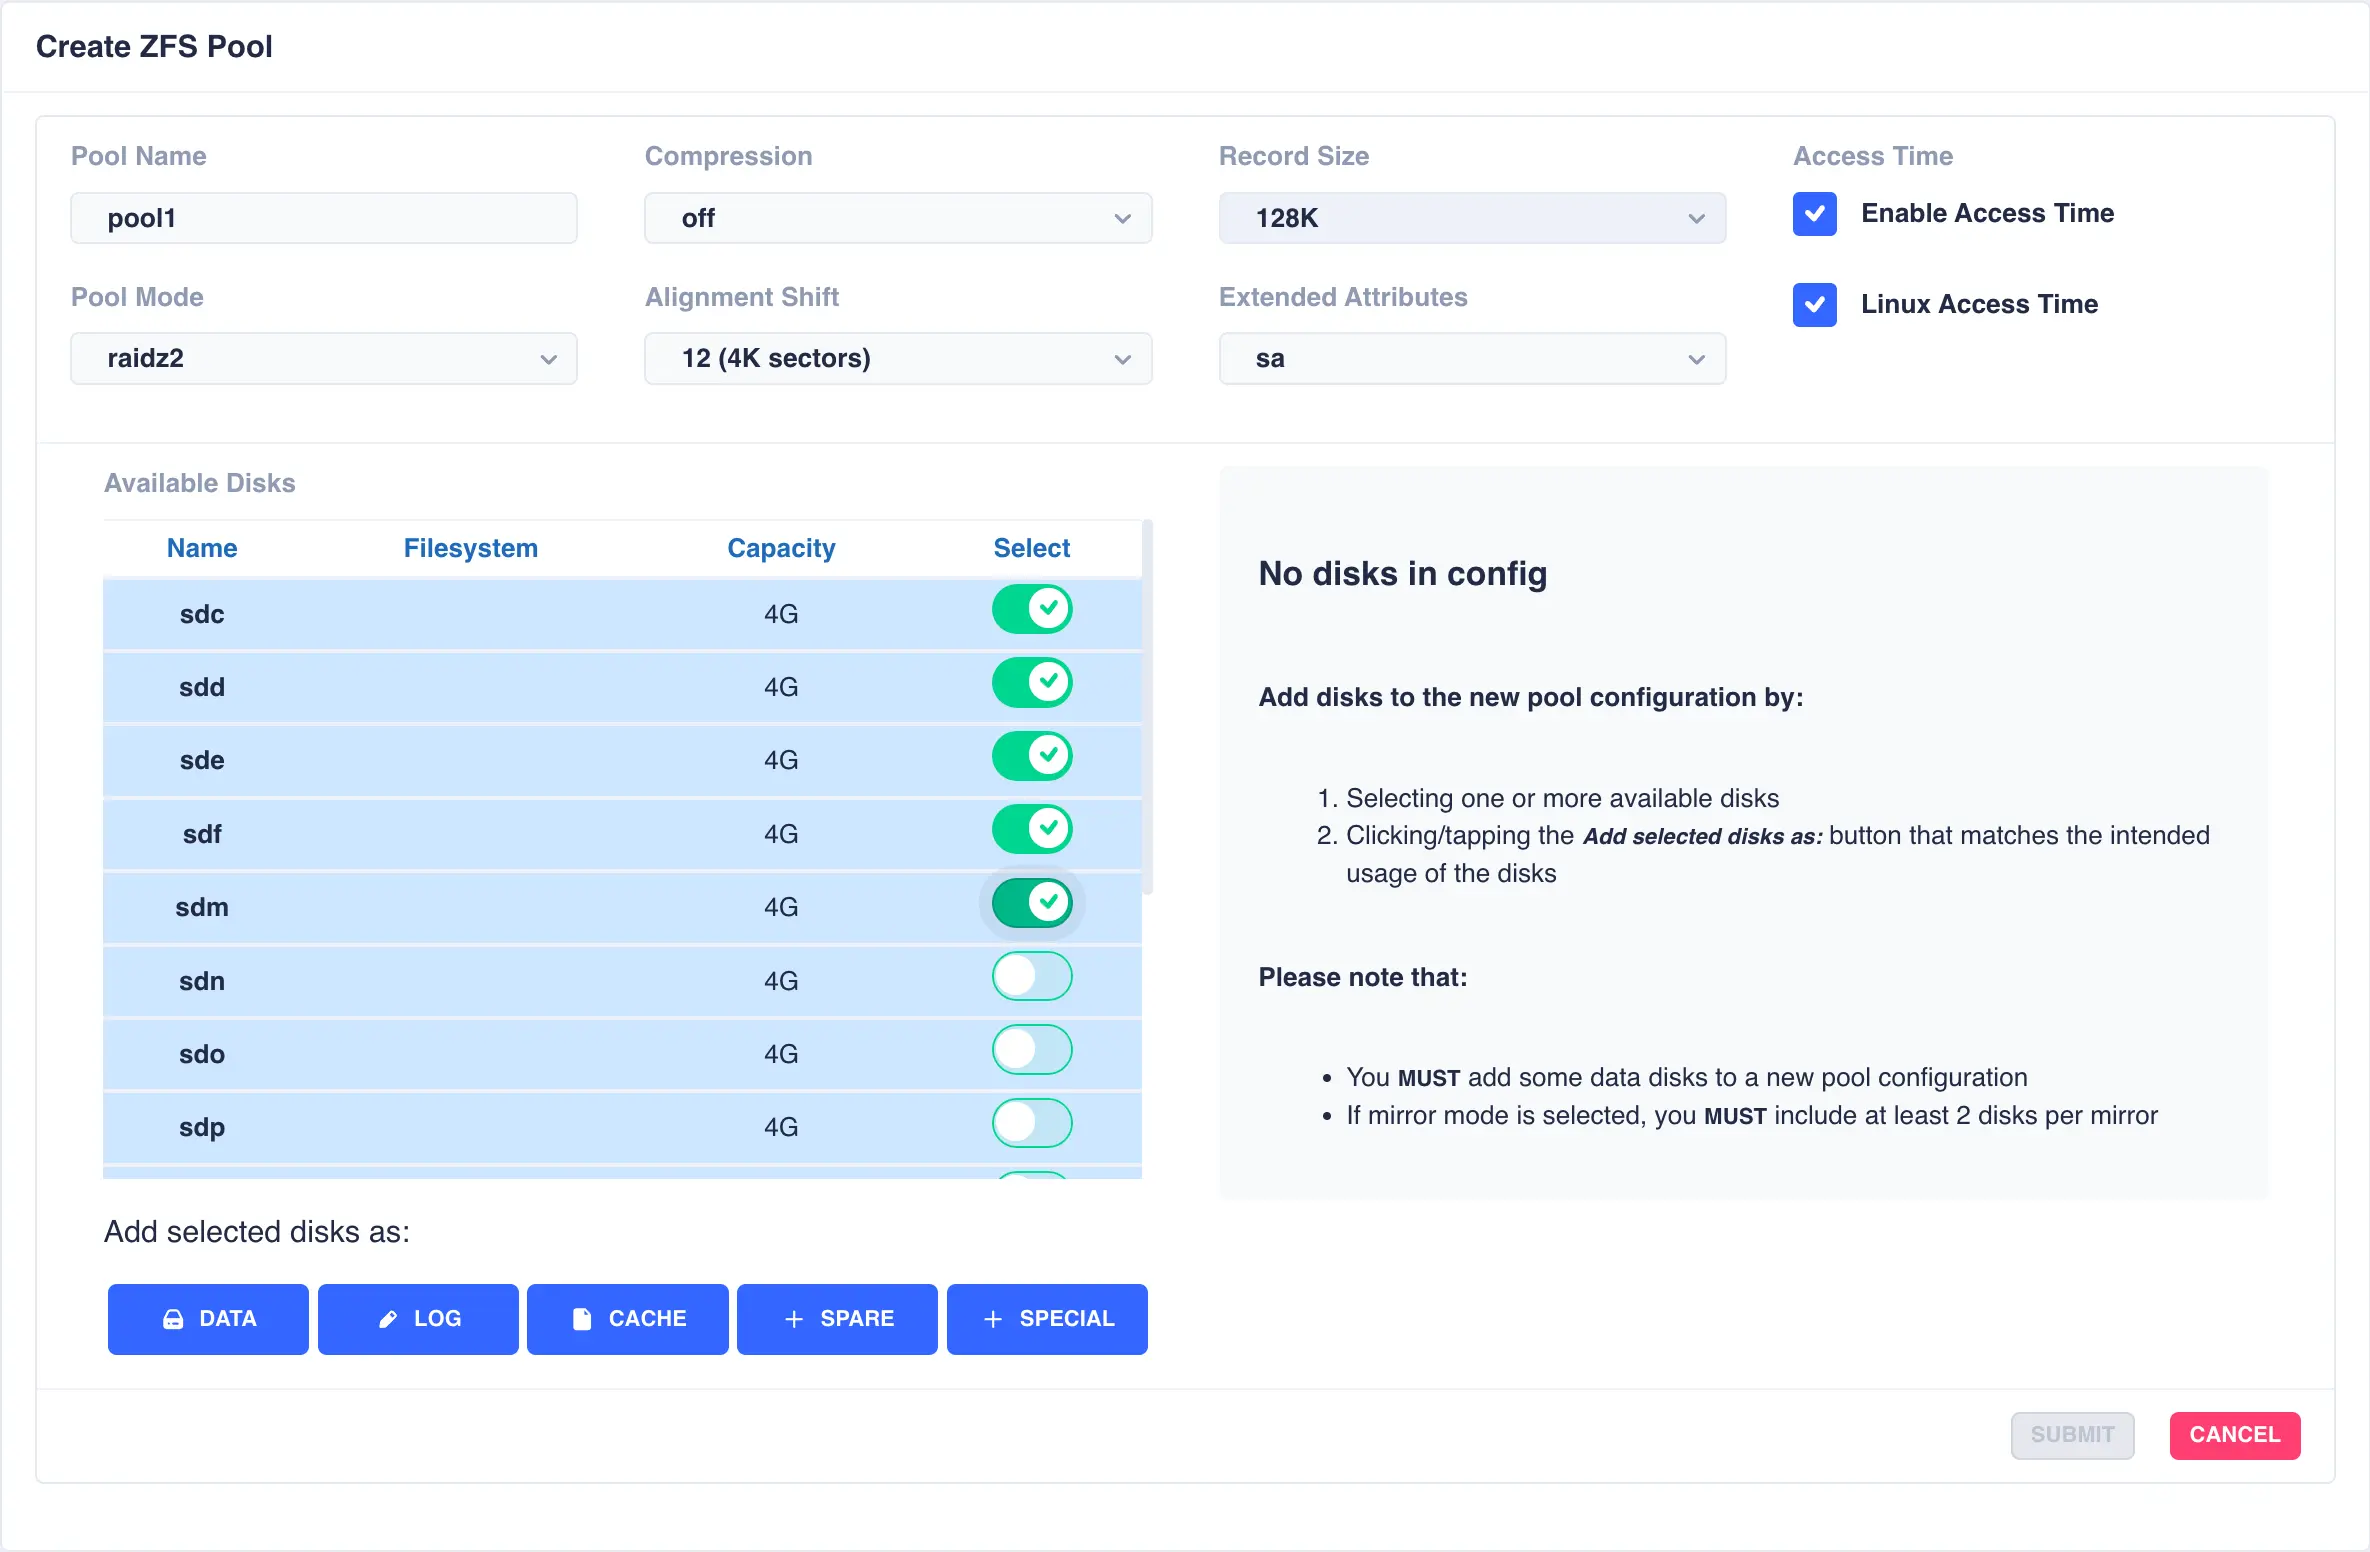
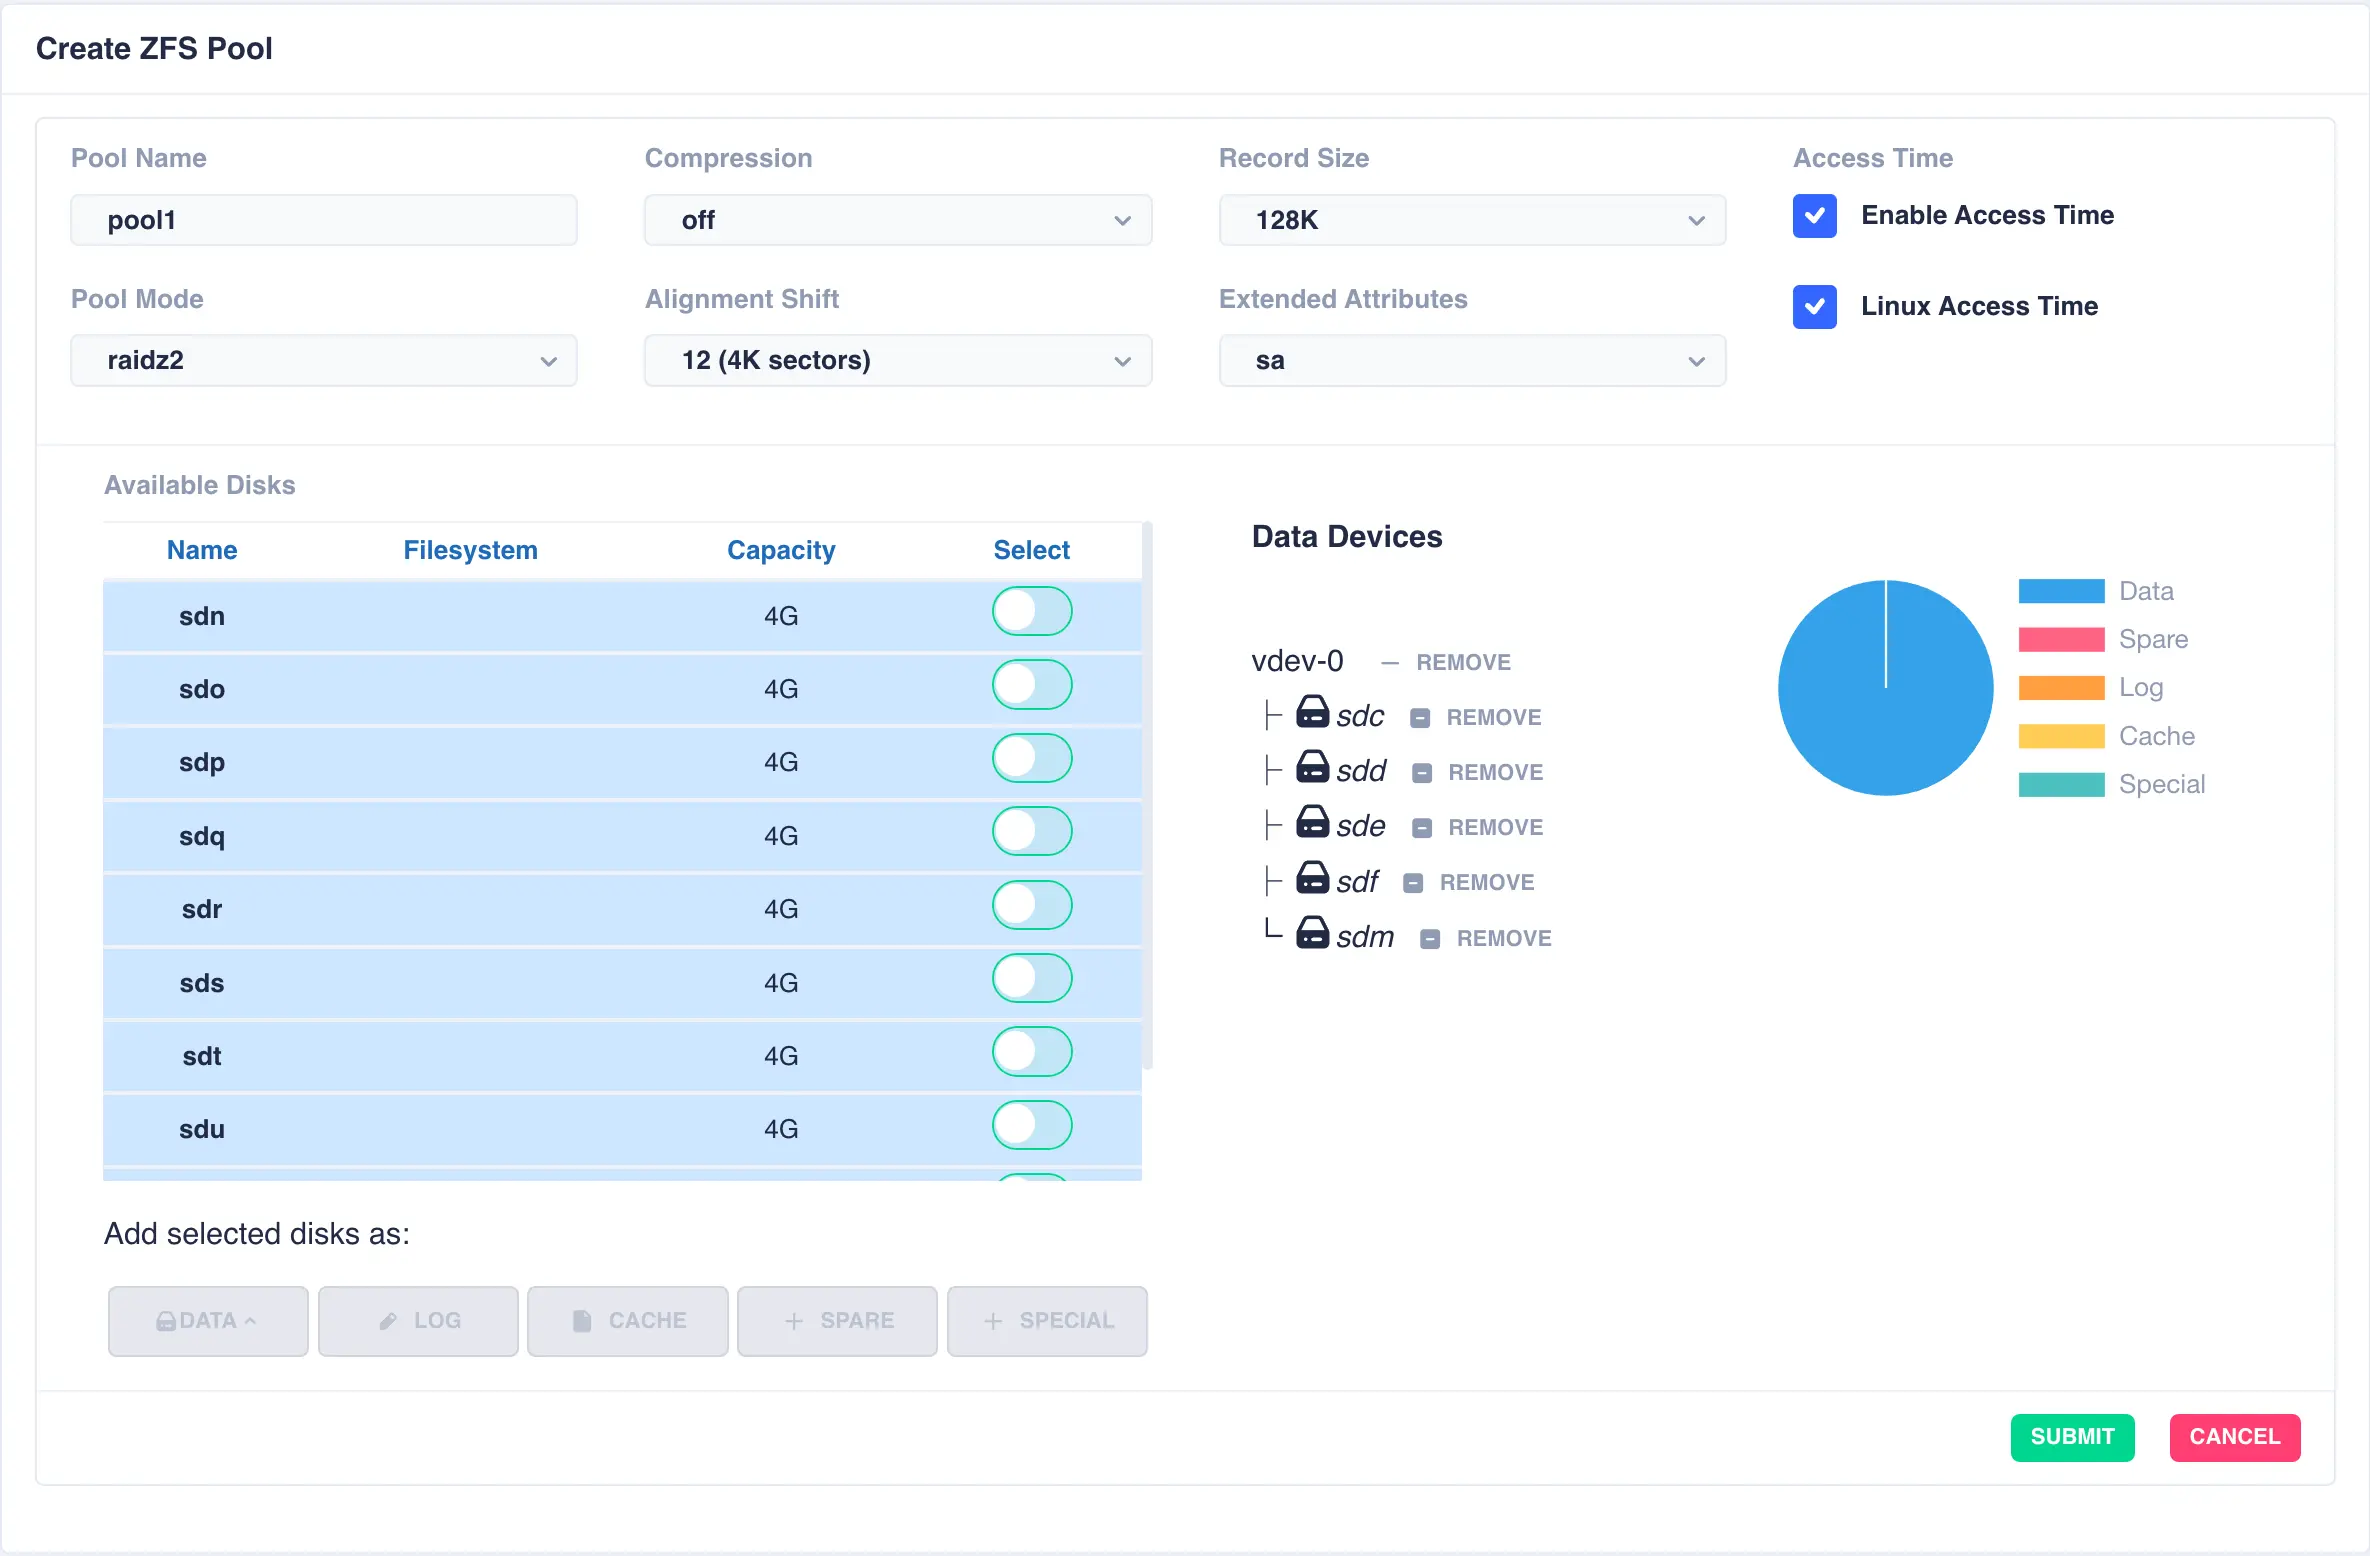
Fill out the Pool name field and select the desired structure of the pool from the Pool Mode list.
The cluster supports three types of layout when creating vdevs for a pool:
| Layout | Description |
|---|---|
mirror |
Each drive in the vdev will be mirrored to another drive in the same vdev. Vdevs can then be striped together to build up a mirrored pool. |
raidz1 |
One drive is used as a parity drive, meaning one drive can be lost in the vdev without impacting the pool. When striping raidz1 vdevs together each vdev can survive the loss of one of its members. |
raidz2 |
Two of the drives are used as parity drives, meaning up to two drives can be lost in the vdev without impacting the pool. When striping raidz2 vdevs together each vdev can survive the loss of two of its members. |
raidz3 |
Three of the drives are used as parity drives, meaning up to three drives can be lost in the vdev without impacting the pool. When striping raidz3 vdevs together each vdev can survive the loss of three of its members. |
jbod |
Creates a simple pool of striped disks with no redundancy. |
draid1 |
One drive is used as a parity drive, meaning one drive can be lost in the vdev without impacting the pool. When striping draid1 vdevs together each vdev can survive the loss of one of its members. |
draid2 |
Two of the drives are used as parity drives, meaning up to two drives can be lost in the vdev without impacting the pool. When striping draid2 vdevs together each vdev can survive the loss of two of its members. |
draid3 |
Three of the drives are used as parity drives, meaning up to three drives can be lost in the vdev without impacting the pool. When striping draid3 vdevs together each vdev can survive the loss of three of its members. |
dRAID (distributed raid) and RAIDZ are two different vdev layouts in ZFS, each offering distinct approaches to data redundancy and fault tolerance. RAIDZ is a traditional RAID-like structure that distributes data and parity information across multiple disks, while dRAID distributes hot spare space throughout the vdev, enabling faster rebuild times after drive failures.
Configure options according to your requirements - for a more in-depth discussion on options please see the HAC ZFS Tuning Guide:
Option |
Description |
|---|---|
Compression |
Compress data before it is written out to disk, choose either no compression, lz4 or zstd (on is an alias for lz4) |
Record Size |
The recordsize property gives the maximum size of a logical block in a ZFS dataset. Unlike many other file systems, ZFS has a variable record size, meaning files are stored as either a single block of varying sizes, or multiple blocks of recordsize blocks. |
Access Time |
Updated the access time of a file every time it is read or written. Recommended setting is off for better performance. |
Linux Access Time |
Hybrid setting meaning the access time is only updated if the mtime or ctime value changes or the access time has not been updated for 24 hours (on next file access). |
Alignment Shift |
Set to the sector size of the underlying disk - typically this is the value 12 for 4K drives (note some drives report a 512 byte sector size for backwards compatibility, but are in reality 4K; if unsure check manufacturers specifications) |
Extended Attributes |
This property defines how ZFS will handle Linux' eXtended ATTRibutes in a file system. The recommended setting is sa meaning the attributes are stored directly in the inodes, resulting in less IO requests when extended attributes are in use. For a file system with many small files this can have a significant performance improvement. |
Log Device
The log device (also referred to as SLOG or Seperate LOG) is a dedicated storage device in a ZFS pool that enchances the performance of synchronous writes; it is best practice to deploy an SSD or NVMe device. The log serves as a temporary storage area for data that is being written synchronously, ensuring that the data is safely logged before it is written to the main storage pool.
The log device is a stripe of either single or mirrored vdevs, defined when creating the first log vdev.
For example, to create a log consisting of mirrored vdevs select two or more devices when first creating the pool:
After clicking SUBMIT the pool will be created with the following structure:
pool: pool1
 state: ONLINE
config:

    NAME        STATE     READ WRITE CKSUM
    pool1       ONLINE       0     0     0
      raidz1-0  ONLINE       0     0     0
        sdc     ONLINE       0     0     0
        sdd     ONLINE       0     0     0
        sde     ONLINE       0     0     0
    logs
      mirror-1  ONLINE       0     0     0
        sdf     ONLINE       0     0     0
        sdm     ONLINE       0     0     0

errors: No known data errors
Additional mirrored vdevs can be added if required.
Cache Device
ZFS keeps a data cache in the systems main memory, referred to as the ARC (Adaptive Replacement Cache - the algorithm used by ZFS to cache data). The pool itself can hold a second tier of cache on a dedicated cache device. The vdev itself can only be a stripe of individual devices, as mirrors etc. are not supported in cache vdevs.
Spare Device
A ZFS spare device is a disk that is designated to automatically replace a failed or faulted device in a ZFS storage pool, helping to maintain data availability and system reliability. It is not actively used in the pool until needed, allowing for seamless recovery from disk failures. Multiple spare devices can be added to a pool. They can also be shared between pools - simply select an existing spare when creating/editing a pool.
Warning
Spare drives will always appear in the list of available devices so they can be configured as spares into multiple pools. Be careful not to allocate a spare drive to another type of vdev, ie. data/log/cache etc. If this happens you will get an error from ZFS blocking the action, without affecting the existing pool structure.
Special Device
A ZFS special device is a vdev dedicated to storing a pools metadata in preference to storing that data in the pools regular vdevs. Therefore adding a dedicated SSD/NVMe special device can have significant performance improvements, especially when the pool consists of many small files.
When special vdevs are added to a pool they become an integral part of that pool, i.e. should the special vdev become unavailable then the whole pool will be unavailable. For this reason it is critical to introduce redundancy when creating/adding a special vdev; at the very least it should be mirrored. For more information please see here.
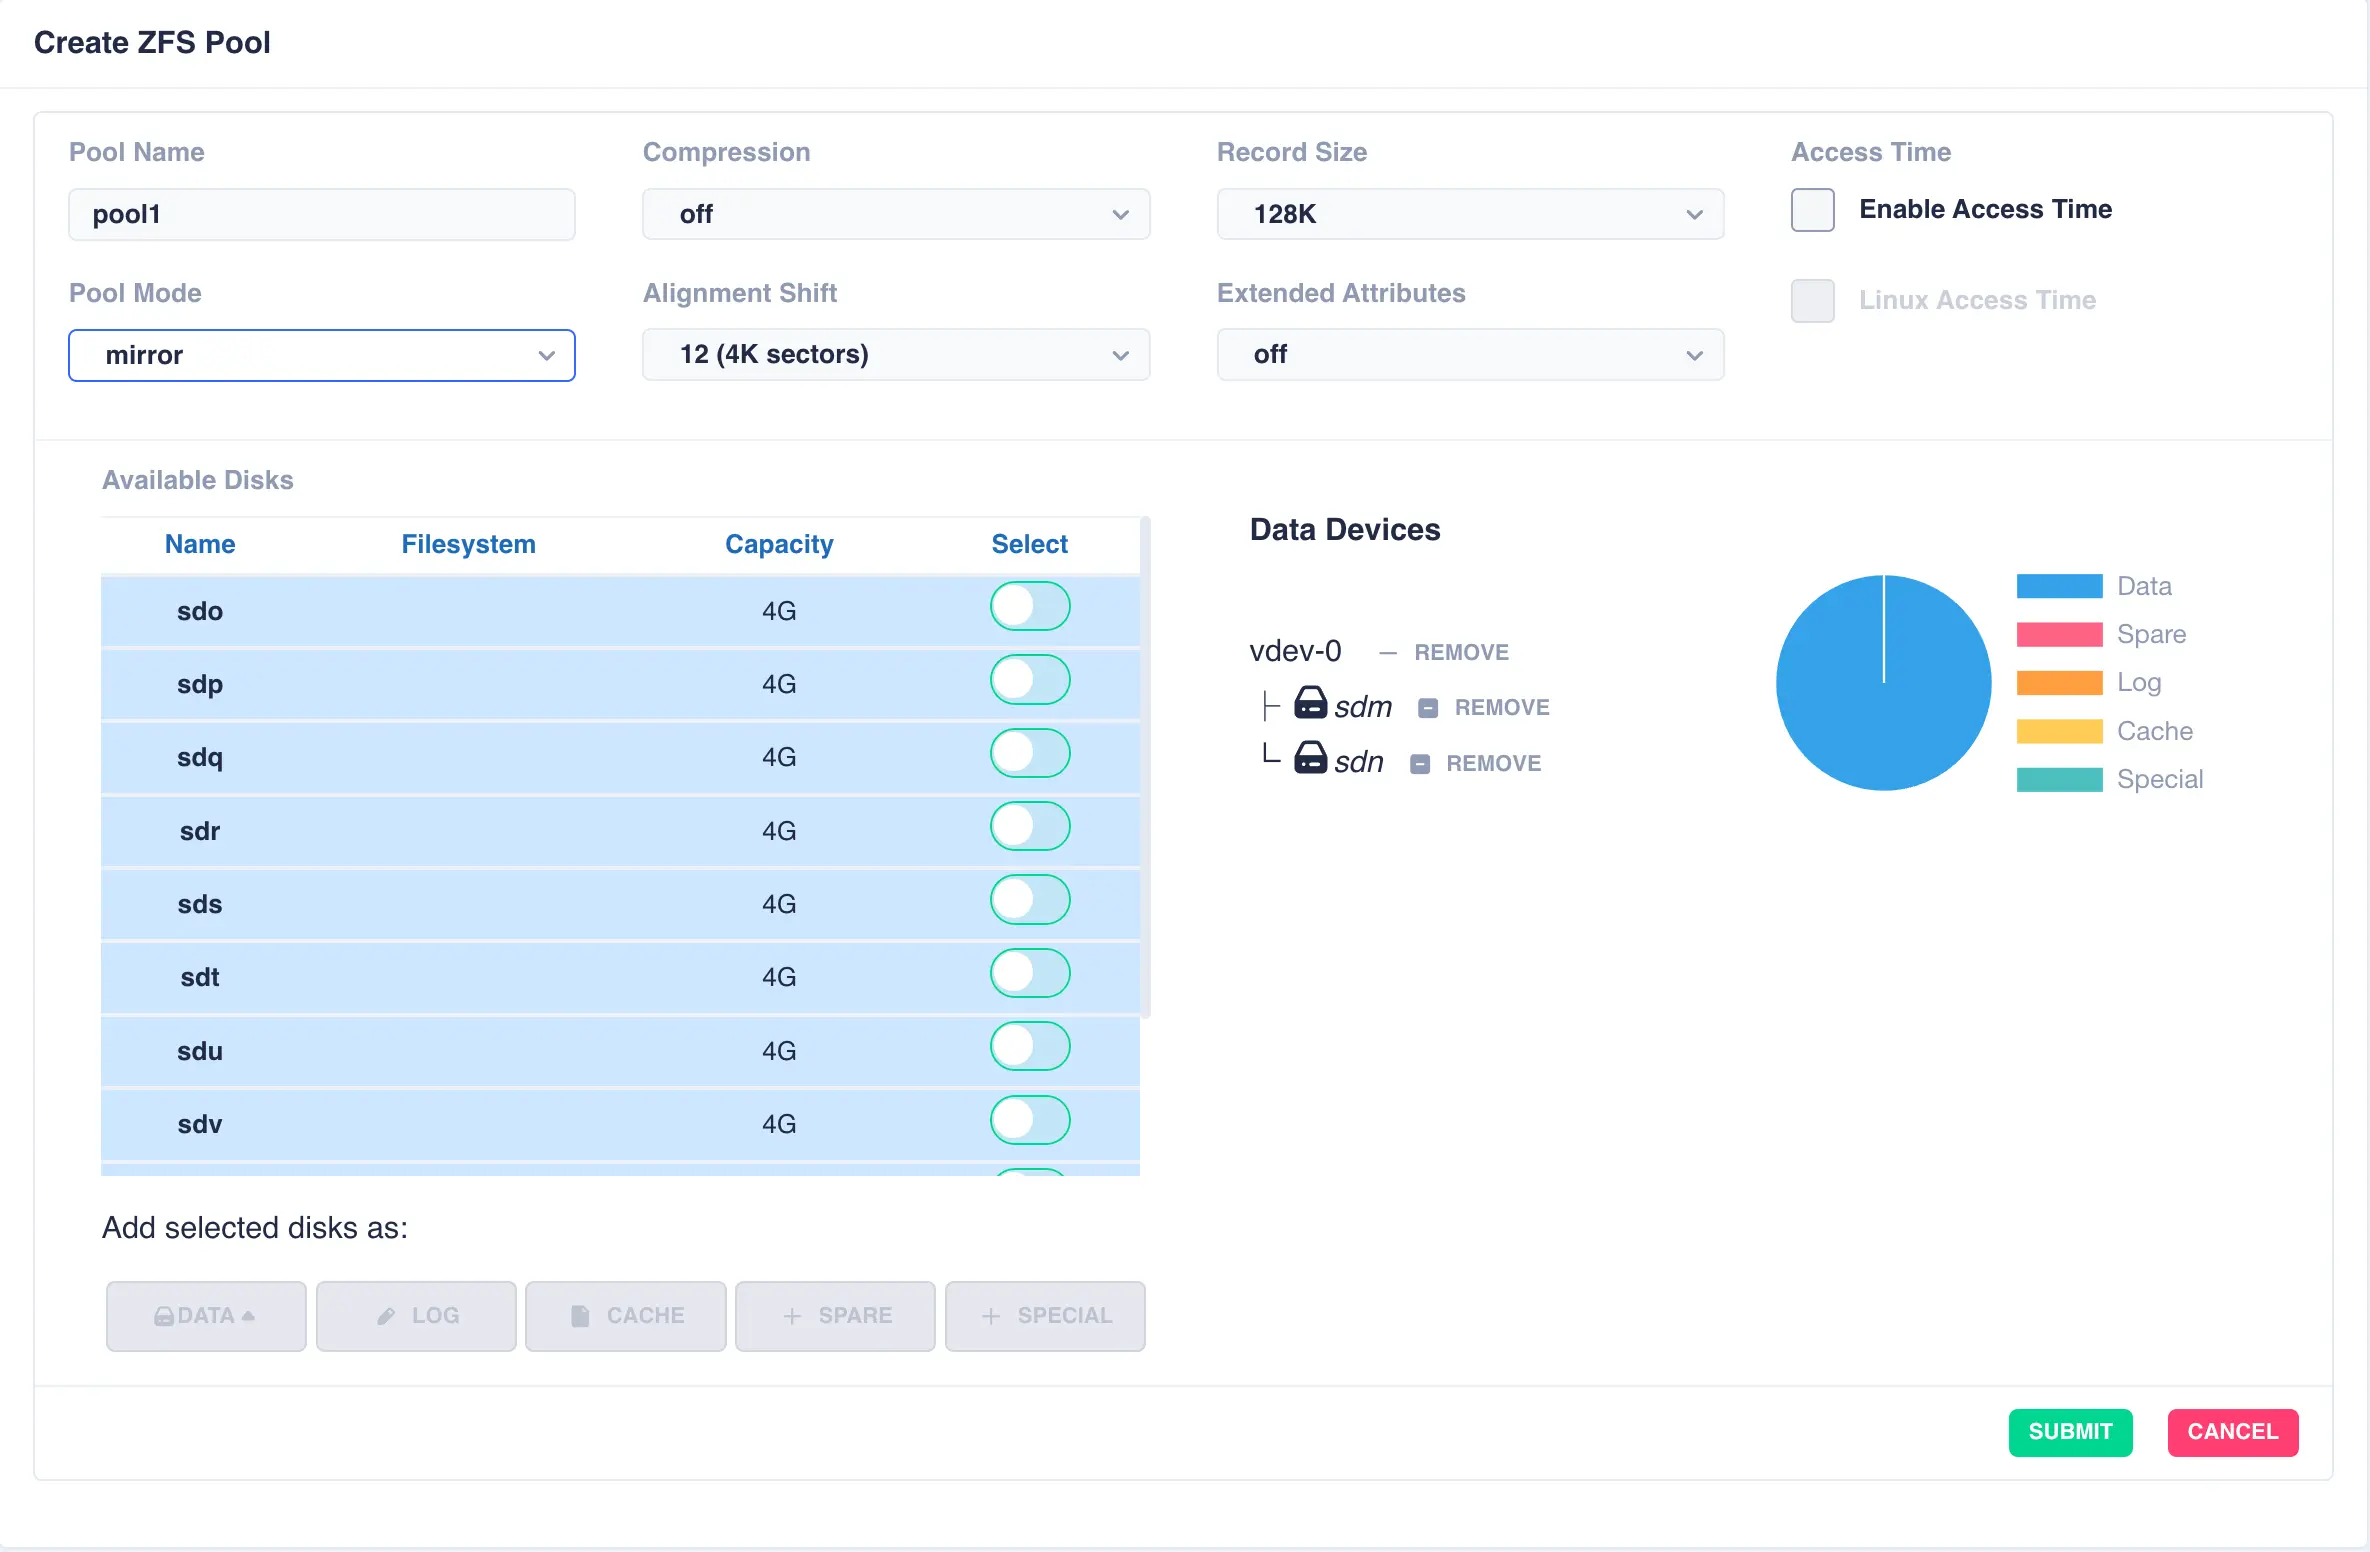
Mirrored Pool
Mirrored pools are created by striping together individual mirrored vdevs.
Start by creating an individual mirrored DATA vdev (in this example a two way mirror is created,
but these could be three, four way mirrors etc). Select drives for the vdev from the
Available Disks list and click DATA to add them as data vdevs - in this example sdm and sdn
are used to create the first mirror:
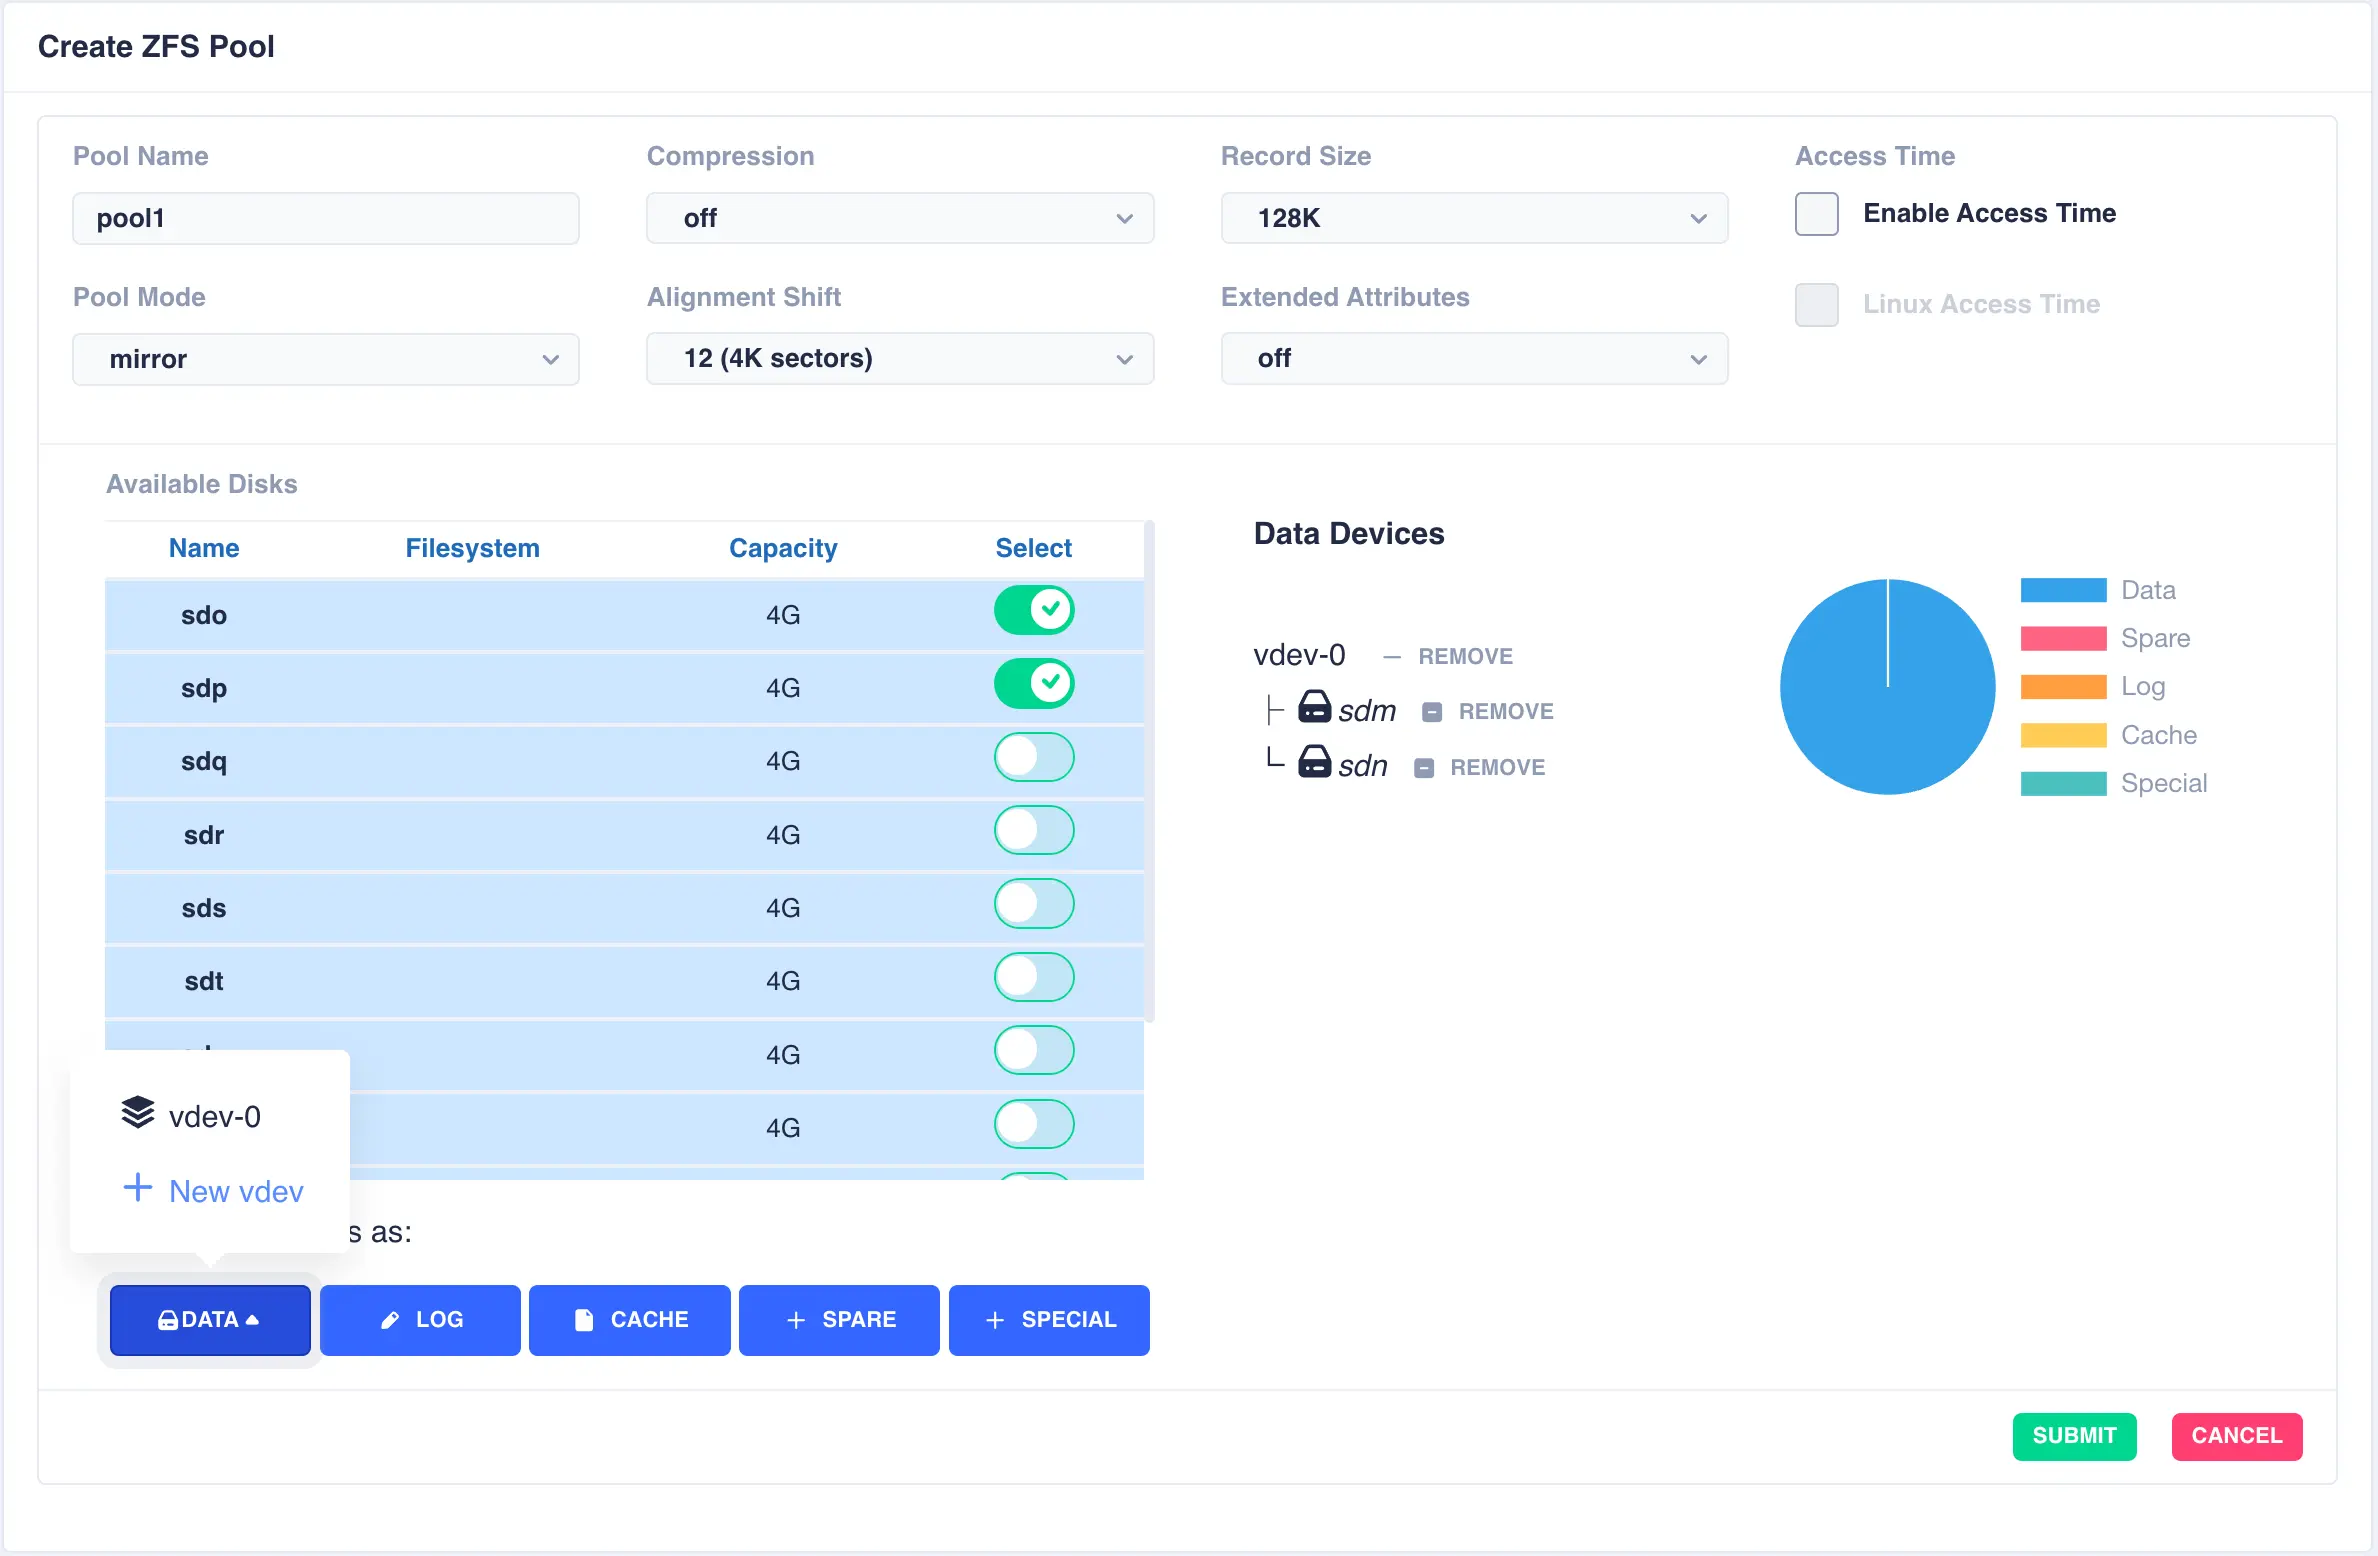
To configure multiple striped mirrors, select the next
set of drives using the same number of drives as the existing data vdev, click DATA,
then from the popup menu select + New vdev (note that selecting vdev-0 would
extend the existing vdev rather than creating a new one):
This action will then add a further pair of mirrored drives to the pool layout, creating a mirrored stripe; additional drives are adding in the same manner:
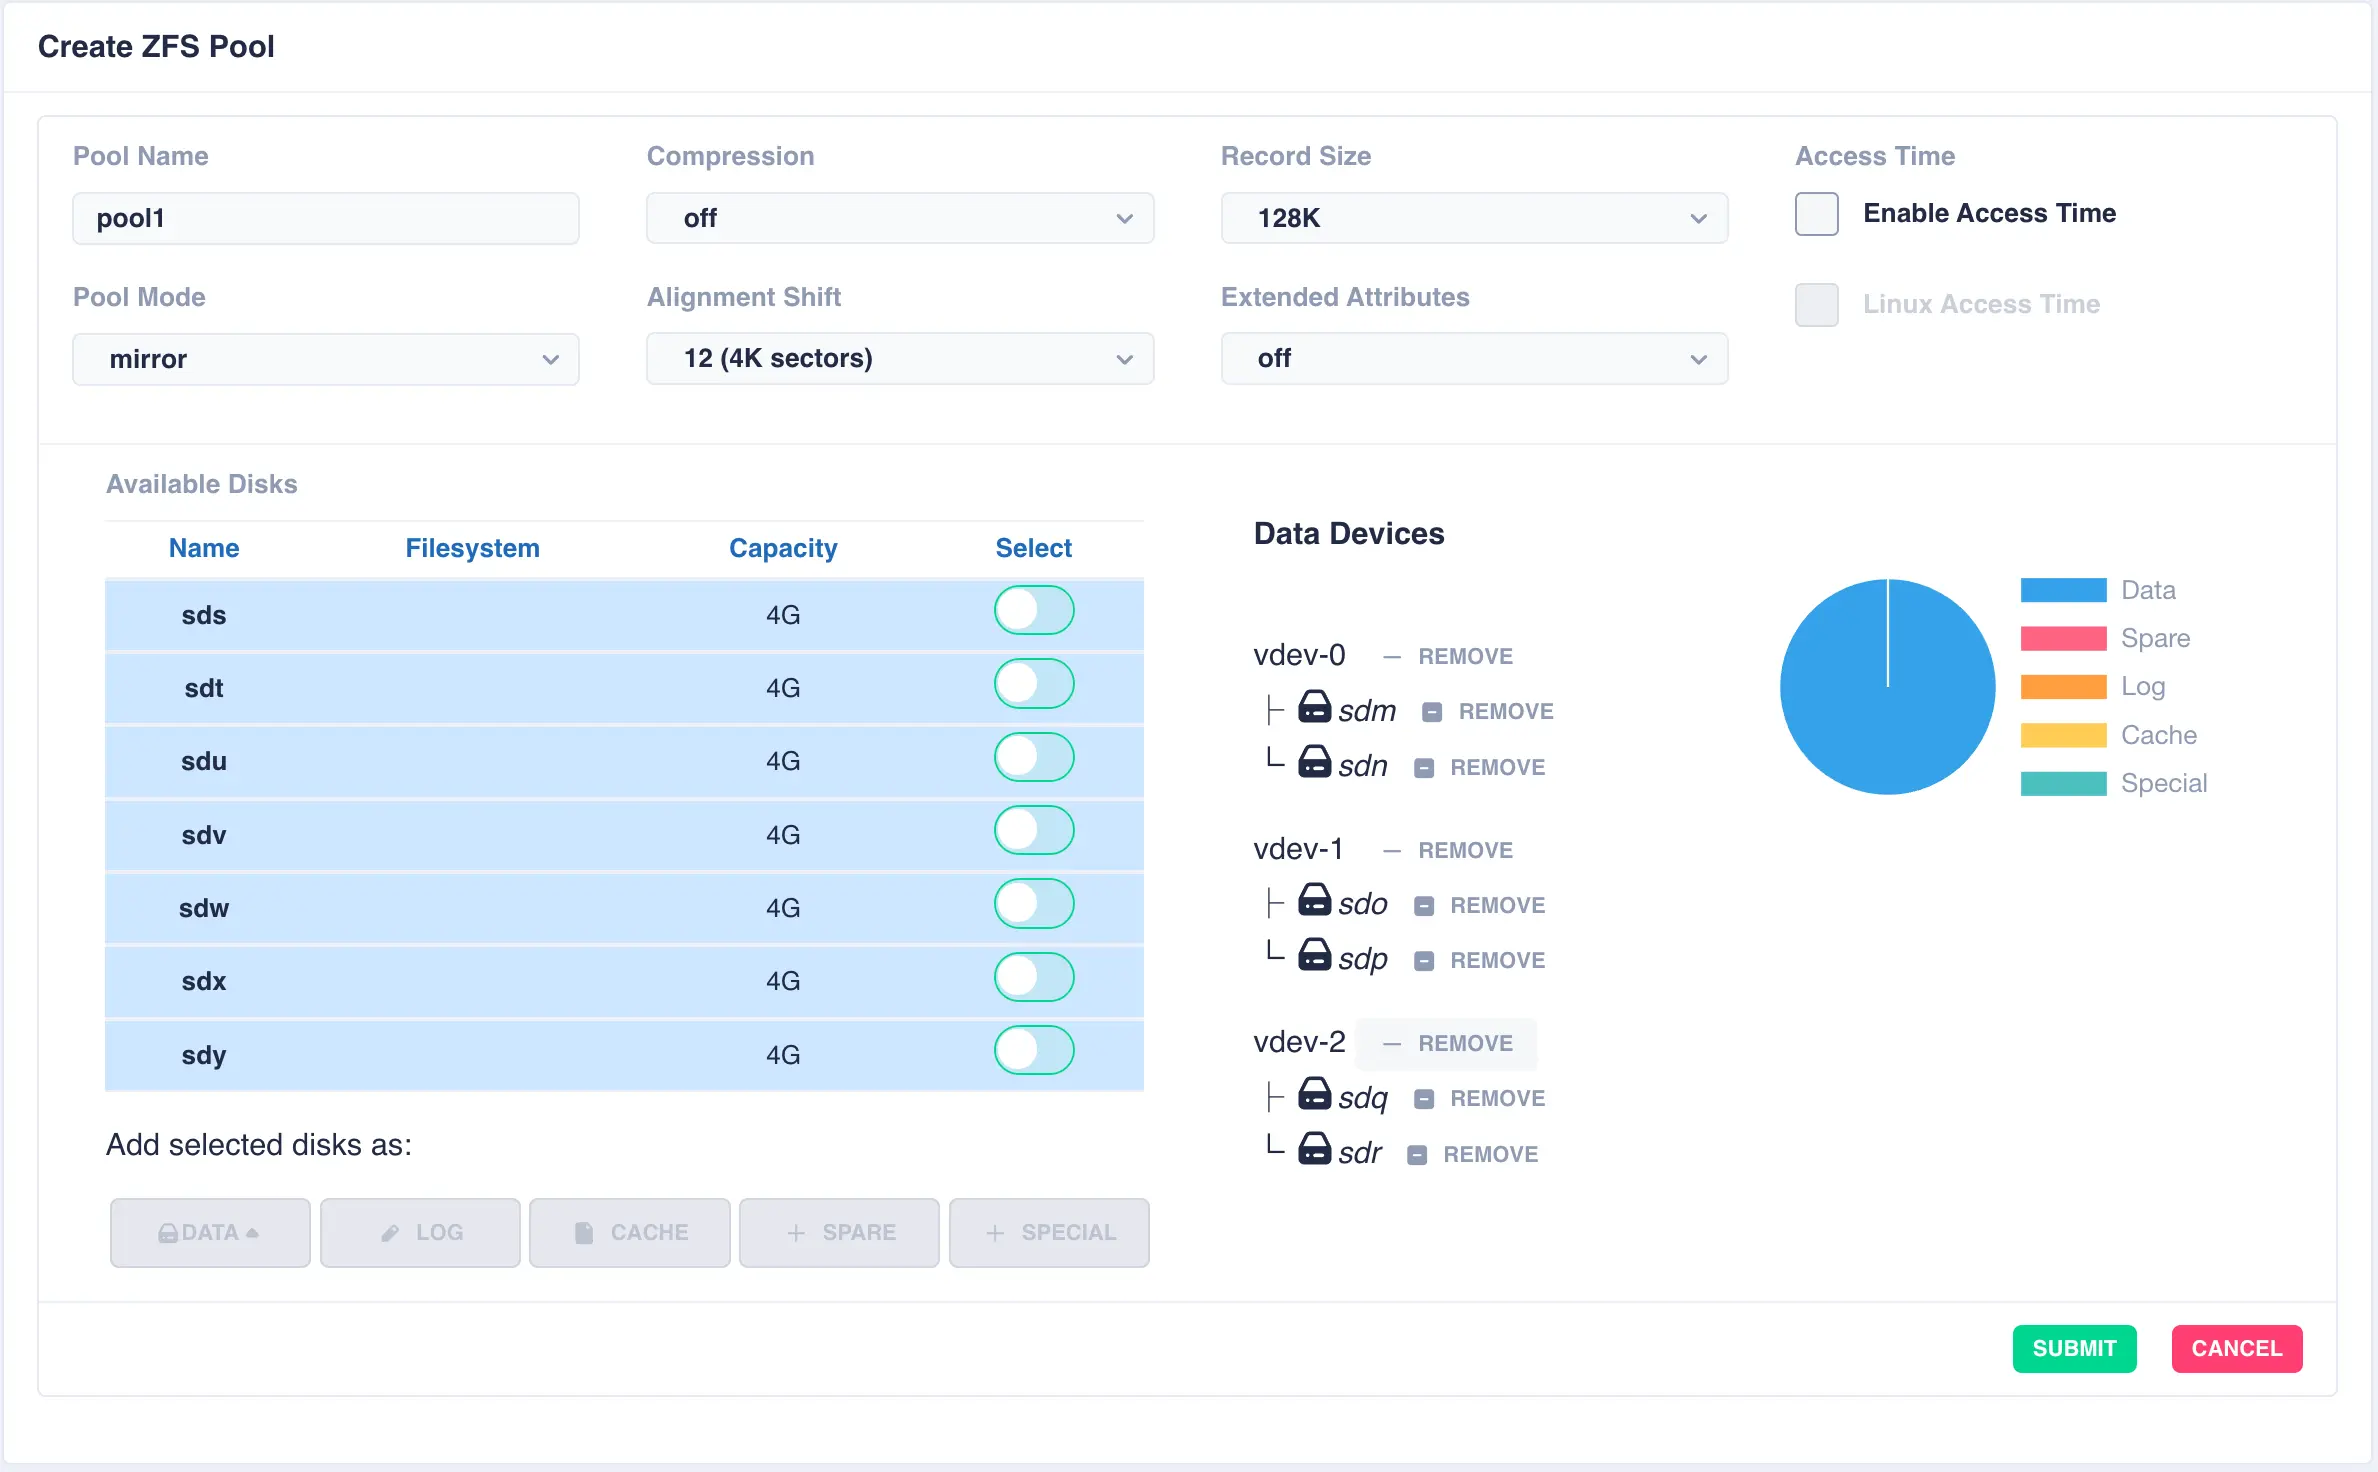
Add further vdevs as required, here a log and a cache have been added:
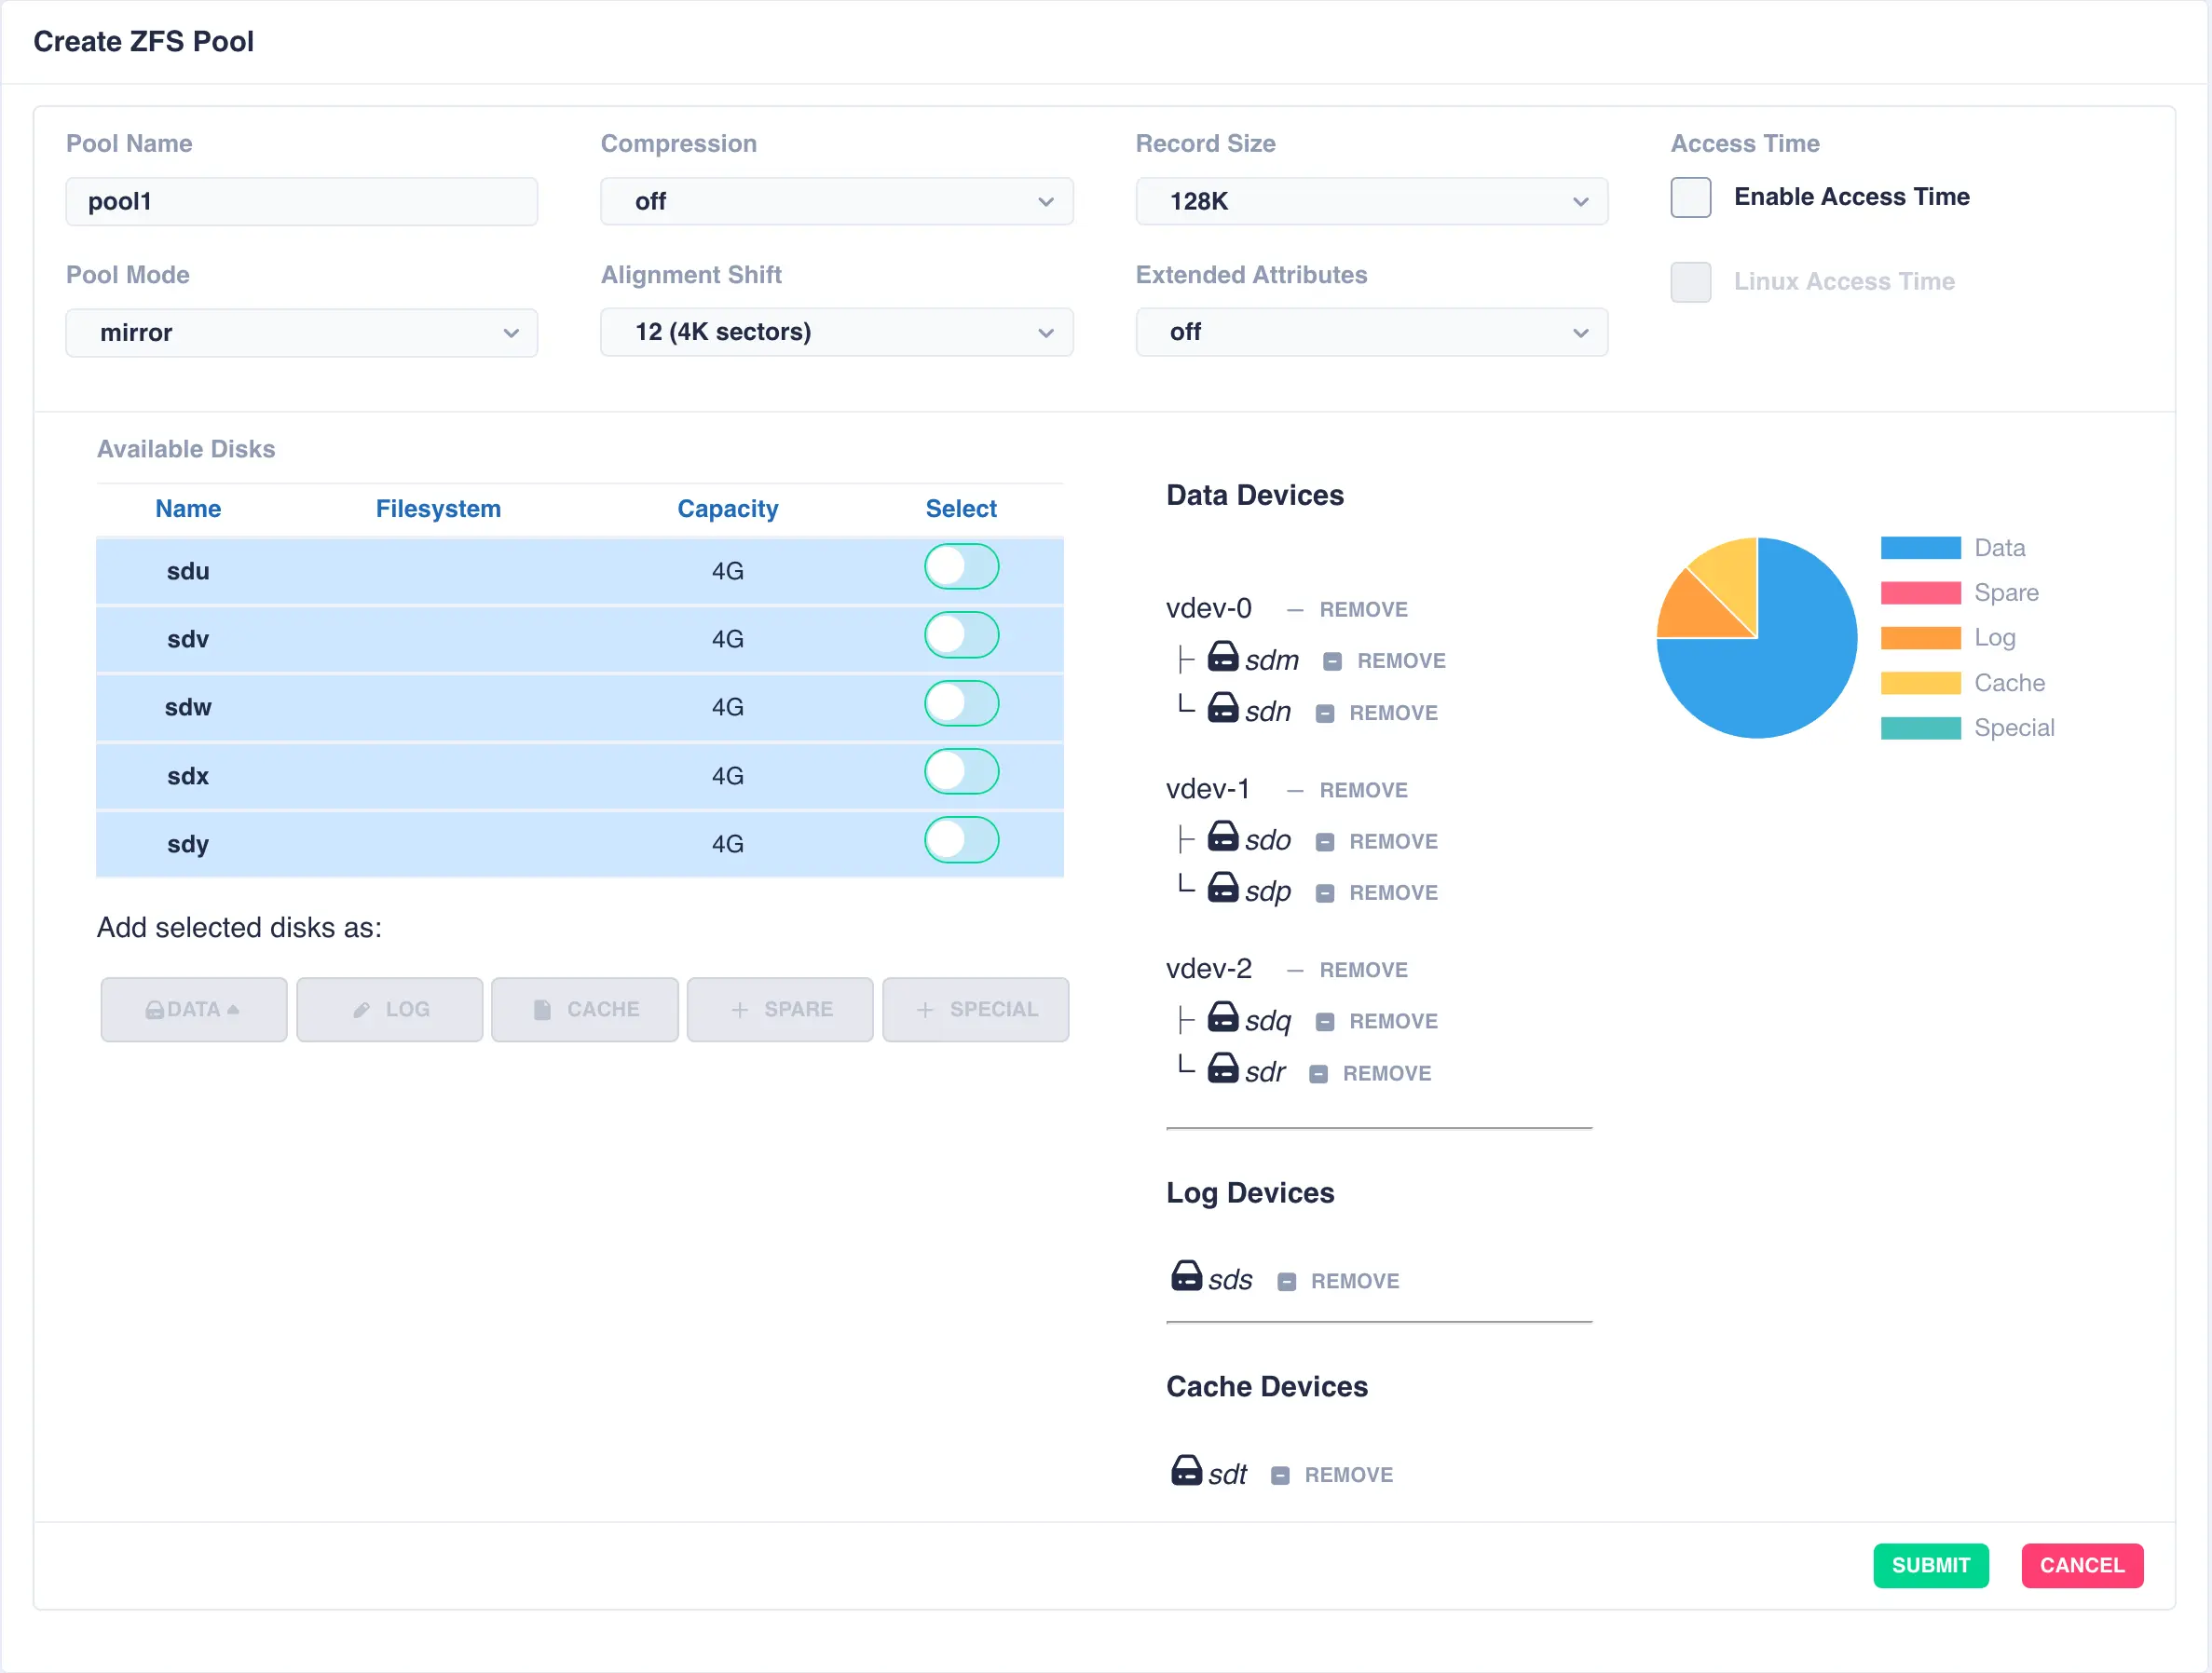
Once configuration is complete, click SUBMIT and the pool will be created and displayed
in the main pools page ready for clustering. The configuration of the pool can be checked by clicking the
expand/collapse arrow on the left hand side of the pool entry:
JBOD/Stripe Pool
A jbod pool is a stripe of disks in a single vdev with no redundancy. Select individual disks and add them
to the vdev using the DATA button:
Next click SUBMIT - the pool will be created and displayed in the main pools page.
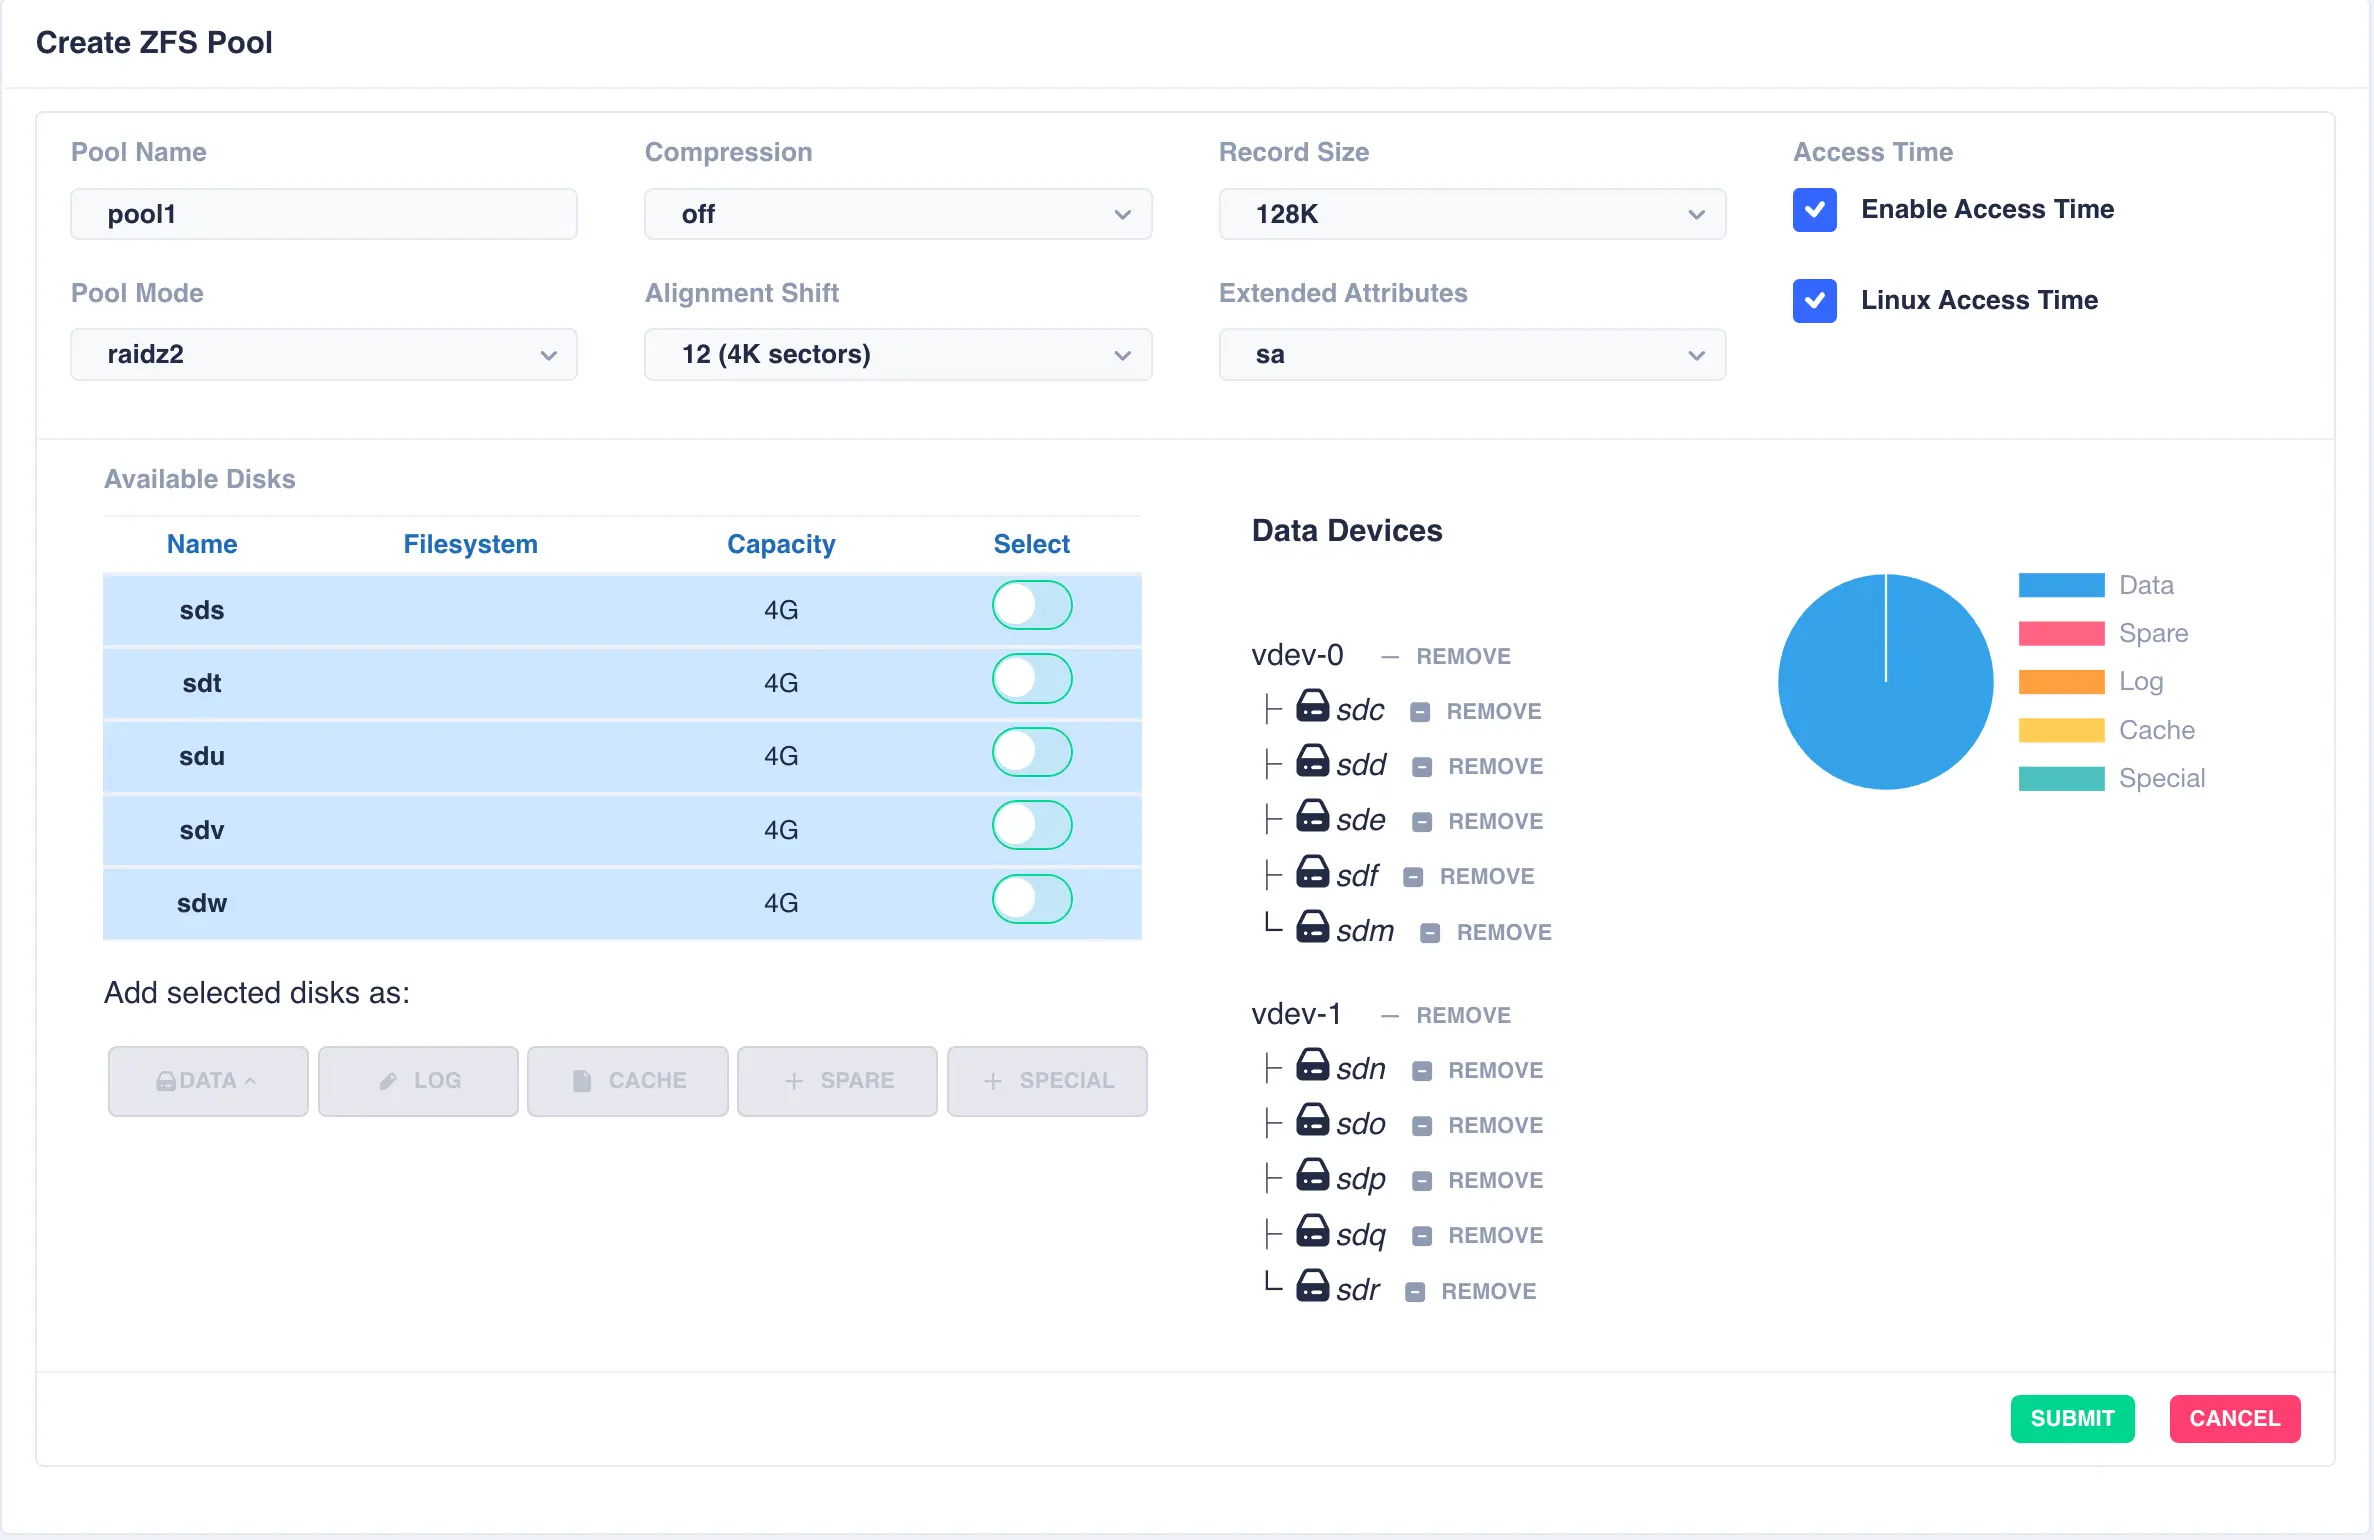
RAIDZ2 Pool
For this example a RAIDZ2 pool consisting of two five drive vdevs striped together, a log, a cache and a spare will be created. Five disks are selected for the first vdev, the desired Pool Name entered and raidz2 chosen from the Pool Mode list:
Click on DATA from the Add selected disks menu to configure the first vdev:
Next the second vdev is added, again using five drives, but this time selecting + New vdev from the DATA menu:

The resulting configuration depicts the two vdevs striped together:
Next a log disk is added by selecting one of the remaining available drives and clicking the LOG button:
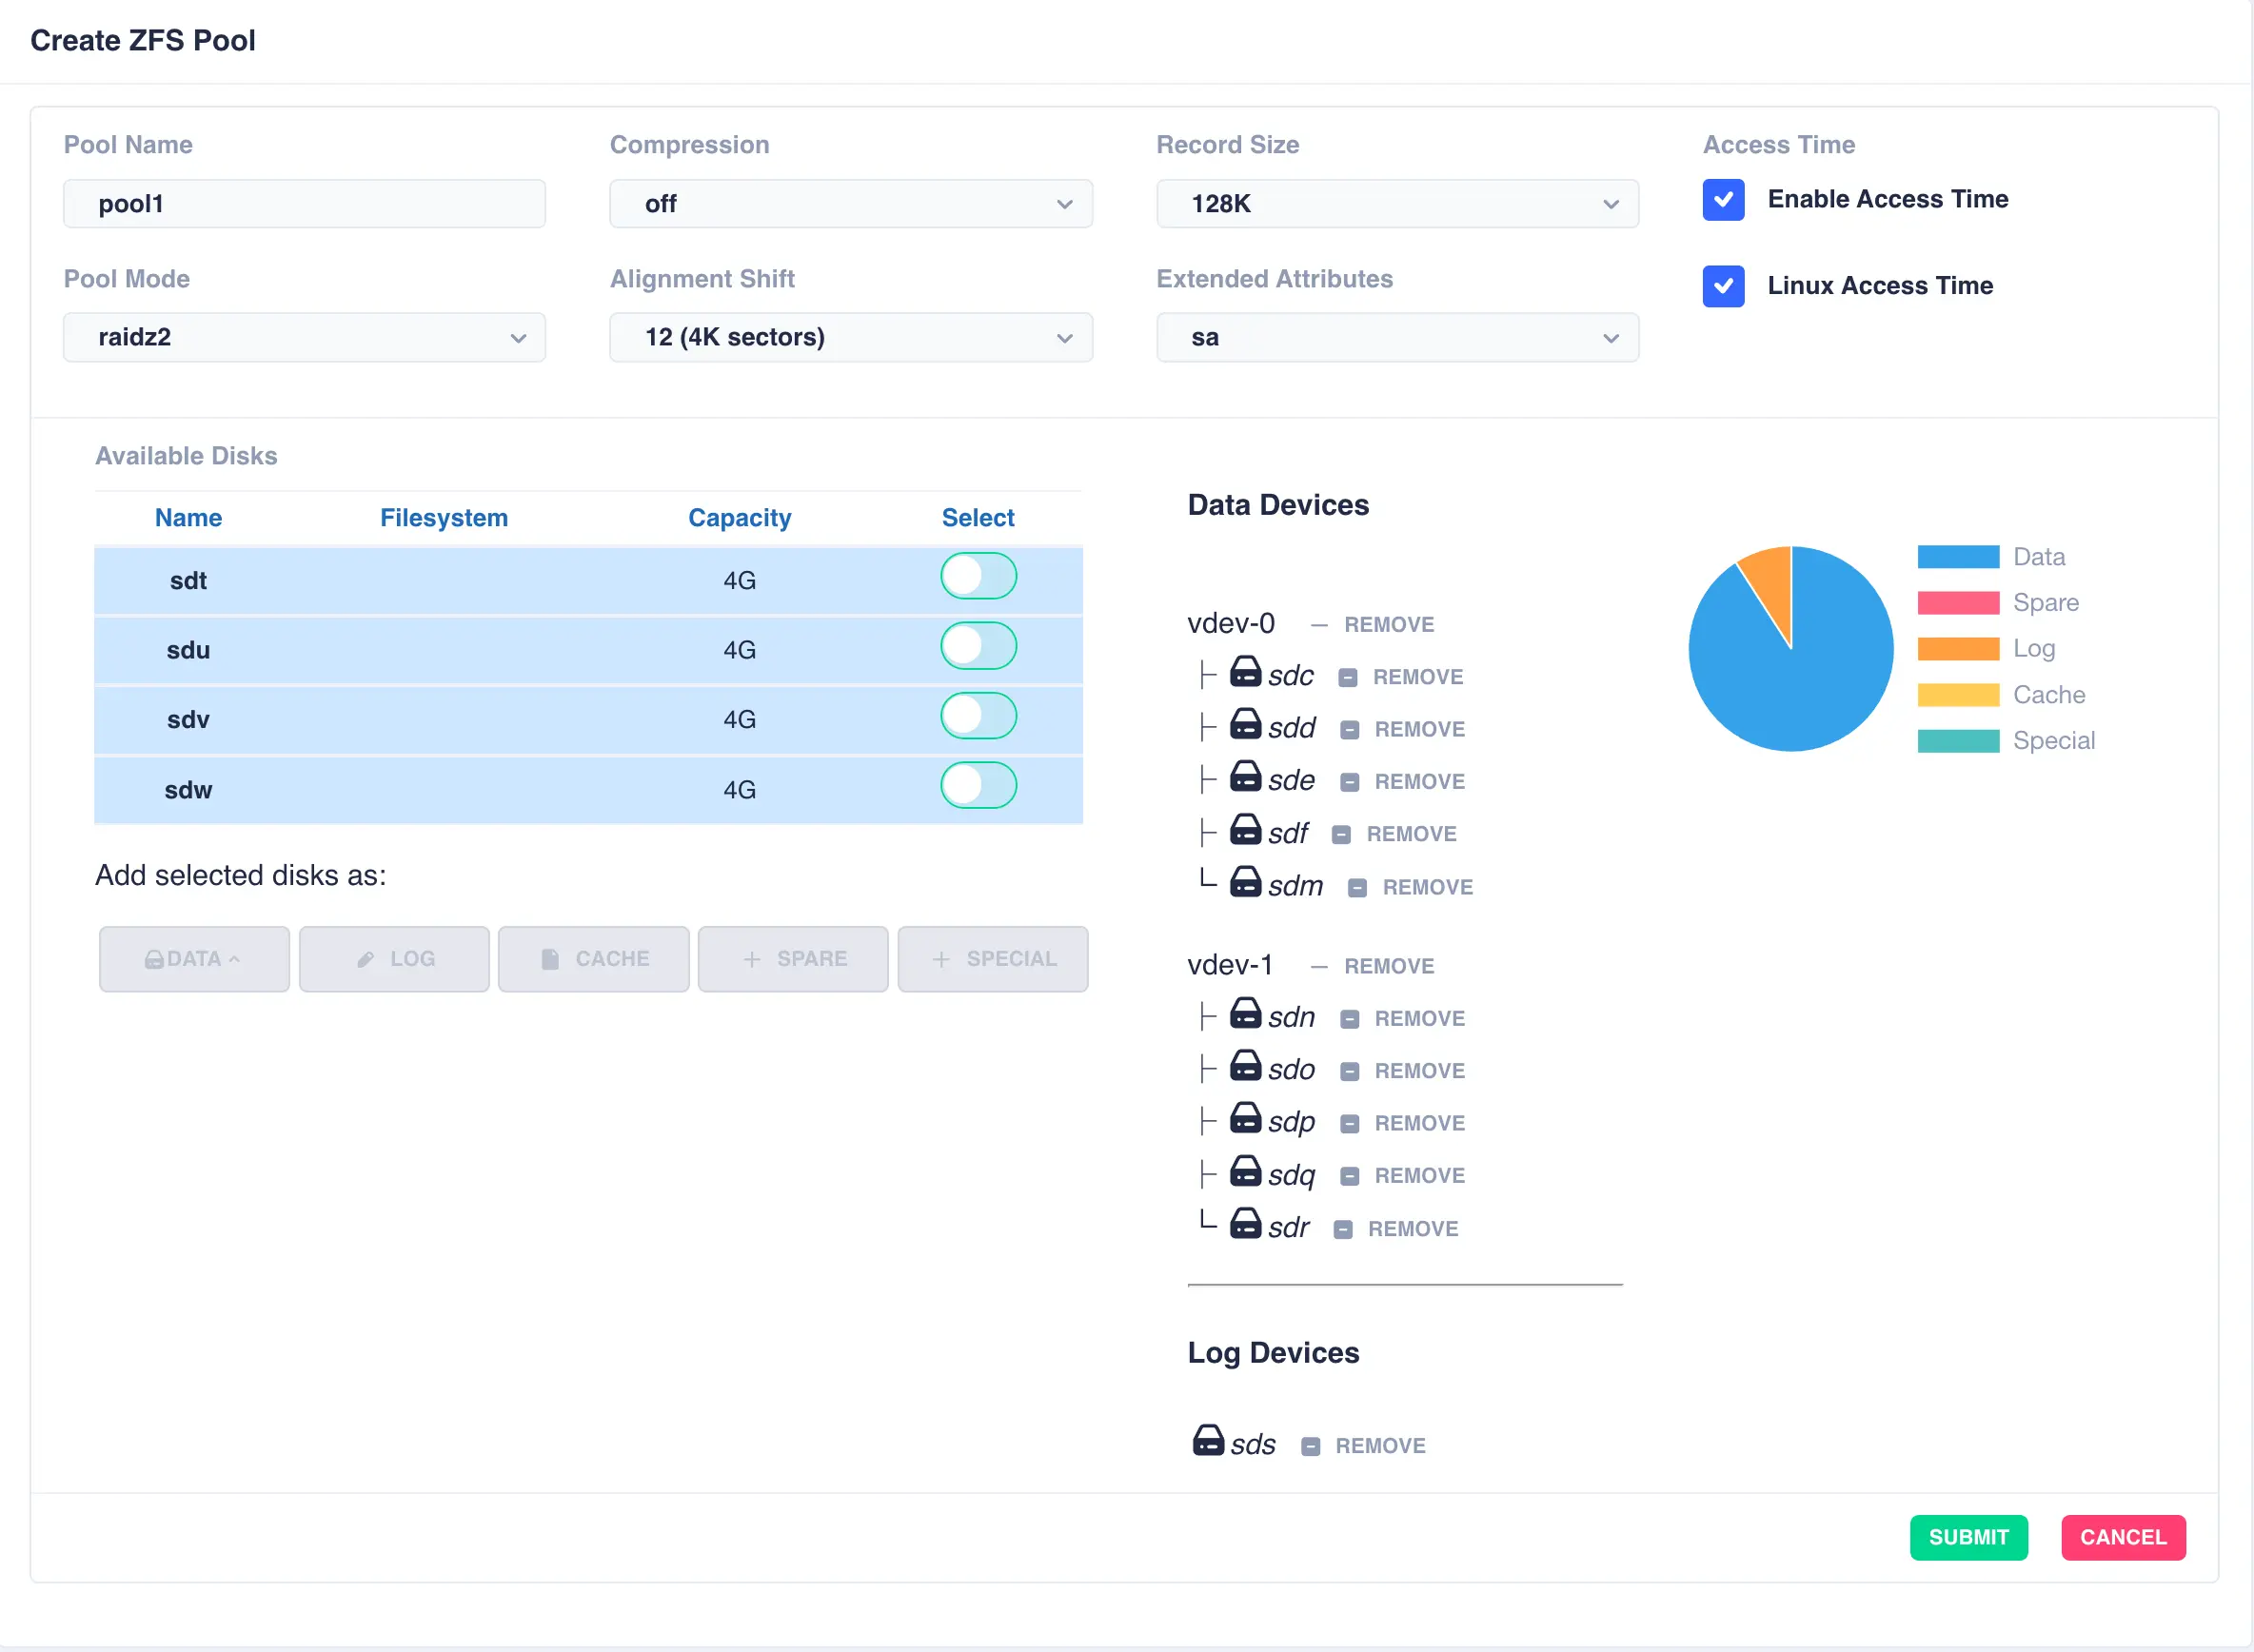
The same is done for a cache and spare device giving the final configuration:
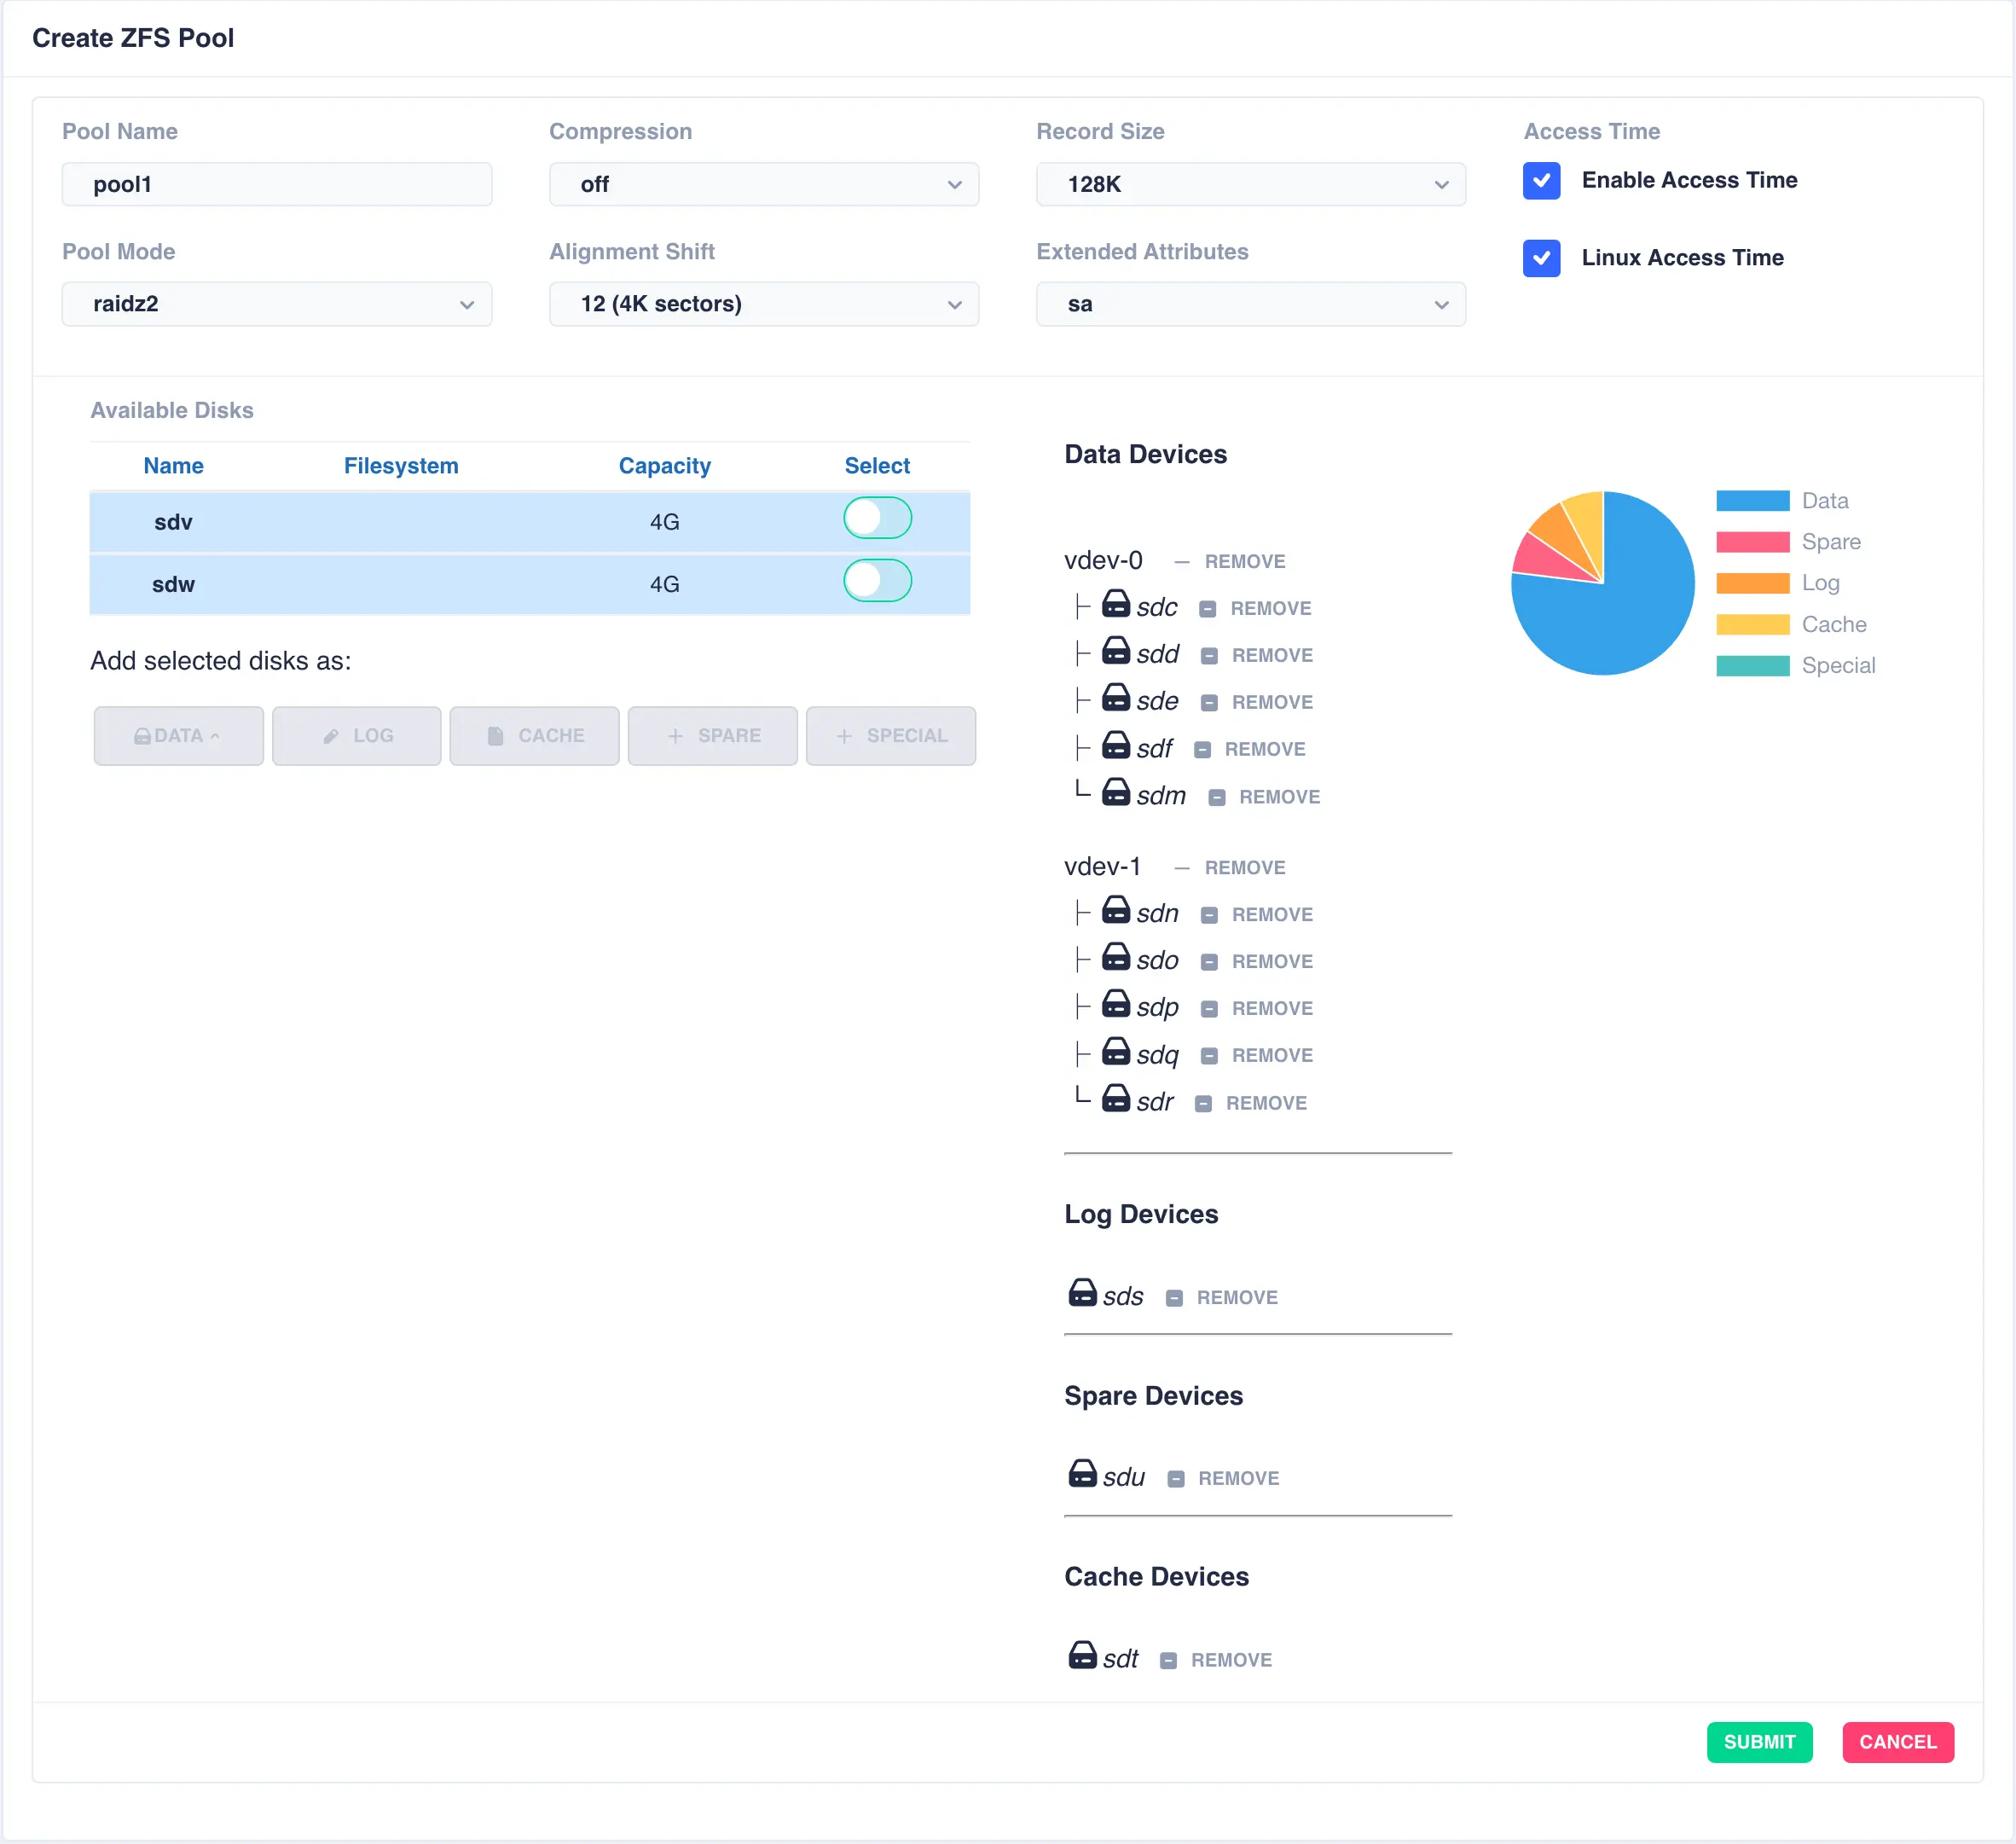
Finally click SUBMIT - the pool will now be created and will show up in the main pools page.
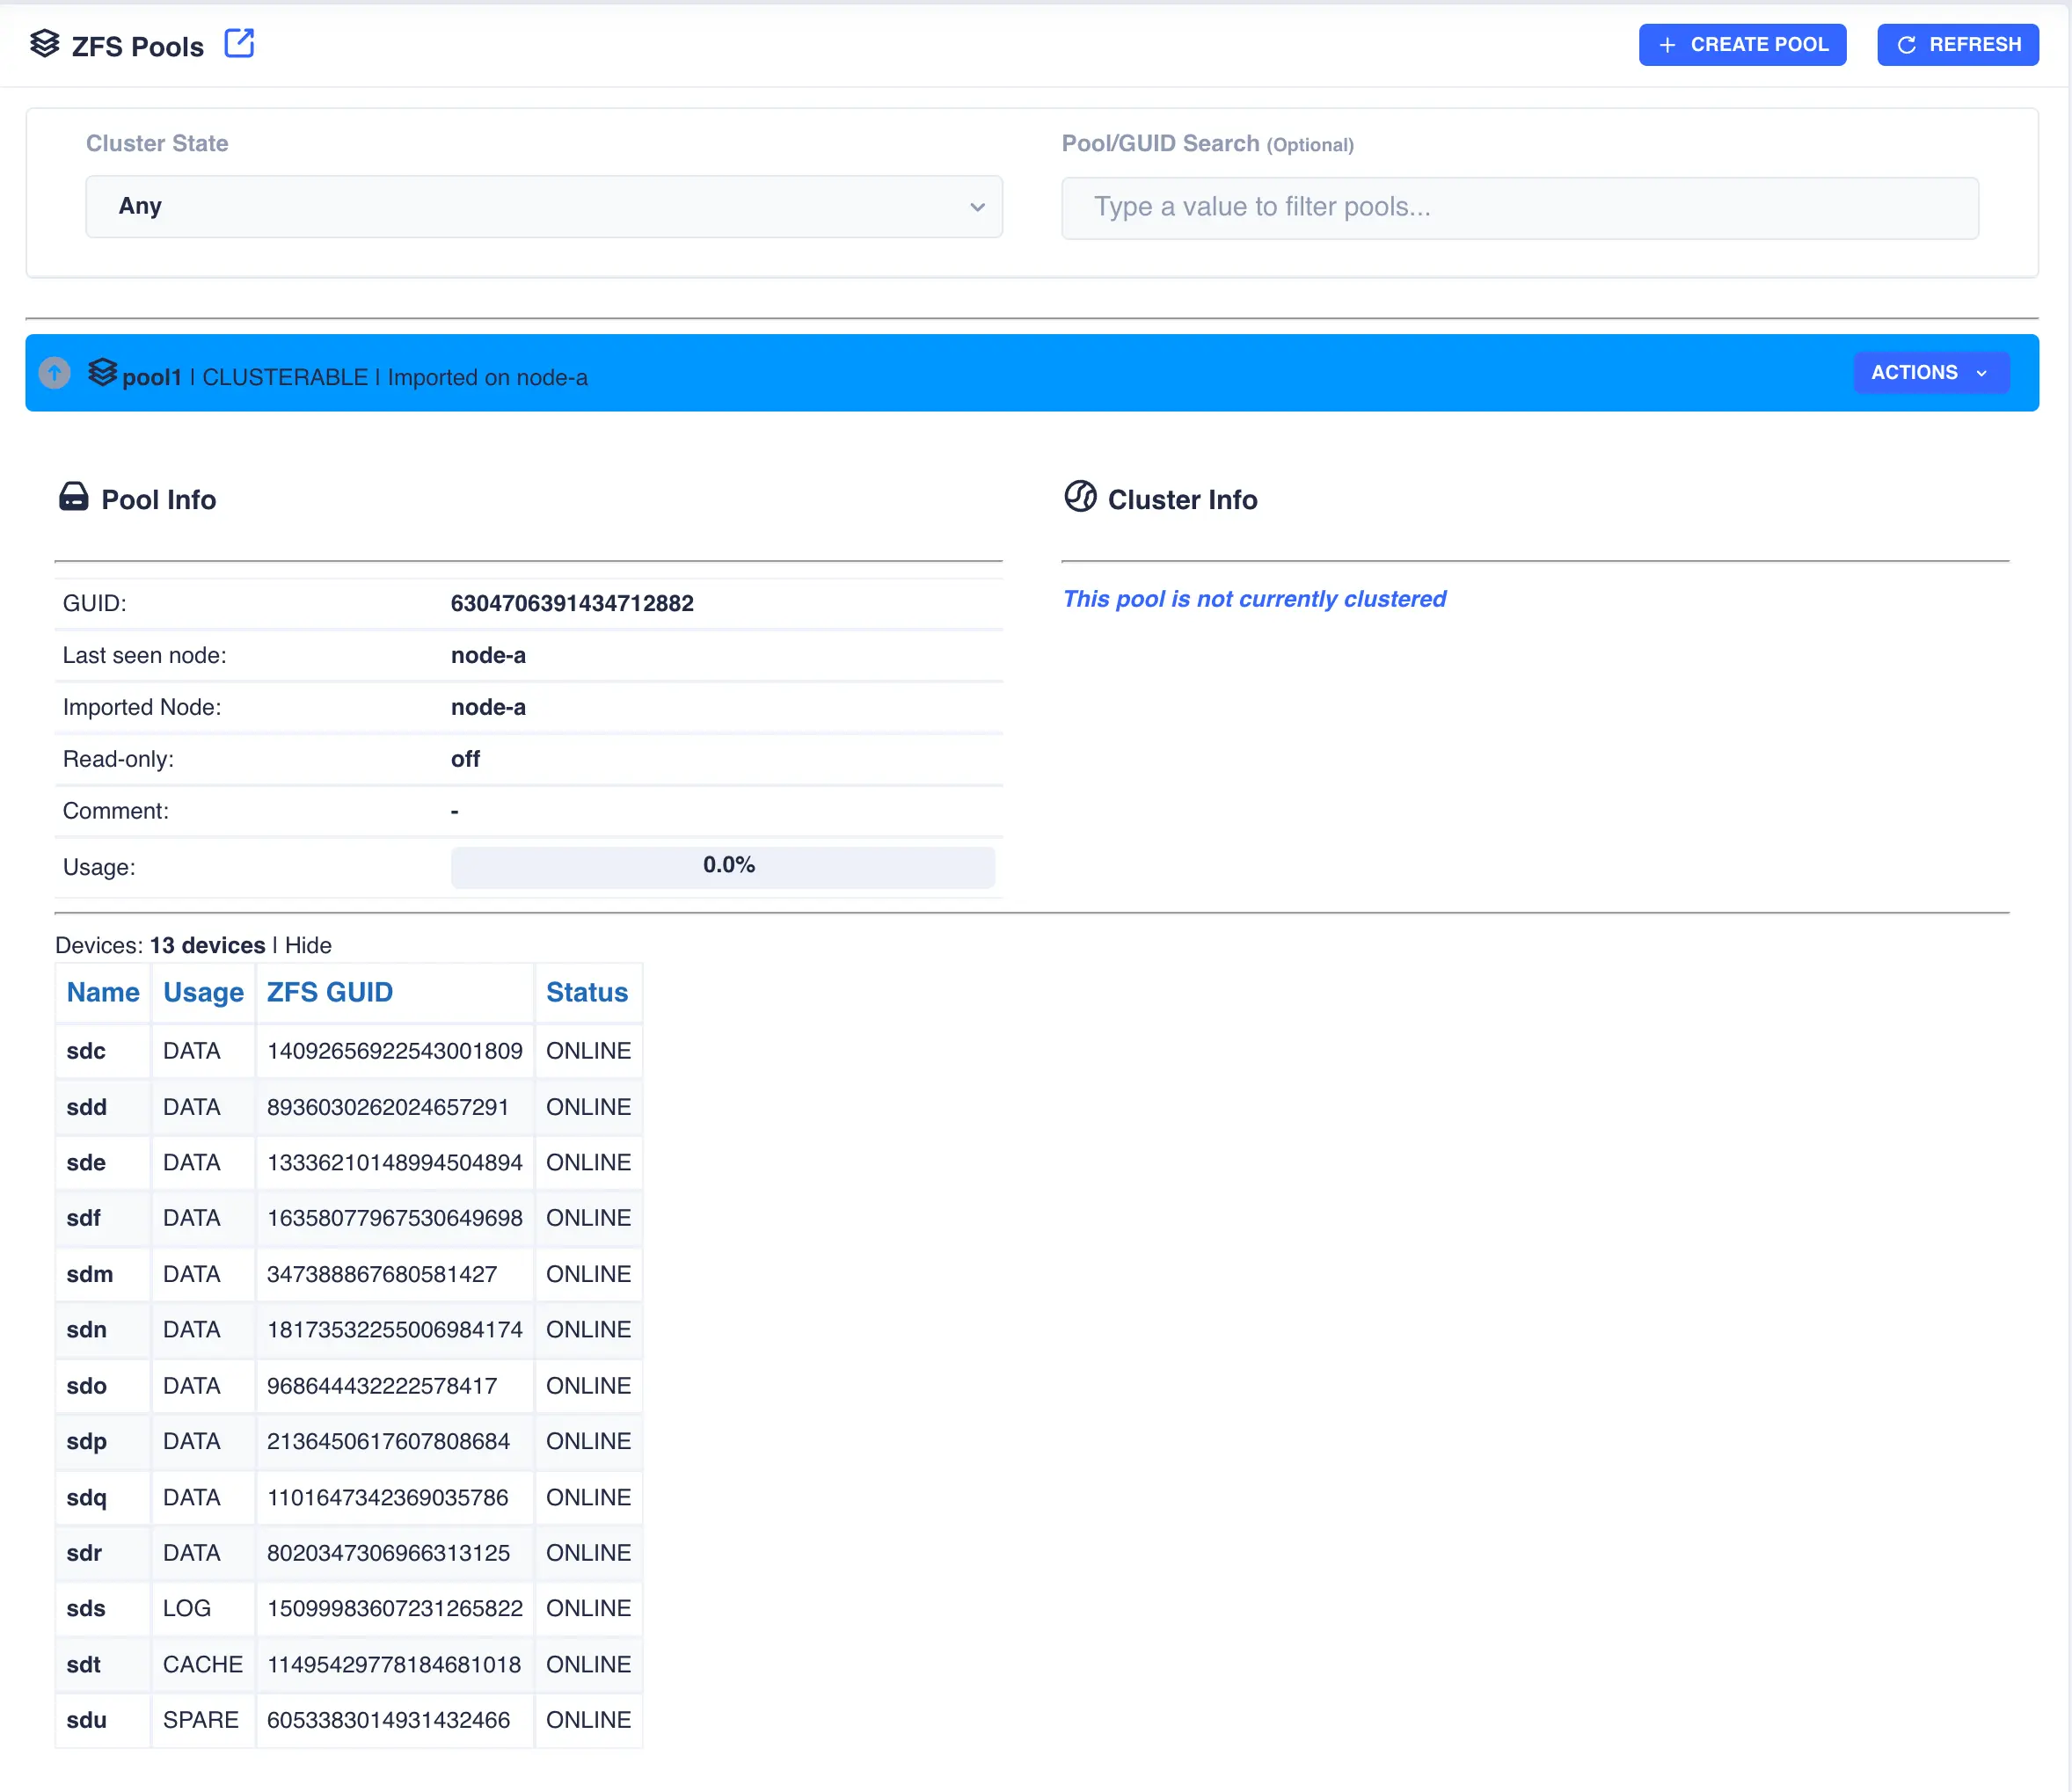
Toggle the down arrow ![]() next to the pool name for details. Device information is shown by clicking
next to the pool name for details. Device information is shown by clicking Show on the devices
line:
Editing a Pool
To edit a pool, navgate to ZFS -> Pools and then from the Actions menu for the pool to be edited select
Edit Pool. This will present a summary of the pools current configuration:
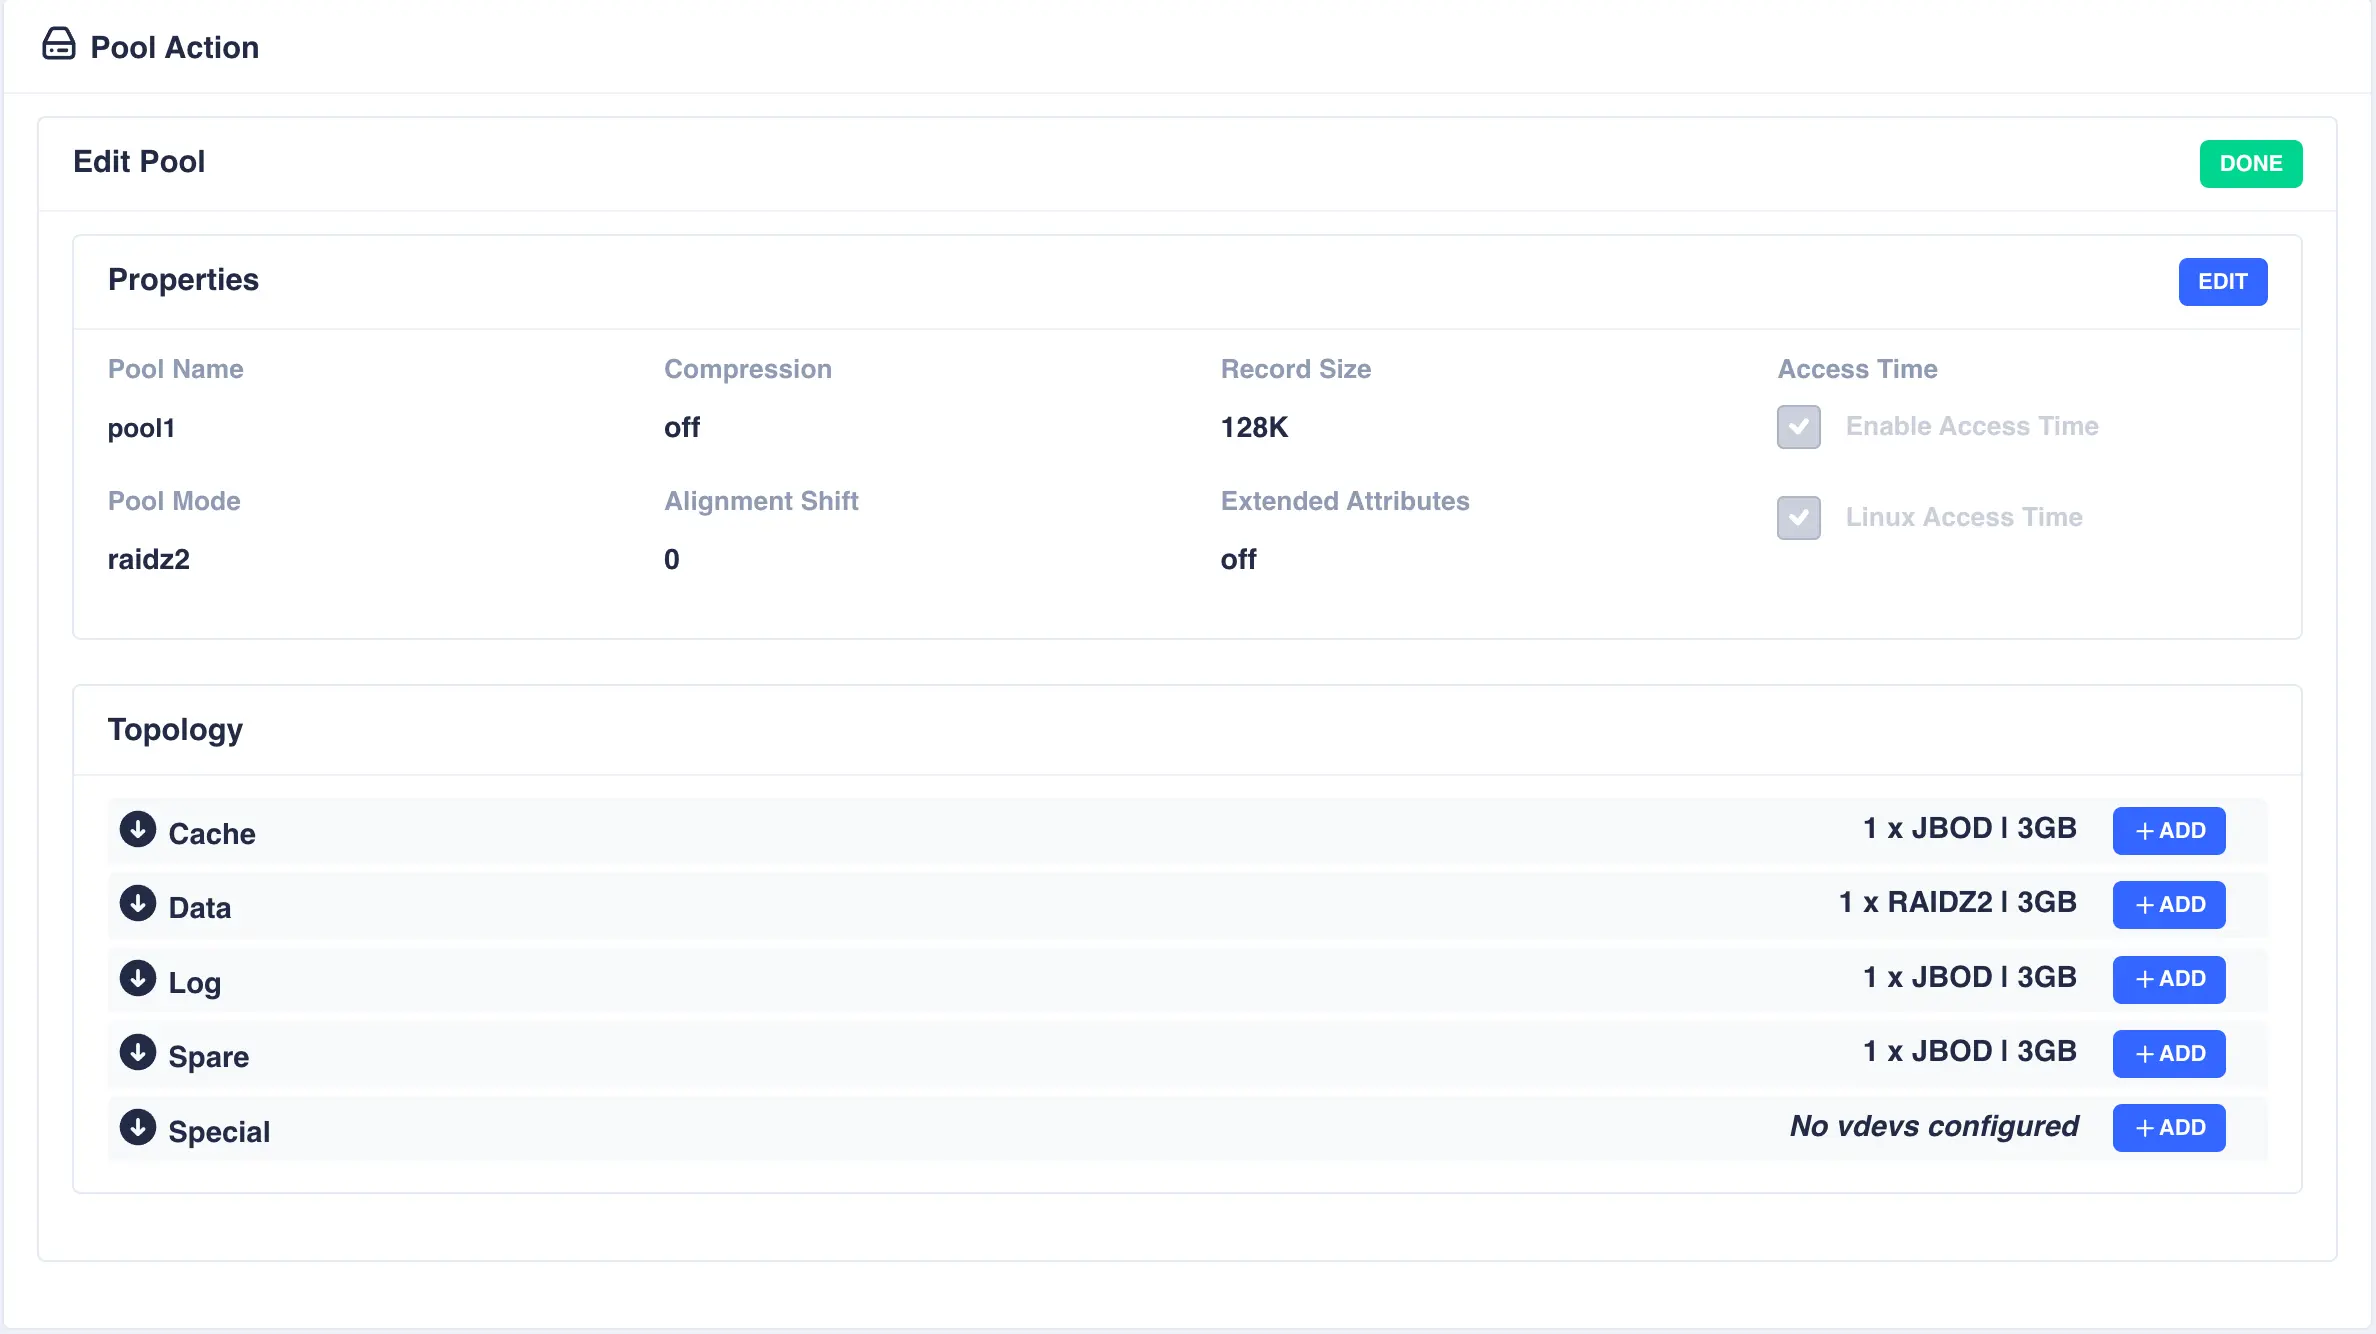
Properties
To edit the properties of the pool click the EDIT button on the properties panel:
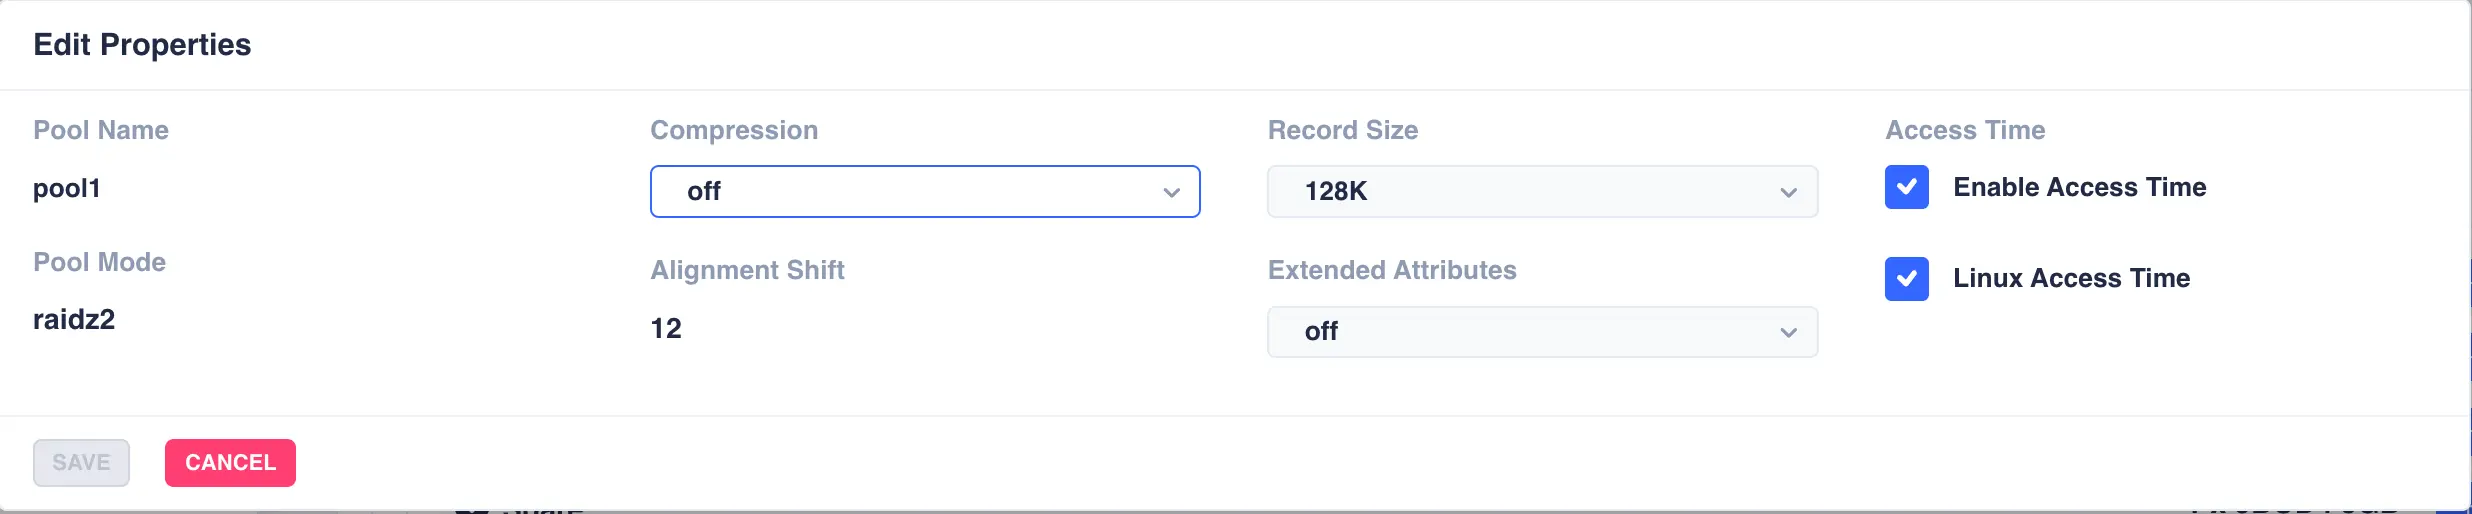
Make any required changes and click SAVE to update the pool properties (Pool Name, Pool Mode and Alignment Shift
are immutable).
Pool Topology
Adding vdevs when editing a pool
The constraints that apply to the different types of vdevs when creating a pool also apply when editing a pool, i.e.
if a Log vdev is a mirror of 2 drives then it can only be extended with another mirrored vdev consisting of 2 drives.
Likewise a raidz2 Data vdev with 5 drives should only be extended by adding another 5 drive Data vdev.
When adding or extending a Special device, the redundancy level must be the same as the Data vdevs. This is because
if the Special device fails, the entire pool maybe compromised. Special devices are a single device or mirror, depending on the
required redundancy level of the Data vdevs. More information on special devices and their use can be found
here.
To view the current topology of a specific vdev type click the arrow next to the vdev name:
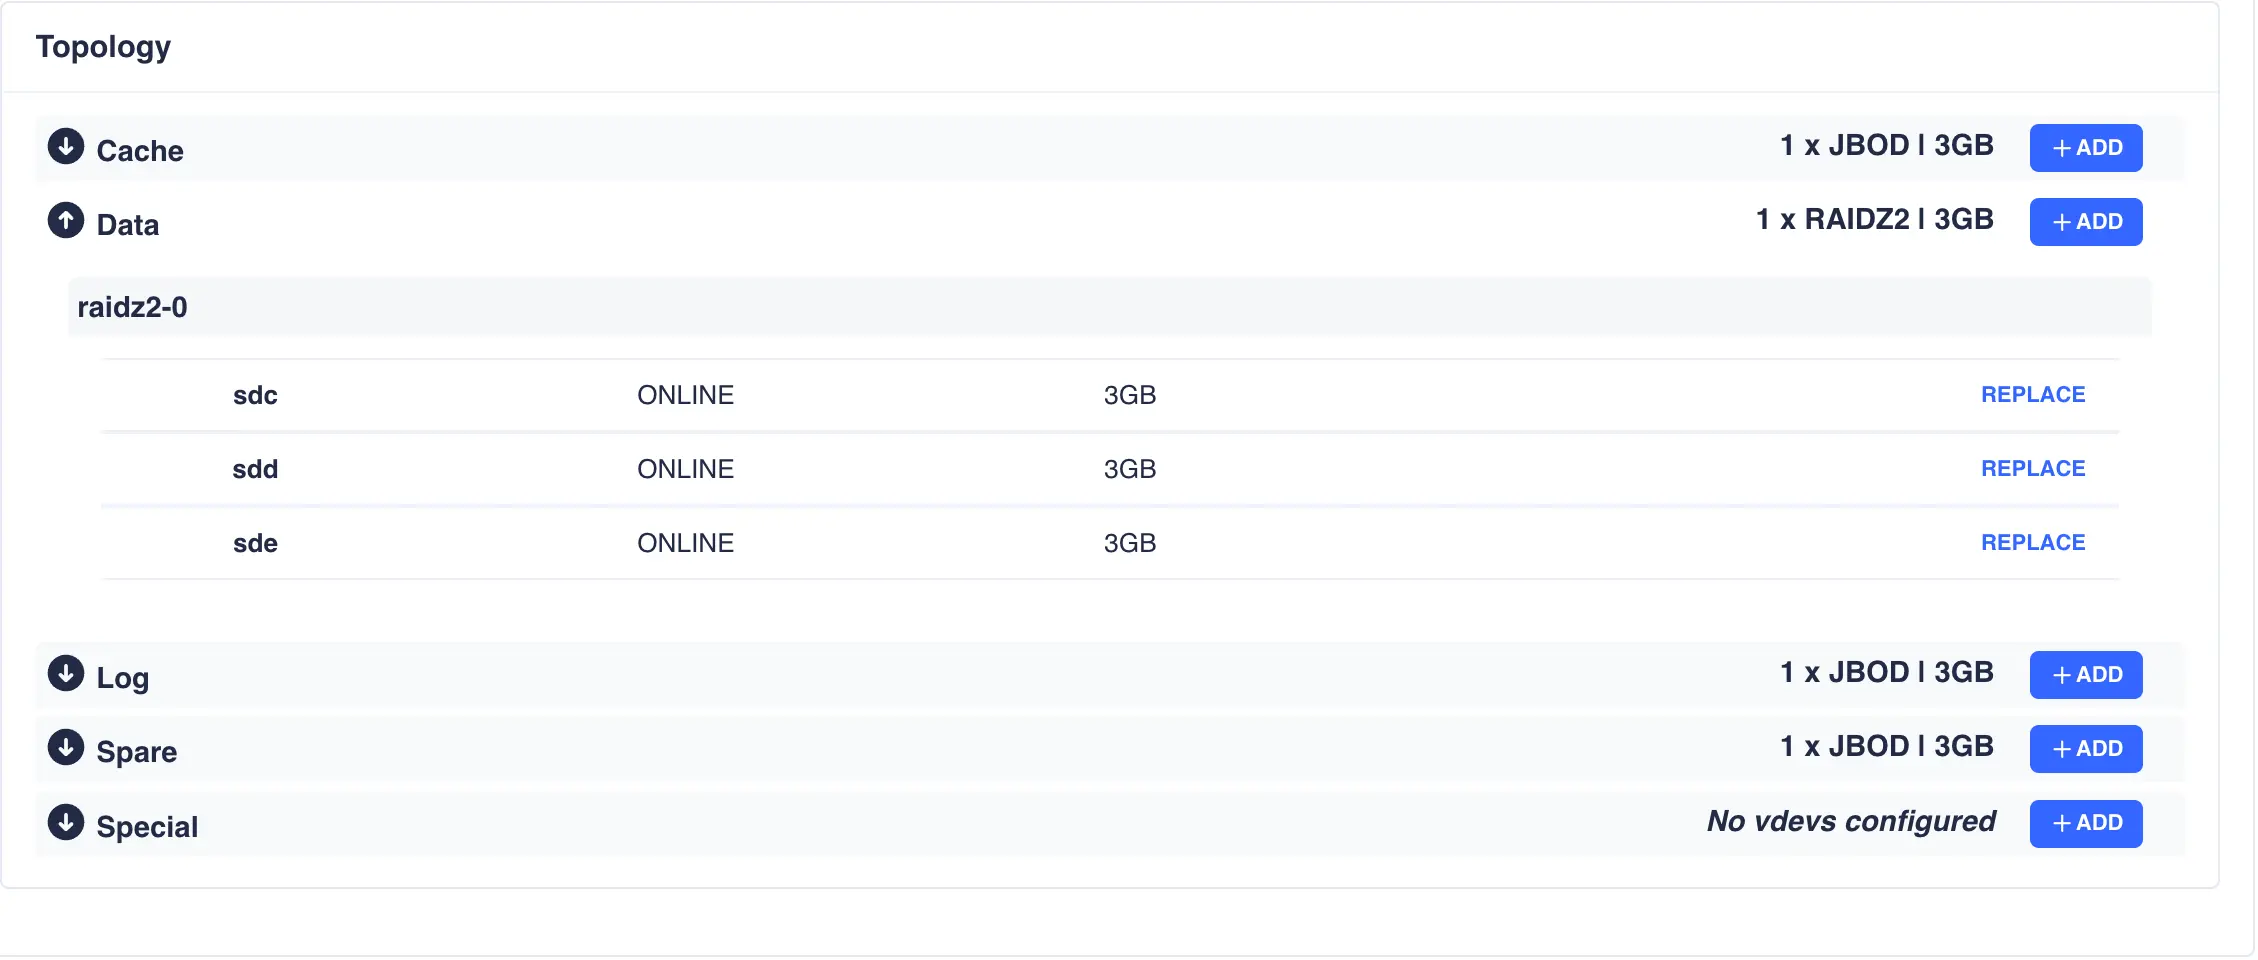
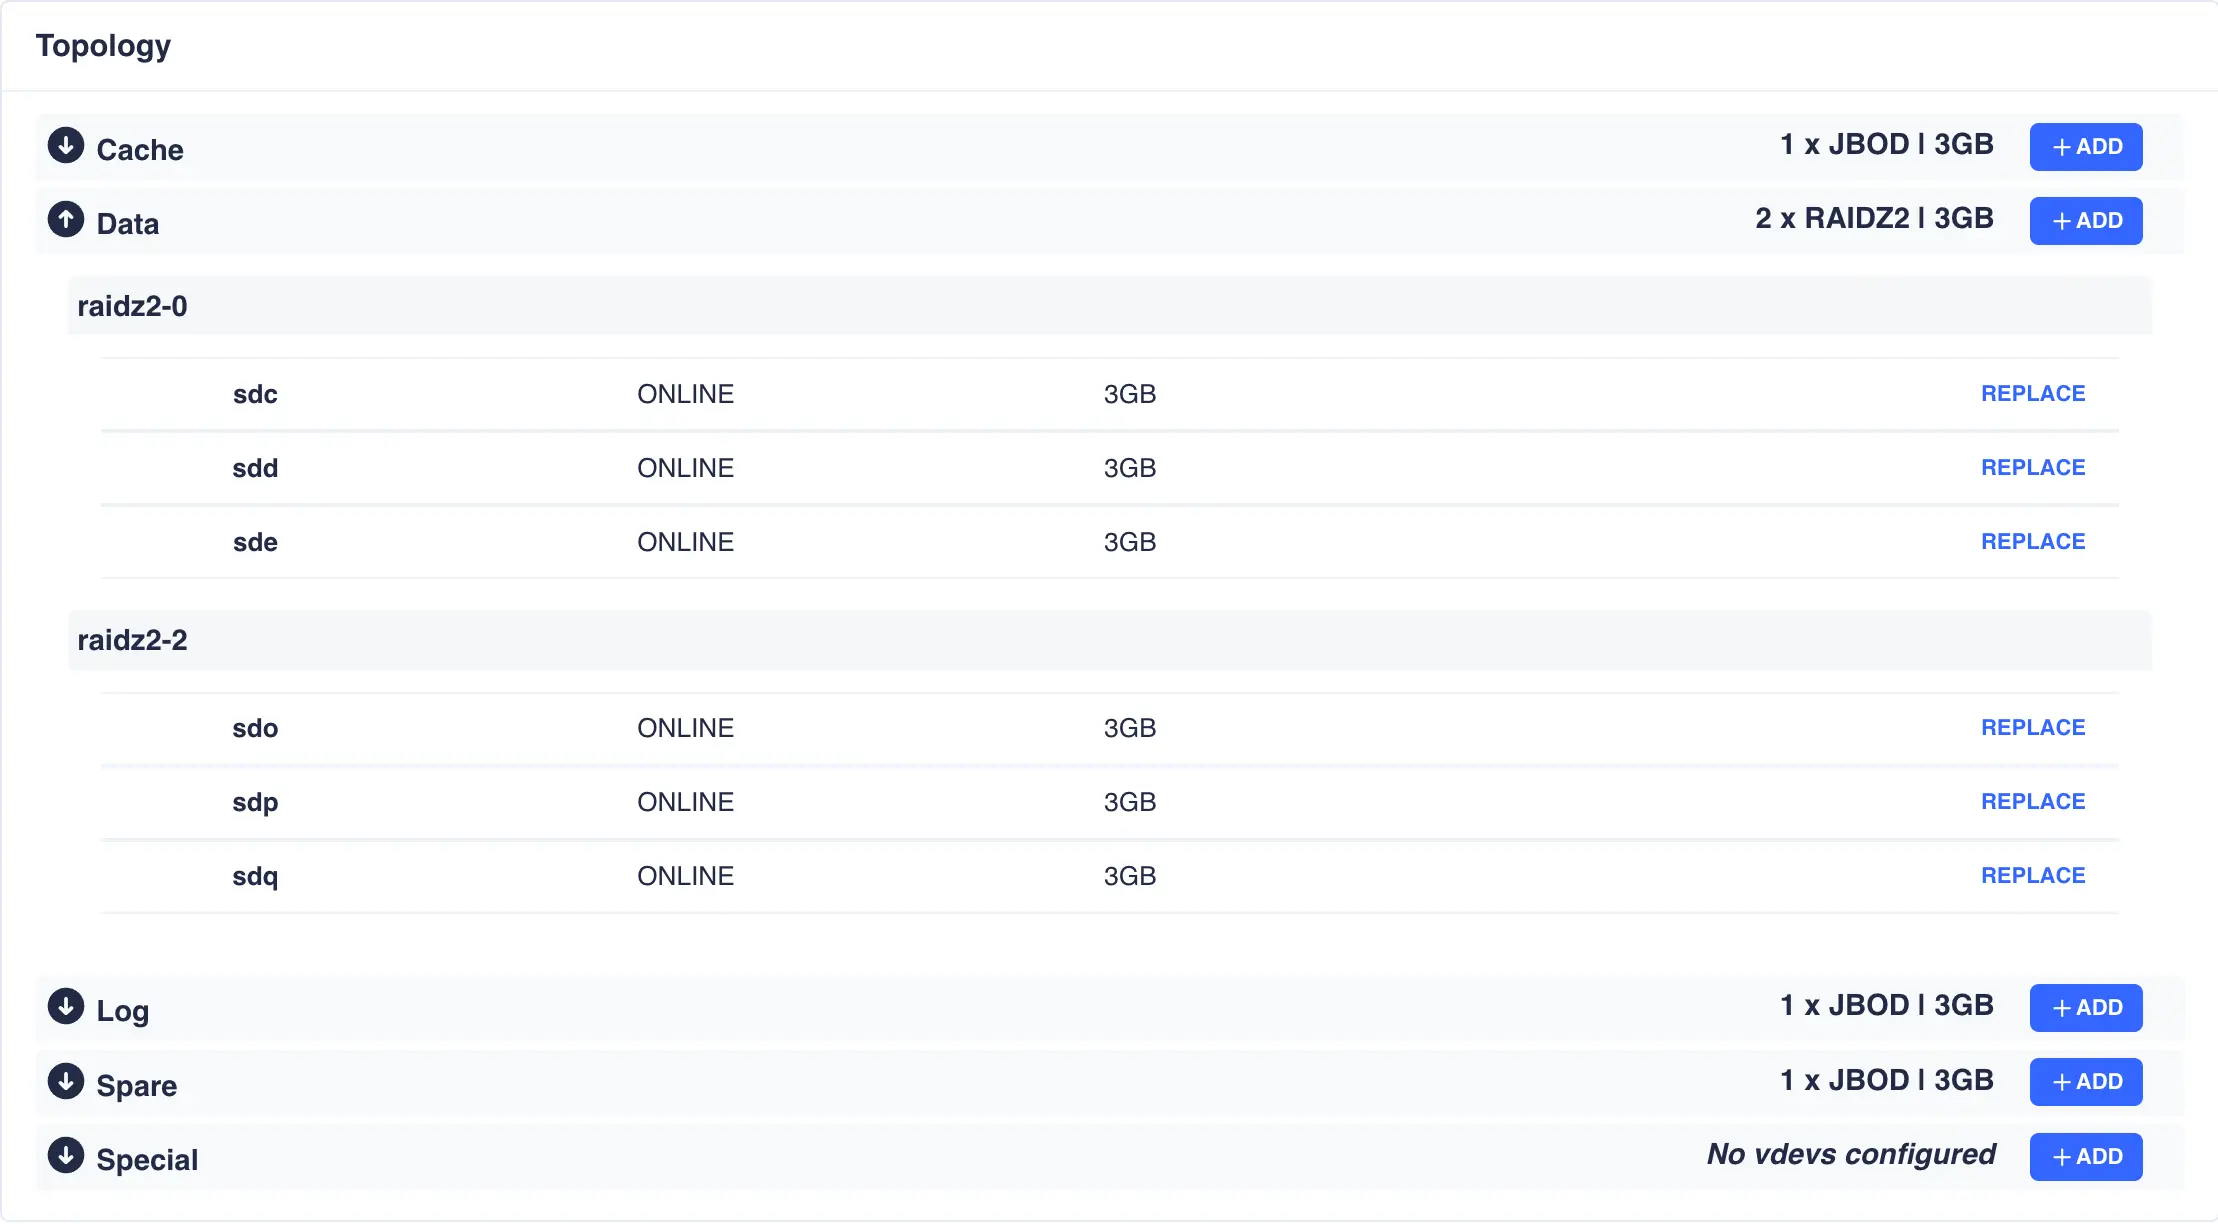
To add or extend the pools vdevs click the + ADD button next to the specific vdev and select the drives from
the list of available devices; in this example a additional raidz2 Data vdev is being added:

Finally click CREATE VDEV to add it to the pool:
When you have finished editing a pool, click DONE to return to the pools page.
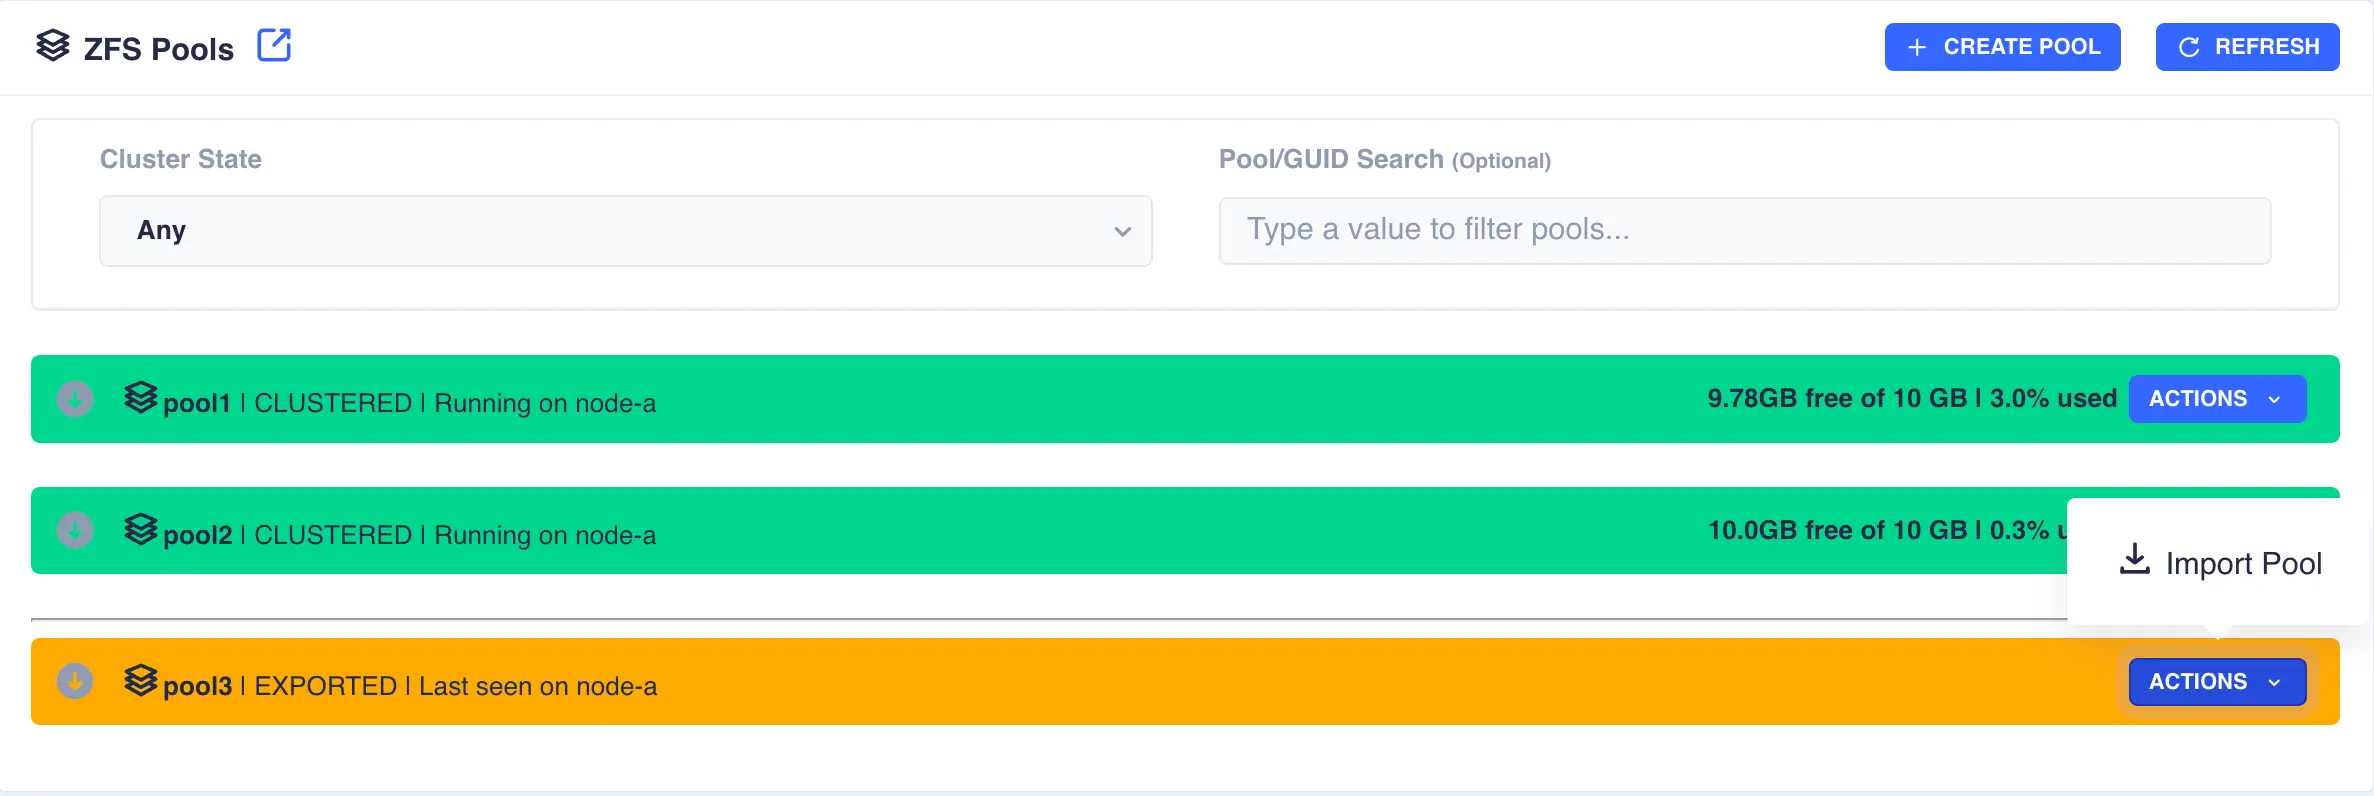
Preparing a Pool to Cluster
Pools must be imported on one of the nodes before they can be
clustered. Check their status by selecting the Pools option on the
side menu.
Shared-nothing clusters
For a shared-nothing cluster, the pools will need
to have the same name and be individually imported on each node
manually.
In the following example pool1 and pool2 are already clustered and pool3 is going to be added to the cluster:
Firstly the pool need to be imported; select the Import Pool item from the Actions menu:
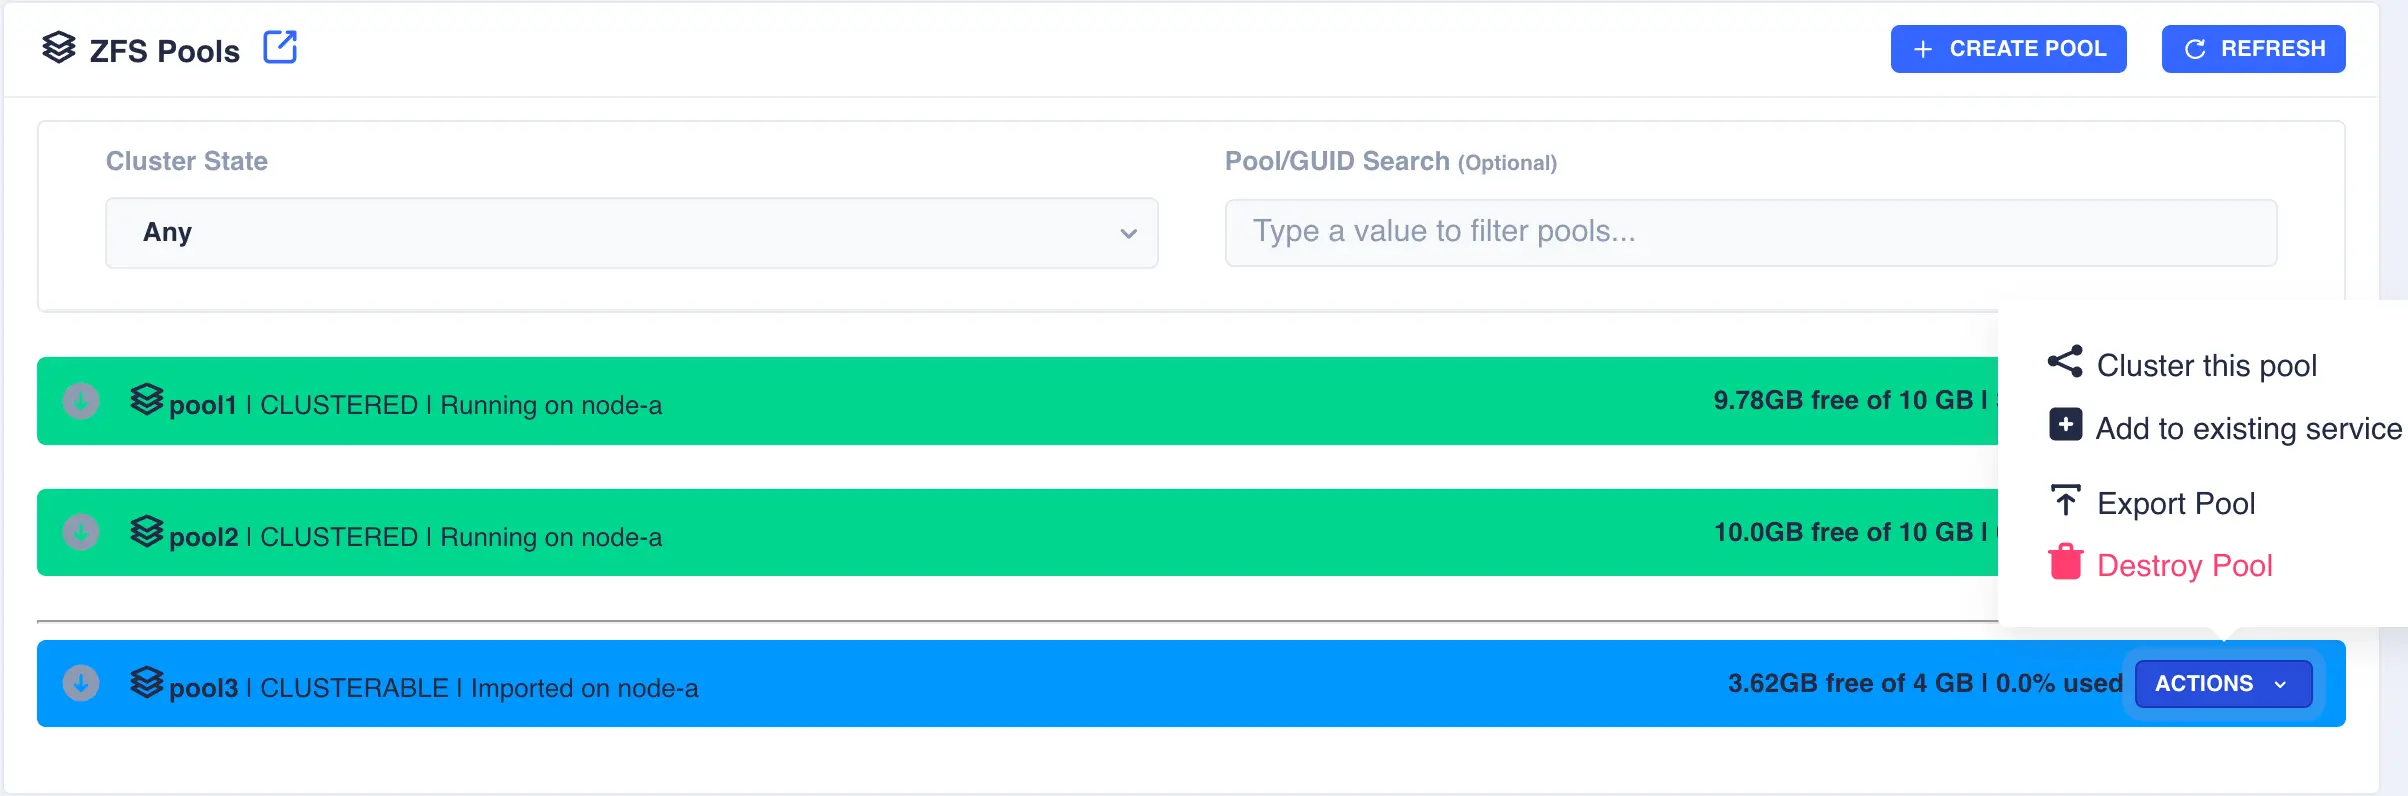
The status of the pool should now change to Imported and CLUSTERABLE:

The pool is now ready for clustering.
Unclusterable Pools
Should any issues be encountered when importing the pool it will
be marked as UNCLUSTERABLE. Check the RestAPI log
(/opt/HAC/RSF-1/log/rest-operations.log) for details on why the
import failed.
With a shared-nothingcluster, this may happen if
the pools aren't imported on both nodes.
Clustering a Pool
Select the Cluster this pool item from the Actions menu:
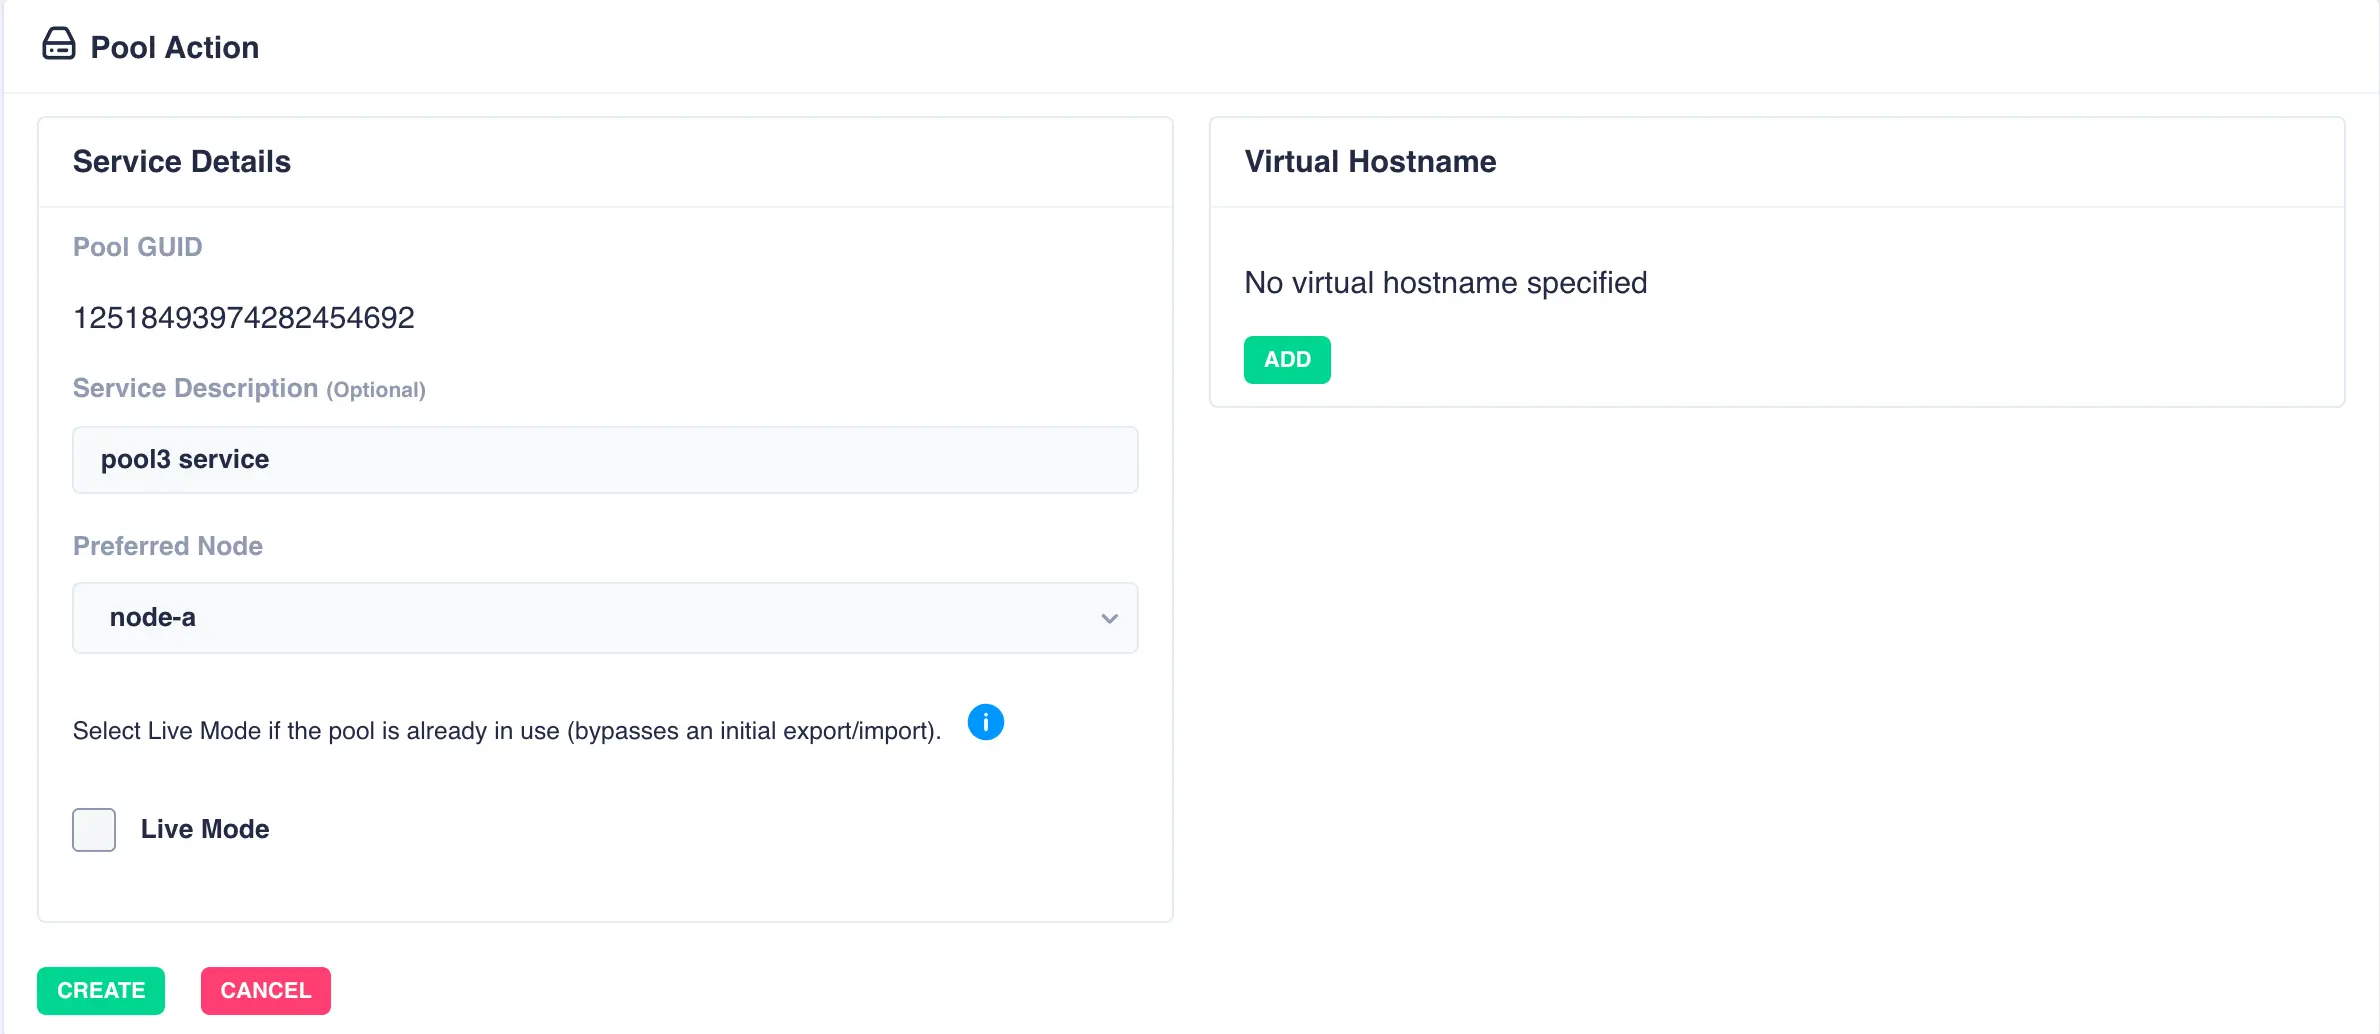
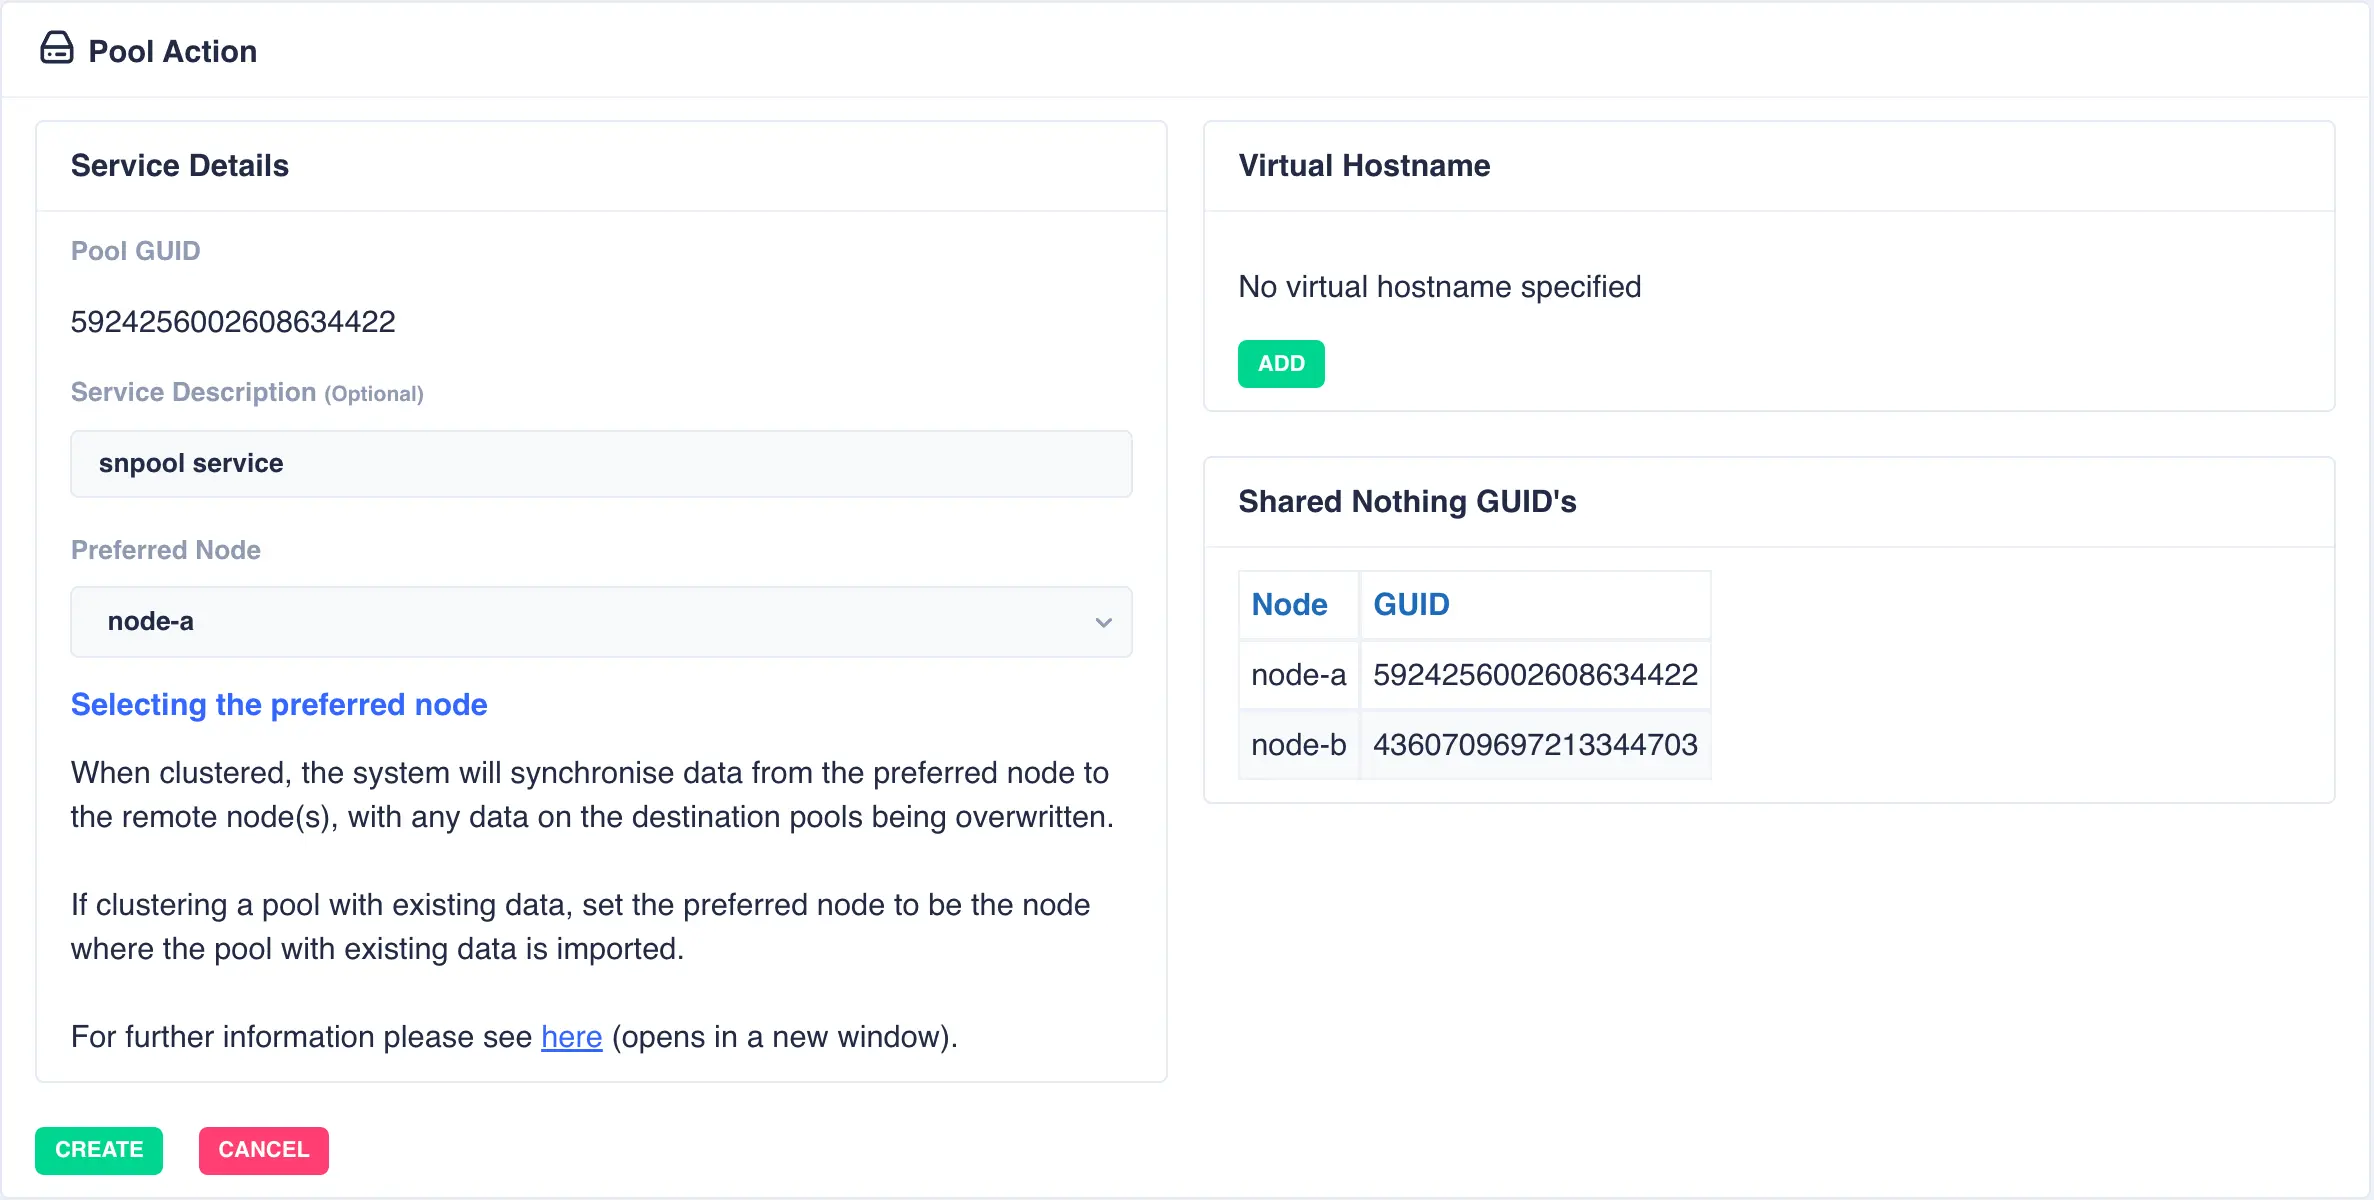
Fill out the description and select the preferred node for the service:
What is a preferred node
When a service is started, RSF-1 will initially attempt to run it on it's preferred node. Should that node be unavailable (node is down, service is in manual etc) then the service will be started on the next available node.
For shared nothing clusters the system will synchronise data from the preferred node to remote node(s), with any data on the destination pools being overwritten. If clustering a pool with existing data, set the preferred node to be the node where the pool with existing data is imported to prevent its data being overwritten.
With a shared-nothing pool the GUID's for each pool will be shown:
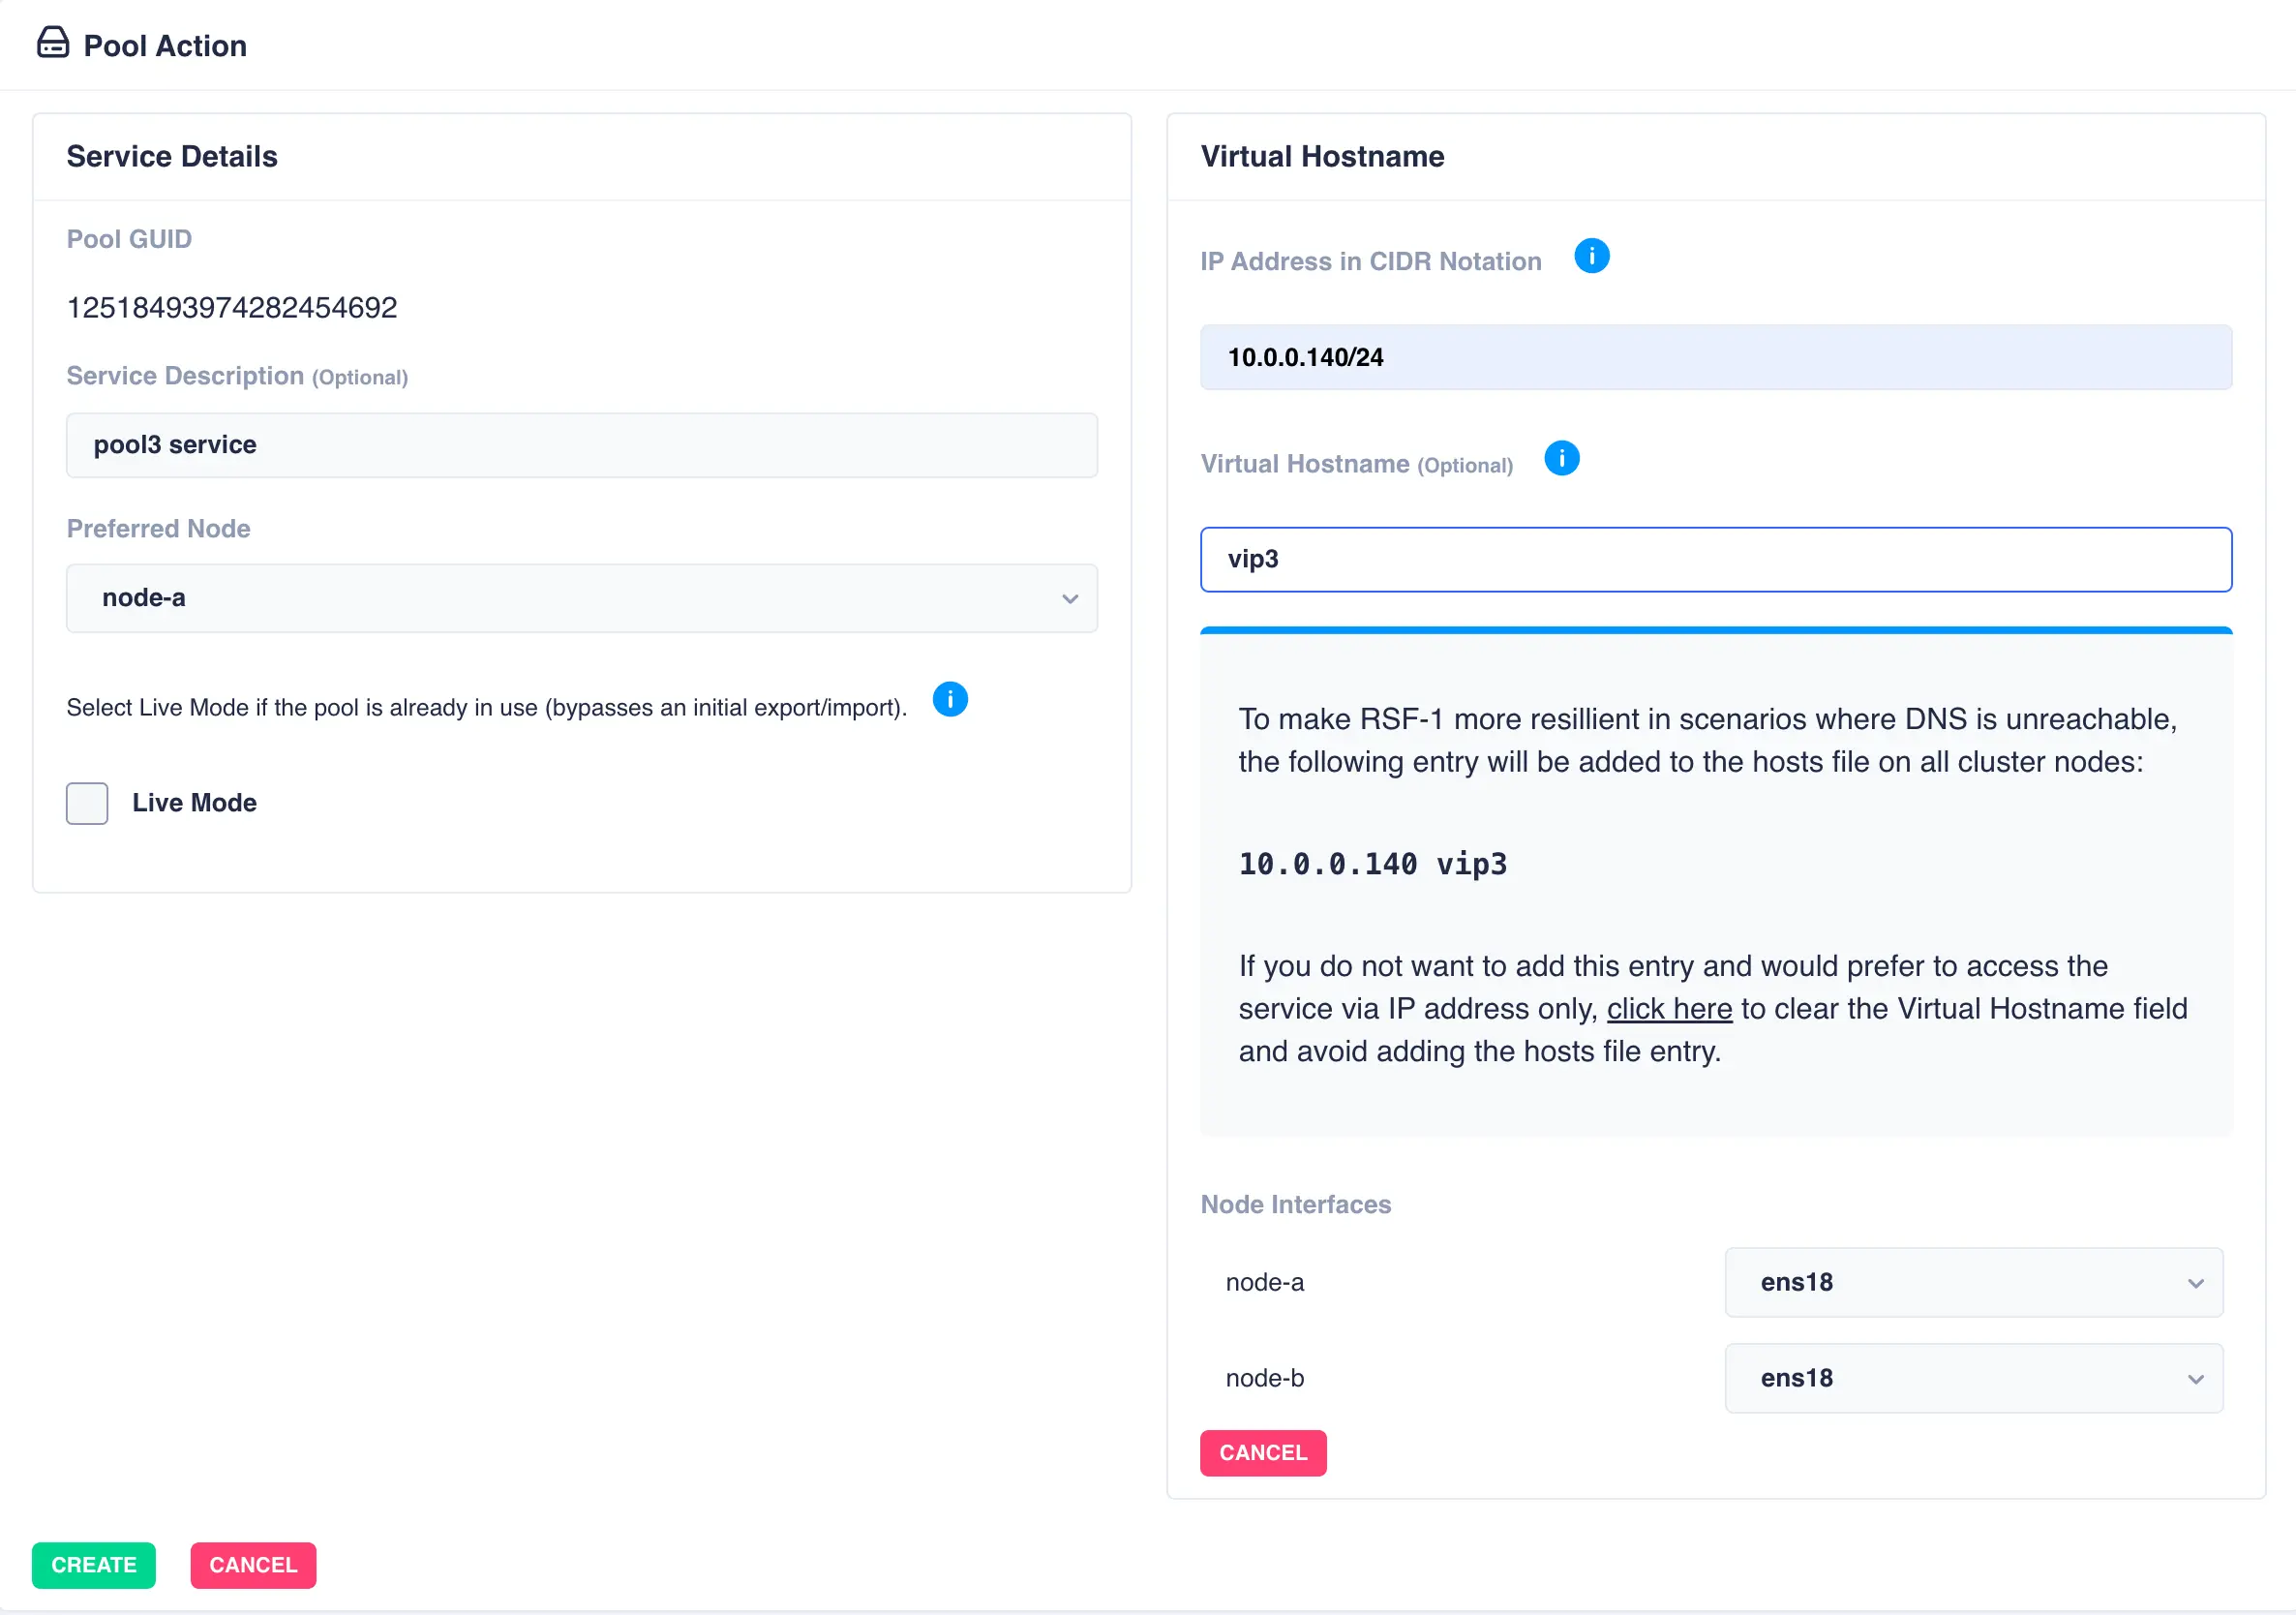
To add a virtual hostname to the service click Add in the Virtual
Hostname panel. Enter the IP address, and optionally a hostname.
For nodes with multiple network interfaces, use the drop down
lists to select which interface the virtual hostname should be assigned
to:
Finally, click the Create button; the pool will now show as CLUSTERED: